Use the Automations tab on an automation request to decompose a Task Mining recording into discrete automations that Automation Center categorizes as UI-block or non-UI-block interactions.
Before you begin
Before you begin:
About this task
When a business user submits an automation request from Task Mining, the request appears in Automation Center with the task recording summary saved as an attachment. Use this procedure to instruct Automation Center to read that attachment and use AI to decompose the task into discrete automations. Each automation is categorized as a UI block (browser-based interaction) or a non-UI block (background
application interaction), which determines how AI Desktop Actions handles it when the agent runs.
Important:
Because the decomposition uses AI, results may vary between runs. Review all generated automations before proceeding to agent creation.
Procedure
-
Open the automation request submitted by the Task Mining user.
-
Navigate to .
-
Select the list icon (
 ).
).
-
On the Lists tab, under Build, select All Automation Requests.
-
Open the automation request submitted by the Task Mining user.
Important: To find automation requests from Task Mining, check the Intake source column on the All Automation requests table and look for Task mining.
-
Verify that the automation request contains the task recording attachment.
The attachment contains the task timeline and interaction summary generated by Task Mining. Automation Center reads this attachment to generate automations. If the attachment is missing, ask the Task Mining user to resubmit the automation request.
-
Select the Automations tab on the automation request page.
The Automations tab displays the decomposed automations after you generate them.
-
Select Generate automations.
The
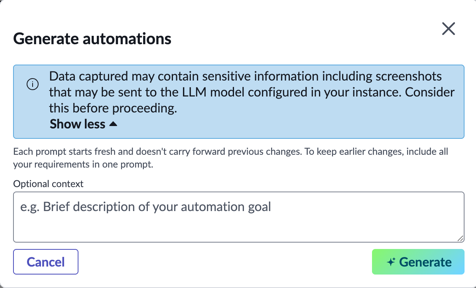
Generate automations window is displayed.
- Optional:
Enter additional instructions in the Optional context field to guide the decomposition.
Use additional instructions to focus or constrain the output. For example, you can specify steps to exclude or applications to prioritize. If you skip this step,
Automation Center uses only the task recording attachment as input.
Automation Center reads the task recording attachment and uses AI to decompose the task into discrete automations. A status message is displayed while the decomposition runs.
Important: AI-generated decompositions may be inaccurate or incomplete. Always review the results before proceeding.
-
Review the generated automations.
Each automation displays the following information:
Table 1. Decomposed automation fields
| Field |
Description |
| Name |
AI-generated name for the automation. |
| Execution Mode |
Provides information of where this automation is executed. There are two values for this column:
- Background task: This is the non-UI block automation. For non-UI blocks, instructions are most important.
- On-Screen task: This is the UI block automation. For UI block, screenshots are most important. Without screenshots, UI block desktop actions aren't generated.
|
| Description |
A summary of the steps the automation performs. This field is used as the basis for the AI Desktop Actions tool instructions and the agent instructions when you create the agent. Review this field carefully. |
- Optional:
Open individual automation tasks to see the details.
The following details are provided:
Table 2. Decomposed automation fields
| Field |
Description |
| Automation name |
AI-generated name for the automation. |
| Target application |
The application the automation interacts with, such as Microsoft Excel or a browser. |
| Input and Output |
AI-generated values for the data the automation receives and produces. |
| Description |
A summary of the steps the automation performs. This field is used as the basis for the AI Desktop Actions tool instructions and the agent instructions when you create the agent. Review this field carefully. |
| Goal and intent |
The primary goal of the automation. |
| Guardrails |
Considerations to run the automation smoothly. |
-
If the results are unsatisfactory, select Generate automations again.
The Generate automations window is displayed.
Provide the updates in the Optional context field. You can regenerate automations as many times as needed. Each run calls the AI model again and may produce different results — including changes to
automations you did not intend to modify. Review all automations after each regeneration.
Important: Each prompt starts fresh and doesn't carry forward the previous changes. To keep earlier changes, include all your requirements in one prompt.
Result
The Automations tab displays the decomposed automations. You can now create an agent from the decomposed automations.