


SanjivMeher

Mega Patron
Options
- Subscribe to RSS Feed
- Mark as New
- Mark as Read
- Bookmark
- Subscribe
- Printer Friendly Page
- Report Inappropriate Content
08-05-2018
07:46 PM
This post covers few basic use cases related to Email Client, Client Templates and Inbound Email Actions .
Activate Email client for a table
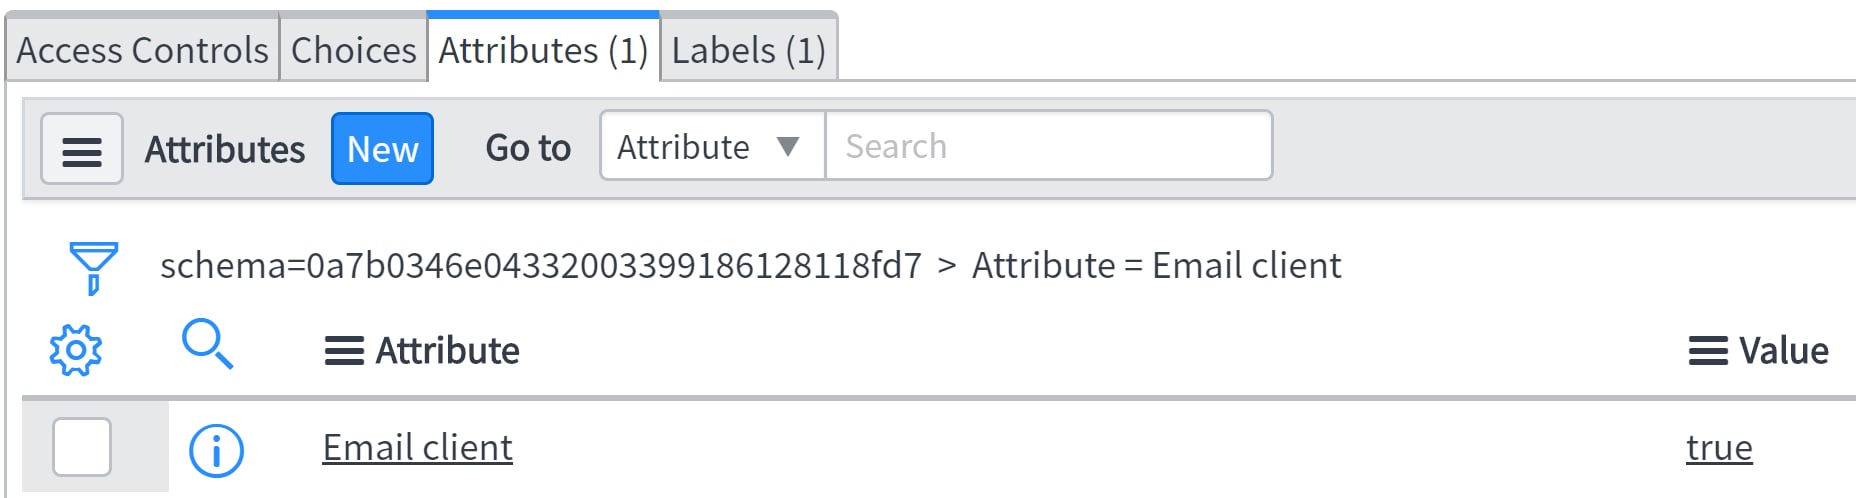
Out of box, Email Client is not active for all tables.
But you can activate it by adding email_client attribute to your table.
To do so, from the list view or form view of the table, right click on the header and open Configure->Dictionary.
Search for a dictionary record with Type as Collection. Open the dictionary record and click New in the Attributes Related List tab.
On the Attribute form, select Attribute as 'Email Client' and Save the record.
You should now see the Email button by clicking the More Option.
Add 'Email' button to Header Menu
In lot of cases Email client is frequently used by ServiceDesk or Analysts and you don't want them to do multiple clicks to get to the Email Client, you can ease their life by giving them an option to directly open email client using a menu option.
Create a UI action on your table with below configuration
Name: Email
Table: <Table Name>
Action Name: open_email
Active: true
Show Update: True
Client: True
Form Button: True
Onclick: openEmailClient()
Script:
function openEmailClient(){
	emailClientOpenPop('<Table Name>');
}
You should now see the 'Email' button in the Header Menu.
Access to Scoped Application Roles
If you want to activate email client for a scoped user, for ex, in my case I wanted to activate email client for sn_si.analyst you can follow the above steps. But that still doesn't activate the UI page for the role.
You need to add the scoped role to an access control named 'EmailClientProcessor'. Unless you don't do that, you will receive a blank page when you click Email button.
Show Send/Receive Emails in Activity Stream
If your user doesn't see emails in the activity stream, you may need to add the user role to the system property glide.ui.activity.email_roles.
Add Reply, Reply All, Forward to Record Activity
You can also add Reply, Reply All, Forward button by adding the glide.ui16.emailStreamResponseActions to system properties.
Navigate to sys_properties.list and add the glide.ui16.emailStreamResponseActions and set the value true.
Then send an email from email client. The email sent should appear in the activity and you should see the Reply, Reply All and Forward button for every email sent out and received in the record.
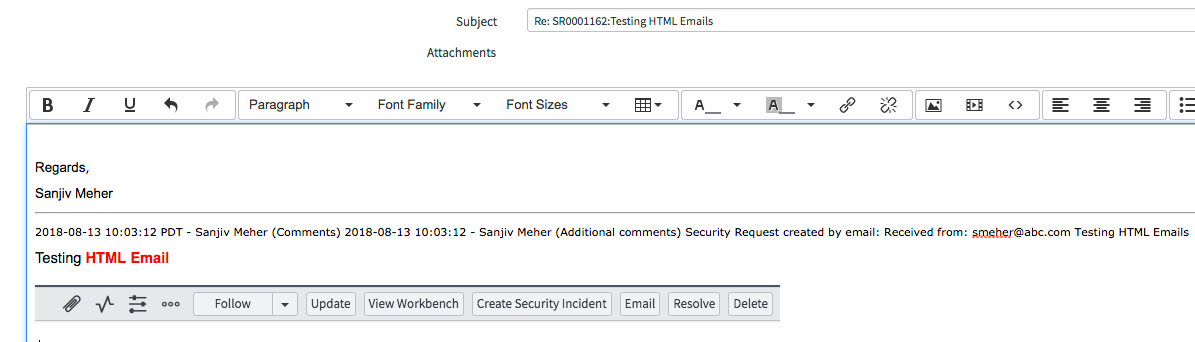
Receive Emails in HTML format
Out of box, all inbound emails from end user is converted to a plain text and added to the comments of the record.
The following line adds the email to the incident comments in plain text format.
current.comments = "received from: " + email.origemail + "\n\n" + email.body_text;I would prefer adding them in the same format it was sent instead of adding a Plain Text, which is not readable in most of the cases.
Now to add the email body to the comments in HTML format, all you have to do is replace the above line with below script
current.comments = "received from: " + email.origemail + "\n\n[code]" + email.body_html+"[/code]";
Add users in CC to watch List
An inbound email from end users can also have CC. But when ServiceNow creates an incident, only sender is notified that the incident is created and people in CC have no idea about the incident progress. Then you end up adding them to Watch List manually.
Instead of doing it manually you can automate it by using below script. Add below script to your inbound Create/Update script and it will automatically add users in CC to the Watch List of the incident.
	var rarray = email.recipients.toLowerCase().split(",");
	var nrarray =  '';

	for (var i=0; i<rarray.length; i++) {
		if (rarray[i] != instanceEmail && current.u_cc.indexOf(rarray[i])==-1) {
			if (nrarray)
				nrarray=nrarray+','+rarray[i];
			else
				nrarray = rarray[i];
		}
	}

	if (nrarray!='')
		{
		if (current.u_cc!='')
			current.watch_list = current.u_cc+','+nrarray;
		else
			current.watch_list = nrarray;
	}
Client Templates
You can do a lot with Client Templates. To access Client Templates, navigate to Email Client->Email Client Templates.
Below are few important functionality you can use in conjunction with email client.
Set From and ReplyTo in Client Templates
If you want to use a different email address as From and ReplyTo in Client Templates, you can do so by adding the From and ReplyTo field to the form and setting these values. Out of box these field are not available on the form.
For example, if you want to set the From and ReplyTo as your HR mailbox ID, you can do so by adding that email id in From and ReplyTo fields in Client Template.
Auto-populate To and CC from incident
To set the recipient in the client template, you can add caller to the To field. Similarly from the previous use case 'All Users in CC to Watch List', you can add them to CC by just adding watch_list to the CC field.
Create Condition based Client Templates
If you want to configure condition based Client Templates, you can do so by adding Condition field to the Client Template form.
Out of box, this field is not present on the Client Template Form. You can add it to the form using form layout.
For Ex: If you want to create Client Templates based on Priority, you can add the condition to the Client Template and based on the priority of the incident, the corresponding client template will open. Below is an example.
Auto-populate Subject and Email Body
To set a field as Subject in a Client Template, you can add ${field_name} to your subject field on Client Template.
Similarly you can add ${field_name} to the Body HTML field in the Client Template.
Ex: if you want to add short description as Subject and description as Body HTML, you can add ${short_description} to Subject field and ${description} to Body HTML.
Sending a high importance email from Email Client
We had a use case, where our team wanted to send a high importance email via the email client. I had to raise a HI ticket for the same and ServiceNow responded that OOB there is no solution, but they provided below link which lead me to what I was trying to achieve.
I referred the above thread and this is what I came up with.
I created an onBefore onUpdate Business Rule with below configurations.
Condition
Script
(function executeRule(current, previous /*null when async*/) {

	current.importance = "high";
	current.subject = current.subject.substring(1);

})(current, previous);
So now any email sent from email client, if the analyst add an '!' to the start of the subject in the Email Client, the BR will mark the email as High Importance. It will also remove the '!' from the subject, so that subject doesn't change.
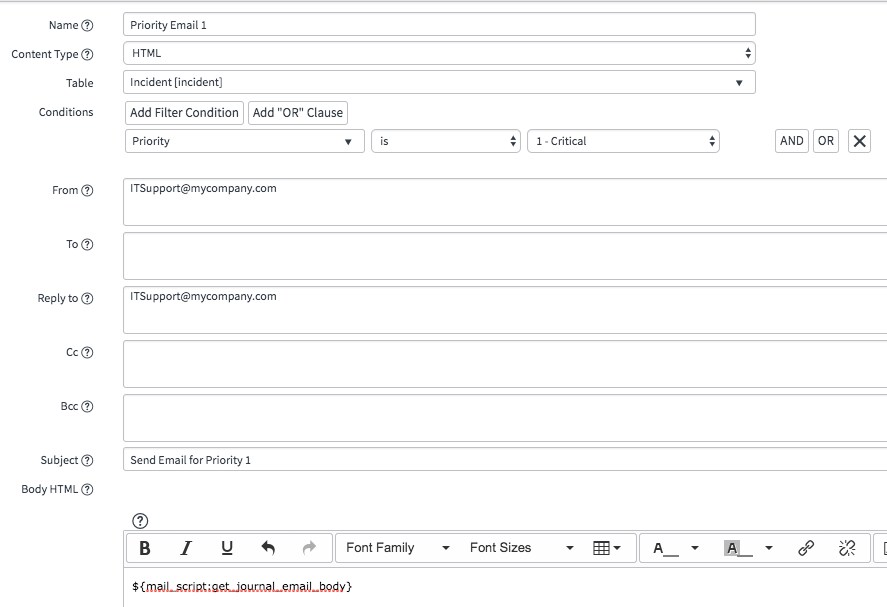
Auto-populate Email Body using Email Script
If you want to add any content dynamically using a script, you can create an email script and add to the Body HTML.
Ex:. I wanted to add the inbound HTML email received in use case 'Receive Emails in HTML format' to be added as a email body.
Navigate to System Notifications->Email->Notification Email Scripts
Create a email script to pull the html comments.
Name:get_journal_email_body
Script:
(function runMailScript(current) {
	var html_str = current.comments.getJournalEntry(1).replace('[code]','');
	html_str = html_str.replace('[/code]','');
	template.print(html_str);

})(current);
Then add the email script created to the body HTML. Syntax is ${mail_script:<Name of the Email Script>}
${mail_script:get_journal_email_body}Now when you click on Email, it will open the email client with the additional comments in the body of the email
Auto-populate Email Signatures
You can also ease analysts work by adding signature automatically for them
To do so, you can create another email script in below format.
Set Newlines to HTML: true
Script:
(function runMailScript(current) {

var user = new GlideRecord('sys_user');
user.get(gs.getUserID());

template.print(user.getValue('name')+'\n');
template.print('Title:'+user.getValue('title')+'\n');
template.print('Business Phone:'+user.getValue('phone')+'\n');
template.print('Department:'+user.department.getDisplayValue()+'\n');

})(current);
You can add additional formatting by adding HTML tags.
Now you can add both the signature and comments email script to the bodyHTML as below
${mail_script:get_user_signature}
${mail_script:get_journal_email_body}
Labels:
- 169,842 Views
60 Comments
- « Previous
-
- 1
- 2
- 3
- …
- 6
- Next »
You must be a registered user to add a comment. If you've already registered, sign in. Otherwise, register and sign in.

