


darius_koohmare

ServiceNow Employee
Options
- Subscribe to RSS Feed
- Mark as New
- Mark as Read
- Bookmark
- Subscribe
- Printer Friendly Page
- Report Inappropriate Content
02-07-2017
01:44 PM
When customers utilize Okta as their SSO/Integration solution between their current AD/LDAP environment and ServiceNow, they may have noted that there are a set number of fields they can map to:
(Okta field: ServiceNow field format)
User ID: user_name
Email: email
First Name: first_name
Last Name: last_name
SysID: sys_id
Password: user_password
Active Status: active
Manager: manager
Location: location
Department: department
Business Phone: phone
Mobile Phone: mobile_phone
Cost Center: cost_center
Title: title
However, by using clever Profile Mappings from your directory connection to Okta, and Okta to ServiceNow, you can automatically take in any attribute from your directory environment to your user records in ServiceNow.
Keep in mind that mapping a custom field will come at a cost of one of the base system text fields above, so we suggest using an item that is not often utilized, or that is less business critical. Using a text field is needed as a reference field will not properly map the data.
How to map custom fields from your directory using Okta and ServiceNow
In this example, we will use the Business Phone instead.
Part I. Okta configuration
- Begin by logging into your Okta instance as an administrator, and navigate to the Directory tab in the upper left.
- In the Profile Mappings section, select Edit Mappings for the ServiceNow application.
- Click the section titled Okta to ServiceNow - Eureka and later releases.
- Find the field you want to map over in the right. (Keep in mind that you will not be able to use this field then.) In this example, we will write your CUSTOMATTRIBUTE over the businessPhone field.
- Navigate to the ServiceNow application in the Applications section. Under the Provisioning tab, click Edit.
- Find the field you mapped over in step 4 and define the field name in ServiceNow to be mapped over. In this example, we map to a u_CUSTOMATTRIBUTE field.
Part II: ServiceNow configuration
- Start by searching for the user records from the application navigator, and open any user record.
- Right-click the user record header and select the Configure > Form Design option.
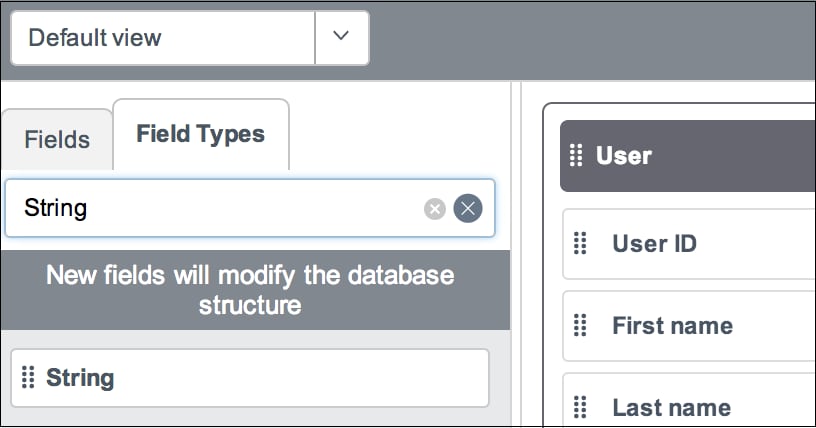
- From the Field Types section, click a String field and drag it anywhere on the form.
- Define this field to have any label you prefer with the field name CUSTOMATTRIBUTE. Keep in mind that ServiceNow automatically appends u_ to custom field names, as well as setting them all to lowercase. So since you entered CUSTOMATTRIBUTE as the name, we are mapping (from step 6 in the Okta configuration) to the u_customattribute field.
Congratulations - you have now mapped custom fields from your directory using Okta and ServiceNow! Stay tuned for more updates as we enhance the functionality to include custom mappings by default.
Labels:
You must be a registered user to add a comment. If you've already registered, sign in. Otherwise, register and sign in.

