- Post History
- Subscribe to RSS Feed
- Mark as New
- Mark as Read
- Bookmark
- Subscribe
- Printer Friendly Page
- Report Inappropriate Content
on 03-28-2022 10:51 PM - edited on 11-21-2024 11:01 PM by Sohail Khilji
This Article helps you to understand the concepts of Agent Client Collector and how it can be used in real time with an example. Normally, the Discovery is an Agent Less connection and discovers based on the configured schedules, Patterns & Credentials.
The Horizontal Discovery sometimes may not be able to connect/reach to all your Infrastructure Machines/Servers. It is ideal to use ACC on these kind of Machines where your normal discovery is not reachable and discoverable.
Note: I have used Windows based MID Server. For others, the configuration will be different i.e. if you are using any Linux/Unix Machine as a MID, you need to follow the MID Server setup differently. Follow the below reference.
MID Server Installation in Linux
Pre-Requisites
- 2 EC2 Instances from AWS.
- One EC2 Instance for MID Server
- One for Agent Client Collector i.e. install the ACC in this machine to capture the information into your Servicenow Instance via MID Server
- One Personal Servicenow Instance (Quebec/Rome/Sandiego)
Note: Amazon gives you a 1 year free subscription, but you need to make sure you are using free tier EC2 Instances only in order to make sure it will not cost you / send you the bills to pay. After this configuration, please terminate these instances from your AWS console
Agent Client Collector Plugins
- Install the below plugins in your personal instance
-
- Discovery
- Agent Client Collector for Visibility
- Agent Client Collector for Framework
Before you begin
- Personal Instance with probably choose Rome/Sandiego
- MID Server Installation
-
- A MID Server (Windows 2019 / equivalent)
-
- For this, you can choose AWS EC2 Instance free tier version if you have
- Otherwise, make some server machine of your own
- Create a MID User in your instance and provide the role for this user as mid_server
- Install Powershell latest version in your MID Server.
- Open your instance url (https:<your instance>.service-now.com) from your server
- On the Filter Navigator ⇒ MID Server ⇒ Downloads ⇒ Download Windows MSI File
- Once you download the file, start your MID Server installation
MID Server Installation Steps
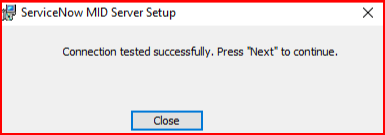
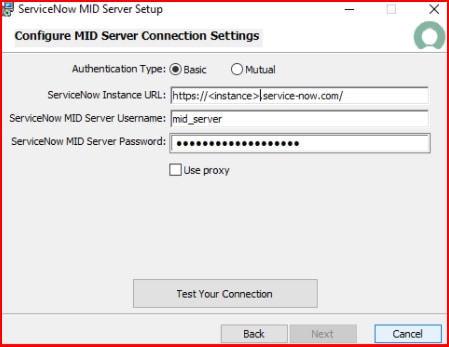
- Copy your instance url, provide the mid server user that you have created in your instance and Test your connection


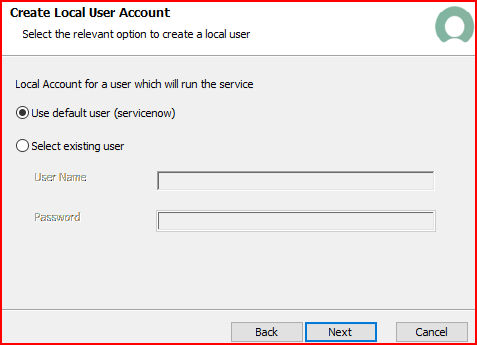
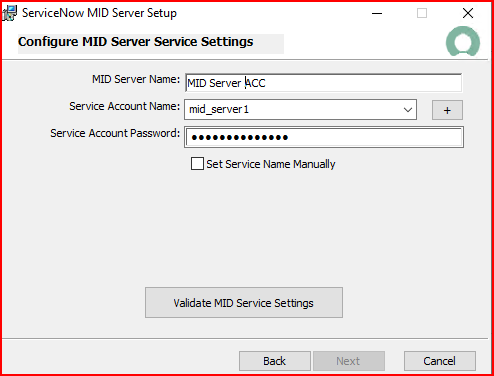
- Once you successfully test your connection click “Next”. Now, Click on (+) and create a service account in your MID Server. Note: This will create a local user in your MID Server. Provide a name for your MID Server, Click on Validate MID Service Settings and make sure it is valid


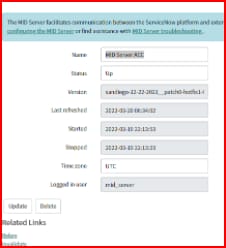
- Complete your installation & it will create a record in your instance once you complete and start the service. Now, Validate the MID Server and make sure your MID Server is Up & Running

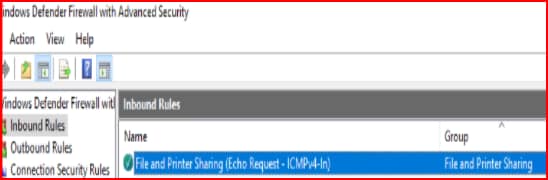
Enable Firewall Settings in MID Server
- Open Windows Defender Firewall with Advanced Security
- Click on “Inbound Rules” as shown below and create a new rule to allow inbound port 8433 (This is the default port for Agent Client Collector)
- Also, Enable the below rule


ACC Agent Download & Installation
- Goto your other EC2 Instance that you are prepared for ACC
- Open the Servicenow Instance URL from here and on the Filter Navigator,
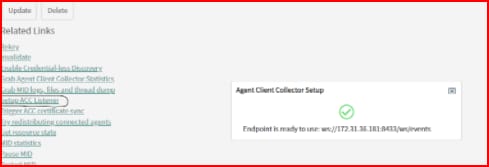
- Goto Agent Client Collector ⇒ Deployment ⇒ MID Servers ⇒ Open the MID Server
- Under the Related Links, Click on Setup ACC Listener. This will create the endpoint like below

- Goto Agent Client Collector ⇒ Deployment ⇒ MID Web Server. You can see the entry here.
- Goto Agent Client Collector ⇒ Deployment ⇒ Websocket Endpoint. You can see the entry here as well
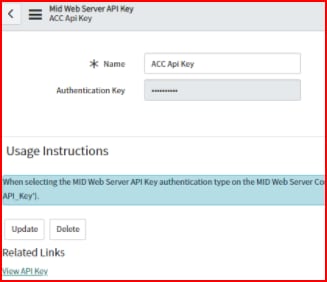
- Goto Agent Client Collector ⇒ Deployment ⇒ MID Web Server API Key. Create an entry here like this

- Here click on “View API Key” under Related Links and copy the API Key once you created it.
- Start your installation on your machine where you wanted to install the agent client collector by downloading from Agent Client Collector ⇒ Deployment ⇒ Agent Downloads
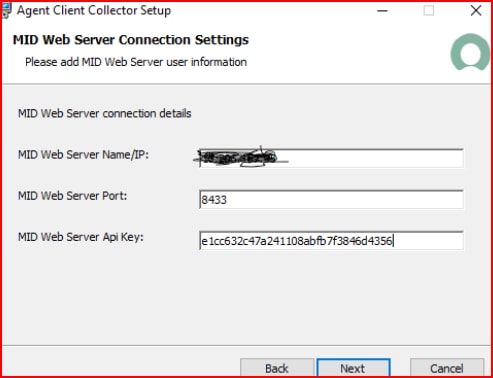
- Provide the below information (Ipaddress, Port, API Key that was copied from your previous “View API Key”. Select the defaults for next steps and complete the installation.


Once you have successfully installed the Agent Client Collector, do this
Agent Client Collector Configuration on the Machine
- Open the installation folder (C:\Program Files\ServiceNow\agent-client-collector) and make sure it has bin, embedded etc., folder are there
- Install Powershell in this Machine as well
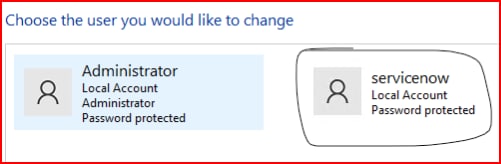
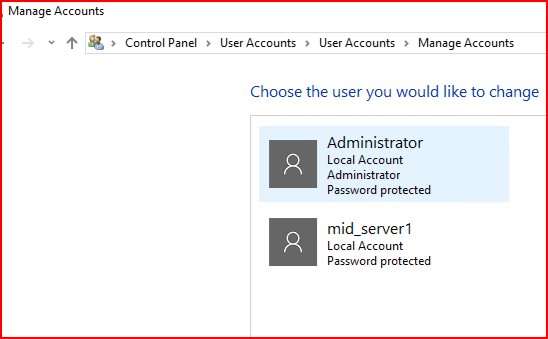
- Go to Local Users from control panel of this machine. Servicenow user account will be created like this

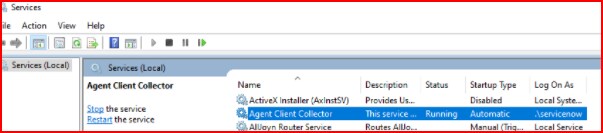
- Make sure the Agent client collector service is running using the local account (servicenow) that was created while performing the ACC installation.

- Now, open C:\ProgramData\ServiceNow\agent-client-collector\config\acc.yml file from this Machine and configure the below. (ProgramData folder is a hidden folder, so you can choose the windows explorer options to show this folder)
-
- name = <agent name that will be registered in the SNC instance> (You can provide a custom name of your own choice
- backend-url = ws://<MID_SERVER_IP_ADDRESS>:<MID_WEB_SERVER_PORT>/ws/events (Copy the Websocket Endpoint from your instance under ACC -> Deployment -> Websocket Endpoint record)
- api-key = (Your Instance ⇒ ACC -> Deployment -> MID Web Server API Key -> Select the record -> Under the Related Links -> View API Key - > Copy and paste here
- Close the file , Stop the ACC Service and start the ACC Service
- Open the yml file again and observe the api-key is encrypted / not. It will encrypt the api-key value like this (example)
-
- “encrypted:FQRRuoZ8anhsWeaIJSm6bkzCYZPbitLqaKqjKRgONB/+G9mBXARKPlDRj6O57/QW”
- Now, you are ready to test this
Performing the Self Test for ACC
- Goto Command prompt (Run as Administrator)
- Goto C:\Program Files\ServiceNow\agent-client-collector\bin
- Type “acc self-test”(If you observe the MID connected via Websocket and not with the HTTPS which is fine as per our configuration. Make sure all the tests are getting "PASS")

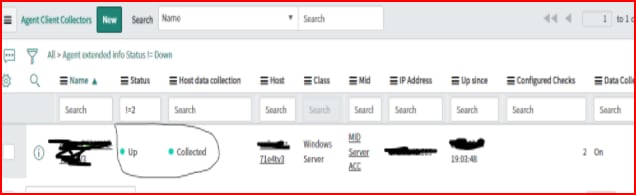
Now, that you have started the ACC Service on this machine, you will be able to see the Agents in your instance like this (Agent Client Collector ⇒ Agents)

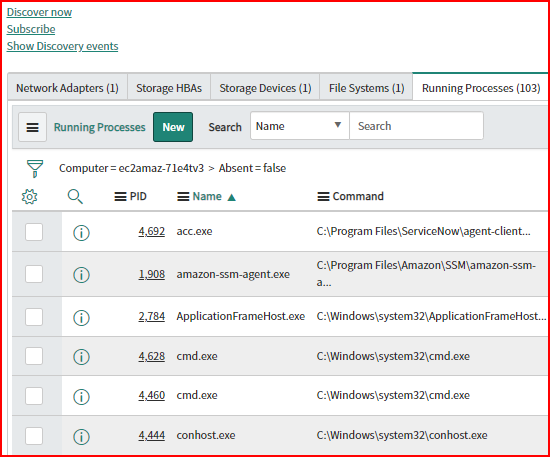
Open the above record and click on "Collect host data" button. Now, it starts collecting the data from this machine and creates CI Record.


You can observe the Running process, Software Installation, Network Adapters, Serial Numbers etc., records as well under the related links of the above CI Record.
Note: This is a basic setup of ACC on one Machine. In order to install this on multiple Machines, Servicenow has given the steps to bundle as a package.
Other Settings/Basic Trouble shooting steps
- In order to grab the Software Installation of any ACC Machine, make sure you configure and Publish with your own conditions (Agent Client Collector ==> Configurations ==> Policies)
- In order to cross check whether the OOTB definitions are working properly, Go to Agent Client Collector ==> Configurations ==> Check Definitions ==> Under Related Links ==> Click on "Test Check" and provide the relevant CI. If you are getting the response properly, then the definition is working fine.
- Under Related Links of each Agent record, you have an option to trouble shoot what happened with that agent by clicking on "Recent ECC Queue". You can observe the "input" ECC record XML to see what data is getting
Please feel free to reply back if you have any queries.
Thanks,
Narsing
- 59,287 Views
- Mark as Read
- Mark as New
- Bookmark
- Permalink
- Report Inappropriate Content
Hi this Article is really helpful ,but i am facing issue on create a service account (Now, Click on (+) and create a service account in your MID Server. ) its returning the error says that "service account creation failed "
i am unable to fetch the root cause
can you please help me out
- Mark as Read
- Mark as New
- Bookmark
- Permalink
- Report Inappropriate Content
Hi,
Have you tried to create a user account outside of this installation i.e. via Control Panel -> Users
Could be the issue where you donot have permission with the user id that you logged in / try to install the msi using Run As Administrator
Thanks,
Narsing
- Mark as Read
- Mark as New
- Bookmark
- Permalink
- Report Inappropriate Content
Hi ,
thanks for the help it worked out ,
may i know How we are gonna discovery multiple windows machine in service now instance using one mid server via ACC
and how ACC is connecting to midserver to discovery the windows machine (mass discovery).
- Mark as Read
- Mark as New
- Bookmark
- Permalink
- Report Inappropriate Content
Hi,
For mass deployment, refer the below link
Once you install ACC on a Machine, the Service will run automatically and the Poll begins from there onwards between certain default intervals. You can observe this in the Agent record. So the ACC Machine itself will send information into MID ==> This will send the input to the instance via xml payload. This will intern use the ACC Configuration Policies and create/update the record in cmdb.
Thanks,
Narsing
- Mark as Read
- Mark as New
- Bookmark
- Permalink
- Report Inappropriate Content
Hi,
We have installed agents on few Windows servers to discover the host as well as the installed software's on it using Agent Client Collector-Visibility. Unfortunately some of the agents are not discovering the software's at all. We have applied "Installed Software" check along with "Enhanced Discovery" to these agents and collected the host data, but no use.
Please help us in troubleshooting the issue.
- Mark as Read
- Mark as New
- Bookmark
- Permalink
- Report Inappropriate Content
Hello everyone,
I am facing this same issue with Installed Software Discovery on my PDI environment and wondering if this is a limitation of a PDI? I have tried with Windows, Linux and MacOS. None of them gets Installed Software related list populated on the CI form. I also have both Checks applied; "Enhanced Discovery" and "Installed Software". When testing "Installed Software", it retrieves all installed software from the host. So the check seems to be working but it does not populate the cmdb_software_instance or cmdb_sam_sw_install tables.
Many thanks in advance!
- Mark as Read
- Mark as New
- Bookmark
- Permalink
- Report Inappropriate Content
Replying to myself - issue resolved. The default scheduled interval in the Policy is 86400 seconds which is 24 hours. For some reason Discovery seems to run and states "Collected" for the Host data collection. This does not apply to the Software Installed, so either you have to wait the first 24 hours or change the Software Installed Policy => Scheduling => Interval (sec). See attached screenshot below.

- Mark as Read
- Mark as New
- Bookmark
- Permalink
- Report Inappropriate Content
Hello,
Mid Server not getting connected to either HTTPs or WebSocket. Can you please help here.

- Mark as Read
- Mark as New
- Bookmark
- Permalink
- Report Inappropriate Content
Hi,
Have you created the Inbound rules as mentioned in my article in MID Server. If not please add. Basically I think it is throwing error because it could not able to connect to the MID with the Websocket url and port.
Also, Refer the below trouble shooting guide provided by snow support. May be helpful for any other issues.
Thanks,
Narsing
- Mark as Read
- Mark as New
- Bookmark
- Permalink
- Report Inappropriate Content
Hello,
Thank you 🙂
It worked after creating inbound rules, wanted to know about System resources on client machines does it impact the performance of the machine after installing agent on the machine or how many resources does the agent take for itself ,any articles or documents on this please.
- Mark as Read
- Mark as New
- Bookmark
- Permalink
- Report Inappropriate Content
@Narsing1 Thanks for such detailed steps. It worked.
- Mark as Read
- Mark as New
- Bookmark
- Permalink
- Report Inappropriate Content
anyone can help me for below error, i am unable to fix
FAIL!: Could not connect to any MID server over HTTP/S. Check your backend-url configuration and/or network connection to the MID server
FAIL!: Could not connect to any MID server over WebSockets. Check your backend-url configuration and/or network connection to the MID server
- Mark as Read
- Mark as New
- Bookmark
- Permalink
- Report Inappropriate Content
If the ACC-V app cannot connect to the MID Server:
- Restart the MID Server service (on the MID Server host machine).
- Wait a 1-2 minutes.
- Restart the Agent Client Collector service (on the client device).
- Mark as Read
- Mark as New
- Bookmark
- Permalink
- Report Inappropriate Content
I need help to resolve below queries related to Agent Client Collector (Visibility):
1) If a machine is inactive for 30 days then agent record for that machine should auto delete | how & where can I set this rule
2) Some machines are showing software installations which are actually uninstalled by IT Help Desk, machine is scanned everyday still showing those installations | how to rectify this
3) If hostname of a machine is changed, does ACC over writes same record or it creates another record with new hostname? If yes then how can we auto remove old hostname record
4) ACC-V is IP based or hostname based?
Any inputs are highly valuable
- Mark as Read
- Mark as New
- Bookmark
- Permalink
- Report Inappropriate Content
Here you go.
1) If a machine is inactive for 30 days then agent record for that machine should auto delete | how & where can I set this rule
- Write a scheduled job and Check All agents where status is "Up" & Host data last collected is recent/today & Host.Most Recent Discovery > 30 days (relative query). If your query returns true, then mark the Operational status/Life cycle to End of life/Retired. Also, update the Retired Date
- Write an Archive Rule/Table cleanup to archive/cleanup records where Operational status is Retired & Retired Date is more than 3/4 days
2) Some machines are showing software installations which are actually uninstalled by IT Help Desk, machine is scanned everyday still showing those installations | how to rectify this
- Can you observe the last scanned field and probably write a scheduled job on it. The Job needs to mark the "Active Install" to false. Normally, this will automatically happen if you have SAM plugin.
- Check this Article
3) If hostname of a machine is changed, does ACC over writes same record or it creates another record with new hostname? If yes then how can we auto remove old hostname record
- I think it depends on the Discovery Property called "Always Update Hostname"
which is "glide.discovery.hostname.always_update" - Also, check the Identification Rules
4) ACC-V is IP based or hostname based?
- Its a Hostname based I believe since the Agent is already installed on the Machine, it does the dns name resolution. So we may say its hostname based. But I don't see a specific document on it.
Hope this helps.
Thanks,
Narsing
- Mark as Read
- Mark as New
- Bookmark
- Permalink
- Report Inappropriate Content
Hi @Narsing1
I have installed ACC agent on a Windows Computer, the agent is discovered and the Host CI is also created, but the installed softwares are missing on the CI record. How can we get this info?
- Mark as Read
- Mark as New
- Bookmark
- Permalink
- Report Inappropriate Content
I love the ACC agent. we have it deployed to some Linux and Windows servers.
What I am trying figure out is what we need to get the Agent to upgrade on Linux servers. Windows Server upgrade fine.
Linux looks to download the files it need and does everything up to the point of testing if we can run the command to start the agent service using sudo and command=/usr/bin/systemctl start acc
It fails here.
I am assuming that I need to add some commands to visudo. I am not finding on what all is needed.
- Mark as Read
- Mark as New
- Bookmark
- Permalink
- Report Inappropriate Content
Hi,
Thanks for the detailed guide. But I am facing issue.

I have ACC Visibility and ACC Framework plugins installed, and while running the acc self-test for registering the agent, the test passed.

Can anyone help me resolve this issue or has someone resolved similar issue?
Thank you!
- Mark as Read
- Mark as New
- Bookmark
- Permalink
- Report Inappropriate Content
Hi,
Have fixed the rest of the issues, the only one remaining is "Cannot locate embedded ruby path, skip run script test". The fatal error ACC-2503 is still there.
Any solutions?
- Mark as Read
- Mark as New
- Bookmark
- Permalink
- Report Inappropriate Content
Hi, do you know if there is any property that I can use for start collecting host data right after a device is rebooted? I currently have this issue when renaming a PC name , the Agent_ CI has the new name but the computer CI still showing the old name until the next data collection, so I want to start the data collection right after a reboot.