- Post History
- Subscribe to RSS Feed
- Mark as New
- Mark as Read
- Bookmark
- Subscribe
- Printer Friendly Page
- Report Inappropriate Content
on 07-13-2022 12:12 PM
Excellent! By now you've created your first GraphQL API and learned how to craft queries to it. The final step, of course, is to actually use that data. Your API can be used anywhere within the platform, or configured for third party integrations outside of ServiceNow, in this example we will explore how easy it is to render within ServiceNow using UI Builder (UIB).
Show a Student and their Incidents on a Page
GraphQL is a foundational technology for UI Builder and as a result they play very nicely together. As we will discover today it's exceedingly easy to create a query and wire it up to be rendered in a workspace.
We will be creating a page using UIB that will accept a student's user record sys id and show information about the student and then use a repeater to show a summary list of their incidents.
Craft a New Query
Before we render the data we need to quickly create a new GraphQL query schema with which to retrieve a student and their incidents in a single request.
Edit the Schema
Luckily we can use what we created in Part 2 of this series and won't even have to write any more code. We can just edit the schema with a new query and wire up the existing resolvers for Users and Incidents.
Navigate to System Web Services > GraphQL APIs and open "University".
Edit the schema to be the following (note addition of "getStudent" under the Query type).
Schema with Get Student (01)
schema {
  query: Query
}

type Query {
  getIncidentsForStudent(callerId: String!, last: Int): [Incident]
  getIncident(id: ID!): Incident!
  getStudent(id: ID!): User /* Get a Student's User Record */
}

type Incident {
  id: String! @source(value: "sys_id.value")
  number: String! @source(value: "number.value")
  active: Boolean! @source(value: "active.display_value")
  state: String! @source(value: "state.display_value")
  shortDescription: String @source(value: "short_description.value")
  description: String @source(value: "description.value")
  priority: String @source(value: "priority.display_value")
  assignedTo: User @source(value: "assigned_to.value")
  caller: User @source(value: "caller_id.value")
}

type User {
  id: String! @source(value: "sys_id.value")
  active: String @source(value: "active.display_value")
  name: String @source(value: "name.value")
  email: String @source(value: "email.value")
  phone: String @source(value: "mobile_phone.value")
  manager: User @source(value: "manager.value")
  city: String @source(value: "city.value")
  state: String @source(value: "state.value")
  incidents: [Incident]
}
Resolver Mappings
Resolvers
The existing resolvers from Step 2 of this series can be reused without modification. If you have not implemented those yet see "Get Incidents Resolver (02)" and "User Resolver (05)" in Querying Data with your GraphQL API Tutorial (Part 2 of 3).
Resolver Mappings
getStudent Resolver Mapping
1. Go to the "GraphQL Resolver Mappings" related list and select "New".
2. Select the path "Query:getStudent".
3. Select the "Get User" resolver.
User Incidents Resolver Mapping
This will allow us to dot-walk to the user's Incidents.
1. Go to the "GraphQL Resolver Mappings" related list and select "New".
2. Select the path "User:incidents".
3. Select the "Get Incidents" resolver.
Query the API
That should do it. We just need to create a query.
Query Variables
So far we have just hard coded parameters in our queries, and while this can work luckily GraphQL has a standardized technique for passing parameters to queries.
In this case we need to pass the sys id of the user to the query. To do this we will create a query variable called "$studentSysId".
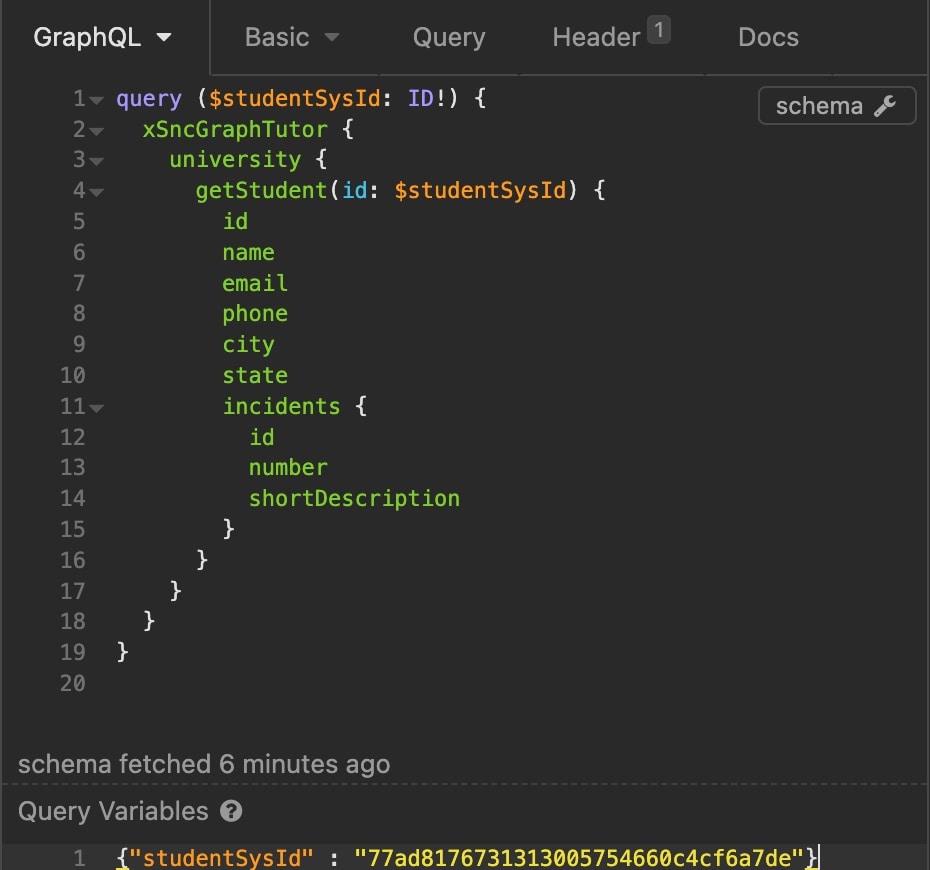
Query Get Student and Incidents (02)
query ($studentSysId: ID!) {
  xSncGraphTutor { /* Replace with your Application Namespace */
    university {
      getStudent(id: $studentSysId) {
        id
        name
        email
        phone
        city
        state
        incidents {
          id
          number
          shortDescription
        }
      }
    }
  }
}
You add a new variable denoted with a $ for studentSysId at the top level of the query and it can be re-used further down the stack.
To test this with Insomnia you add a variable object at the bottom of the screen in the format of a key-value object. (Insomnia will even auto-complete for you).
In our case we can use this:
{"studentSysId" : "77ad8176731313005754660c4cf6a7de"}
Create a Page and Render this Data
O.K., this next bit is actually pretty easy! We are going to create a new blank UI Builder page, a new GraphQL Data Broker and wire up the variable to a query string parameter. To learn more be sure to check out the Next Experience Center of Excellence.
Create a new UI Builder Page
If using UI Builder Directly:
1. Open Now Experience Framework > UI Builder
2. Click the "Create experience" button
If using App Engine Studio:
1. Open your app in App Engine Studio
2. Under "Experience" click "+ Add" and choose "Workspace"
Create a new page
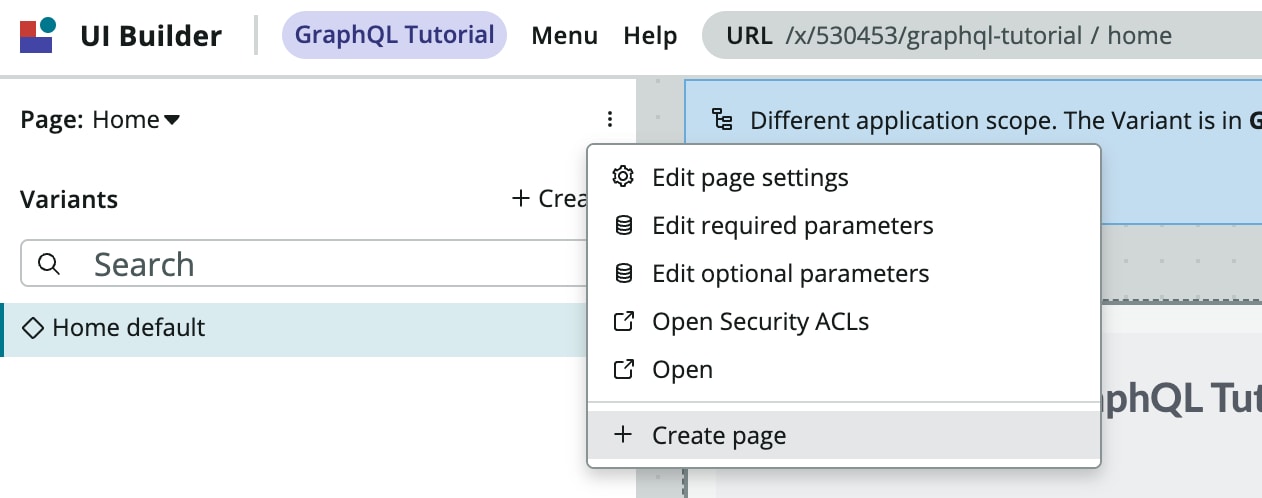
1. Select the snowman near the top of the left hand nav on the line for "Page" and choose "+ Create Page".

2. Name the page "Student"
3. When prompted, select "Add required parameters" button then add a new parameter called "sysId" and save out of the modals.
4. Click the "sysId" parameter in the URL and put in a test value of "62826bf03710200044e0bfc8bcbe5df1"

Add a new GraphQL Data Resource
1. Click the little database icon in the bottom left and in then next to "Data resource instances" select "+ Add".
2. Then choose "+ New" next to "Data resources" and choose "GraphQL".
3. Name it "Get Student with Incidents" and fill in the following properties:
A. Query
Just copy and paste the exact query you've been unit testing with!
Query Get Student and Incidents (02)
query ($studentSysId: ID!) {
  xSncGraphTutor { /* Replace with your Application Namespace */
    university {
      getStudent(id: $studentSysId) {
        id
        name
        email
        phone
        city
        state
        incidents {
          id
          number
          shortDescription
        }
      }
    }
  }
}
B. Properties
NOTE: Properties have a standard format for all data resources. If you forget what it should look like you can always look at another data resource for an example under Now Experience Framework > Data Management > GraphQL Queries.
The name simply needs to match the "$" variable in the query() node of your schema.
[
  {
    "name": "studentSysId",
    "label": "Student Sys Id",
    "description": "Student's Sys ID",
    "readOnly": false,
    "fieldType": "string",
    "mandatory": true,
    "defaultValue": ""
  }
]
4. Save the record and return to the UI Builder. You will be prompted that the data resources have changed. Choose "Update Page".
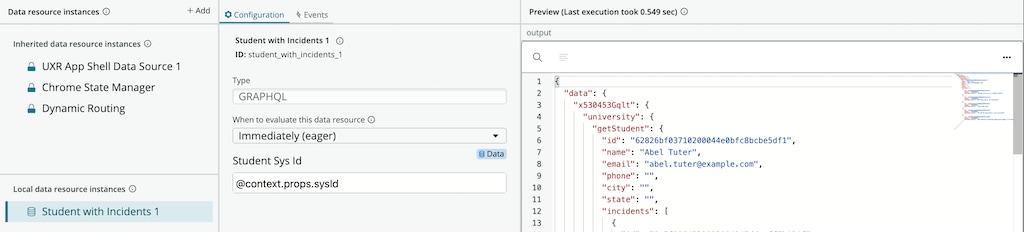
5. Go back to the "Data Resource Instances" and select "+ Add" again. Scroll down to your application name in the first column and select "Student with Incidents" under Server Data.

6. Bind the "sysId" to the resource instance by selecting "Student with Incidents 1" and within the "Student Sys Id" property by clicking the little database icon and entering:
@context.props.sysId
Sweet! You should see a document in the output panel like this:

Let's start Dot Walking (i.e., let's bind the data)
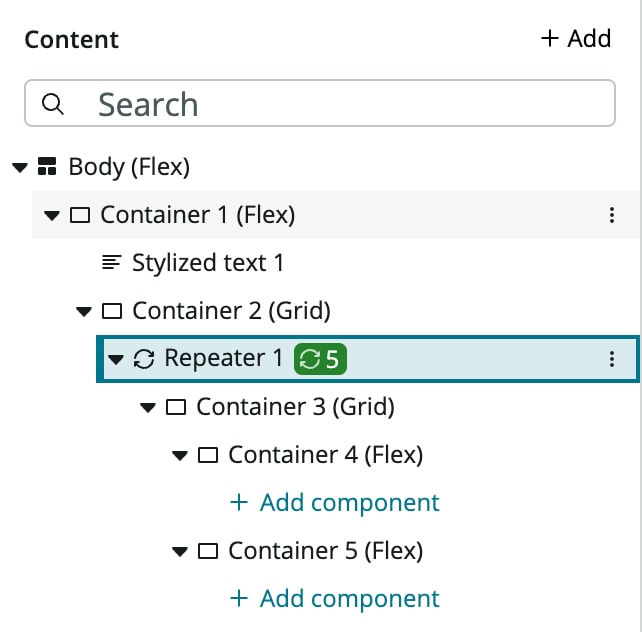
1. First lets add some student data to the header.
A. In the left hand under Body (Flex) click "+ Add component" and add a new Container.
B. Under the Container 1 (Flex) click "+ Add component" and add a new "Stylized Text".
B. i. In the right hand properties for this Stylized Text component change the "HTML Tag" property to "H2"
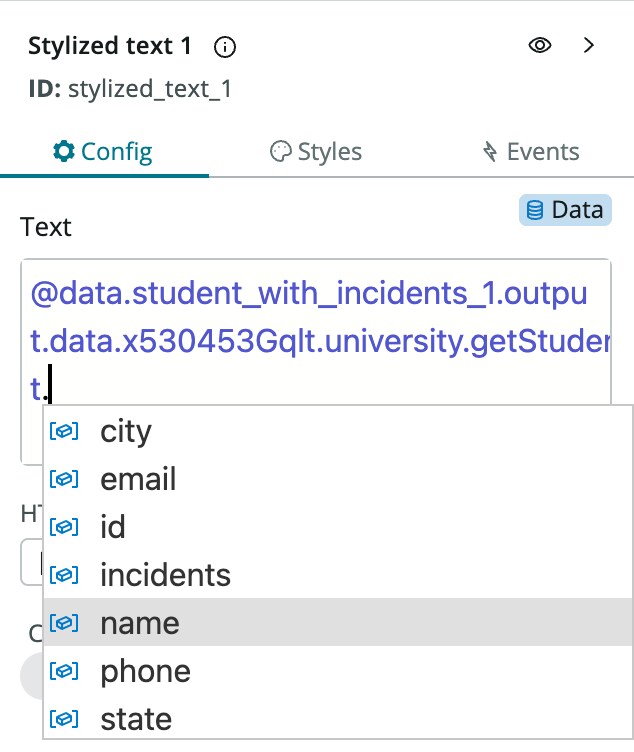
B. ii. Bind the student's name in the "Text" input by selecting the little database icon and start typing from "@data"--you will see as you go it will autocomplete so you can easily find the "name" value.
NOTE: Don't forget to replace xSncGraphTutor with your application's namespace

2. Now let's loop through a list of the student's incidents.
A. In the left hand nav for Stylized text 1 click the little "..." and select "Add component after" and then choose "Container".
B. Beneath that container in the left hand we will add a Repeater to loop through the student's incidents. Choose "+ Add component" and select "Repeater".
B. i. In the Repeater's properties choose "Data array" and the little database icon and dot-walk down to the student's list of incidents.
Remember to replace "xSncGraphTutor" with your namespace


Conclusion
If you've made it this far you've been through a lot. Hopefully you can see that while there is a bit of knowledge and skill to learn these concepts and wire everything up, once you get the hang of it ultimately it becomes pretty straightforward.
In the end adding a new query becomes as simple as copying and pasting from your GraphQL client, and binding it is made easier thanks to the nice dot-walking features in the UI Builder.
The source for this series is available at https://github.com/ServiceNowNextExperience/graphql-tutorial
Thank you, and happy coding!
PS: The next step is changing data, for which Dylan Lindgren created a Mutating data via GraphQL in UIB article.
- 15,016 Views
- Mark as Read
- Mark as New
- Bookmark
- Permalink
- Report Inappropriate Content
Excellent tutorial!
- Mark as Read
- Mark as New
- Bookmark
- Permalink
- Report Inappropriate Content
Great way to lay out the information! Very helpful tutorial. When I run this code through UIB I get an error. Undefined field: University. Does that need to be defined in the Query Schema?
- Mark as Read
- Mark as New
- Bookmark
- Permalink
- Report Inappropriate Content
This was a comprehensive post!
I have one doubt for which I wanted clarity, though.
Say we have different operations in the query block and there are 2 functions with the argument as 'id'- like in this example:
getIncident(id: ID!): Incident!
  getStudent(id: ID!)
In the resolver functions we would use 'getArguments().id' to get the parameter value and yes there would be resolver mapping, but maybe based on the scenario- its possible we meet both the resolver paths and so wouldn't getting 'getArguments().id' be ambiguous- meaning maybe the incident Id is passed (coz say getIncidents() was called and in some case say getUser() operation is called- where in user id is passed in 'id', so it woudl cause issue, right?
var sysId = env.getArguments().id
Basically what I'm coming at is would it be wise to have well defined parameter name for each operation to not be ambiguous while doing a getArguments() in the resolver function- or there is context maintained of which operation is called etc so the 'id' parameter in different operations of the query are already segregated, which I am failing to get...
(i hope i was able to convey my dilemma...)
@Jon G Lind @Brad Tilton
- Mark as Read
- Mark as New
- Bookmark
- Permalink
- Report Inappropriate Content
Thank you Jon for this information! It was really helpfull to get started in UI Builder.
- Mark as Read
- Mark as New
- Bookmark
- Permalink
- Report Inappropriate Content
FYI, the User's incidents field will not be resolved to the users incidents but the last 5 incidents. The resolver script will not get the callerId argument
- Mark as Read
- Mark as New
- Bookmark
- Permalink
- Report Inappropriate Content
Hi @tomashrobarik ,
You can modify the last line from the query schema like this:
incidents: [Incident] @source(value: "sys_id.value")
And in the Get Incidents Resolver add one more query:
- Mark as Read
- Mark as New
- Bookmark
- Permalink
- Report Inappropriate Content
Hi All,
Can anyone help me how exactly we can use mutation functionality to create or update the records?
Thanks in advance!
Ganesh
- Mark as Read
- Mark as New
- Bookmark
- Permalink
- Report Inappropriate Content
Hi @Ganeshm1 ,
There is a link at the end of Jon's post:
Mutating Data with GraphQL in UI Builder - DylanLindgren.com