- Post History
- Subscribe to RSS Feed
- Mark as New
- Mark as Read
- Bookmark
- Subscribe
- Printer Friendly Page
- Report Inappropriate Content
03-22-2022 12:11 PM - edited 10-23-2025 09:11 AM
The Service Graph Connector for AWS (SG-AWS) is part of the Service Graph integration projects. The connector is built to simplify the onboarding setup and ease the integration across multiple AWS accounts in an organization. This application uses one ServiceNow user account to pull in data from all of the accounts in an AWS Organization. This article describes the concepts and setup of the Service Graph Connector for AWS.
Objectives of SG-AWS
- Simplify on-boarding experience
- Minimal credentials requirement
- No MID server required
- Coverage for multiple AWS accounts across the organization
- Future proofing new account or region addition
- Near-real time Discovery of changes
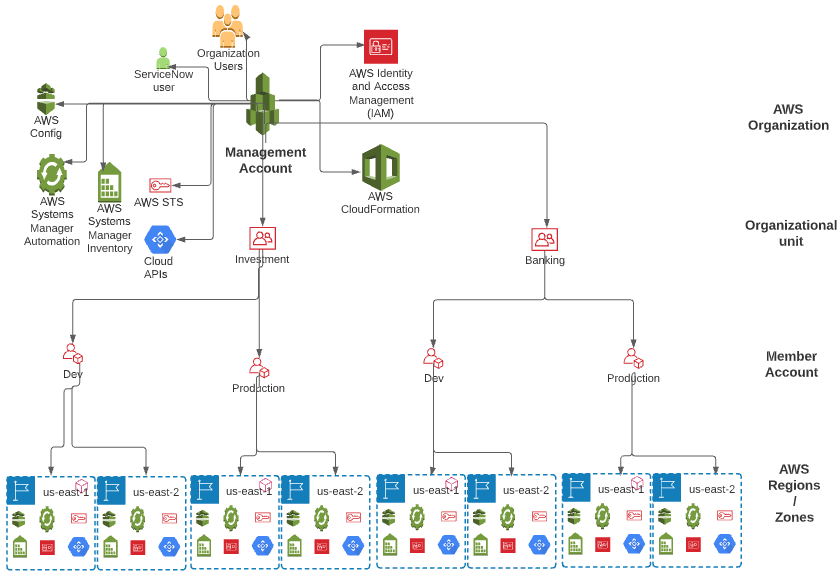
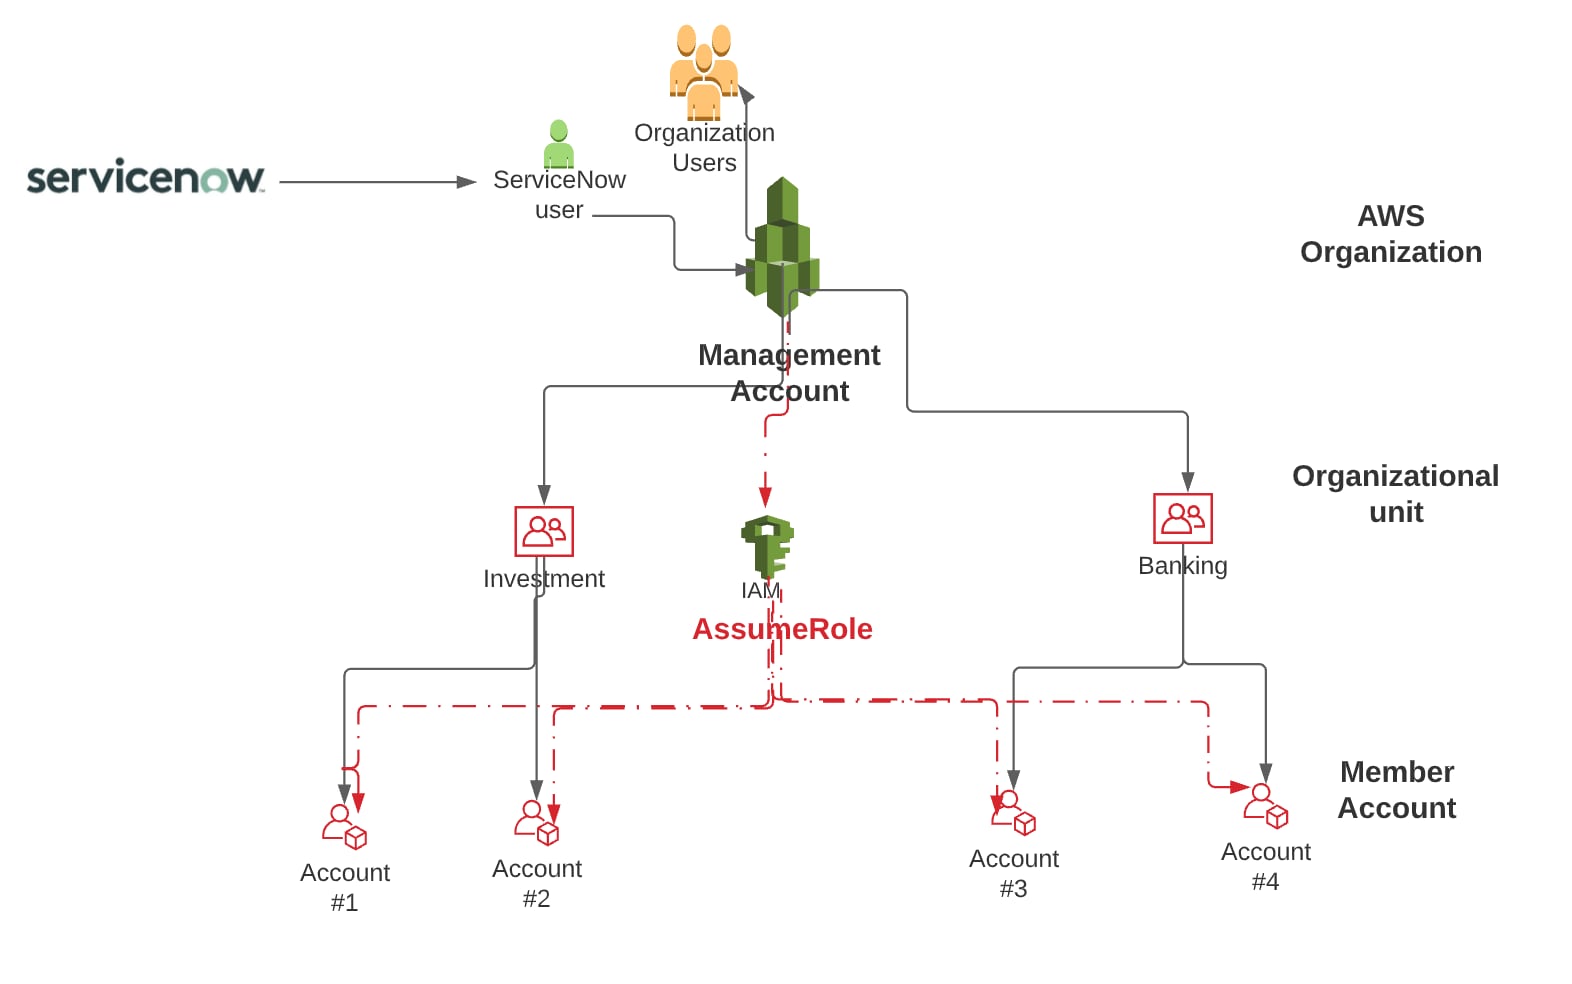
AWS Organization Structure

The figure above shows the AWS Organization management & member account setup. The individual accounts are grouped in an Organization Unit which we can correlate to a business unit or department in an organization. Within each unit, it can have multiple accounts to represent different environments such as development, test, UAT, or performance.
Service Graph Connector for AWS uses AWS components Config & SSM to get hardware, software and OS information.
- AWS Config
- Gets All hardware CI information into CMDB
- AWS Systems Manager (SSM)
- When SSM enabled, it will get all software installed information into CMDB.
- Deep Discovery
- When SSM enabled and deep discovery setup done, it will bring Serial Number, low-level OS details, TCP and Running process information in to CMDB.
Based on your requirement, you can enable these features incrementally.
However, to get the Account ID, Regions, EC2 Instance Types & Image Types (AMI), we need to invoke individual APIs to get the details. For more details on the specific roles, refer to FAQ.
AWS Config
AWS Config is AWS' Configuration Management Database (CMDB) service, which enables you to assess, audit, and evaluate the configurations of your AWS resources. AWS Config continuously monitors and records your AWS resource configurations, allowing you to automate the evaluation of recorded configurations against desired configurations. Using Config, you can review changes in configurations and relationships between AWS resources, dive into detailed resource configuration histories, and determine your overall compliance with the configurations specified in your internal guidelines. This simplifies compliance auditing, security analysis, change management, and operational troubleshooting.
AWS Config records resource information at a regional level, which can be aggregated at an account or organization level. For our use cases, we will aggregate at a regional level and make the appropriate API calls.
AWS Config Recorder
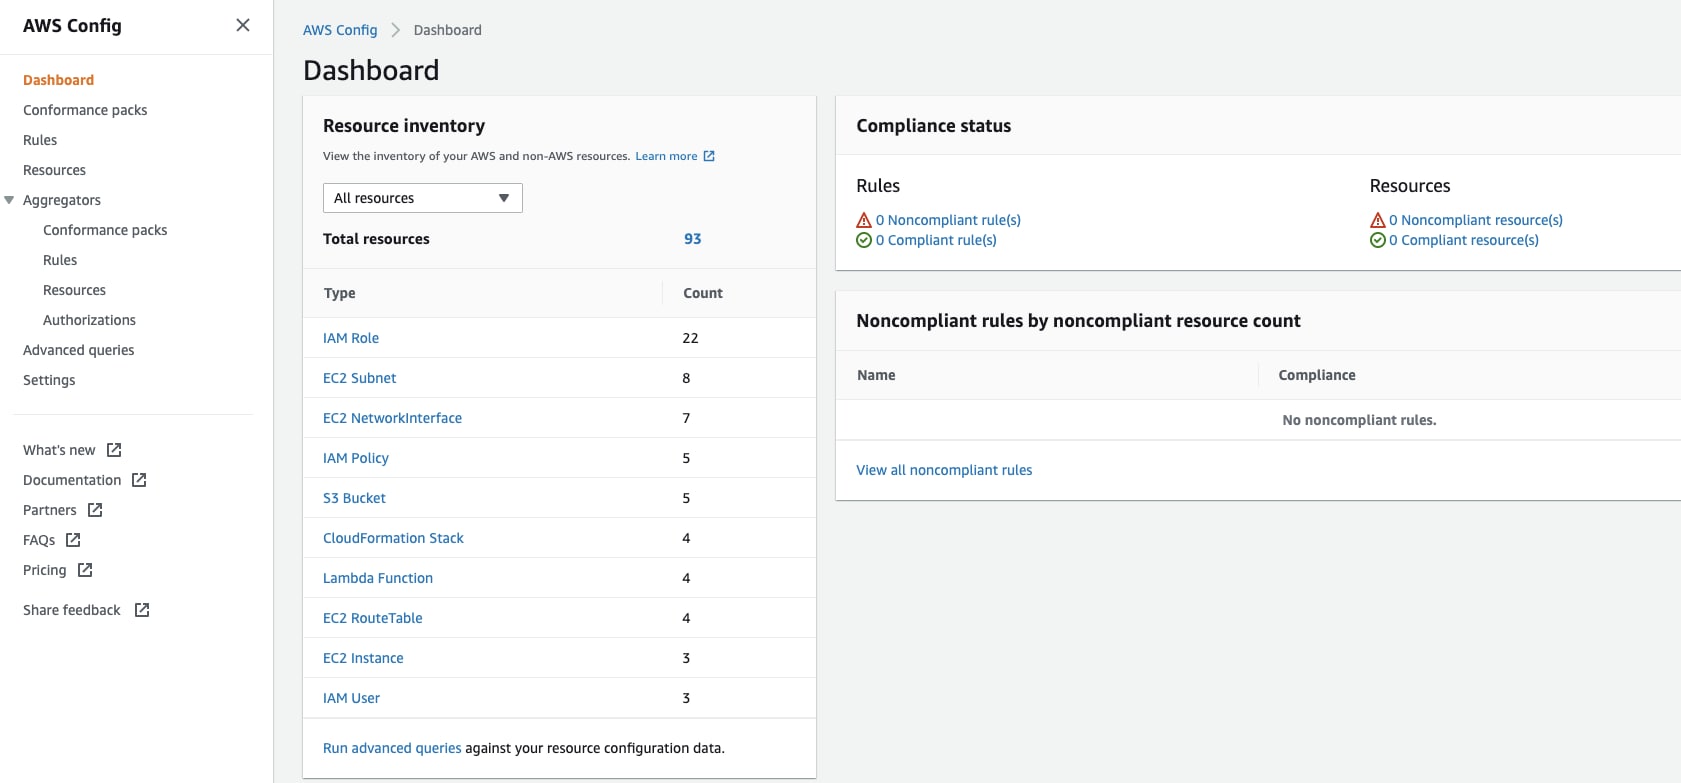
The AWS Config recorder collects Configuration Item (CI) information from various resources in a region and updates its database in near real-time. By default, this feature is not set up in AWS, so the AWS administrator must set up the recorder in each account. As part of the guided setup, we will use the CloudFormationScript - EnableAWSConfig.yml, which will enable the AWS Config Recorder. This script can be executed in all or selected accounts and regions, with detailed setup instructions provided in the guided setup.
Once the script is executed in an account and region, the AWS Config dashboard will appear as follows.
screenshot.

AWS Config Aggregator
An aggregator is an AWS Config resource type that collects AWS Config configuration and compliance data from the following:
- Multiple accounts and multiple regions.
- Single account and multiple regions.
- An organization in AWS Organizations and all the accounts in that organization which have AWS Config enabled.
Advantages of using Central Aggregator:
- With the central aggregator, Service Graph Connector for AWS gets all the data from one location.
- It doesn't require looping into each account and region.
- This setup will significantly improve the performance and speeds up pulling data.
- Central aggregator is used to get the bootstrap (baseline) and incremental update (any new config added after last update).
- However, for detecting the deleted resources, Service Graph Connector for AWS needs to loop through each account and region to update the CMDB CI accordingly. We need config:List* (specifically config:ListDiscoveredResources) IAM access in each account.
config:ListDiscoveredResources API & Performance Impact:
-
When a resource is deleted from an AWS environment, it must be recorded in the Configuration Management Database (CMDB) and marked as retired or absent. The only API that currently offers details about removed resources is config:ListDiscoveredResources. However, since this API is only accessible at the account and region levels, SGC-AWS must loop through every account and region to collect this deleted data.
-
The default retention duration for AWS Config is seven years, and there is no date range available in the config:ListDiscoveredResources API to select a subset of data. The API will paginate to extract all the data from AWS Config, and when resources are repeatedly built and deleted, AWS Config accumulates deleted data.
-
Due to the inability to specify a date range, the config:ListDiscoveredResources API makes several thousand API calls to gather all the data, which has a significant impact on performance.
-
We have submitted a feature request to the AWS Config team asking them to include information about removed resources in the aggregator API for AWS Config Central, where we can specify a date range and retrieve the specific subset of data we need. We have addressed this issue as part of the SGC-AWS 2.0 release by limiting the number of API calls.
Setup Instructions:
- Refer to the setup instructions described in the AWS Documentation https://docs.aws.amazon.com/config/latest/developerguide/setup-aggregator-console.html
This is an optional setup. If the aggregator is set up at a central location, it will import the data faster.

AWS Systems Manager (formerly SSM - Simple Systems Manager)
The AWS Systems Manager is the operations hub for AWS. Systems Manager provides a unified user interface so you can track and resolve operational issues across your AWS applications and resources from a central place. As part of the Service Graph connector integration, we are going to use one specific feature - Inventory.
AWS Systems Manager Inventory
The AWS Systems Manager collects information about your instances and the software installed on them, helping you to understand your system configurations and installed applications. You can collect data about the applications, files, network configurations, Windows services, registries, server roles, updates, and any other system properties. The gathered data enables you to manage application assets, track licenses, monitor file integrity, discover applications not installed by a traditional installer, and more.
AWS Systems Manager Inventory and Service Graph connector for AWS Integration
- By default, AWS Systems Manager doesn’t have permission to perform actions on your instances. So, you will need to grant access by attaching an AWS IAM instance profile role (AmazonSSMForInstancesRole) to an EC2 instance.
- As part of the Service Graph connector for AWS, it imports the software installed in the instances and populates the CI information.
- Refer to the Systems Manager prerequisites for a successful setup.
- The following components should be available in all of the accounts for the Systems Manager integration to be successful:
- Systems Manager Agent (SSM Agent) installed in EC2 instances.
- AmazonSSMManagedInstanceCore policy attached as instance profile in EC2 instances.
- Systems Manager Inventory setup configured in each region.
AWS Systems Manager Inventory Setup
AWS Systems Manager is not available by default. We need to enable it to use this feature and it's available for free. The setup is a two-step process:
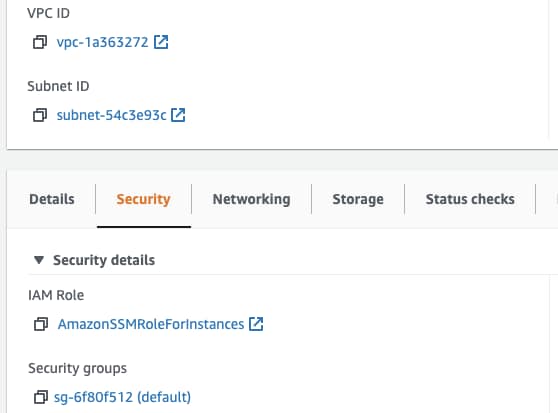
1. Setup AmazonSSMRoleForInstances instance profile in EC2 instances
For us to get the software installed details, we need to provide permissions for communication between the instances and the Systems Manager API. You need to create a policy and attach the 'AmazonSSMManagedInstanceCore' role. This role needs to be assigned to the EC2 instance.
The AWS documentation provides details steps to create an instance profile and how to attach it to an EC2 instance. As part of this integration, we need to create the Policy: AmazonSSMManagedInstanceCore. Based on your environment, create the appropriate policies and attach it to the EC2 instances. We can ignore the steps described for S3 buckets as we are not using this feature.

The figure below shows the 'AmazonSSMRoleForInstances' attached to the EC2 instance.

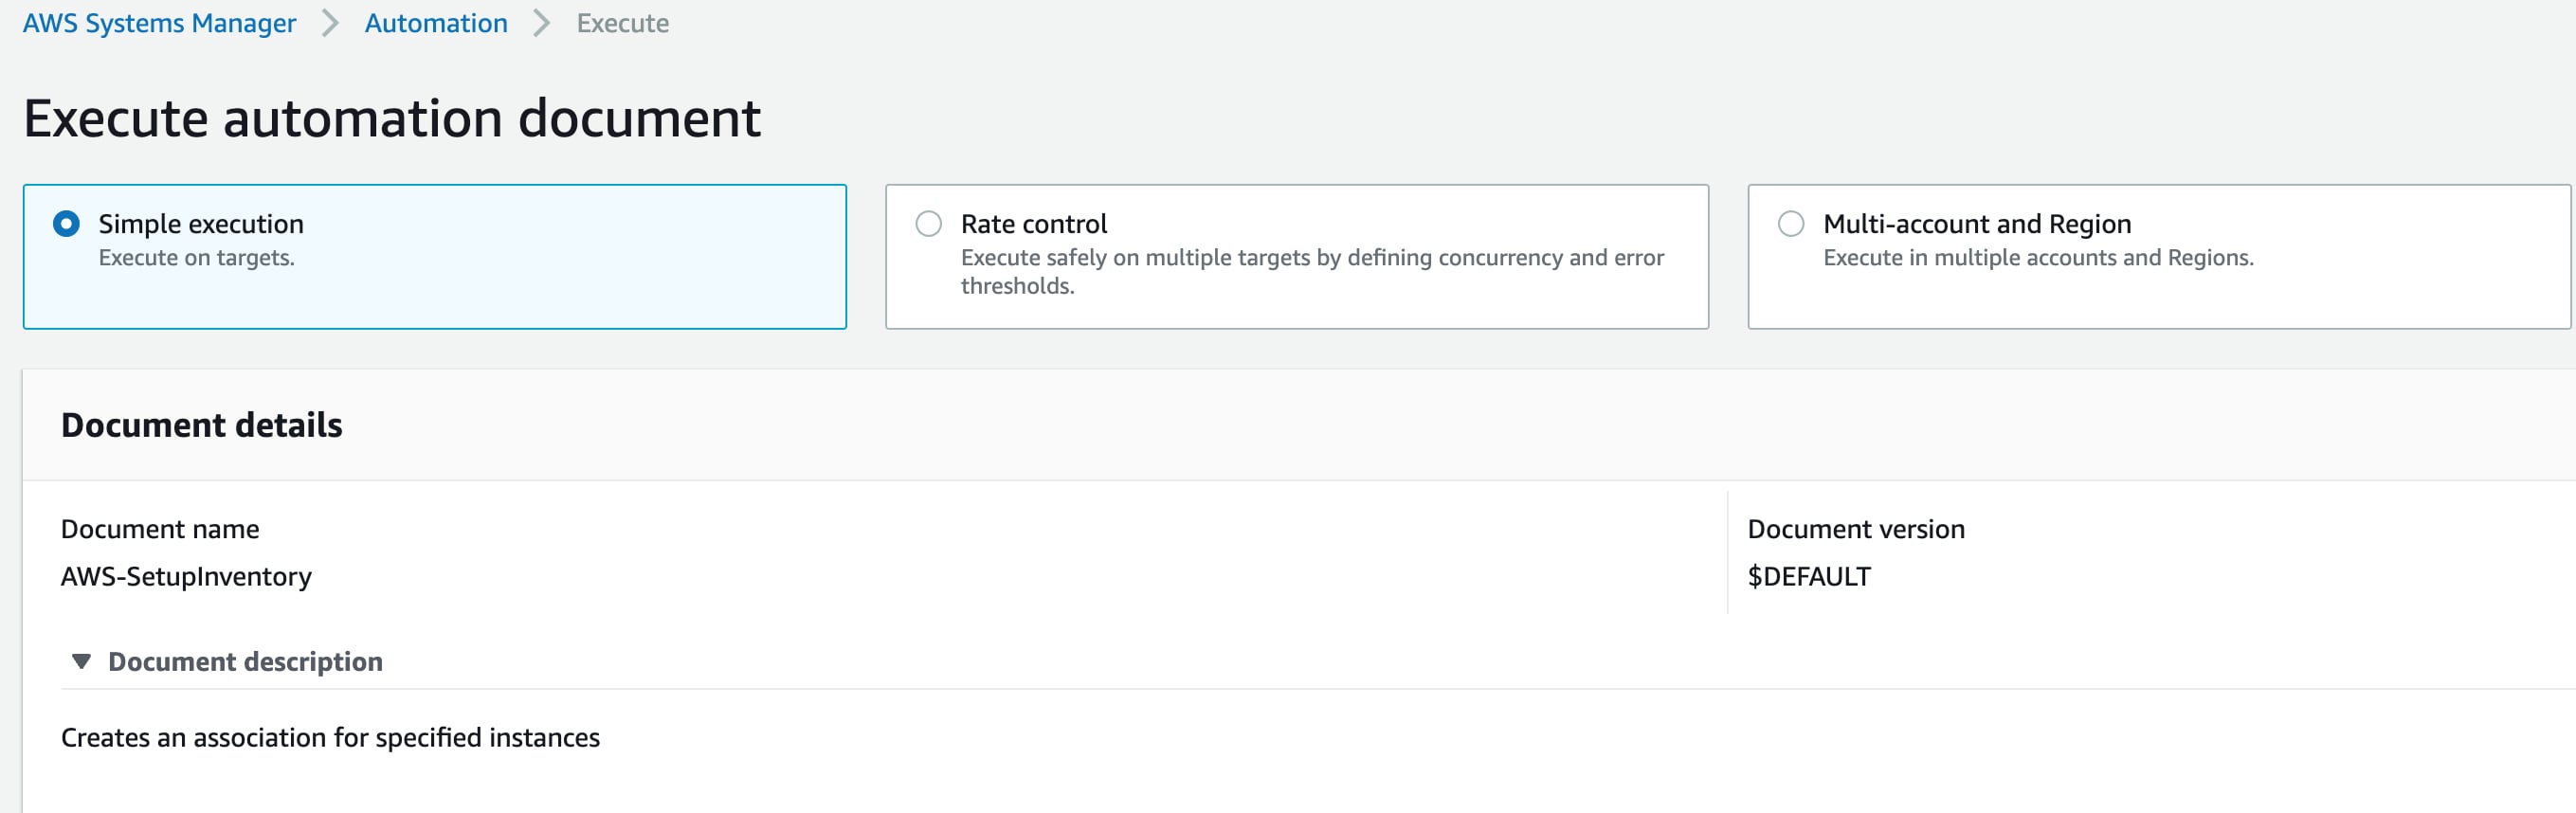
2. Setup AWS Systems Manager Inventory
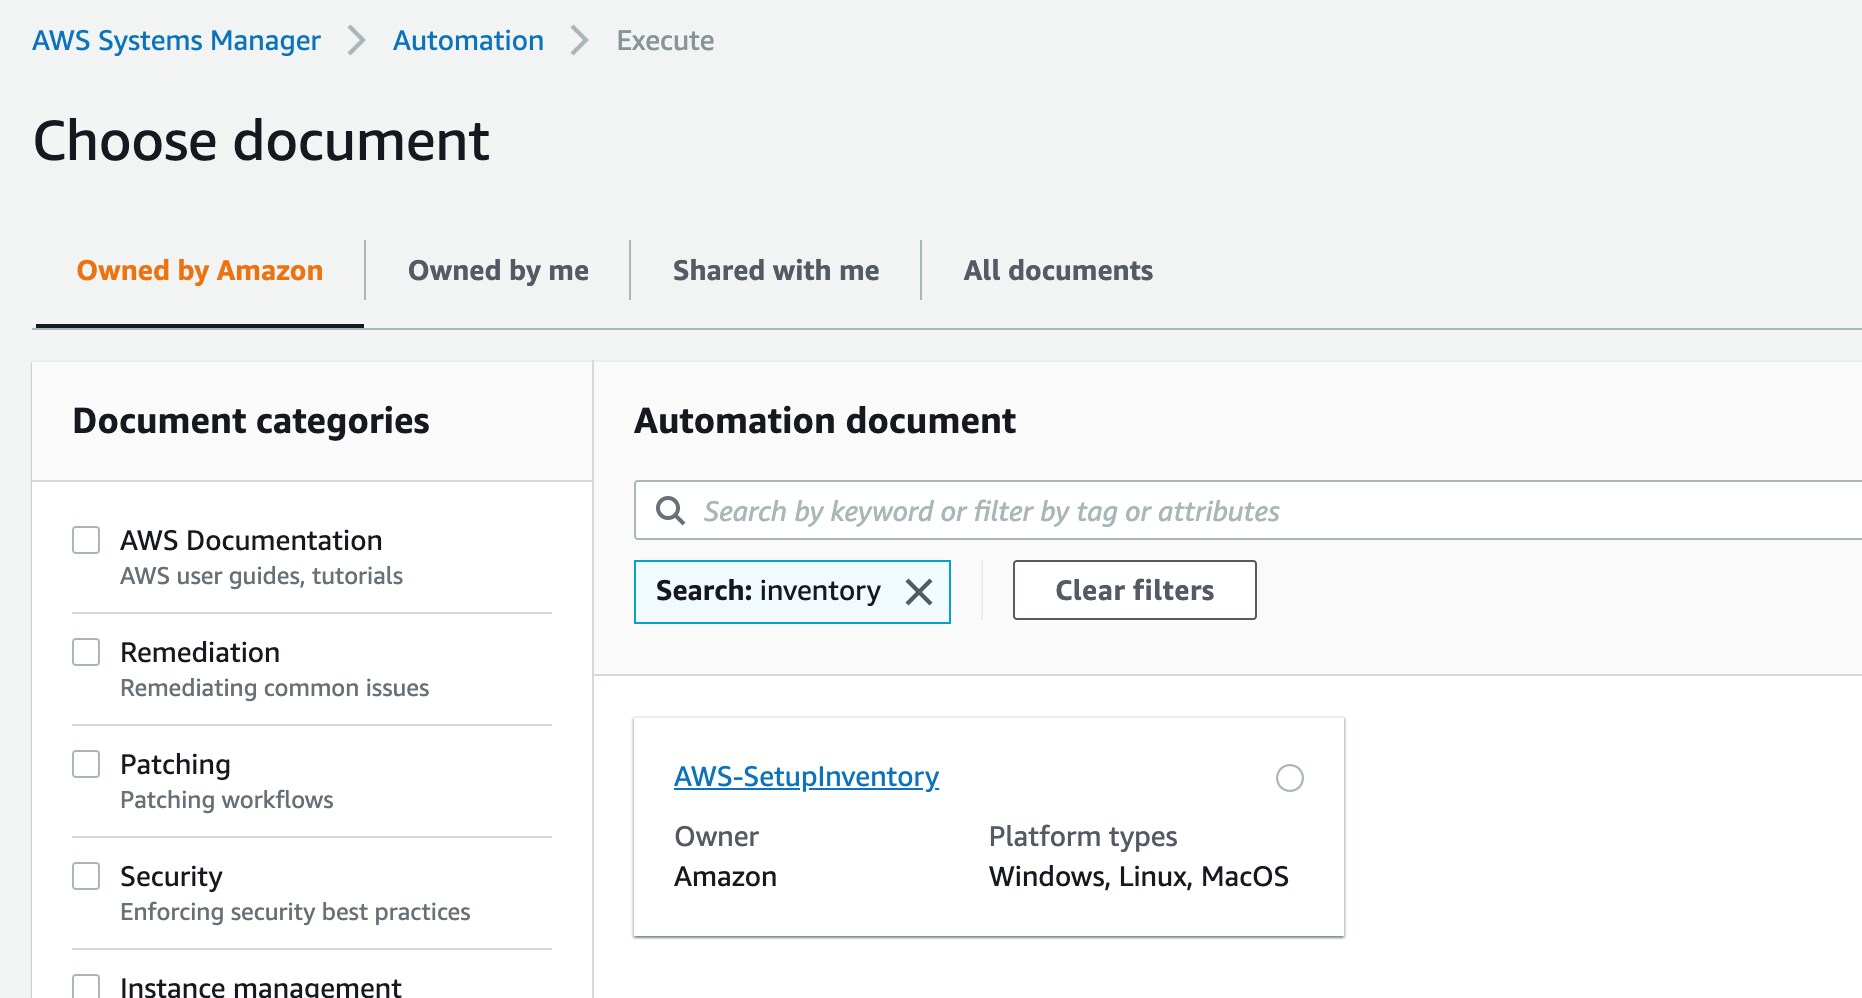
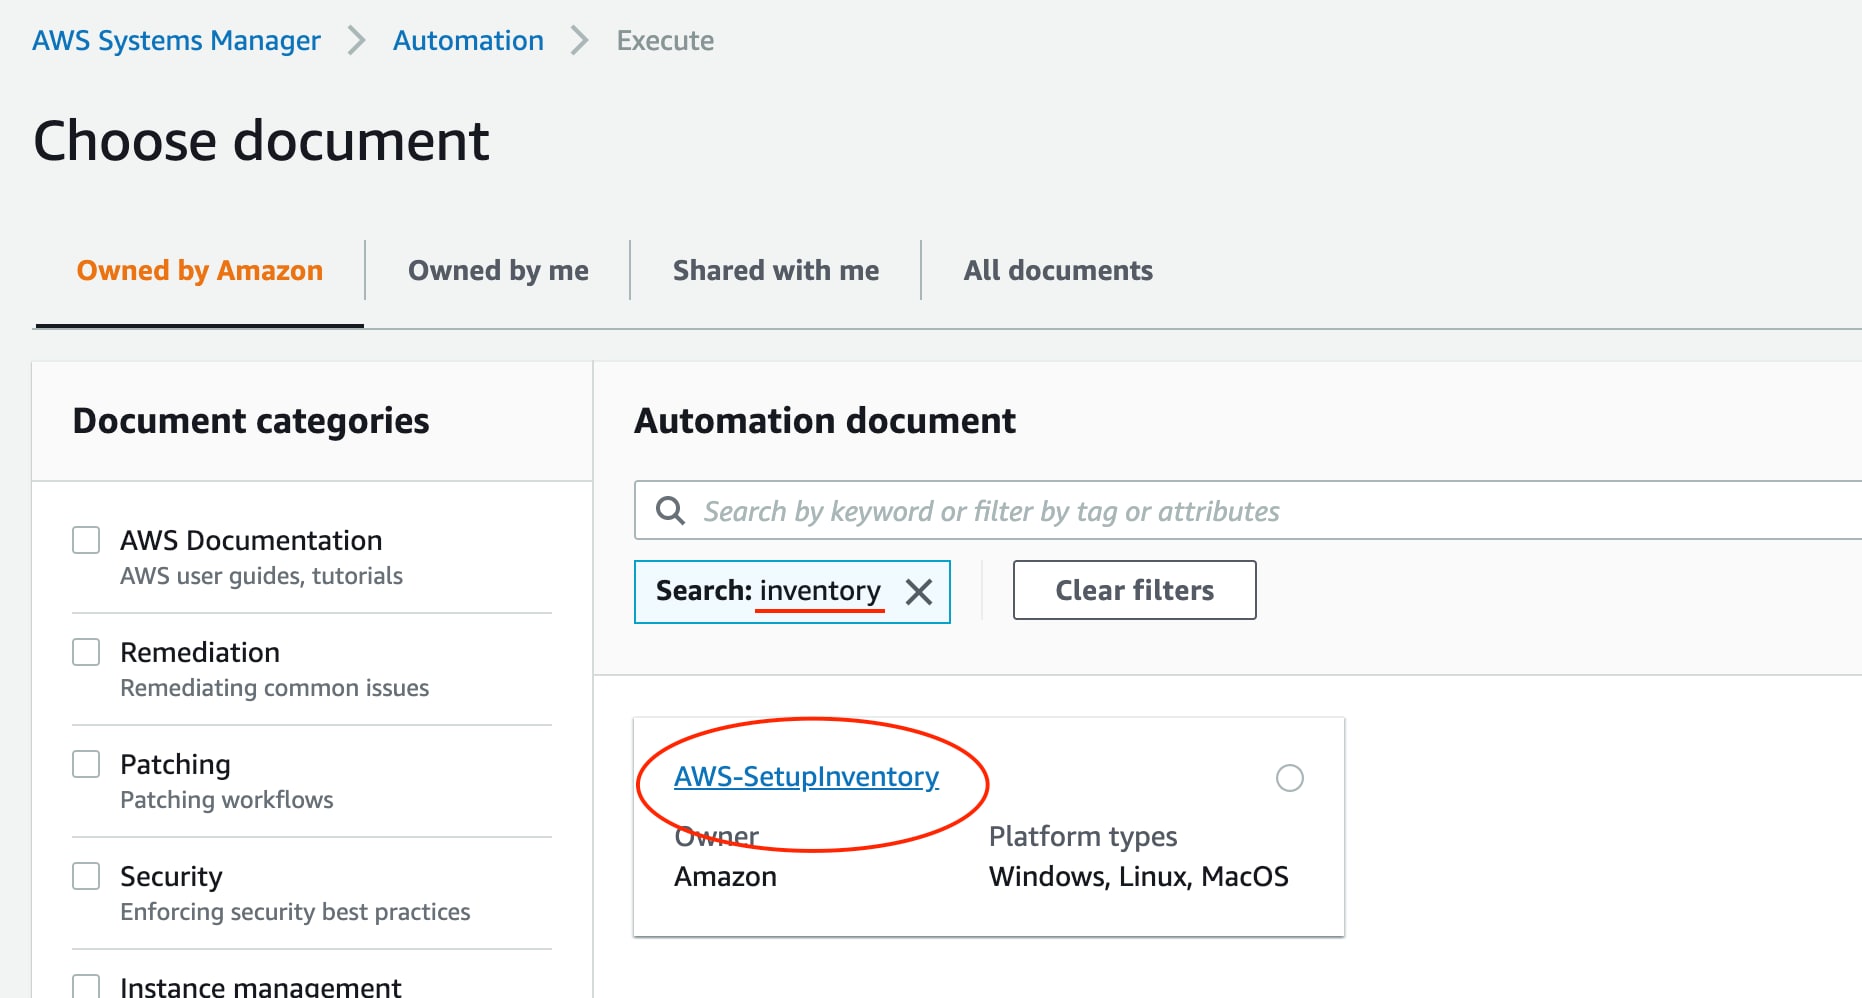
AWS provides an automation script which is available as part of the AWS Systems Manager Automation which will setup the AWS Systems Manager inventory in an account. You can navigate to AWS Systems Manager > Automation > Execute then search for 'inventory; in the automation document as shown below.

From this page, you need to navigate inside the 'AWS-SetupInventory', click on "Execute Automation". Once you are in this page, you can execute the document and it will setup SSM inventory in the account region.

Multi-Account Multi-Region SSM Inventory setup:
If you have multiple accounts and regions, it may take time to repeat the steps in all the accounts and regions. To set up a multi-account multi-region SSM Inventory, the admin needs additional privileges such as AWS-SystemsManager-AutomationExecutionRole and AWS-SystemsManager-AutomationAdministrationRole. Please refer to the guided setup for instructions on how to set up the IAM privileges correctly. Please note that these roles are assigned to your company's AWS Admin and not the ServiceNow user.
After setting up the IAM privileges, please refer to the AWS documentation under the section "Run an automation in multiple Regions and accounts (console)". Once you have the setup, select the "Multi-account and region" option, enter the OUs/Account IDs, select regions, and execute the automation script.

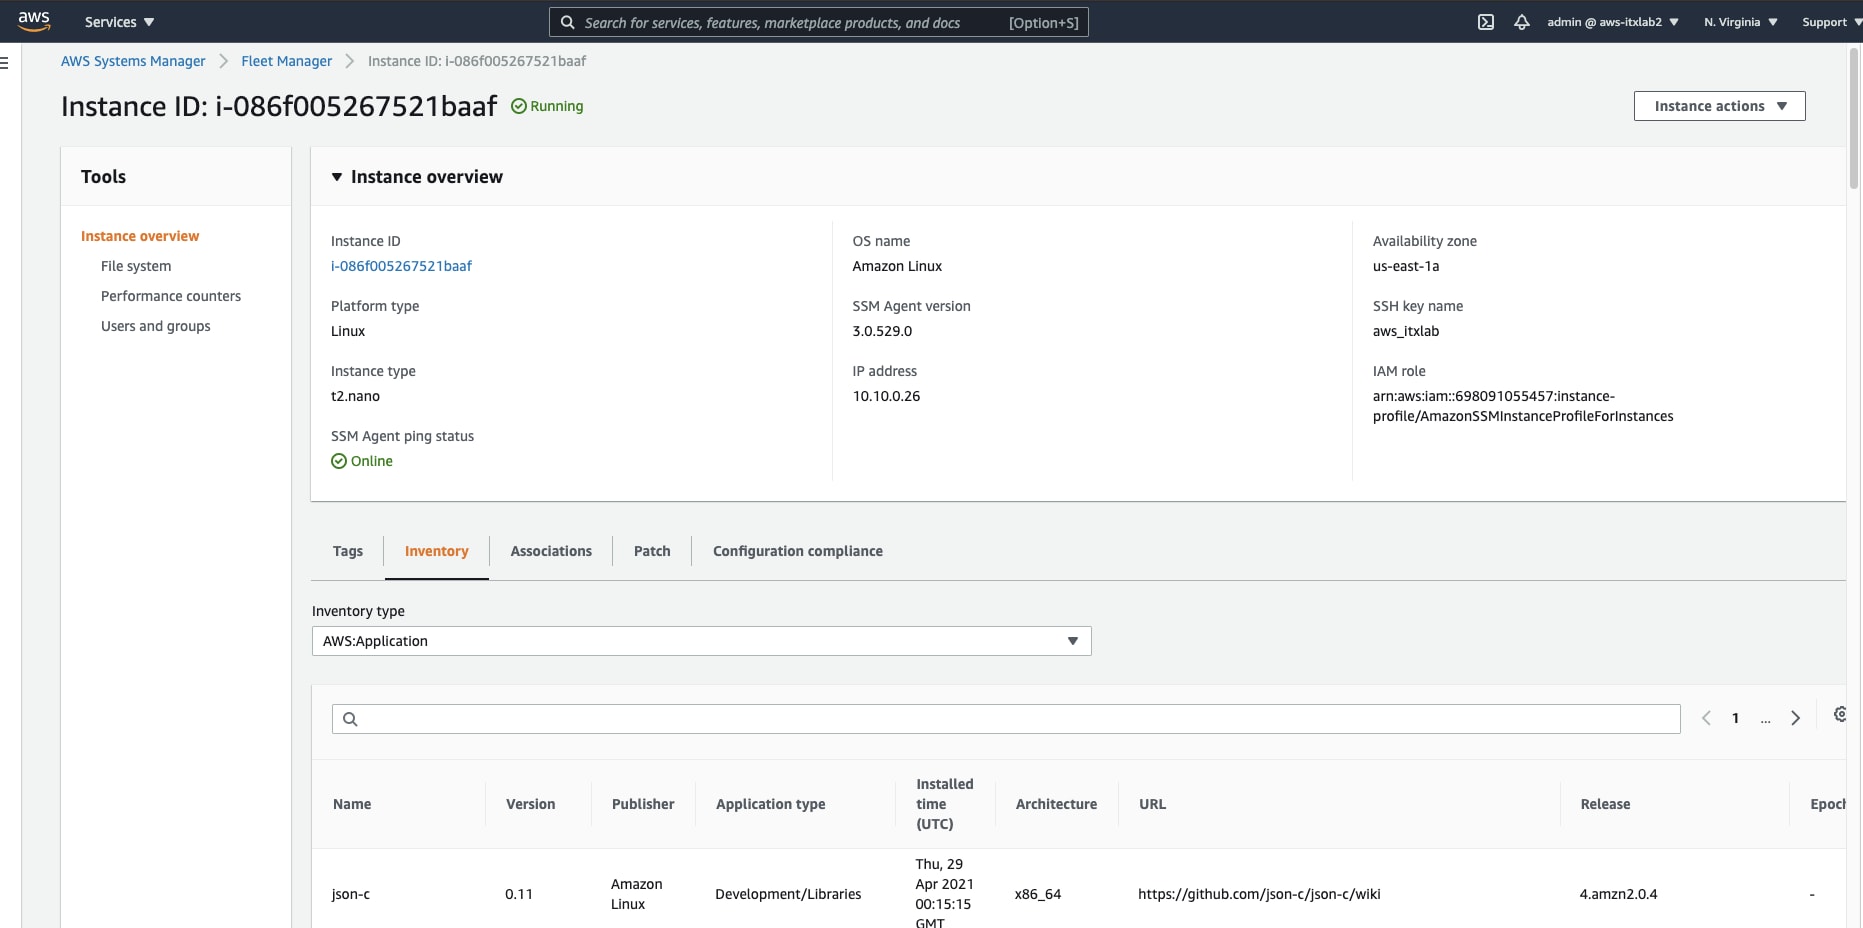
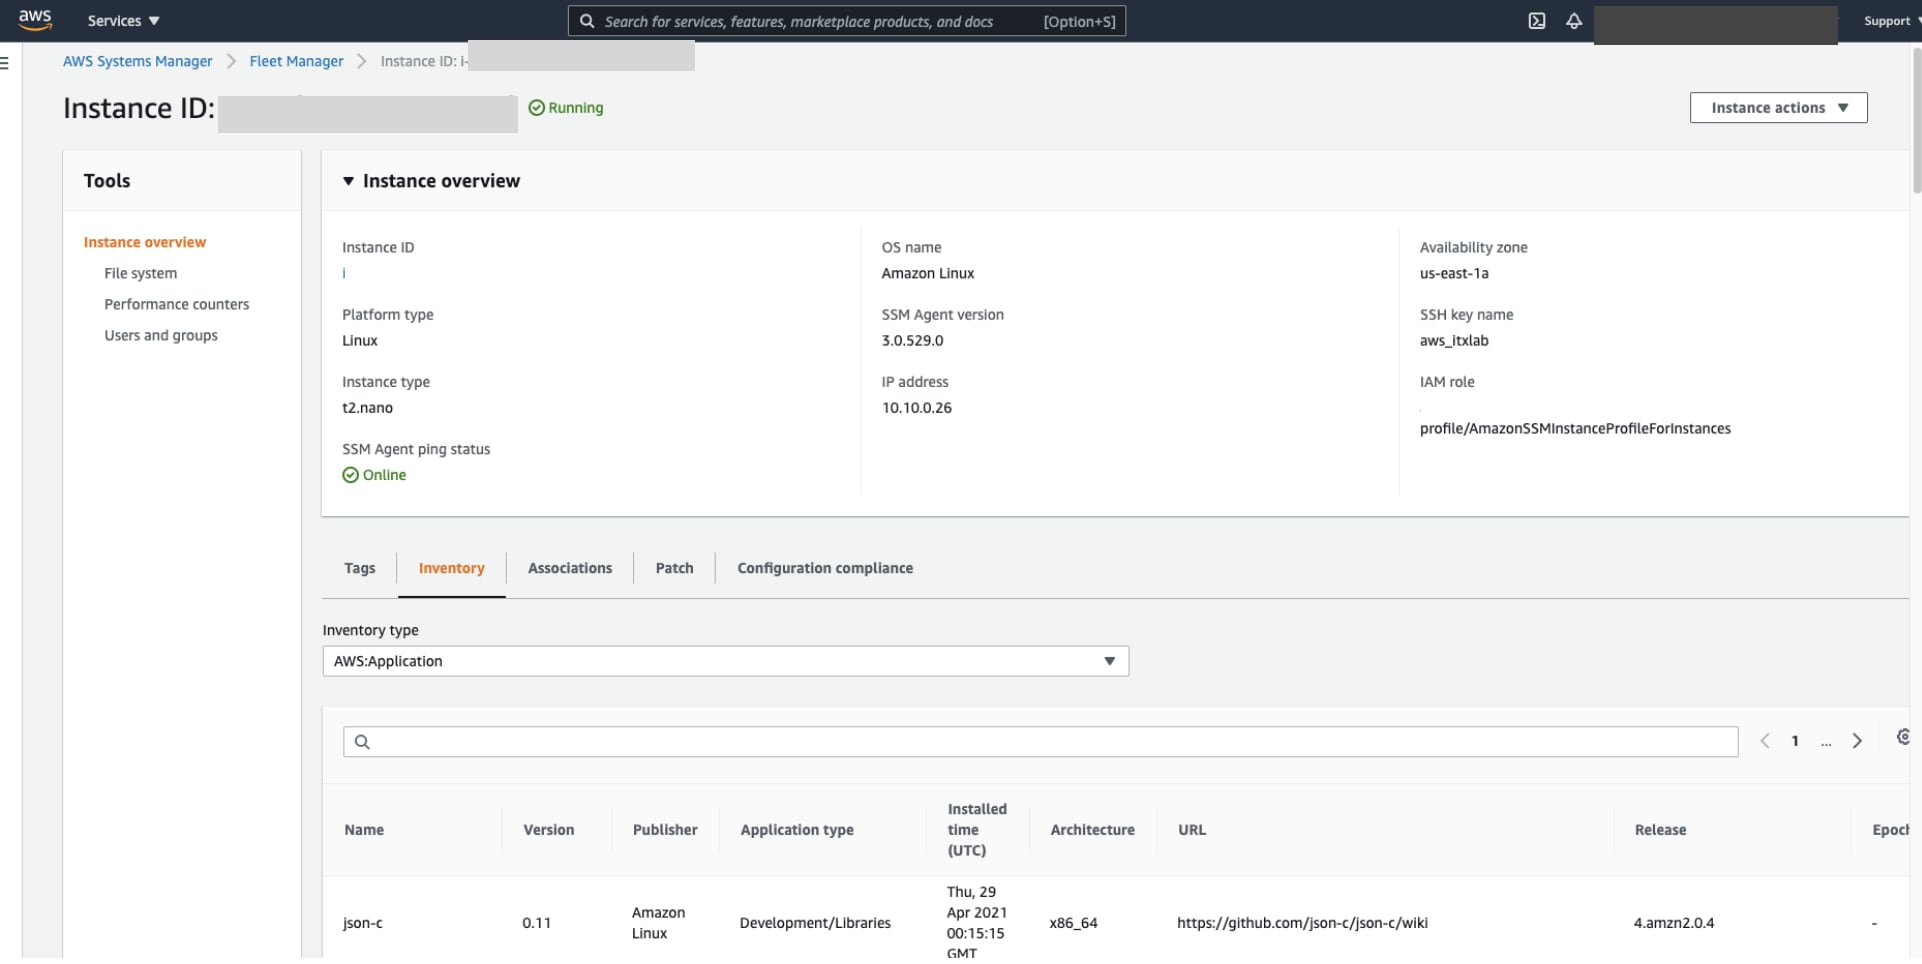
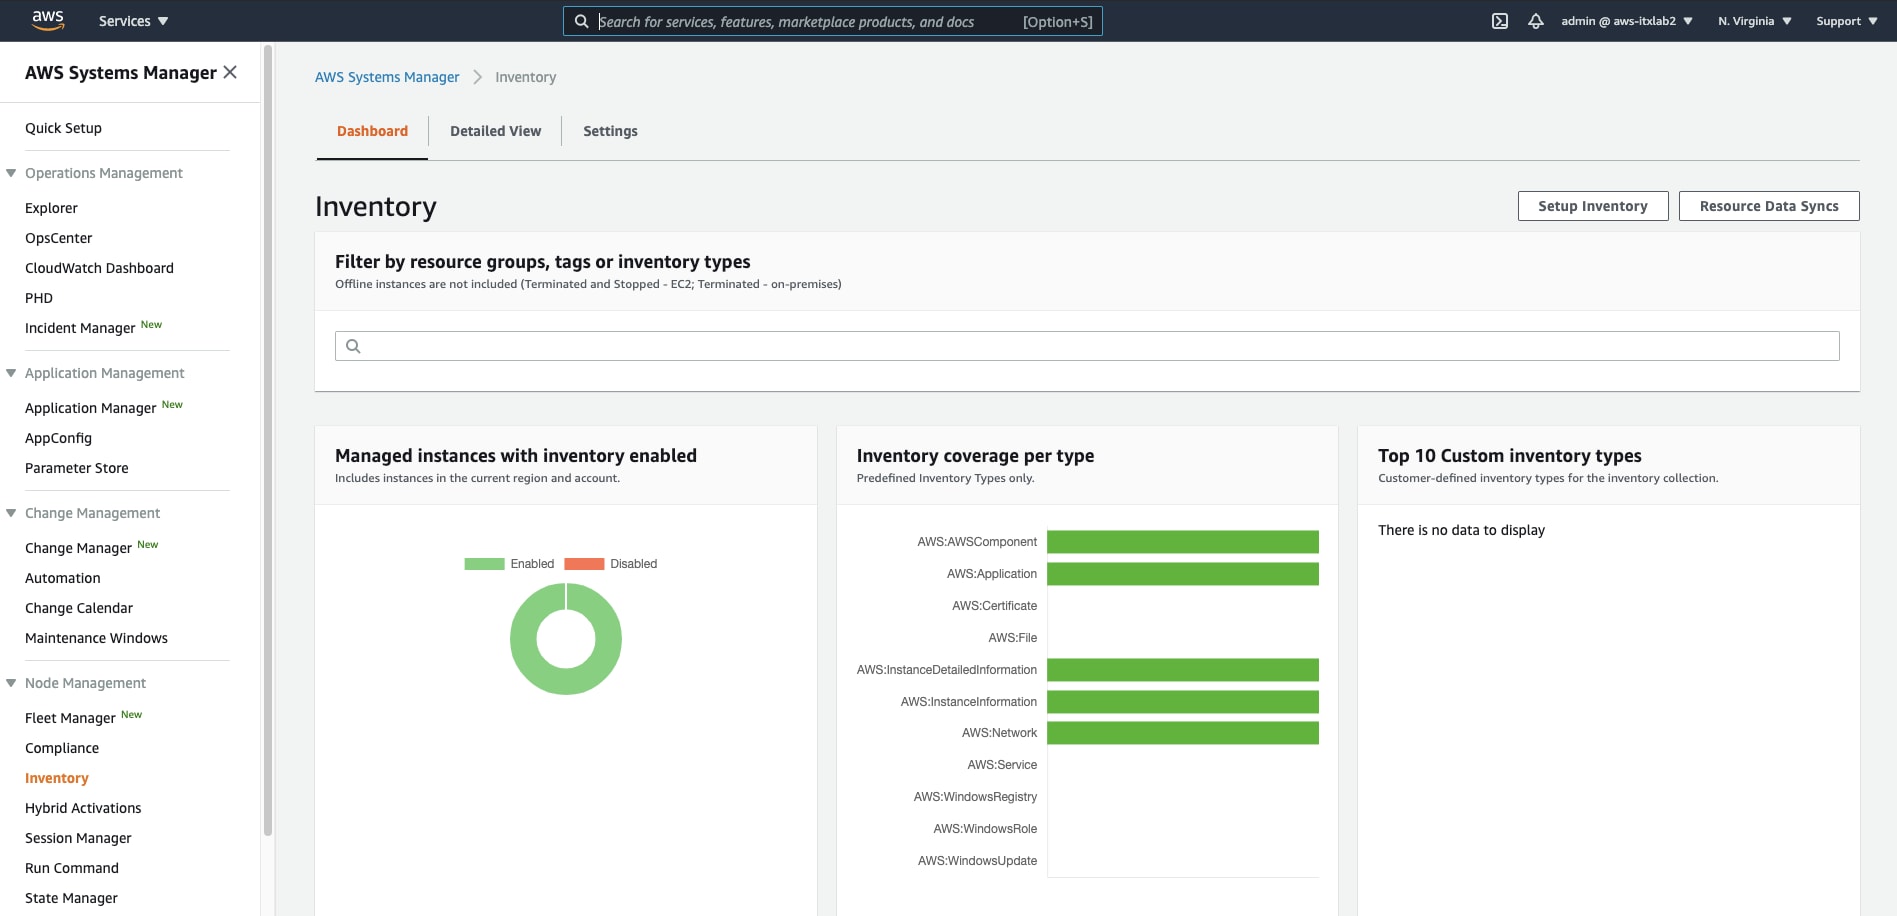
Inventory Dashboard:

Note: To view the Inventory dashboard, we need to have the EC2 instance(s) created in the region or else it will show up on the 'Setup Inventory' page.
The figure below screenshot displays the Inventory list for an EC2 instance.

AWS Systems Manager for getting EC2 System Information (aka. Deep Discovery):
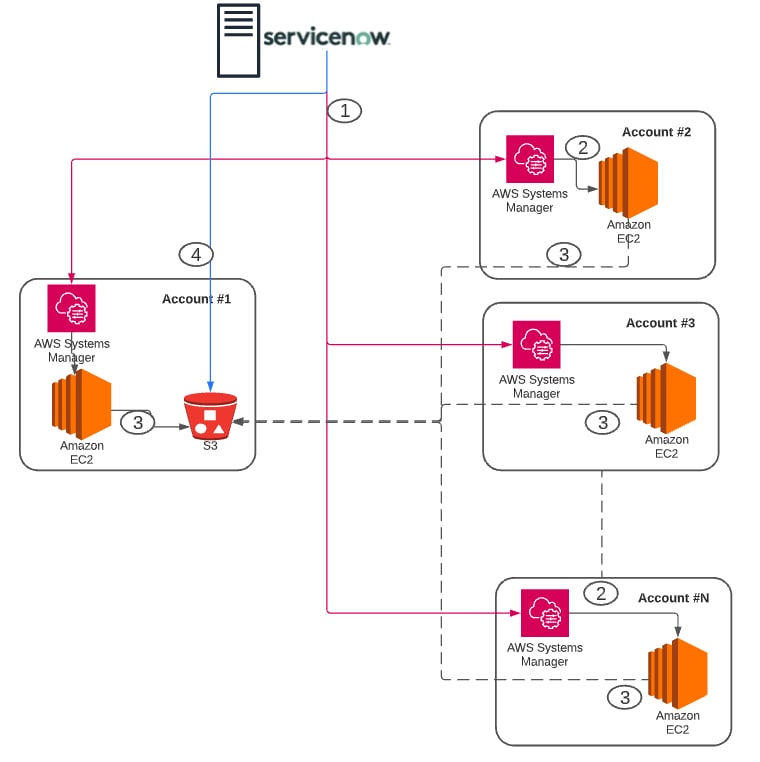
Currently, there is no AWS API available to provide hardware deep discovery details such as serial number, RAM, hard disk, TCP connections, and process information. However, we can obtain this information by executing OS-specific commands. AWS Systems Manager (SSM) provides the SendCommand API, which allows us to execute the OS-specific commands. The terminal output is collected in an S3 bucket, and SGC-AWS parses the output and populates the CMDB CI. At a high level, the flow to execute commands and get the data into the CMDB is as follows:
- SG-AWS makes the SSM SendCommand API call to execute a custom SSM document defined by SG-AWS.
- SSM executes a custom SSM document script in an EC2 instance.
- EC2 executes the command and publishes the output into the common/centralized S3 bucket.
- SG-AWS then invokes files generated in S3 bucket and parse the command output and populates the relevant CMDB data. SG-AWS then deletes the files in S3 and completes the process.

Security Risk and Mitigation:
1. Malicious Command Execution:
The SendCommand API executes SSM document scripts, which take inputs from the API request body. There are pre-existing documents available for Windows (AWS-RunPowerShellScript) and Linux (AWS-RunShellScript), which take commands as inputs and execute them in an EC2 instance. However, these documents can pose serious security risks, such as shutting down an instance or killing a process. To mitigate these risks, we have created a custom SSM document that does not take any input parameters and executes predefined commands, as discussed in later sections.
2. S3 Bucket Access:
The output of the terminal is large, and the API response truncates it halfway. Hence, we collect the output in an S3 bucket to make the setup easier. We request you to create one S3 bucket for this feature, where the ServiceNow user will have the privileges to read and delete files once the process is completed. It is recommended to create an S3 bucket specifically for the SG-AWS application and allow the ServiceNow user to have access to this bucket in the organization.
To enhance security in the AWS environment, the ServiceNow user will need access to the following SSM documents (SG-AWS-RunShellScript, SG-AWS-RunPowerShellScript) and specific S3 bucket. The IAM policies defined later in the sections will describe the policy to be set.
Setup Instructions:
- Create S3 bucket.
- Target S3 bucket policy.
- Attach IAM permissions to EC2 instance to publish command output to S3 bucket.
- Setup SSM Documents - Windows (AWS-RunPowerShellScript) & Linux (AWS-RunShellScript).
- Add additional SSM, S3 IAM permissions to the ServiceNow user.
1.Create S3 bucket
Create S3 bucket in the account region you want with the permissions listed below:
| Permissions overview | |
| Access | Bucket and objects not public |
| Block public access (bucket settings) | Block all public access |
| Bucket policy | See next section |
2. Target S3 bucket policy
The target S3 bucket must allow the instance profile role, which is attached to the managed EC2 instance, to access the bucket. You can either create a bucket policy or grant access to the source AWS account in the bucket access control list (ACL).
Warning: Creating a bucket policy is a security best practice. Adding the source AWS account to the bucket ACL allows all users and roles in the source AWS account to access the S3 bucket.
The following is an example of a bucket policy for the target S3 bucket. The bucket policy needs to be repeated for each account, as described in the example:
- Replace DOC-EXAMPLE-BUCKET with the S3 bucket name in the target account. Make sure, you have '/*' after the bucket name.
- Replace SOURCE-AWS-ACCOUNT with the source AWS account ID.
- Replace INSTANCE-PROFILE-ROLE-NAME with the IAM instance profile that is attached to the EC2 instance.
Template:
{
    "Version": "2012-10-17",
    "Id": "Policy1589684413780",
    "Statement": [
        {
            "Sid": "Stmt1589684412557",
            "Effect": "Allow",
            "Principal": {
                "AWS": "arn:aws:iam::SOURCE-AWS-ACCOUNT:role/INSTANCE-PROFILE-ROLE-NAME"
            },
            "Action": [
                "s3:GetObject",
                "s3:PutObject",
                "s3:PutObjectAcl"
            ],
            "Resource": "arn:aws:s3:::DOC-EXAMPLE-BUCKET/*"
        }
    ]
}
Example:
{
    "Version": "2012-10-17",
    "Id": "Policy123456789000",
    "Statement": [
        {
            "Sid": "EC2S3Access",
            "Effect": "Allow",
            "Principal": {
                "AWS": [
                    "arn:aws:iam::123456789000:role/AmazonSSMRoleForInstances",
                    "arn:aws:iam::123456789001:role/AmazonSSMRoleForInstances",
                    "arn:aws:iam::123456789002:role/AmazonSSMRoleForInstances",
                    "arn:aws:iam::123456789003:role/AmazonSSMRoleForInstances",
                    "arn:aws:iam::123456789004:role/AmazonSSMRoleForInstances"
                ]
            },
            "Action": [
                "s3:GetObject",
                "s3:PutObject",
                "s3:PutObjectAcl"
            ],
            "Resource": "arn:aws:s3:::myS3Bucket/*"
        }
    ]
}
Reference: https://aws.amazon.com/premiumsupport/knowledge-center/ssm-output-s3-other-account/
3. Attach IAM permissions to instance profile for EC2 instance to publish command output to S3 bucket
In the AWS Systems Manager setup, we created the 'AmazonSSMForInstancesRole' role and attached it to each EC2 instance to get software information. You need to attach the below policy to the existing instance profile. The AmazonSSMForInstancesRoleSetup.yml script has the update.
The IAM instance profile role attached to your managed Amazon Elastic Compute Cloud (Amazon EC2) instance must have the following actions in place to allow access to the S3 bucket. Replace DOC-EXAMPLE-BUCKET with the S3 bucket name in the target account.
For the AWS Systems Manager setup, we created the 'AmazonSSMForInstancesRole' role and attached it to each EC2 instance to retrieve software information. You need to attach the policy below to the existing instance profile. The AmazonSSMForInstancesRoleSetup.yml script has the update.
The IAM instance profile role attached to your managed Amazon Elastic Compute Cloud (Amazon EC2) instance must have the following actions in place to grant access to the S3 bucket. Replace DOC-EXAMPLE-BUCKET with the actual S3 bucket name in the target account.
{
    "Version": "2012-10-17",
    "Statement": [
        {
            "Sid": "PublishTerminalOutputToS3",
            "Effect": "Allow",
            "Action": [
                "s3:PutObject",
                "s3:GetObject",
                "s3:PutObjectAcl"
            ],
            "Resource": "arn:aws:s3:::DOC-EXAMPLE-BUCKET/*"
        }
    ]
}
4. Setup SSM Documents:
The SG-AWS application will use the SendCommand API to invoke the SG-AWS-RunShellScript and SG-AWS-RunPowerShellScript scripts for Linux-based and Windows-based instances, respectively. SSM Documents were introduced in version 1.4.2, and we will continue to add more features over time. Depending on the version you download, you will receive appropriate attributes in the system.
Using SSM SendCommand, you can obtain the following OS-level details:
| # | Attribute | Available from SG AWS Version | CMDB CI |
| 1 | Serial Number | 1.4.2 | cmdb_ci_server.serial_number |
| 2 | Running Process | 1.4.2 | cmdb_running_process |
| 3 | TCP | 1.4.2 | cmdb_tcp |
| 4 | CPU Model | 1.5 | cmdb_ci_server.model_id |
| 6 | Disk Space | 1.5 | cmdb_ci_server.disk_space |
| 7 | Manufacturer | 1.5 | cmdb_ci_server.manufacturer |
| 8 | CPU Speed | 1.5 | cmdb_ci_server.cpu_speed |
| 9 | RAM | 1.5 | cmdb_ci_server.ram |
| 10 | CPU Manufacturer | 1.5 | cmdb_ci_server.cpu_manufacturer |
| 11 | CPU Type | 1.5 | cmdb_ci_server.cpu_type |
| 12 | CPU core count | 1.5 | cmdb_ci_server.cpu_core_count |
Also the SSM SendCommand brings the TCP, Running Process
TCP (cmdb_tcp)
| # | Attribute |
| 1 | Type |
| 2 | IP |
| 3 | Port |
| 4 | PID |
| 6 | Process |
Running Process (cmdb_running_process)
| # | Attribute |
| 1 | PID |
| 2 | Name |
| 3 | Command |
| 4 | Parameters |
| 6 | PPID |
| 7 | Parent |
This article provides detailed information about the various versions of SSM documents used in this application.
Note:
This setup is optional. If you need to import serial numbers, TCP connections, and process information in an EC2 instance, then this setup is required. This setup depends on SSM enablement, and you need to follow the steps described in the 'AWS Systems Manager Setup' section.
5. SSM, S3 IAM permissions to the ServiceNow user:
{
 "Action": [
     "ssm:SendCommand"
  ],
 "Resource": [
    "arn:aws:ec2:*:*:instance/*",
    "arn:aws:ssm:*:*:document/SG-AWS-RunShellScript",
    "arn:aws:ssm:*:*:document/SG-AWS-RunPowerShellScript"
 ],
 "Effect": "Allow",
 "Sid": "SendCommandAccess"
}
The output from the TCP/Running process terminal is published in an S3 bucket. This bucket must be accessed by a ServiceNow user in order to read and populate CIs. When the process is finished, we delete the file from the S3 bucket because it is no longer referenced. We require read and delete access to the S3 bucket in order to complete these processes. As a result, we are asking you to create a separate S3 bucket to which only the ServiceNow user will have access.
{
 "Action": [
    "s3:GetObject",
    "s3:GetBucketLocation",
    "s3:ListBucket",
    "s3:DeleteObject"
 ],
 "Resource":
   "arn:aws:s3:::myBucket/*"
 ],
 "Effect": "Allow",
 "Sid": "S3BucketAccess"
}
These IAM positions have been consolidated into a single role, which is covered in the next section.
Legal Disclaimer: S3 Bucket costs
The feature uses an S3 bucket to collect the terminal output in a central location. SSM SendCommand captures the output in the S3 bucket, and the SG-AWS application reads and deletes the file immediately. There is a cost associated with the files created in the S3 bucket. Depending on the number of EC2 instances running in the organization and the size of the terminal output, the monthly cost will vary. For more information on pricing, please visit the AWS S3 Pricing page.
AWS Identity and Access Management (IAM)
The AWS IAM provides fine-grained access control to each component. We need two sets of permissions for integrating the Service Graph connector and AWS:
- Admin user: The admin user performs the setup of various components in AWS and may require additional privileges apart from the standard Administration Access role.
- ServiceNow user: The ServiceNow user will have limited privileges to invoke AWS API and import CI information into the CMDB.
Admin User:
An admin user who has the AdministratorAccess policy assigned has privileges to execute the CloudFormation scripts to set up the AWS Config. Additionally, to set up the AWS Systems Manager Inventory from a management account, the admin needs the AWS-SystemsManager-AutomationAdministrationRole and AWS-SystemsManager-AutomationExecutionRole roles.
ServiceNow User IAM Privileges:
To import CI information from a client's AWS account, a ServiceNow user needs to be created in the management account. User credentials (Access Key and Secret key) are entered in the ServiceNow instance to integrate with AWS accounts. We will execute CloudFormation templates in member and management accounts for us to integrate with all the accounts.
The OrganizationAccountAccessRole IAM role is created when an account is created from an organization. This is an admin role that helps a user with a management account to hop into a member account and perform administrative operations. However, if the account is created externally and was later added to the organization, the OrganizationAccountAccessRole is not created by default.
If the organization is okay using the OrganizationAccountAccessRole, and the role is present in all accounts, then skip executing CreateSnowOrganizationAccountAccessRoleInMemberAccount.yml.
Alternatively, if an organization is concerned about security or the OrganizationAccountAccessRole is not present in all accounts, then you can execute the CF Template:
CreateSnowOrganizationAccountAccessRoleInMemberAccount.yml. This template has limited read-only access. It creates the following IAM role: SnowOrganizationAccountAccessRole, and SnowOrganizationAccountAccessPolicy policy.
In a typical setup, member accounts are either created from the organization or an account created externally later added to the organization. The OrganizationAccountAccessRole IAM role is created when an account is created from an organization. This is an admin role that helps users with a management account to hop into a member account and perform administrative operations. However, if the account is created externally and was later added to the organization, the OrganizationAccountAccessRole is not created by default. In this case, we will be using the SnowOrganizationAccountAccessRole, which will have limited read-only access. You can also have your own role name as per enterprise standards. This role name is required while setting up guided setup for SG-AWS.
{
    "Version": "2012-10-17",
    "Statement": [
        {
            "Action": [
                "organizations:DescribeOrganization",
                "organizations:ListAccounts",
                "organizations:ListRoots",
                "organizations:ListAccountsForParent",
                "organizations:ListOrganizationalUnitsForParent",
                "organizations:DescribeOrganizationalUnit",
                "organizations:ListTagsForResource"
            ],
            "Resource": "*",
            "Effect": "Allow",
            "Sid": "ReadOnly_Access_In_Org_Account"
        },
        {
            "Action": [
                "config:ListDiscoveredResources",
                "config:SelectResourceConfig",
                "config:BatchGetResourceConfig"
            ],
            "Resource": "*",
            "Effect": "Allow",
            "Sid": "ReadOnlyAccess_For_Config_In_Each_Account"
        },
        {
            "Action": [
                "config:DescribeConfigurationAggregators",
                "config:SelectAggregateResourceConfig",
                "config:BatchGetAggregateResourceConfig"
            ],
            "Resource": "*",
            "Effect": "Allow",
            "Sid": "ReadOnly_Access_For_Config_In_Account_Config_Aggregator_is_defined"
        },
        {
            "Action": [
                "ec2:DescribeRegions",
                "ec2:DescribeImages",
                "ec2:DescribeInstances",
                "ec2:DescribeInstanceTypes"
            ],
            "Resource": "*",
            "Effect": "Allow",
            "Sid": "Read_Only_Access_In_Account_Where_ServiceNow_User_Is_Created"
        },
        {
            "Action": [
                "tag:GetResources"
            ],
            "Resource": "*",
            "Effect": "Allow",
            "Sid": "ServiceNowUserReadOnlyAccessTag"
        },
        {
            "Action": [
                "iam:CreateAccessKey",
                "iam:DeleteAccessKey"
            ],
            "Resource": [
                "arn:aws:iam::<ACCOUNT_ID>:user/<SERVICENOW_USER_NAME>"
            ],
            "Effect": "Allow",
            "Sid": "ReadWriteAccessToRotateIAMAccessKeys_Optional_Setup"
        },
        {
            "Action": [
                "ssm:SendCommand"
            ],
            "Resource": [
                "arn:aws:ec2:*:<ACCOUNT_ID>:instance/*",
                "arn:aws:ssm:*:<ACCOUNT_ID>:document/SG-AWS*"
            ],
            "Effect": "Allow",
            "Sid": "SSM_SendCommand_Access_To_Get_Deep_Discovery_Details_Optional_setup"
        },
        {
            "Action": [
                "s3:GetObject",
                "s3:GetBucketLocation",
                "s3:ListBucket",
                "s3:DeleteObject"
            ],
            "Resource": [
                "arn:aws:s3:::<BUCKET_NAME>/*",
                "arn:aws:s3:::<BUCKET_NAME>"
            ],
            "Effect": "Allow",
            "Sid": "ServiceNow_S3_Bucket_Access_Needed_In_Account_Where_S3_Bucket_Is_Defined"
        }
    ]
}
If you want to customize the roles, you can refer to the FAQ article.
Some companies place organization level AWS service control policies to restrict member accounts to make specific API calls. You need to talk to your corporate security operations team to whitelist (Allow) the member accounts.Below is an example:

ServiceNow User Creation
The ServiceNow user is created in either a management (organization) account or designated member account with limited privileges. The CFT scripts, which are part of this section, need to be executed based on the use case scenario. CreateServiceNowUser.yml is executed with any of the options you choose.
ServiceNow user created in a Management (Organization) Account
- The ServiceNow user will pull the organization details, list of accounts, and list of regions in the management account.
- A trust is established between the management account and all member accounts using the CreateSnowOrganizationAccountAccessRoleInMemberAccount.yml script.
- With this trust, the ServiceNow user will be able to assume the role to get CI information from all member accounts.

In the figure above, the ServiceNow user is created in a management account. The ServiceNow user will hop into all member accounts with STS Assume role access and pull in CI information.
ServiceNow user created in Designated Member Account
- Some organizations prefer to create users in a designated account for security reasons.
- To enable the ServiceNow user to pull the organization details, list of accounts, and list of regions in the management account, we need to establish trust between the designated member account and the management account.
- Similarly, a trust is established between a designated member account and all other member accounts to enable the ServiceNow user to get CI information from all member accounts using the CreateSnowOrganizationAccountAccessRoleInMemberAccount.yml script.
- To establish trust between a designated member account and management account, you need to execute SnowDesignatedAccountAccessRoleInManagementAccount.yml in the management account and then add the designated member account ID into the script.

In the above figure, the ServiceNow user is created in a designated (non-management) account and can access management and other member accounts through STS Assume role to retrieve CI information.
ServiceNow User's SnowAccountAccessPolicy:
The following IAM permissions are required for a ServiceNow user where it is created. These roles are packaged as part of CreateServiceNowUser.yml with the policy SnowAccountAccessPolicy. If you need AWS Key rotation feature, then make sure 'iam:CreateAccessKey' and 'iam:DeleteAccessKey' permissions are assigned in the policy.
- ec2:DescribeImages
- ec2:DescribeRegions
- ec2:DescribeInstances
- ec2:DescribeInstanceTypes
- organizations:DescribeOrganization
- organizations:ListAccounts
- iam:CreateAccessKey*
- iam:DeleteAccessKey*
* - Optional permissions required if you activate AWS Key rotation
SnowAccountAccessPolicy:
 {
    "Statement": [
        {
            "Action": [
                "ec2:DescribeImages",
                "ec2:DescribeRegions",
                "ec2:DescribeInstances",
                "ec2:DescribeInstanceTypes",
                "organizations:DescribeOrganization",
                "organizations:ListAccounts",
                "iam:CreateAccessKey",
                "iam:DeleteAccessKey"
            ],
            "Resource": "*",
            "Effect": "Allow",
            "Sid": "ServiceNowUserReadOnlyAccess"
        }
    ]
}
Performance:
For optimal performance, AWS APIs have TPS limits to serve all clients, with specific limits for each API. When these limits are exceeded, AWS throws a Throttling Error. In SG-AWS, we will retry and get the response in the next second. However, with hundreds of accounts and thousands of API calls, this can significantly impact performance.
To enhance performance of the integration, we recommend raising a support ticket to increase the TPS limits for the following APIs:
- https://config.[aws_region].amazonaws.com - Config Service
- https://sts.amazonaws.com - IAM (Identity and Access Management)
- https://ssm.[aws_region].amazonaws.com/ - Systems Manager
- https://tagging.[aws_region].amazonaws.com - Tags
- https://ec2.[aws_region].amazonaws.com - Elastic Cloud Computing
- https://dynamodb.[aws_region].amazonaws.com - DynamoDB
- https://s3.[aws_region].amazonaws.com - Amazon Simple Storage Service (S3)
Related Articles:
SGC-AWS - Release 2.0 Features
Service Graph Connector for AWS - Functional Spec and CI Details
Service Graph Connector for AWS - Diagnostic Tool
ServiceGraph AWS Connector - Using MID Server
Service Graph Connector for AWS - FAQ
Service Graph Connector for AWS - SSM Documents
Service Graph Connector for AWS - Amazon EKS Integration (KB1437138)
Related KBs:
SGC-AWS Setup Instructions (KB: KB1220597)
Presentations:
Beers with Engineers on SGC-AWS
Beers with Engineers on SGC-AWS 2.0
- 197,132 Views
- Mark as Read
- Mark as New
- Bookmark
- Permalink
- Report Inappropriate Content
Using the Service Graph connector AWS, can I perform discovery of AWS accounts by separating them by environment? For example: Prod, Dev and Homl?
Tranks
Jose
- Mark as Read
- Mark as New
- Bookmark
- Permalink
- Report Inappropriate Content
@Jose_nery No, its not possible.
- Mark as Read
- Mark as New
- Bookmark
- Permalink
- Report Inappropriate Content
Reducing AWS Config Costs: Key Considerations
-
Retention Period
• AWS Config defaults to a 7-year data retention period, which significantly impacts S3 storage costs.
• Reducing the retention period can lead to substantial cost savings. -
Account Scope
• If you manage 2,000 AWS accounts but only need to monitor 1,000 production accounts, limit AWS Config to those production accounts only. -
Resource Coverage
• Enabling AWS Config across all resource types can be expensive.
• Instead, selectively enable it only for the resource types relevant to your monitoring and compliance needs. -
Regional Scope
• If your organization uses AWS resources in only a few regions, configure AWS Config just in those specific regions to avoid unnecessary cost overhead.
Hope this helps.
Thanks,
Murali
- Mark as Read
- Mark as New
- Bookmark
- Permalink
- Report Inappropriate Content
Hi @Murali Reddy1
When we want to use the AWS with SGC using a MID Server, and have configured the Connection alias in the Setup guide,

do we still need to apply the following instructions below ?
ServiceGraph AWS Connector - Using MID Server
- Mark as Read
- Mark as New
- Bookmark
- Permalink
- Report Inappropriate Content
Hi @Murali Reddy1 - We have configured the AWS SGC and it is working as expected for pulling the data into SN CMDB but it is not updating the status of the Server records according when the respective Server/EC2 is terminated on AWS end, all the required configurations are in place w.r.t AWS platform, do I need to modify any reconciliation rules for allowing the AWS discovery source to update? Anyone facing similar issues? please let me know how to tackle this situation.
Thanks
Naveen Reddy
- Mark as Read
- Mark as New
- Bookmark
- Permalink
- Report Inappropriate Content
@Community Alums If there are no custom modifications to the CMDB BR/IRE and AWS is properly configured, then everything should work as expected. Please raise a case for the team to investigate.
- Mark as Read
- Mark as New
- Bookmark
- Permalink
- Report Inappropriate Content
can we store the access key and secret key in CyberArk for the service graph integration instead of storing it in servicenow?
- Mark as Read
- Mark as New
- Bookmark
- Permalink
- Report Inappropriate Content
@Ravish Shetty We haven't done this type of integration. Probably you can raise a feature request for our PM to take on.
- Mark as Read
- Mark as New
- Bookmark
- Permalink
- Report Inappropriate Content
Hello @Murali Reddy1 ,
We are currently setting up the AWS Service Graph Connector (SGC) and have requested the AWS team to provision an S3 bucket for Deep Discovery.
Since our AWS environment spans multiple regions and S3 buckets are region-specific, we would like clarification on the recommended approach:
- Do we need to create a separate S3 bucket in each region?
- If yes, should we also configure multiple SGC integrations corresponding to each region?
Additionally, we would like to understand whether setting up an S3 bucket is mandatory for Deep Discovery. From our understanding, the S3 bucket is primarily used as a storage layer for data collected via SSM agents. Could you confirm if the S3 bucket is required for discovery, or if there are alternative approaches?
Any insights or best practices would be greatly appreciated.
- Mark as Read
- Mark as New
- Bookmark
- Permalink
- Report Inappropriate Content
Deep Discovery is an optional feature, as described in the Setup Instructions KB. This capability provides additional VM-level details such as serial numbers, running processes, TCP connections, and related information.
If your requirement is to capture and populate these additional details in the CMDB, then enabling and configuring this feature would be necessary.
The overall goal of the simplified setup approach is to use a single S3 bucket across the AWS organization in all accounts and regions. As mentioned in this article, the output generated by the SSM commands must be captured in the S3 bucket so it can be processed for Deep Discovery data collection.
Hope this helps clarify the setup and purpose of the feature. Please let us know if you have any additional questions or need further assistance.
Thanks,
Murali
- Mark as Read
- Mark as New
- Bookmark
- Permalink
- Report Inappropriate Content
Hi Murali,
I wonder if you can help describe how software inventory is pulled in a bit better. The setup details make it appear that software inventory as extracted by SSM/AWS Config is being pulled from the S3 bucket, but I only see the deep discovery data coming from the S3 bucket. Software inventory is being retrieved by the StarlingDoveService.BatchGetAggregateResourceConfig and I don't see any mechanism to tell the SGC-AWS to get this data from the S3 bucket even if we had the Config Aggregator setup to move the software inventory to the S3 bucket.
We have a support ticket opened on this subject because we are only getting 249 EC2's software inventory records being returned by the BatchGetAggregateResourceConfig query when we have over 3k active EC2 instances. Support still believes SGC-AWS should be getting this data from the S3 but the SSM-GetS3Object appears to only return the deep discovery data like serial numbers, TCP ports and process lists but not any software inventory records.
Support suggested we were using the wrong name for the SSM send command (SGC-AWS-RunShellScript) but when viewing that script it only sends commands for deep discovery. That and the documentation is a bit confusing to our AWS admin team. Is the Config Aggregator really the source for software inventory? Does the fact we get records for only 249 servers indicate they don't have AWS Config setup properly?
Thanks,
Don
- Mark as Read
- Mark as New
- Bookmark
- Permalink
- Report Inappropriate Content
Hello @dsg ,
To get Software information, SGC-AWS need you to have AWS Config enabled in the account region & SSM setup done. We invoke AWS Config API to get the software data.
How to Validate Software Information Availability in AWS Config for ServiceNow SGC-AWS
The Service Graph Connector for AWS (SGC-AWS) uses two key AWS services to bring data into the ServiceNow CMDB: AWS Config for hardware CI information and AWS Systems Manager (SSM) for software inventory.
Step 1 — Understand the Source: AWS Config vs. SSM
Before validating, it's important to set expectations. AWS Config handles hardware CIs (EC2 instances, VPCs, etc.), but software installed information requires AWS Systems Manager (SSM) Inventory — not AWS Config alone. The two work together, and this guide validates the full chain.
Step 2 — Verify the SSM Agent is Installed on the EC2 Instance
Before any SSM functionality can work, the SSM Agent must be running on the EC2 instance itself. To verify:
- Connect to your EC2 instance and run the appropriate command:
Linux:
sudo systemctl status amazon-ssm-agent
Windows:
Get-Service AmazonSSMAgent
- The agent status should show as running. If it is not running, install or restart it using the AWS SSM Agent installation guide.
- You can also verify from the AWS Console by going to Systems Manager → Fleet Manager — managed and online instances will appear here if the agent is running correctly.
Step 3 — Verify the Instance Profile and AmazonSSMManagedInstanceCore Policy are Attached
The AmazonSSMManagedInstanceCore policy must be attached as an instance profile on each EC2 instance.
Step 4 — Confirm the AmazonSSMRoleForInstances is Attached
By default, AWS Systems Manager has no permission to act on your instances. You need to explicitly grant access by attaching the AmazonSSMRoleForInstances IAM instance profile to each EC2 instance.
Step 5 — Confirm SSM Inventory is Configured in the Region
SSM Inventory must be set up per region. To check:
- Navigate to AWS Systems Manager → Inventory
- If configured correctly, you will land on the Inventory Dashboard showing instances and their software data
- If not yet configured, you will land on the Setup Inventory page instead
Note: The Inventory Dashboard only appears if EC2 instances exist in that region.
Step 6 — Validate Software Data is Visible in the SSM Inventory Dashboard
Navigate to AWS Systems Manager → Inventory → Select an EC2 instance and inspect the inventory list. You should see installed software entries for that instance, covering applications, files, network configurations, Windows services, registries, server roles, and updates.
If software entries are visible here, SSM is successfully collecting inventory data from the instance.
Step 7 — Check AWS Config for SSM Managed Instance Inventory
This is the critical step that bridges SSM and AWS Config. In the AWS Console:
- Go to AWS Config → Resources
- Filter by resource type:
AWS::SSM::ManagedInstanceInventory
This will show the list of EC2 instances for which AWS Config is receiving SSM inventory details. If an instance appears here, it confirms that software inventory data is being collected by SSM and is visible to AWS Config — and the data should flow through into the ServiceNow CMDB.
If an instance is not listed here, revisit Steps 2–5 to ensure SSM is correctly configured for that instance.
Step 8 — Check for IRE Rule Customizations Affecting Software Inventory Tables
If all the above steps check out but data is still not appearing correctly in the CMDB, the issue may lie within the Identification and Reconciliation Engine (IRE). If any IRE rules have been customized for software inventory-related tables (such as cmdb_sam_sw_install), there is a chance records are landing in partial payloads rather than being committed to the CMDB.
The ServiceNow support team should be able to identify and diagnose partial payload issues by inspecting the IRE partial payload logs for the relevant tables.
Summary
| Step | What to Check | Where |
|---|---|---|
| 1 | Confirm SSM is the software data source, not Config alone | Conceptual |
| 2 | SSM Agent is installed and running on EC2 | EC2 terminal / SSM Fleet Manager |
| 3 | AmazonSSMManagedInstanceCore policy attached to EC2 |
EC2 Console → IAM Role |
| 4 | AmazonSSMRoleForInstances attached to EC2 |
EC2 Console → Instance Details |
| 5 | SSM Inventory configured per region | SSM Console → Inventory |
| 6 | Software entries visible in SSM Inventory Dashboard | SSM Console → Inventory → Instance |
| 7 | AWS::SSM::ManagedInstanceInventory visible in AWS Config |
AWS Config → Resources |
| 8 | No IRE customizations causing partial payloads | ServiceNow Support / IRE Logs |
Hope this helps. Let me know if you have questions.
Thanks,
Murali
- « Previous
-
- 1
- 2
- Next »