
Chuck Tomasi
Tera Patron
Options
- Subscribe to RSS Feed
- Mark as New
- Mark as Read
- Bookmark
- Subscribe
- Printer Friendly Page
- Report Inappropriate Content
11-30-2011
02:44 PM

Here's what we're after:

Step 1 is to define a UI Macro to hold your message. UI Macros are XML that include Jelly script. Don't worry, there's a great series on Jelly on SlightlyLoony's blog. For this example, I promise to keep this simple.
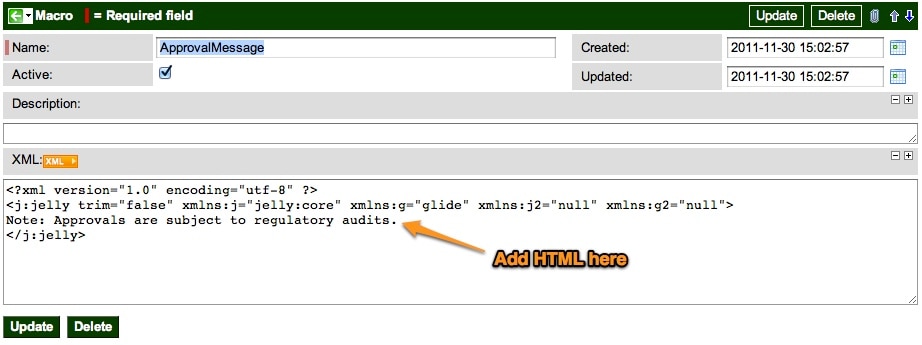
Begin by going to System UI> UI Macros. Click the "New" button to create a new UI Macro. The form will already have the basic framework filled in for you. I'm just going to add a little text. You can also add HTML if you like. My exmaple is as follows:
Name: ApprovalMessage
Active: true
Created: (auto populated)
Updated: (auto populated)
Description: (your call - I like to indicate where it's used)
XML:
<?xml version="1.0" encoding="utf-8" ?>
<j:jelly trim="false" xmlns:j="jelly:core" xmlns:g="glide" xmlns:j2="null" xmlns:g2="null">
Note: Approvals are subject to regulatory audits.
</j:jelly>
The result should look something like this:

Make a note of the UI Macro name. You'll need it in a bit. Also note that I intentionally named it more like a variable (no spaces).
"Hey Chuck, that message is always going to be in English. My organization requires multilingual capabilities." Never fear, just go to System UI> Messages and create a new record with a unique key (ex: approval_audit_message), select the language, and put in the text.

Next, go back to the UI Macro and replace the 'hard coded' text message in the UI macro with
${gs.getMessage('approval_audit_message')}
. Like this:
<?xml version="1.0" encoding="utf-8" ?>
<j:jelly trim="false" xmlns:j="jelly:core" xmlns:g="glide" xmlns:j2="null" xmlns:g2="null">
${gs.getMessage('approval_audit_message')}
</j:jelly>
Add more entries in the Message list with the same key for the other languages you support.
Step 2, place your new UI macro on the form. If you try going to the form and personalizing the form layout in the traditional way (Right click, Personalize> Form Layout), you won't see anything representing your UI Macro. Here's how to place your custom UI Macro on the form:
- Navigate to System UI> Form Sections
- Locate your view in the list (filtering by table helps, ex: sysapproval_approver)
- Open the record
- In the Section Elements related list, create a new entry with the New button
- Fill in the form
- Element: ApprovalMessage.xml
- Position: 0
- Type: formatter
- Submit
- Update the Position on the related list to place the field relative to the other fields (I quickly renumber these using list edit.)

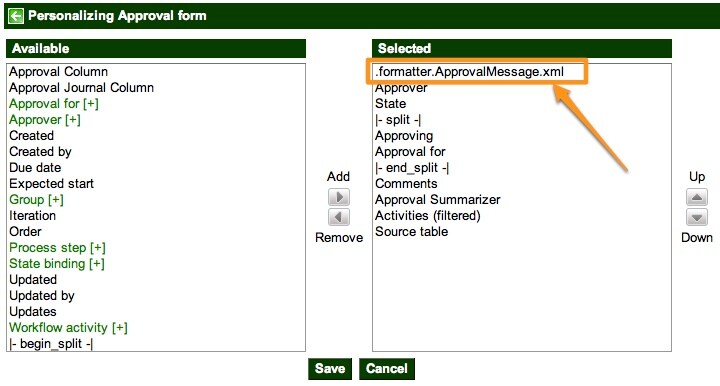
When you go back to Personalize> Form Layout screen, your custom formatter is at the top of the list. Reposition it as necessary.

Caveat: If you remove it (placing it from the Selected column to Available column) and save your new layout, you'll have to re-add it via the Forms Sections again.
Have fun providing your users with more interesting and complex forms using UI Macros!
References:
- http://wiki.service-now.com/index.php?title=UI_Macros
- http://community.service-now.com/blog/slightlyloony/jelly-deep-dive-series
Update (2017-07-12): While the functionality may be similar to annotations, these are persistent. With annotations, users can turn off annotations and the helpful text will no longer appear. Using this method, the users cannot toggle it on/off like annotations.
9 Comments
You must be a registered user to add a comment. If you've already registered, sign in. Otherwise, register and sign in.

