


aaron_dixon

ServiceNow Employee
Options
- Subscribe to RSS Feed
- Mark as New
- Mark as Read
- Bookmark
- Subscribe
- Printer Friendly Page
- Report Inappropriate Content
06-23-2016
03:17 PM
Earlier this week my colleague, Christopher Killion, and I posted a blog about the importance of working with and understanding the needs of the business. Once you have that figured out we know that as techies you want to go and configure something, so we wanted to publish another blog about how to create a custom workflow activity to make a REST call. Create custom activities is a great way to provide the business with a lot of flexibility. Once the activity is created business users can drag and drop the activity into their different workflows to follow the desired process.
Typically, we like to show something that is a rather common technology when demonstrating orchestrations. This provides several benefits such as the ability for anyone to reproduce what we've done and allows us to focus on the mechanics of building a workflow and not worry as much about the specifics of the end point that we are integrating with. In the past, I've done things like integrating with google maps to calculate the distance for a technician between his address and the requestor's address. I've also shown an integration with yahoo finance to pull back stock and other company data. I was speaking to my colleague, Zack Sargent, about this a few weeks back and he mentioned that he's been using weather underground so I decided to take a look at. Christopher and I thought that we would put together a quick how-to on this topic. I'm not sure why we decided to put this together today as I originally planned on going out for a mountain bike ride since it's my birthday today. Based on that we will call this the birthday blog. If you have any questions feel free to post on the blog or in the "ask the experts" section.
Weather underground has a well-documented api and you can find information at https://www.wunderground.com/weather/api/d/docs. One thing to note is that you will need to request an API key, but the developer key is provided at no cost. Once you have your API key you are ready to get started.
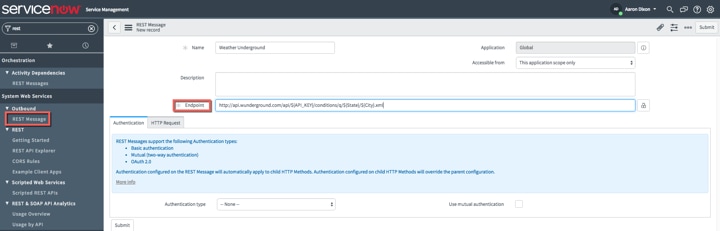
The first step is to create a REST endpoint in ServiceNow. This will allow us to define, connect and test our access to the API prior to creating our activity. Simply enter the REST endpoint and click save or submit.
One of the really nice features about the REST message setup is that once you put in the REST endpoint and click save or submit it will pull back all of the available methods. In this example, we pulled back a get, put, delete and post. For today's example we will use the get method.
ServiceNow has the ability to auto-generate the variables needed by clicking on the auto-generate variables link. Once this is done you will see variables for API_KEY, City and State. Submit sample data and select the test link. Thanks again to Zack for saving me some time and letting me know that you need to use an underscore if the city has spaces.
Once you run the test you will see the output from the REST call. This is a great way to do some initial troubleshooting to ensure that you are receiving the data that you expect.
Now that we have our REST endpoint set-up and tested we can move on to creating a custom activity that can be used with orchestration/workflow.
Open the workflow editor and create a new workflow. We prefer to select global for the table initially as that gives greater control over testing while you construct the workflow and activity.
Traditionally we've used the core activity called REST message. However, our product management and development teams have done an amazing job over the last few releases around creating custom activities. In addtion to being reuseable they are simple to create, don't require any coding and add a lot of value around mapping the outputs. I don't have a development background so this has reduced my activity creation time by about 95%! Select the custom tab, click the plus sign and then select REST Web Service.
This will now take us through a guided creation of a workflow activity.
On the inputs tab we will click the plus sign to add input variables for API_KEY, City and State and also provide some default values for testing. (The three inputs that we learned from creating the REST endpoint.)
On the execution command tab we can select the REST message and function that we previously defined.
Next select test inputs and you should see the values populated from the defaults or you can type in different values as well.

This is the area that I'm most impressed with. You will see the full response. You'll want to do two things: click save for parsing rules so that we can use that data later and click auto-map to output. The auto-map will map all of the parameters from the REST payload to output variables. On the outputs tab you will now see all of the XML data parsed in to variables.
Currently everything is mapped to the single output variable. However, if you would like to reuse individual variables it's simple to create those as well. First create a new output variable. We will call this one Temperature. Drag and drop temperature from the right had side to the parsing rules section.
This will automatically open the parsing rules feature and you can take advantage of your saved data. First select parse sample data. Now simply scroll down to the data that you would like to collect. In this case, it's the temperature (temp_f). Notice that a parsing rule is built automatically and the value is displayed in the parsing result. This makes it very easy to go and create the variables that you need to for use later in your workflow.
Now that our activity is done we can publish it for other people in the organization to use. If you need to re-use your variables in other activities simply select them from the databus. (Far right tab in the workflow editor)
We hope this has been helpful and we look forward to hearing about the activities that you create.
Blog Contributors:
Aaron Dixon
Christopher Killion
Labels:
- 7,434 Views
3 Comments
You must be a registered user to add a comment. If you've already registered, sign in. Otherwise, register and sign in.

