


richardbrounste

ServiceNow Employee
Options
- Subscribe to RSS Feed
- Mark as New
- Mark as Read
- Bookmark
- Subscribe
- Printer Friendly Page
- Report Inappropriate Content
01-24-2018
02:09 PM
There are many ways to populate the tables of the ServiceNow Configuration Management Database. Discovery, Service Mapping, REST API, JavaScript and external integrations are a few techniques that quickly come to mind. While ServiceNow Discovery and Service Mapping are the preferred ServiceNow methods to populate the CMDB, they are not the only methods. For various reasons, users may need to populate the CMDB from a custom external data source and they wish to populate it automatically. Fortunately, ServiceNow provides the facilities to do this. In this document, I want to describe the population methods of inserting multiple related CIs with an internal script and the Rest API. Before we get into that, it is important to review the CMDB Identification and Reconciliation Application.
QUICK REVIEW OF THE CMDB IDENTIFICATION AND RECONCILIATION APPLICATION
When pushing configuration item data into the CMDB, it is important to leverage the built-in Identification and Reconciliation application. This provides a centralized framework for uniquely identifying CIs and will maintain the CMDB integrity when different data sources or different insertion methods are used to create or update CIs.
This application will prevent duplicate configuration items from being inserted into the CMDB because it uniquely identifies the CIs based on one or more attributes that can be configured for each CI. Without this, any program that looks to insert/update a CI must first query the CI to see if it already exists in the database. If it does then the existing record can be updated and if not, then a new record can be inserted. Since the Geneva release, the CDMB Identification engine has a slick user interface that allows for a configurable set of attributes that can be used to uniquely identify any configuration items. This allows you to push CI data without having to worry about if the configuration item already exists. If the CI is already in the database table, then it will overwrite the data without creating a duplicate. More than that, the mechanism also automatically searches for any duplicates that might already exist for that CI class and will mark them as duplicates and they will show up on the CMDB Health Dashboard.
As for reconciliation, each CI in the cmdb_ci tables and extended tables has a field called discovery_source. This source of discovery is used to reconcile fields being inserted into CIs in the CMDB from one source with fields from another source. In the Reconciliation Definition section of ServiceNow, users can specify which fields are allowed to be written to specific CI classes and which discovery source has greater precedence. The reconciliation mechanism will enforce the rules and will prevent writing data to a CI if it is not allowed by a rule set by the administrator.
Inserting CIs with JavaScript Code
With JavaScript coding using JSON payloads, we can insert/update configuration items leveraging the internal ServiceNow function IdentificationEngineScriptableApi.createOrUpdateCI. This will ensure that any inserts or updates leverage the Identification and Reconciliation Engine. Inserting a single CI instance is simple if the CI can exist independently. This means that the CI can exist without it being related to anything else. A Hardware CI, which includes Windows, Unix, and Linux Servers are examples of this. This means I can insert any Hardware CI by itself and don't need any relations. This is configured in the Identification rules by selecting "Independent".
Here is a sample of JavaScript code that inserts an independent CI for a Windows Server. Since the serial_number is a unique identifier, it is important to specify the serial number in the JSON. Note that "ServiceNow" is specified as a parameter in the IdentificationEngineScriptableApi call so it is being designated as the discovery_source:
var server_name="Test 123";
var payload = {
"items": [{
"className": 'cmdb_ci_win_server',
"values":
{
"name": "Windows " + server_name,
"serial_number": '12345678',
"ram": "4096",
"os": "Windows 2016 Datacenter"
}
}]
}
var jsonUtil = new JSON();
var input = jsonUtil.encode(payload);
var output = SNC.IdentificationEngineScriptableApi.createOrUpdateCI ('ServiceNow', input);
gs.print (output);
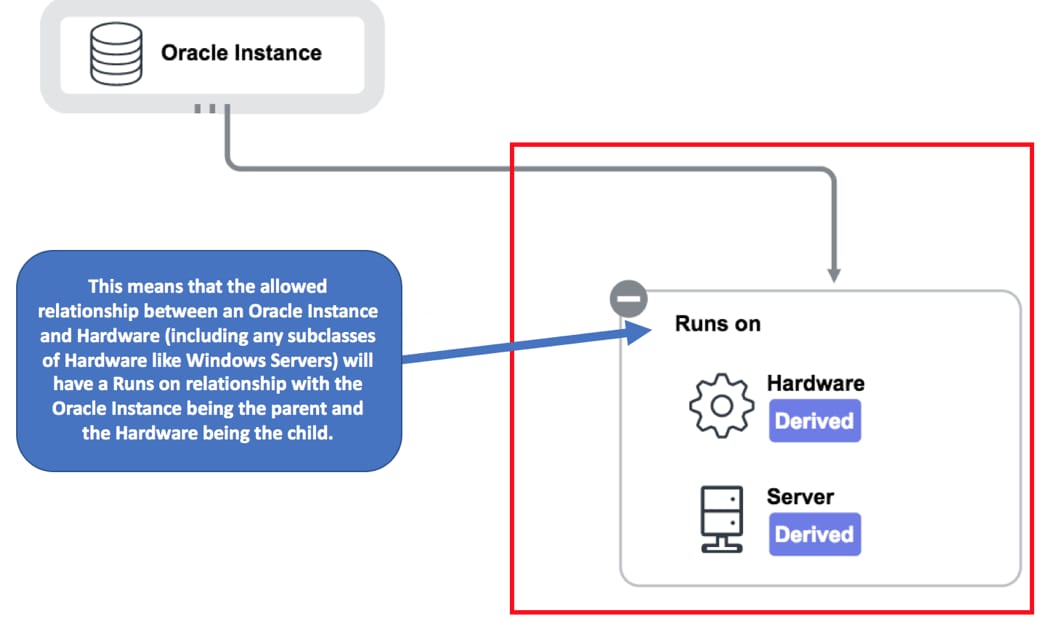
But what if you want to insert a CI that is not independent. For example, an Oracle Database Instance CI class has a metadata relationship hosting rule. This means it cannot be inserted without also inserting/specifying the Hardware on which it runs. The required relationship must be a "Runs on" relationship. An Oracle Database Catalog cannot be inserted without also inserting /specifying the Oracle Instance on which it runs and that required relationship is a "Contains" relationship.
The identification rules and the hosting relationships can be found in the CI Class Manager. In Kingston, there is a "Relationships" menu option when editing a CI. In prior releases, the containment rules are located in a tab called "MetaData" on the CI Identifiers.
Jakarta version and older showing the allowed relationships for an Oracle Database:
In Kingston, the UI changed to reflect the Hosting relationship requirements required for an Oracle Database:
Here is a sample of JavaScript code that inserts an Oracle Database Catalog contained on an Oracle Database Instance running on a Windows Server:
var db_name="Test 123";
var payload = {
"items": [{
"className": 'cmdb_ci_db_ora_instance',
"values":
{
"name": "Oracle DB " + db_name,
"sid": 'ABCD1234'
}
},
{
"className": 'cmdb_ci_win_server',
"values":
{
"name": 'Win Server 100',
"serial_number": "12345678",
"ip_address":"10.20.30.40",
"mac_address":"ABCD1234",
"ram":"4096",
"os": "Windows 2016 Datacenter"
}
},
{
"className": 'cmdb_ci_db_ora_catalog',
"values":
{
"name": 'Catalog test',
"schema": 'test schema'
}
}
],
"relations":
[
{
"child":1,
"parent":0,
"type":"Runs on::Runs"
},
{
"child":2,
"parent":0,
"type":"Contains::Contained by"
}
]};
var jsonUtil = new JSON();
var input = jsonUtil.encode(payload);
var output = SNC.IdentificationEngineScriptableApi.createOrUpdateCI ( 'ServiceNow', input);
gs.print (output);
Inserting CIs using the Rest API
Starting in Kingston, ServiceNow released a new web services Rest API so that configuration items can be inserted into the CMDB leveraging the Identification and Reconciliation Engine. It will insert or update a CI based on the attributes inserted with the necessary relationships if the CI is dependent on another CI in order to be inserted.
Here is an example of how to use it. If we follow the example we used with JavaScript where we wanted to create a Windows Server running an Oracle Database Instance that contained an Oracle Database, we would need 3 API calls. The Rest API will only insert one CI at a time and the sys_id of the related CI must be specified at the time of insert. This can be accomplished by parsing out the sys_id.
Now, we can put together the web service calls. I prefer Google Chrome Postman as an excellent application to simulate web service calls before you code them into an application.
1st Web Service Call: CREATE/UPDATE THE WINDOWS SERVER CI with "ServiceNow" as the discovery_source:
POST: https://<SN_INSTANCE>.service-now.com/api/now/cmdb/instance/cmdb_ci_win_server
{
"attributes": {
"name": "Windows Server Test",
"ram": "8192",
"ip_address": "192.165.1.123",
"serial_number" : "abc123",
"disk_space" : "4096",
"os" : "Windows"
},
"source": "ServiceNow"
}
In the Return Payload:
"virtual": "false",
"assignment_group": "",
"sys_id": "78c63ce94f23cb4028b4e4928110c7b5",
"po_number": "",
"checked_in": "",
2nd Web Service Call: CREATE AN ORACLE DATABASE INSTANCE (note the sys_id in the target)
From the cmdb_rel_type table, we also needed to retrieve the sys_id of the "Runs on::Runs" relationship so it can be specified in the payload of the API call. This can be retrieved manually by right-mouse clicking on the record in the cmdb_rel_type table and selecting "Copy sys_id" to copy it into the clipboard. The sys_id of the "Runs on" relationship is 60bc4e22c0a8010e01f074cbe6bd73c3
Now we can insert the Oracle DB instance specifying that it has a "Runs on" relationship to the Windows Server we previously inserted. Note that we specify "outbound_relations" because there is a parent/child relationship between the Oracle DB instance and the Windows Server with the Oracle DB instance being the parent:
POST: https://<SN_INSTANCE>.service-now.com/api/now/cmdb/instance/cmdb_ci_db_ora_instance
{
"attributes":{
"name": "Oracle DB Instance",
"version": "11.1.2.56",
"sid": "ORA_Rich"
},
"source": "ServiceNow",
"depends_on": {
"outbound_relations": {
"type": "60bc4e22c0a8010e01f074cbe6bd73c3",
"sys_class_name": "cmdb_ci_win_server",
"target": "78c63ce94f23cb4028b4e4928110c7b5"
}
}
}
In the Return Payload we have the sys_id of the newly inserted Oracle DB instance:
"sid": "ORA_Rich",
"manufacturer": "",
"sys_id": "a577f8654fa3cb4028b4e4928110c7a9",
"po_number": "",
3rd Web Service Call: CREATE AN ORACLE DATABASE CATALOG THAT RUNS ON THE ORACLE DB INSTANCE
Note the target sys_id of: a577f8654fa3cb4028b4e4928110c7a9
From the cmdb_rel_type table, we need to get the sys_id of the required "Contains::Contained by" relationship: 55c95bf6c0a8010e0118ec7056ebc54d. Note that we specify "inbound_relations" because there is a parent/child relationship between the Oracle DB instance and the Oracle DB catalog with the Oracle DB catalog being the child:
POST: https://<SN_INSTANCE>.service-now.com/api/now/cmdb/instance/cmdb_ci_db_ora_catalog
{
"attributes":{
"schema": "Ora Schema",
"name": "Ora Schema"
},
"source": "ServiceNow",
"depends_on": {
"inbound_relations": {
"type": "55c95bf6c0a8010e0118ec7056ebc54d",
"sys_class_name": "cmdb_ci_db_ora_instance",
"target": "a577f8654fa3cb4028b4e4928110c7a9"
}
}
}
That's it! You now have 3 CIs in a complex relationship. The calls can be run as often as you wish with different data and they will be identified as the same CIs and updated so duplicates are not created.
- 12,565 Views
4 Comments
You must be a registered user to add a comment. If you've already registered, sign in. Otherwise, register and sign in.

