


Hakan Isik

ServiceNow Employee
Options
- Subscribe to RSS Feed
- Mark as New
- Mark as Read
- Bookmark
- Subscribe
- Printer Friendly Page
- Report Inappropriate Content
03-21-2019
11:26 AM
Importance of cloud adoption is becoming more pressing as organizations are trying to be more agile and more efficient. And naturally AWS and Azure are the most preferred platforms when it comes to public cloud. When I look at last 3-5 years, I’ve come across various “IT” and “non-IT” scenarios organizations have been trying to move to public cloud. Among those scenarios, interestingly, I started to hear hybrid use-cases (IT/non-IT) such as onboarding/offboarding users, license assignments, role management, etc. more often lately. And since Azure Active Directory is getting more and more popular among many organizations, which can be used to support those use-cases, I thought playing with the integration between Azure AD and ServiceNow to see how we can automate some of them using Integration Hub, would be useful for many of us.
So, here are the steps to have our SSO integration between our ServiceNow instance and our Azure Active Directory:
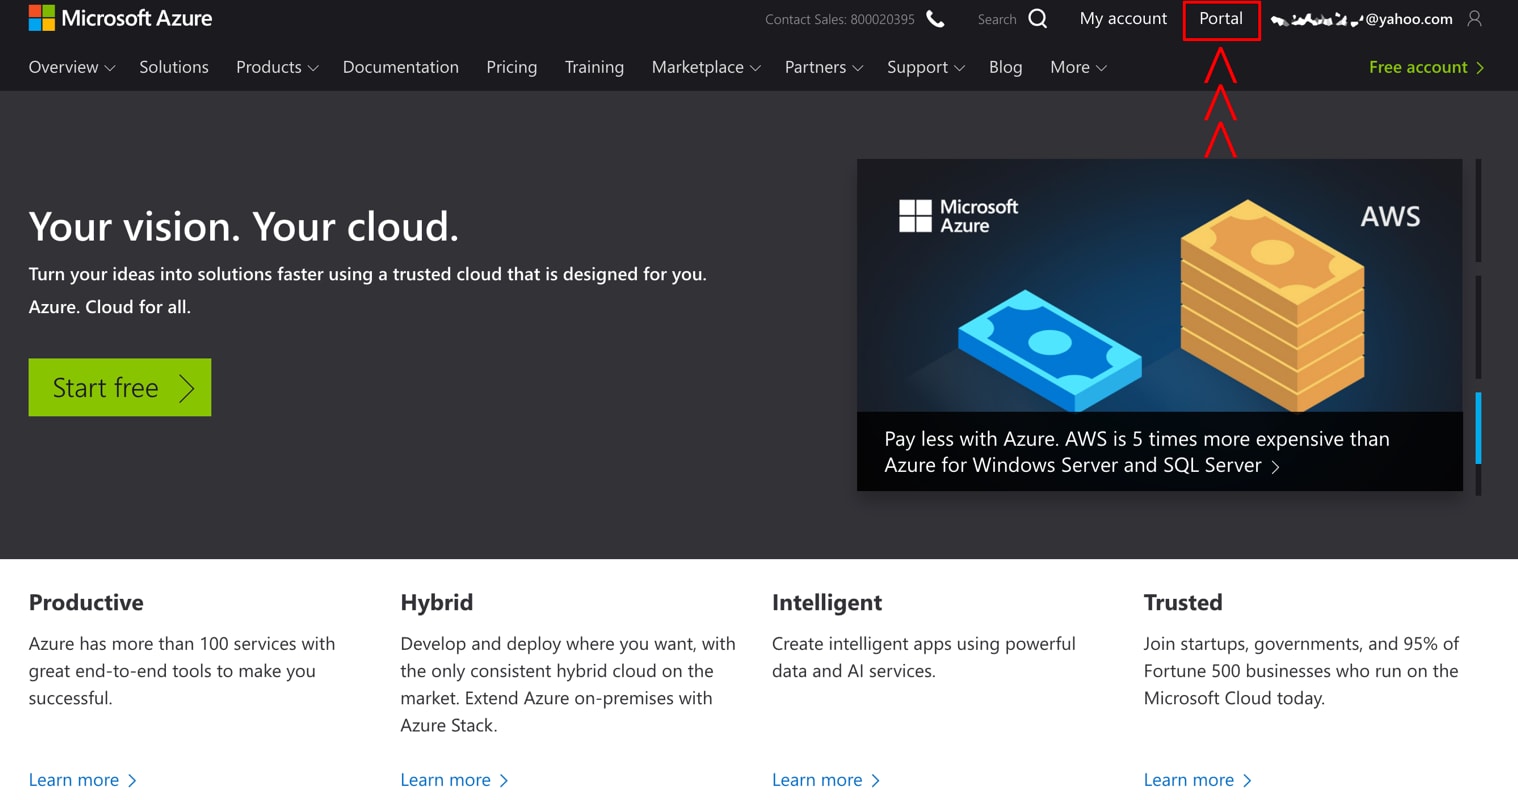
STEP 1: Let's start with the Azure side. The first thing we need is an Azure account. A free tier Azure account is sufficient to create the integration and test the actions in the Azure AD Spoke; with the exception of "license assignment" actions. Because license assignment actions require a "SKU Id" and we're not allowed to create SKU Ids within a free account. For the integration, you also need to have admin rights in your Azure account. If you don’t have one, here is where you can create you own Azure account. This is how it looks when you first log into our Azure account; we need to click the “Portal” link to go to Azure Portal:
STEP 2: And this is how its main page looks like, where we need to click the “Azure Active Directory” link to go to our Active Directory main page:
STEP 3: Under our Active Directory, one of the first things we want to do is going to the “Properties” and copying our “Directory ID” which is required for Single Sign-on integration:
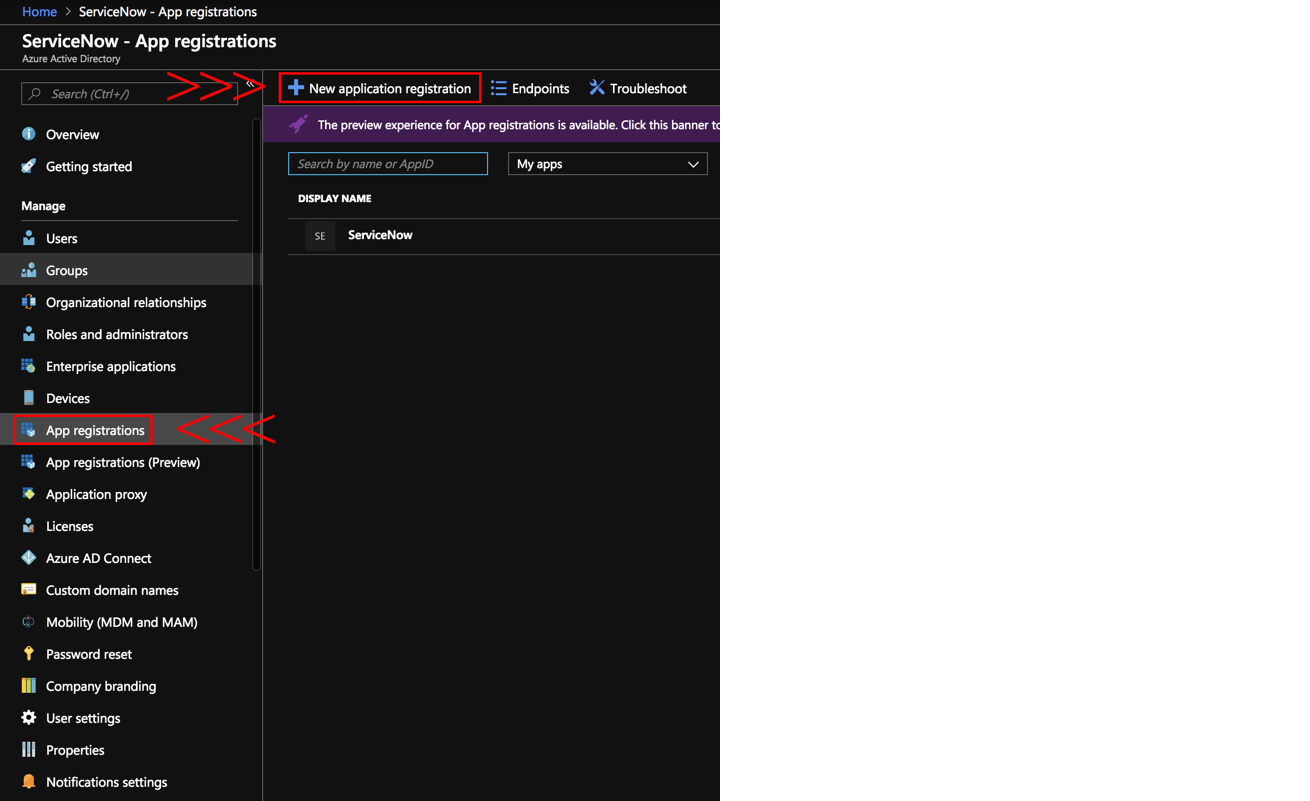
STEP 4: Then we need to go to “App registrations” and add a “New application registration” for our integration:
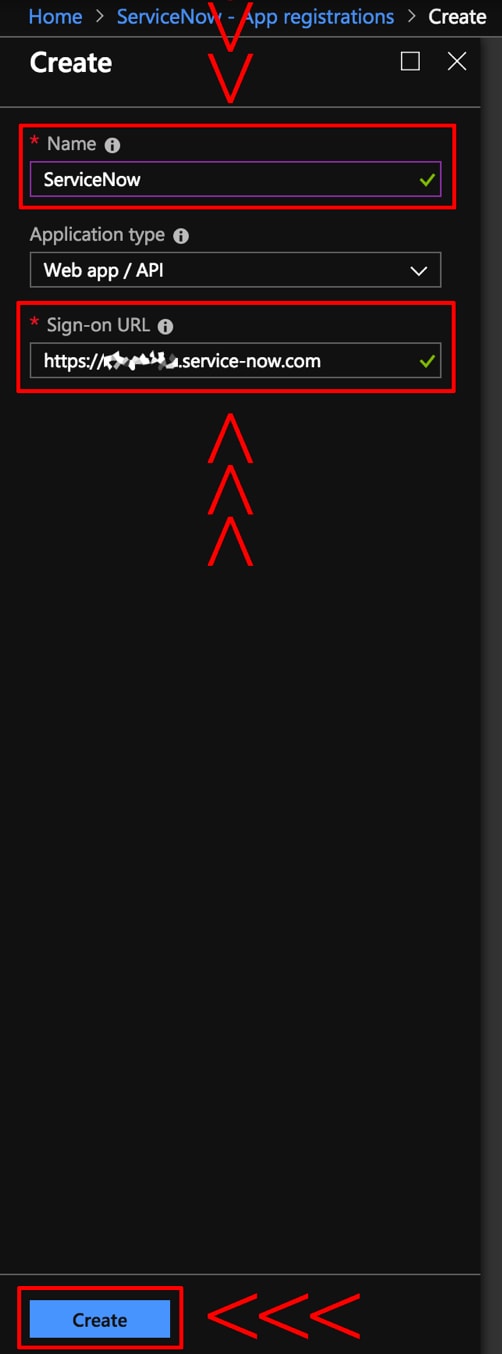
STEP 5: Here we need to enter a name to identify our app registration and the URL of our instance for the integration; and then click "Create":
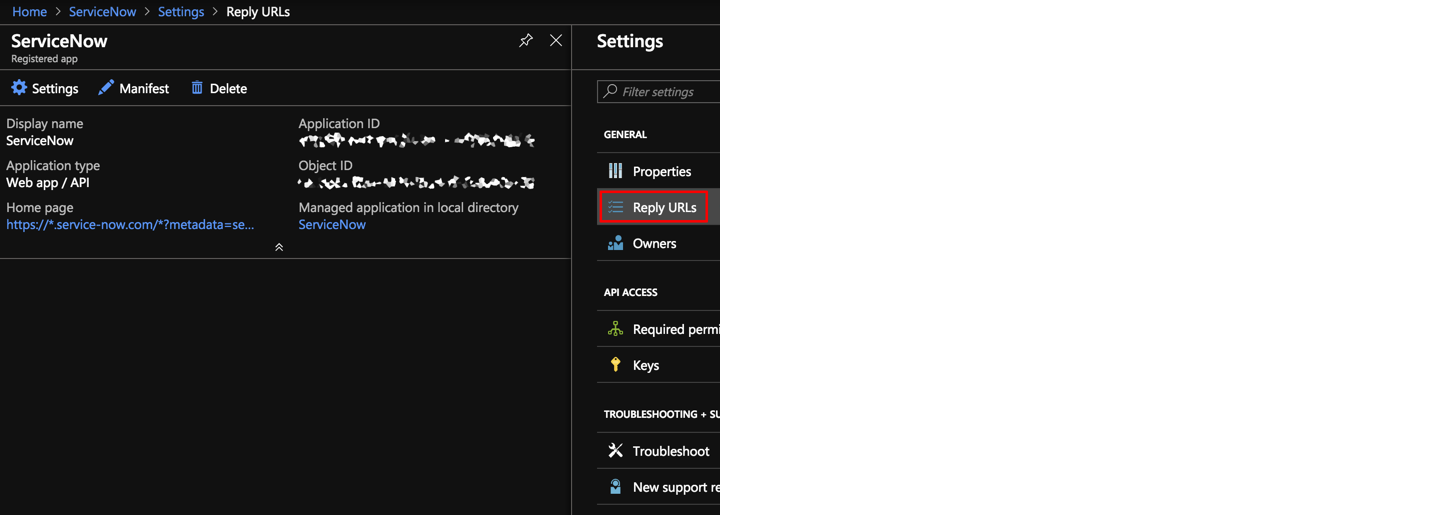
STEP 6: Now there are a couple of things we need to do under the app registration we just created. We first need to copy "Application ID (as our Client ID)" and "Object ID" for further steps; and then click "Settings":
STEP 7: Under settings, click "Reply URLs" and add <instance url>/oauth_redirect.do. Click "Save":
STEP 8: Click "Owners" -> "Add Owner" to add application owners to your app registration from your existing users:
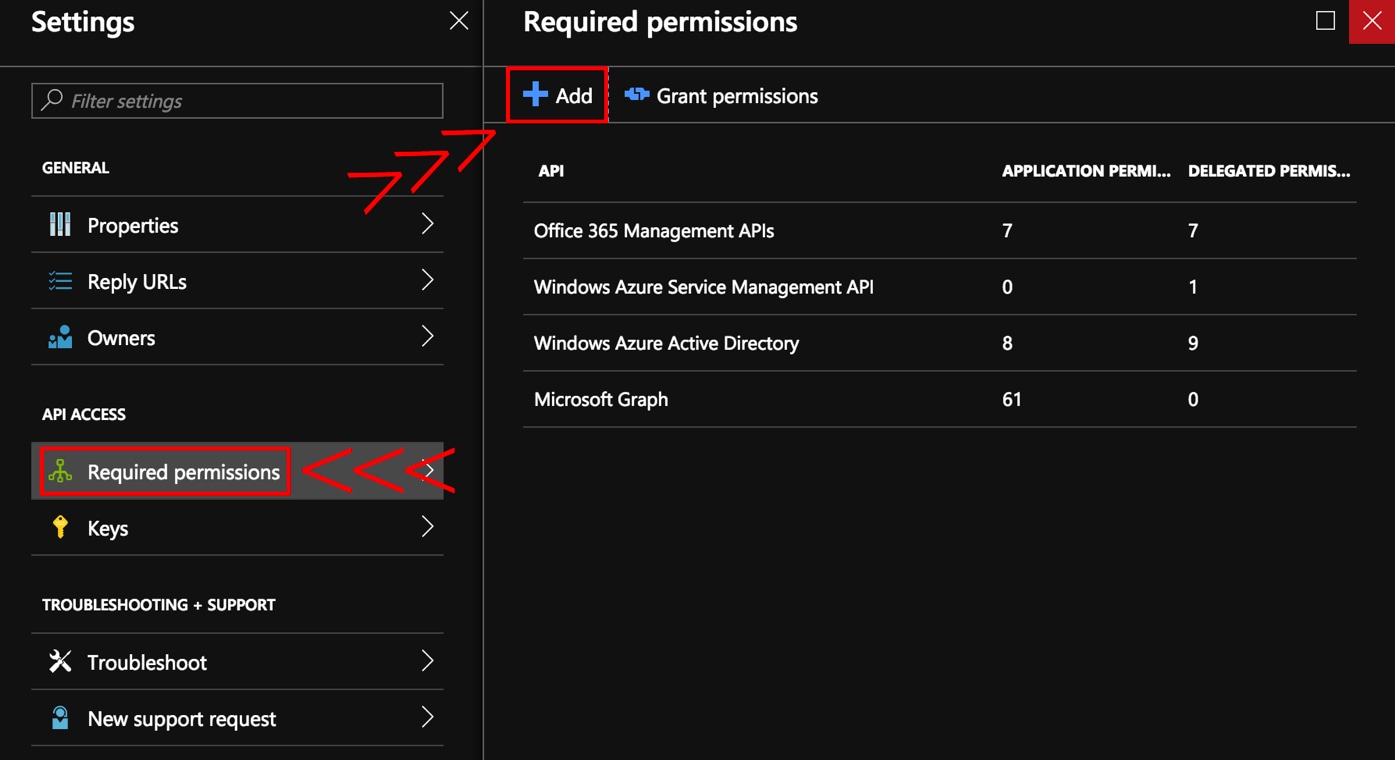
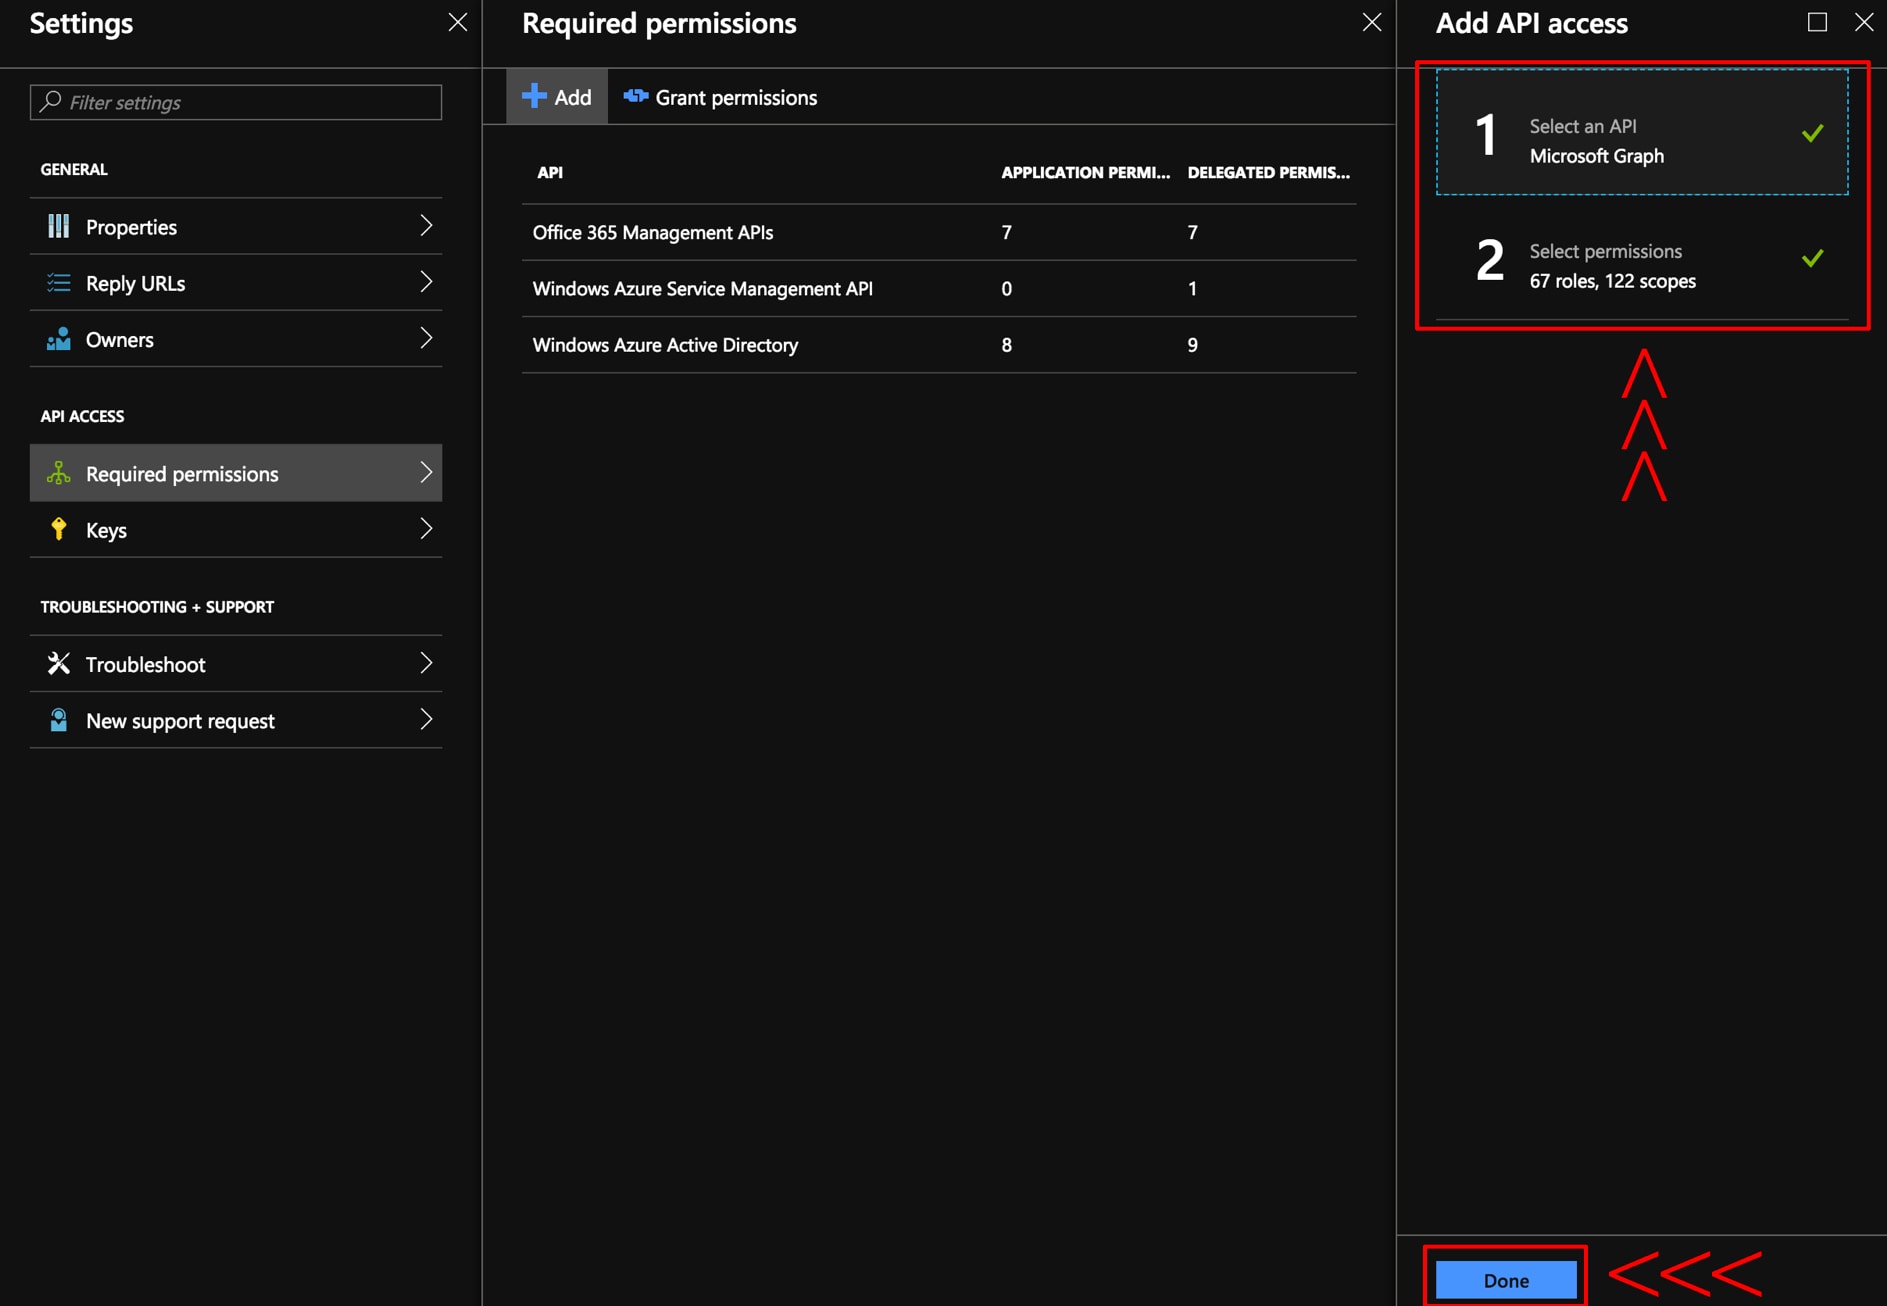
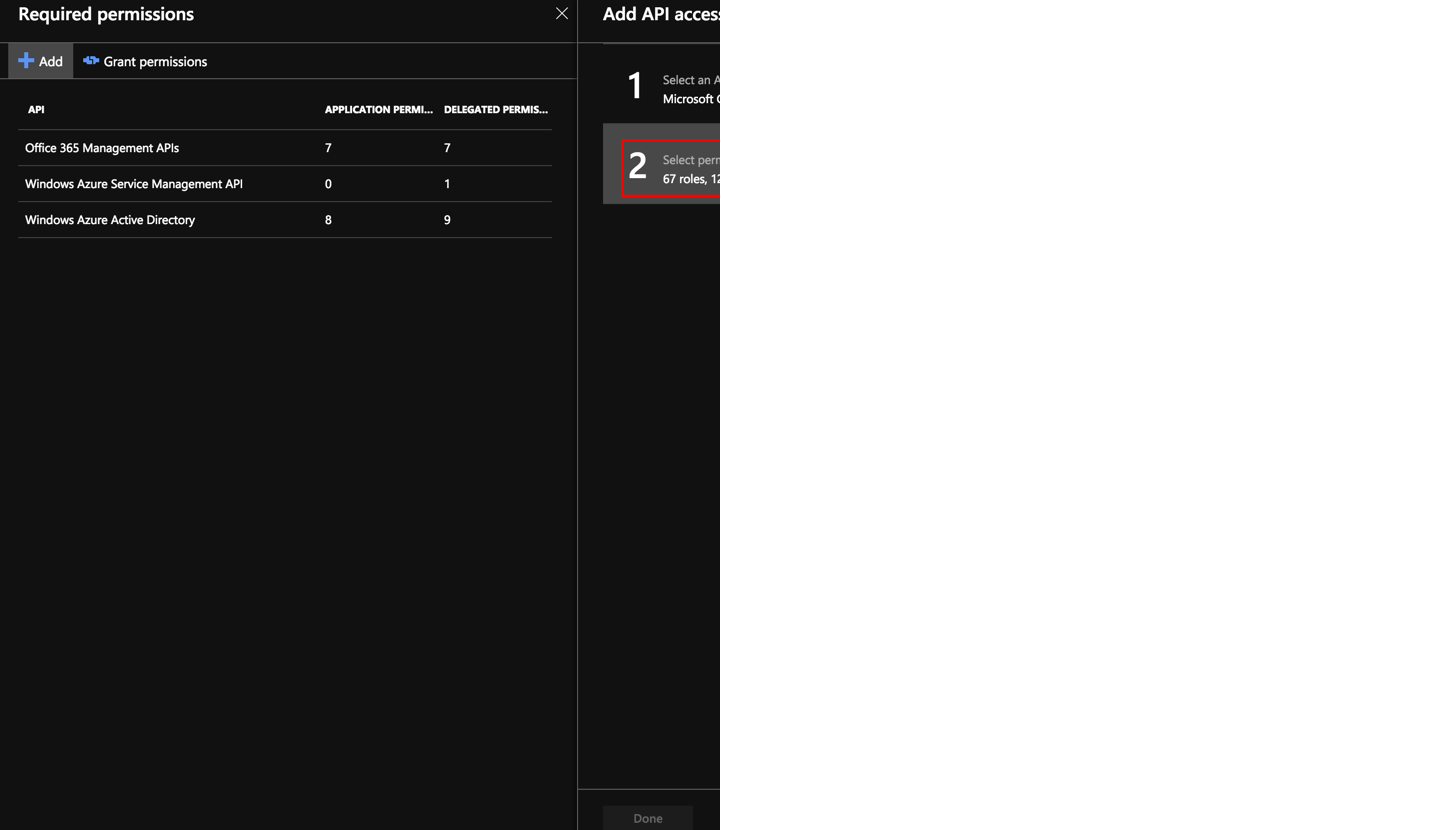
STEP 9: Then under "Required Permissions", click "Add" to give permissions to our users:
STEP 10: Add “Microsoft Graph” which is the API we need for the integration. Click "Select":
STEP 11: And select all permissions. Click "Select":
STEP 12: Click "Done" to apply changes:
STEP 13: Then go to "Keys" to create and copy your "Client Secret" key which is required for the integration. We need to copy our key because once we leave this blade, we won't be able to retrieve it again. Enter a name for your key, and click "Save" to generate you key:
STEP 14: Now let's do some instance side of settings. After logging into our instance as administrator, the first thing we need to do is enabling the SSO plugin. Search for "plugins" in the instance search and go to "System Definition -> Plugins". Under Plugins page, search for "Integration - Multiple Provider Single Sign-On Installer" and click "Install" to install it if it is not already installed:
STEP 15: Search for "Multi-Provider SSO" in the instance search and go to "Multi-Provider SSO -> Administrator -> Properties". Under Multi Provider SSO Properties page, change the settings as shown below:
STEP 16: In the instance search, search for "Application Registry" and go to "System OAuth -> Application Registry". Under Application Registries page, click "New" to create a new registry entry:
STEP 17: Select "Connect to a third party OAuth Provider":
STEP 18: And fill the form with appropriate details:
a) Name: Name of the App registry (Azure Admin)
b) Client Id: Copied from Above
c) Client Secret: Copied from above
d) Default Grant Type: Authorization Code
e) Authorization URL: https://login.microsoftonline.com/<Directory ID>/oauth2/v2.0/authorize
f) Token URL: https://login.microsoftonline.com/<Directory ID>/oauth2/v2.0/token
g) Redirect URL: https://<instancename>/oauth_redirect.do
Then select "OAuth Entity Scopes" tab in the related lists:
STEP 19: And create scope as shown below and then "Submit" your form:
STEP 20: After submitting, click "OAuth Entity Profiles" and select default_profile.
STEP 21: If not already automatically added after you submit the record, manually add the two Entry Scopes which you just added:

STEP 22: Now it is time to create our credentials. Search for "credentials" and go to "IntegrationHub -> Connections & Credentials -> Credentials". Under "Credentials" page click "New" to create a new credentials:
STEP 23: Select "OAuth 2.0 Credentials"
STEP 24: And fill the form with appropriate details:
a) Name: Name of the credentials
b) OAuth Entry Profile: Select the Application Registry default profile which you have created in above step.
c) Client Secret: Copied from above
Click "Submit":
STEP 25: Click "Get OAuth token" to generate and get your token:
STEP 26: A pop-up window will open. Give consent and "Accept":
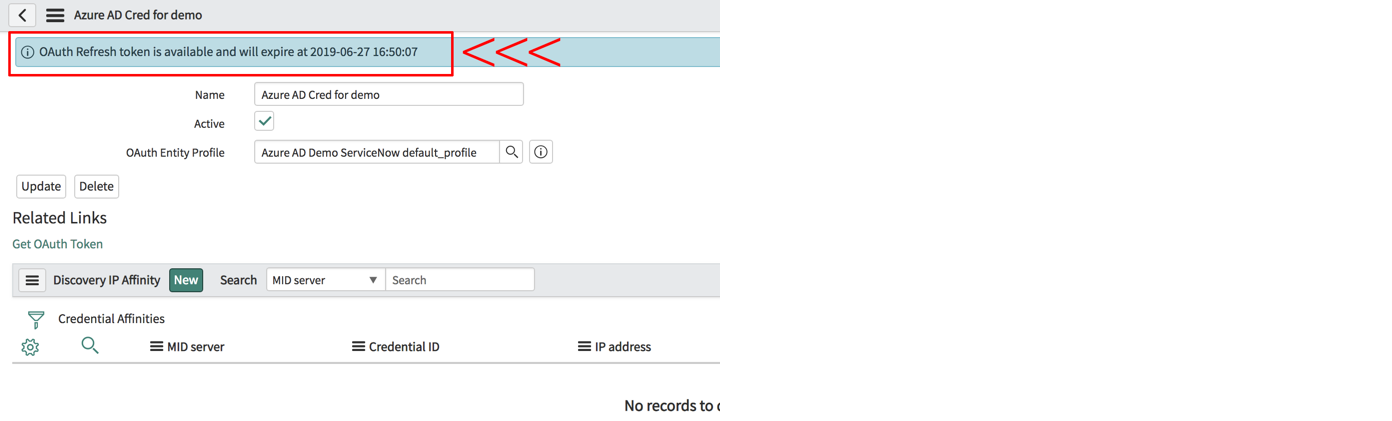
STEP 27: And your token is ready to use:
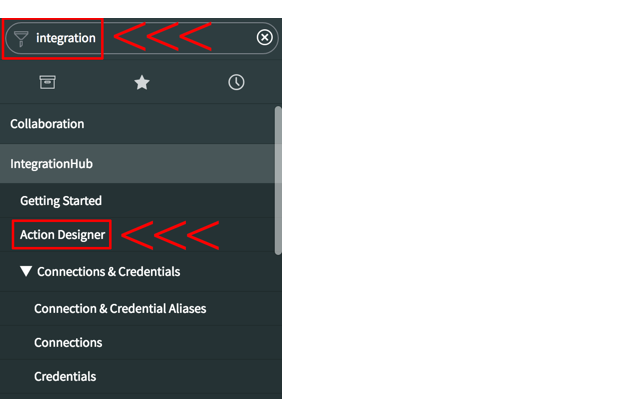
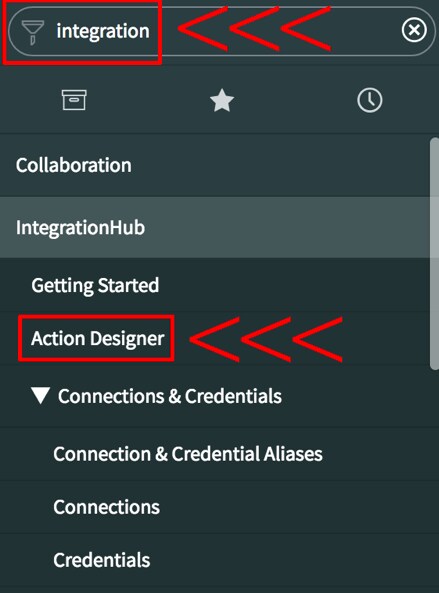
STEP 28: A quick detour! Remember, our goal is being able to use Azure AD Spoke. So let's take a look at it to understand how it is going to use the token we just created. For this we need to "Flow Designer". Search for "integration" and go to "IntegrationHub -> Action Designer":
STEP 29: Once we're there, click "Actions" and search for actions under "Microsoft Azure AD Spoke" application:
STEP 30: Let's pick one to see how it authenticate itself; "Look Up User ID" for example:
STEP 31: In the action, we're looking for a "REST Step" where we make our rest API call. In this particular action, it is "Lookup User". Under "Connection Details" of this step we can see that the step uses a "Connection Alias" called "sn_azure_ad_spoke.AzureAD":
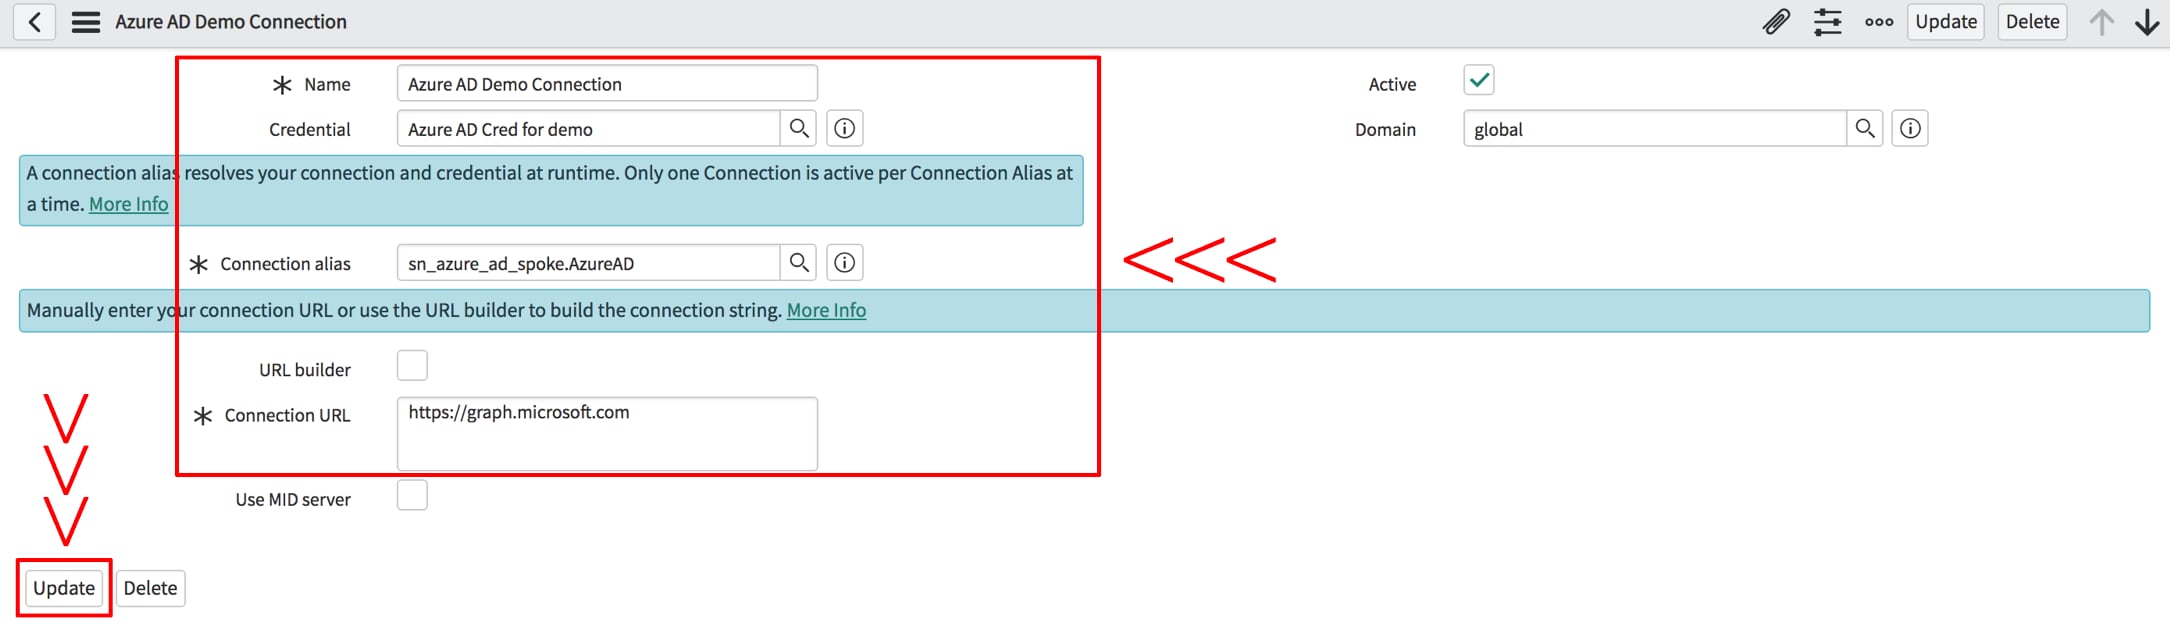
STEP 32: Now let's see where we can find that connection alias and how is it connected to our token. In the application navigator, search for "Connections & Credentials" and then go to "Connections & Credentials -> Connections & Credentials Aliases". Here we can see sn_azure_ad_spoke.AzureAD as the ID of the "AzureAD" connection alias. Now we need open it to add our connection with the right token:
STEP 33: In the "Connections" tab click on the "New" button:
STEP 34: And fill the form with appropriate details:
a) Name: Name of the connection
b) Select the credential you've created
c) Connection URL: https://graph.microsoft.com
Click on "Update"
STEP 35: At this point if we try to run our flow, we get the error below:
STEP 36: We still have a couple steps to take. We don’t have LDAP integration so we need to create a test user manually but without a password; a user we already have in Azure AD, in this case our main user:
STEP 37: We also need to create a new application in Azure AD for SSO integration. For that, we need to go back to our Azure AD and then "Enterprise applications -> All applications -> New application":
STEP 38: Give a name and "Add":

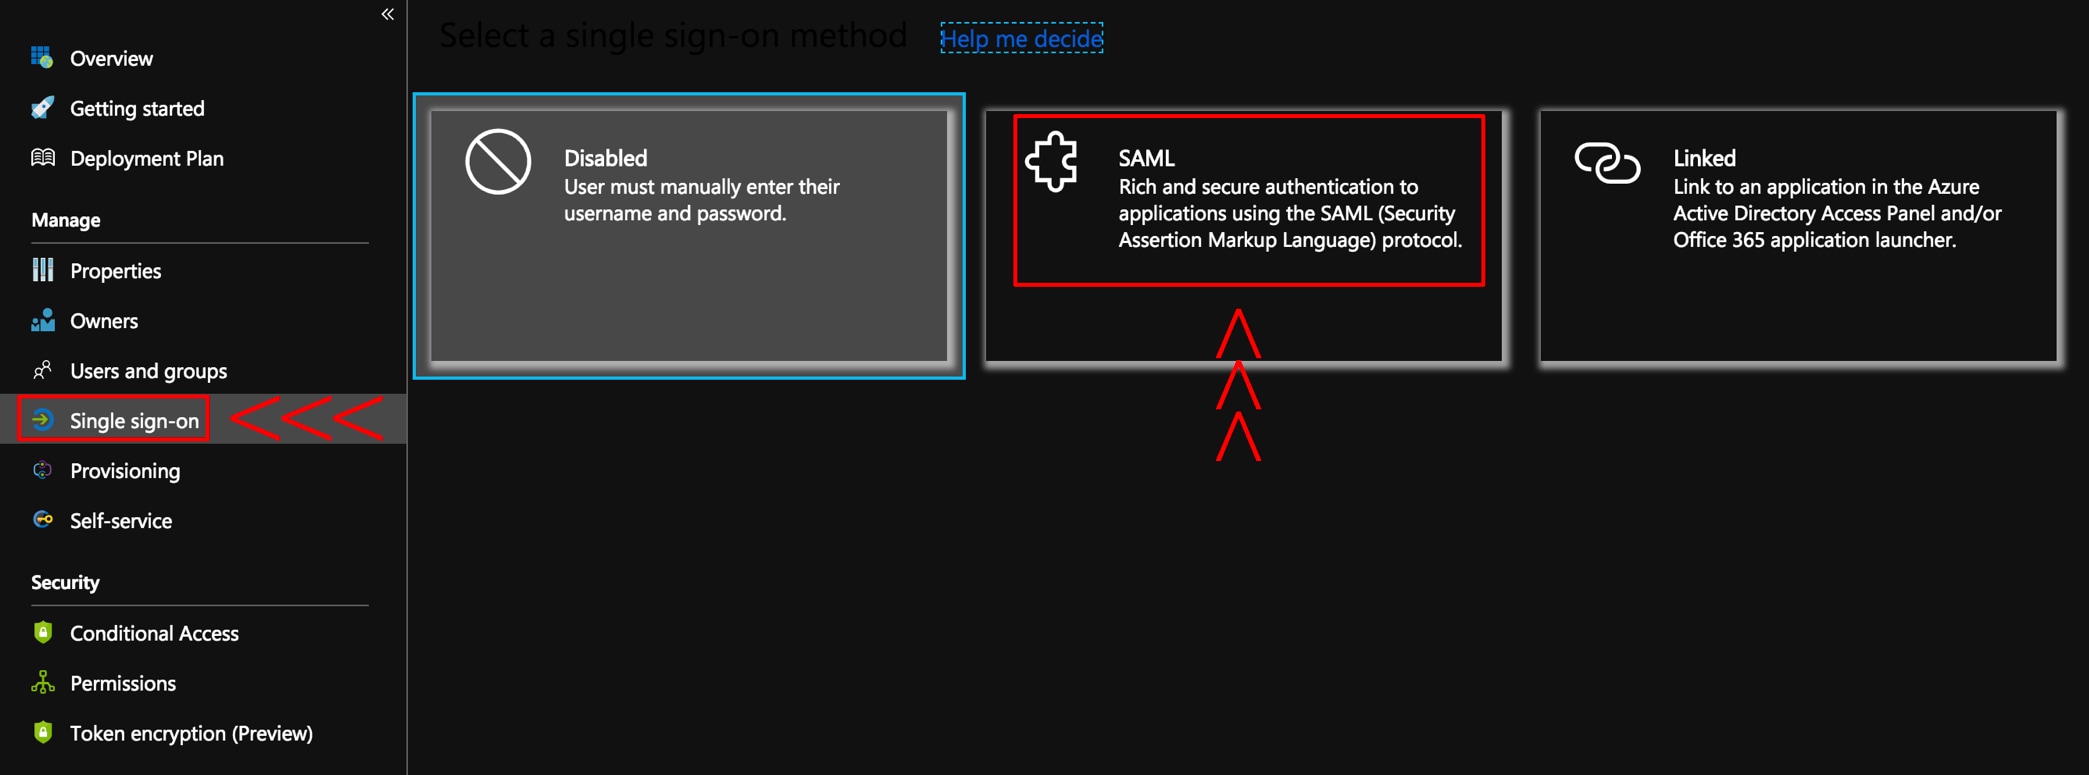
STEP 39: Under the application go to "Single sign-on" and select "SAML":
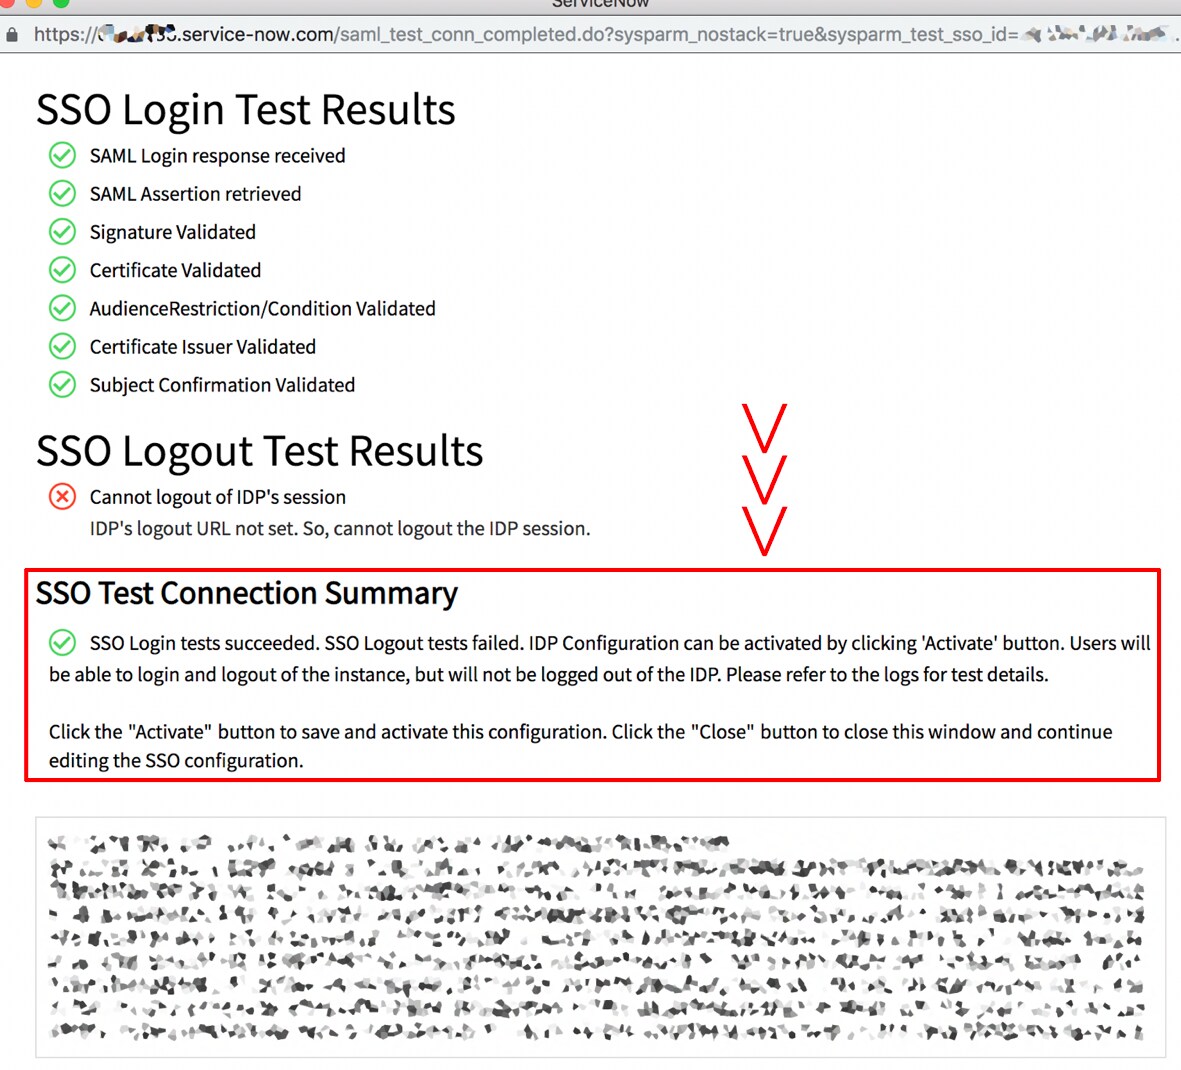
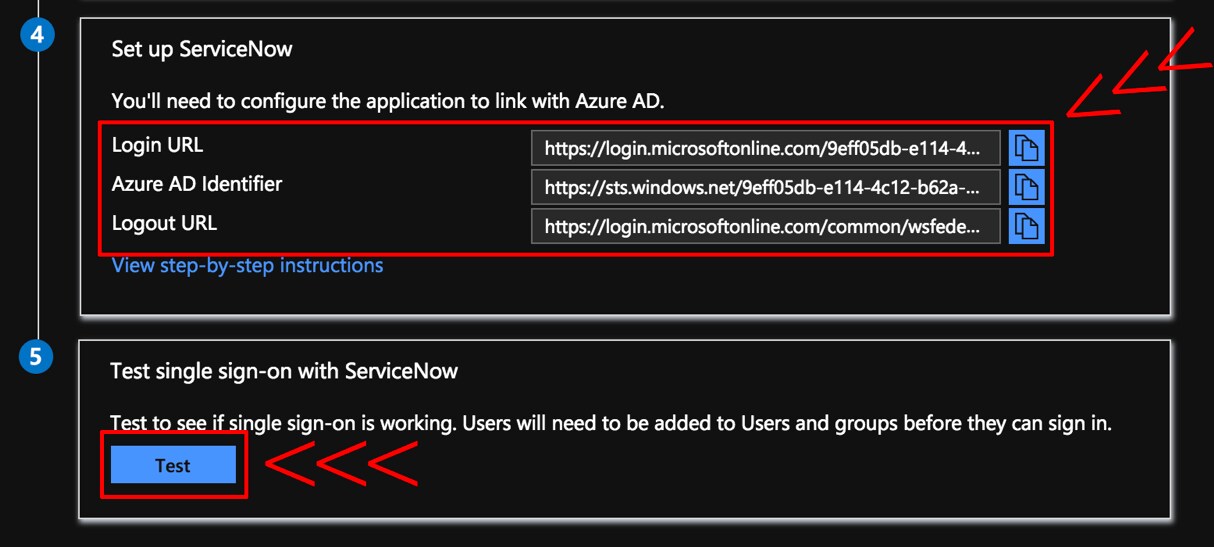
STEP 40: Copy/download the details below for further use and click "Test" to test SSO integration:

STEP 41: It looks like we also need to add our user to the application we just create:
STEP 42: To do that, we need to go to "Users and groups" under our application and "Add user":
STEP 43: If we go back and test SSO again, now it should work:
We should click the "Activate" button to activate SSO between Azure AD and our ServiceNow instance as stated in the "SSO Test Connection Summary" message.
STEP 44: Let's go back to flow designer and run our test flow again. We still have permission relate issues:
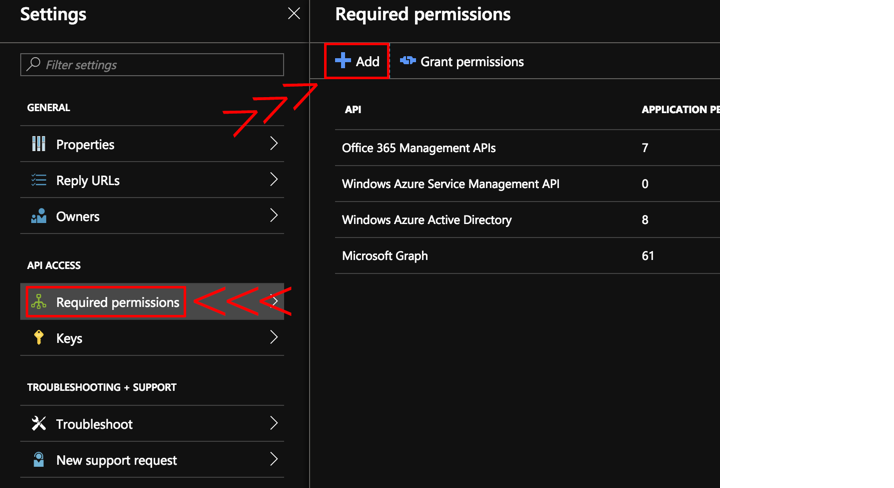
STEP 45: To fix that, we need to go back to the app registration we created at the beginning and grant permissions:
STEP 46: Under the app registration go to "Settings -> Required permissions -> Microsoft Graph":
STEP 47: And "Grant permissions":
STEP 48: Since we changed permissions, we also need to refresh our OAuth token with the new permissions:
STEP 49: If we run our flow again, now it works and Look Up User ID action returns the user ID that It found in Azure AD:
In a separate article, I'll also explain how we can create an example demo flow in flow designer with which we can onboard and offboard users on Azure AD using Integration Hub Azure AD Spoke.
- 15,465 Views
You must be a registered user to add a comment. If you've already registered, sign in. Otherwise, register and sign in.

