


MB26

ServiceNow Employee
Options
- Subscribe to RSS Feed
- Mark as New
- Mark as Read
- Bookmark
- Subscribe
- Printer Friendly Page
- Report Inappropriate Content
01-11-2012
04:14 PM
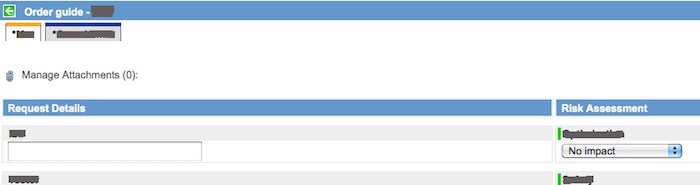
So where is the Order Guide Item Attachment love? On a normal catalog item you are able to attach files, however when using that same catalog item within an order guide, there is no attachment icon. Hopefully I did not miss some functionality somewhere because here is a solution I came up with for you to enable attachments on Order Guides Items.
I have created a UI Macro that can be added to any catalog item (or variable set). This UI Macro first checks to see if the catalog item is coming from an order guide. If it is, it will display the UI Macro, if not it won't, which will allow the default catalog item attachment icon to be used as normal.
Here is what it looks like.
When you click on the "Manage Attachements" you get the standard attachment popup.
All you need to do is to create a UI Macro with the following code. The add this macro as a variable into any catalog item or variable set. This UI Macro does NOT take into account attachment roles property as the standard form attachment use does. This is more of a "lite" version.
<?xml version="1.0" encoding="utf-8"?>
<j:jelly trim="true" xmlns:g="glide" xmlns:g2="null" xmlns:j="jelly:core" xmlns:j2="null">

<g:evaluate>
var rprf = RP.getReferringURL();
var og = rprf.indexOf('sysparm_guide') >= 0;
</g:evaluate>

<j:if test="${og}">
<div id="order_guide_item_attachment">
<div id="header_attachment" style="display: block; width: 100%; overflow: hidden;">
<div id="header_attachment_size_checker">
<ul id="header_attachment_list">
<li>
<a id="header_attachment_list_link" href='#' class="attachment" onclick="saveCatAttachment(gel('sysparm_cart_edit').value, 'sc_cart_item'); return false;">
                                 <img title="Attachments..." src="images/icons/attachment.gifx" height="16" border="0" width="16" /> $[sp]
         ${gs.getMessage('Manage Attachments')} (<span class="attachmentNumber"></span>):
</a>
</li>
<script>
 updateAttachmentCount(gel('sysparm_cart_edit').value);
 if($('header_attachment'))
$('header_attachment').style.height = '20px';
</script>

          </ul>
          </div>
</div>
</div>
</j:if>

<script>
//This initializes the default action. Do you want attachments to be displayed or not onload.  To show, change the .show() to .hide()
$('order_guide_item_attachment').show();
</script>
</j:jelly>
Show/Hide this Macro
What if you wanted to only show this macro in certain scenarios. The ones I had implements was, if someone selected a high risk, or slected a checkbox.
A simple client script can be created. Evaluate your condition like...
var risk = g_form.getValue('risk');
if(risk == 1){
//Here is the one-liner to show or hide the attachment macro.
$('order_guide_item_attachment').show();
//Here is the hide
$('order_guide_item_attachment').hide();
}
The UI Macro is wrappered in a DIV with the ID of "order_guide_item_attachment" making it easy to use a prototypejs selector and hide or show it.
Bonus - Confirm someone has attached something
How can you make sure that someone has uploaded an attachment? I have used an onsubmit script I use to check this. I don't want someone to select a high risk value and then just submit the order guide item without any attachment.
function onSubmit() {
var og = $('sysparm_guide');
var rk = g_form.getValue('variables.risk');
var cont = 'yes';
if(og && rk == 1){
$$('#header_attachment_list span[class="attachmentNumber"]').each(function(item){
var amt = item.innerHTML;
if(amt == 0){
cont = 'no';
alert('You have specified a High Risk Request. Please attach the necessary forms.');
}
});
if(cont == 'no'){
$('order_guide_item_attachment').show();
return false;
}
}
}
Bonus, Bonus -- Popup the attachment dialog whenever
If you want to open the attachment dialog after someone clicks a checkbox use the following code.
//some sort of onChange client script with a condition statement
if(checkbox == true){
//This function will open the window to attach files to the order guide item.
saveCatAttachment(gel('sysparm_cart_edit').value, 'sc_cart_item');
}
NOTE: CALGARY UPDATE
It appears that in Calgary some additional Access Controls (ACL) were added which prevents the end user from using this functionality. I have found that the attachment popup (UI Page) checks to see if the user can write to the record. In this case the user is actually being displayed a record from the "Item" (sc_cart_item) table. Thus the attachment UI Page validates if the user can write to this particular record. In this scenario the end user (Requester) does not have write permissions to this "cart item" record resulting in a blank (no buttons etc.) on the attachment UI Page.
SOLUTION:
In order to get around this you will need to add in two ACLs on the "sc_cart_item" table. We don't want to open this table wide up to everyone so here is what I suggest.
Create a READ ACL on the sc_cart_item table so the logged in user can only read their cart items. You will need to dot walk on the condition to get to the user field.
Type: record
Operation: read
Name: Item [sc_cart_item] --> -- None --
Condition: Cart.User --> IS --> javascript:gs.getUserID()
Create a WRITE ACL on the sc_cart_item table so the logged in user can only write to their cart items. You will need to dot walk on the condition to get to the user field.
Type: record
Operation: write
Name: Item [sc_cart_item] --> -- None --
Condition: Cart.User --> IS --> javascript:gs.getUserID()
This should allow anyone logged in to see and write to only their cart items. In reality the end user should not know that they can read or write to these records as it is all behind the scenes, but from a security perspective this is how it works.
All in all this is obviously modifying the OOB functionality, in terms of security. So this solution is an AS IS, USE AT YOUR OWN RISK solution. The functionality could potentially change from one version to another, as we have seen. So take all of this into account when using this solution.
Again this UI Macro will run only if the item is coming from an Order Guide. Your normal catalog items will continue to use the standard attachment process.
Enjoy.
<script></script>
var _gaq = _gaq || [];
_gaq.push(['_setAccount', 'UA-22945975-1']);
_gaq.push(['_trackPageview']);
(function() {
var ga = document.createElement('script'); ga.type = 'text/javascript'; ga.async = true;
ga.src = ('https:' == document.location.protocol ? 'https://ssl' : 'http://www') + '.google-analytics.com/ga.js';
var s = document.getElementsByTagName('script')[0]; s.parentNode.insertBefore(ga, s);
})();
- 61,708 Views
61 Comments
- « Previous
-
- 1
- …
- 4
- 5
- 6
- 7
- Next »
You must be a registered user to add a comment. If you've already registered, sign in. Otherwise, register and sign in.

