- Post History
- Subscribe to RSS Feed
- Mark as New
- Mark as Read
- Bookmark
- Subscribe
- Printer Friendly Page
- Report Inappropriate Content
on 08-21-2020 01:56 PM
Beginning with the Orlando version of CMP, you are no longer allowed to create new Catalog Items backed by new Blueprints in the Blueprint designer. CMP now requires new catalog items to be template based (Cloud Formation Templates, ARM Templates, Terraform and Ansible). You are still allowed to use the old blueprint based catalog items on new instances but the process is a little different which I’m going to go over here and the process is:
- Create a Blueprint Based Catalog item: Use the blueprint designer and published resource blocks
- Test the catalog item
- Export the Catalog Item to an update set
- Import the Update Set into a new ServiceNow instance
- Consume the Catalog Item
(vSphere 6.7u3 was used and successful during testing)
Step One: Creating Blueprint Based Catalog Items.
In New York or Madrid Cloud Admin Portal:
1. Go to the Design Tab choose Blueprints and click New.

2. Give it a name and Category (Compute). Press Save and it will bring you to the Blueprint Designer

3. Click the ‘+ Resources’ button on the top-left of the designer and select vSphere Datacenter and Virtual Server to bring them on the canvas.

4. You should now have vSphere Datacenter, Virtual Server, and Blueprint Container on the canvas, now we have to connect those. Take your mouse, click and hold the Blueprint container, and drag your mouse to Virtual Server. This will connect them. Do the same click and drag from Virtual Server to vSphere Datacenter to connect those as well. It will look like the diagram below:


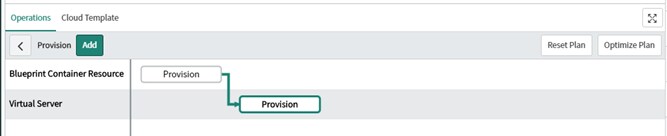
5. In the Operations tab at the bottom of the designer, click Provision. Two components (Virtual Server and Blueprint Container Resource) will be connected. click on the connecting line and delete it. Now, click and hold the Blueprint Container Resource level ‘Provision’ box and drag it to the Virtual Server level ‘Provision’ box. It should look like the screenshot below after completion:


6. Click on the ‘Provision’ box on the ‘Virtual Server’ level to view the Form Parameters on the right-hand side of the screen. Check the boxes next to ‘Cluster’ and ‘Datastore’. Click ‘Save’ above the Form Parameters then Click ‘Create Catalog Item’ at the top of the Blueprint Designer

The next steps are not required but will lead to a better experience when consuming the catalog item:
7. Now that the catalog item is created, click the Catalog tab and under ‘Request Operation’ click the panel with your new catalog item.

8. In ‘Variable Sets’ related link, click ‘Provision’ to access the provisioning variables (Generated from the Virtual Server resource block).
9. Repeat the next step for ‘Virtual_Server_VmFolderName’,’ Virtual_Server_Network’,’ Virtual_Server_Cluster’,’ Virtual_Server_Datastore’.

10. Select the Variable (They should all be Lookup Select Box types by default and Type Specifications should point to a corresponding Resource Pool and list the Pool Filter as getByLDC).

11. In the Related links, click Pool Filter Mappings and select New.
12. Choose ‘Location’ in the ‘Reload on change of’ field and ‘Location’ in the Filter Parameter field. In the Filter Parameter you may receive a lot of location choices, add the ‘Resource Pool Filter’ field to the list view and find ‘getByLDC’ and choose one of those Location values. Click Submit.

13. Once those are all changed, the catalog variables should be set to update based upon the Location chosen on the Provisioning Form.
Step Two: Configure Resource Profiles:
1. Go to Manage, Resource Profiles, complete Compute Profile and OS Profile:
a. Select Compute Profile (T-Shirt size)
b. Select New
c. Create a new profile and click Submit

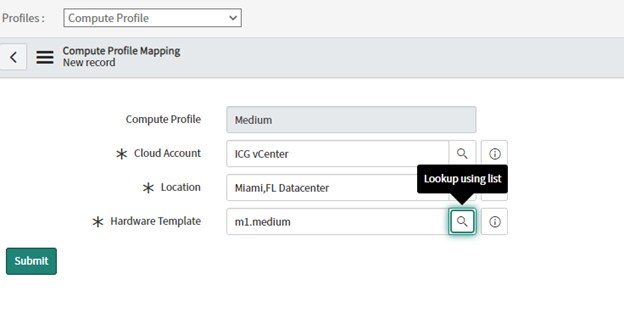
d. Select that profile, under Compute Profile Mappings click ‘New’
e. Select the vCenter cloud account, Location, and select the hardware template (cpu/memory). Click Submit.

f. Select OS Profile from the dropdown and Select New
g. Enter a Name for the profile and click ‘Submit’

h. Choose the newly created OS Profile, under OS Profile Mappings click New. Choose the Cloud Account, Location, and Image Template (vCenter Template).

Step Three: Test Catalog Item:
1. Go to the Cloud User Portal and try out the catalog item you created. The Provision portion of the form should look like below. The Virtual Server Network, Cluster and Datastore should only be selectable after a location is chosen if the filter was also done.


Step Four: Export Catalog Item
1. Go to Cloud Catalog Items under the Design tab in the Cloud Admin Portal, find the panel with the catalog item and click the export arrow on the catalog item. This will bring up a pop-up, click next, export the data and the update sets along with 2 text files should download automatically. The metadata text file gives the order in which to import them into another instance.
Step Five: Import Catalog Item:
1. Go to the desired ServiceNow instance and import the update sets in the order given in the metadata file. Lookup ‘update set’ in the navigator and click ‘Retrieved Update Sets’ then click the link for Import Update Set from XML. Import each of the update sets into the instance in the specified order. Instructions on how to do so are: https://docs.servicenow.com/bundle/orlando-application-development/page/build/system-update-sets/tas...
2. After importing and committing all the update sets, this catalog item will be available to use. The Blueprint will also be available for editing on the new instance (new Blueprints still cannot be created on Orlando instances on).
I've uploaded a zip file containing the update set and text files used to create this catalog item into an s3 bucket and can be accessed at this link. https://icg-cmp-templates.s3.amazonaws.com/vsphere_catalog_item_cmp.zip
Hope this helps!
- 2,132 Views
- Mark as Read
- Mark as New
- Bookmark
- Permalink
- Report Inappropriate Content
Excellent blog article, Ben. A timely one - this is the approach i would recommend for now if the customer cannot adopt Terraform based provisioning for VMware starting from Orlando and needs to create any new catalog items for Center provisioning.
Ram