- Post History
- Subscribe to RSS Feed
- Mark as New
- Mark as Read
- Bookmark
- Subscribe
- Printer Friendly Page
- Report Inappropriate Content
on 05-24-2020 02:39 PM
Template Execution: Dynamic Discovery of New Resource Types
One of the biggest advantages of CMP/CPG is the ability to ingest cloud-native (CFT, ARM, GDM etc) and multi-cloud (terraform) templates and create standard offerings for the end user to consume. Because of this most of the resource types provided by the cloud provider can be provisioned. As long as you have a template, it can be used in CMP/CPG.
This article talks about provisioning new resource types and how to populate the CMDB with these resources right after provisioning. We take a CFT example here. But this is applicable to any of the template types, be it CFT/ARM/GDM/Terraform etc.
There is an accompanying update set which has most of the stuff coded. The url is : https://developer.servicenow.com/connect.do#!/share/contents/4708895_targeted_discovery_of_aws_works.... The steps are handful. Most of the article explains the underlying structure so that you get a good understanding of the system.
1. Background
1.1 Cloud Provider, Products and Resource Types
ServiceNow Cloud Model is a unified model which is validated against a range of cloud providers like AWS, Azure, GCP, IBM Cloud, VMware etc. There is a Provider which has a 1:n relation with Product Types. The Product Types have a 1:n relation with Resource Types.

Taking a sample of AWS and a subset under that
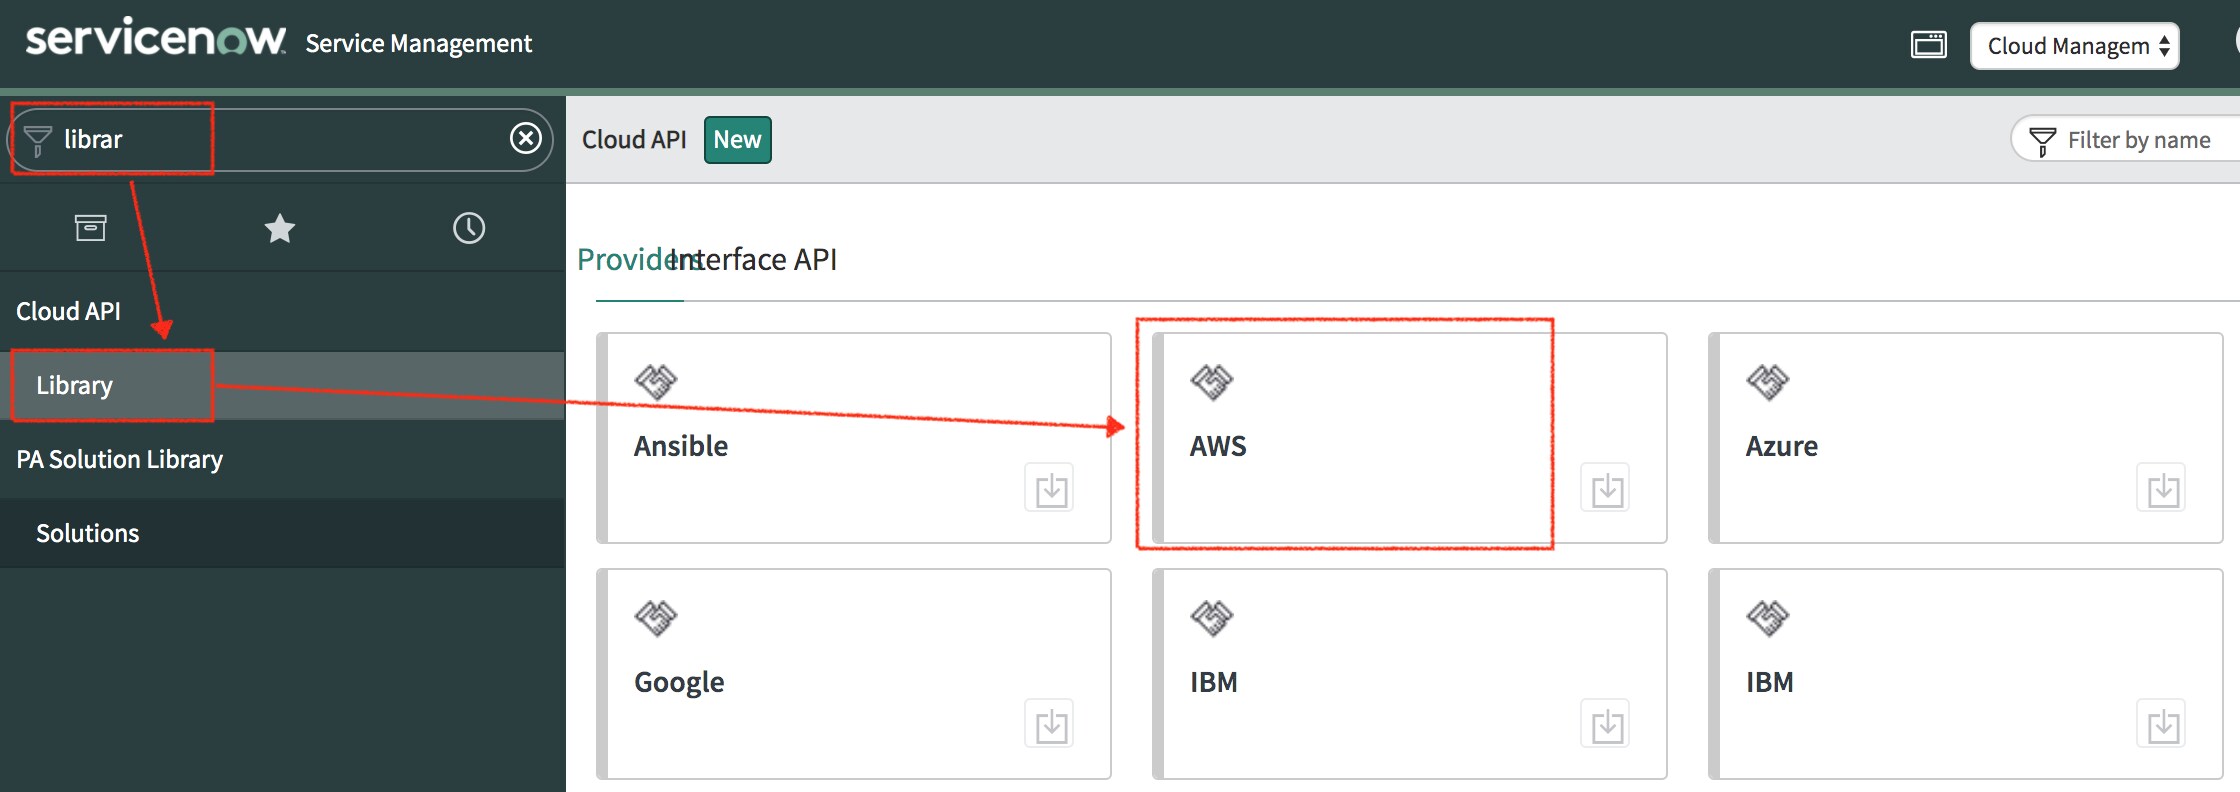
All these information are stored in the system. They can be seen from the main menu "Cloud API --> LIbrary" and choose your provider.
When the cloud template gets executed, the resources are provisioned in the cloud and CMP/CPG gets the information about these resources. Out of the box, we know a set of resource types. New and unsupported resource types can be added in the field. Cloud Discovery has an elaborate setup for each cloud provider's product type and the resource types under them.
1.1.1 Providers:
1.1.2 Product Types:
1.1.3 Resource Types:
This is the table where associate the resource type from the cloud provider to the CI class.
1.2 Targeted Discovery in Template Provisioning
When a template gets executed, we get to know the set of resources that have been provisioned in this execution. Typically we get the resource IDs and the associated resource type. In 1.1.3, we know the resource type to CI class mapping for the given provider. For known cases we populate the appropriate CI class. In cases where we dont know the resource types, we will populate the generic 'Cloud Resource (cmdb_ci_cmp_resource)' CMDB class.
CMP/CPG will populate the proper CI Class record if this mapping is there. It would just populate the object_id column alone. There is a mapping where we map the resource type to which CMP resource operation. If this mapping is present, CMP/CPG will execute this resource operation as a part of the overall provisioning and this resource operation call should populate the CMDB appropriately.
2. Targeted Discovery of Unsupported Resources
Recently one of our customers was provisioning Virtual Desktops in AWS ( AWS Workspaces) using CloudFormation Templates. All things were working as expected. The Virtual Desktop CI class was not populated as the AWS Workspace was an unsupported resource type.
They wanted the following:
- Populate the Virtual Desktop Class
- Create a Personal Computer record as well and have a 'Virtualized By' relation with the virtual desktop.
Let us go over the steps to have this accomplished.
The following are the areas we need to cover to go forward.
- CMDB Model - As with most of the things in ITOM, it starts with CMDB.
- Product Type / Resource Type . - Associate the CI Class to the cloud resource type
- Configure Discovery of the Resource - How this resource info will be got from the cloud and how it will get populated into CMDB.
- Associate Discovery of the resource to the Resource Type - Associate the Resource Type to the discovery from the previous step
If the above steps are covered, the template provisioning process will use this and populate the CMDB as a part of the provisioning.
2.1 CMDB Model
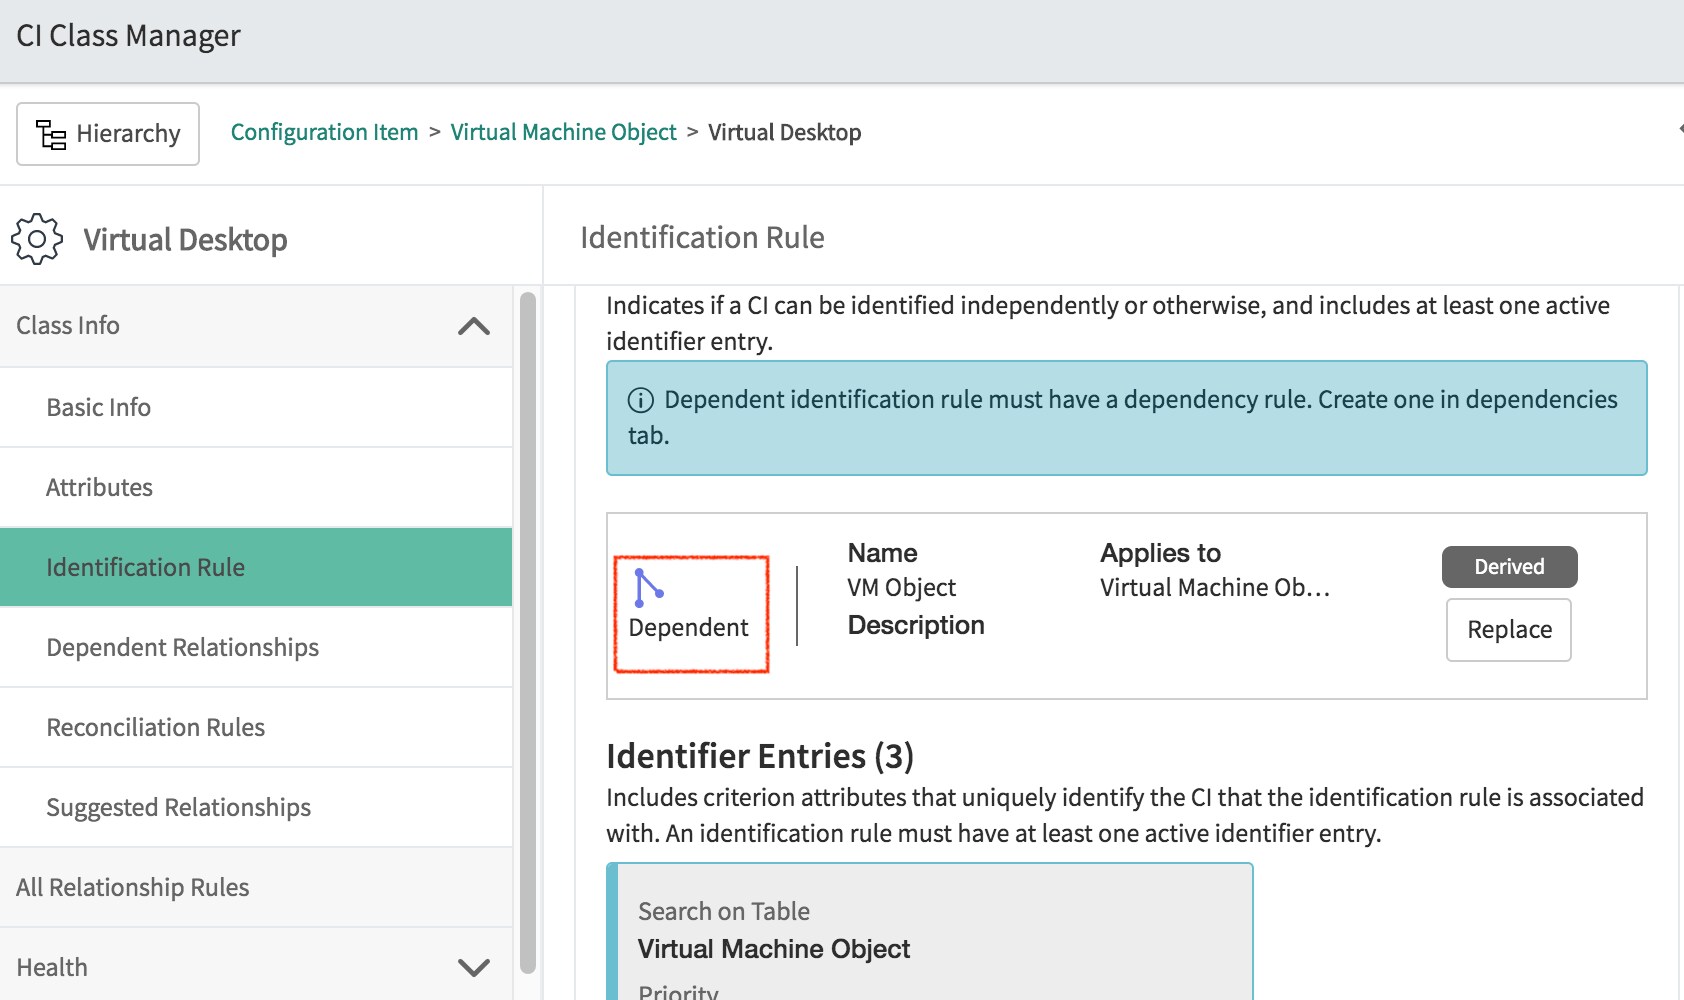
In this specific case the CI Class that needs to be populated was Virtual Desktop. We have an out of the box CI class Virtual Desktop ( cmdb_ci_virtual_desktop) and this suits us fine. If the definition of the class is proper, nothing more needs to be done.
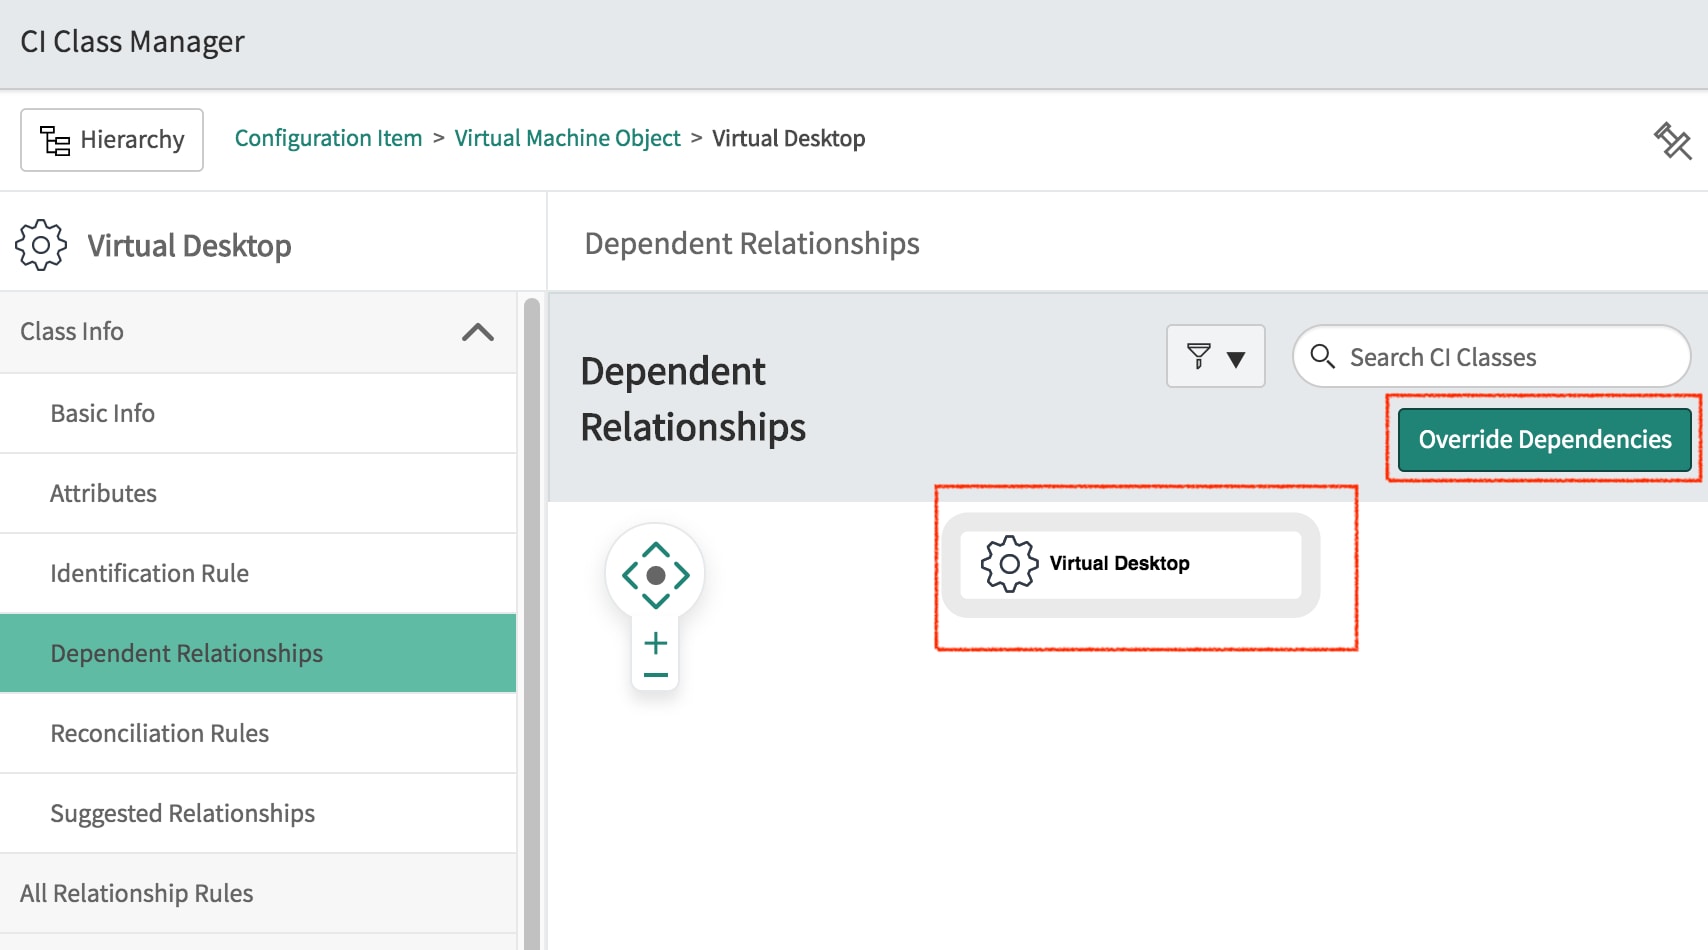
Virtual Desktop is defined as a dependent CI class in its identification. Unfortunately it does not say on which CI class it is dependent on. So you will have to add an 'Hosted on' relation with Logical Datacenter (cmdb_ci_logical_datacenter) class. Logical Datacenter so that we can use the Virtual Desktop for virtual desktops on all clouds.
what you will see in your environment would be like this:
Add the 'Hosted on' 'Logical Datacenter' as the AWS Workspaces are provisioned and hosted on a region.
Virtualized By Relation with Personal Computer
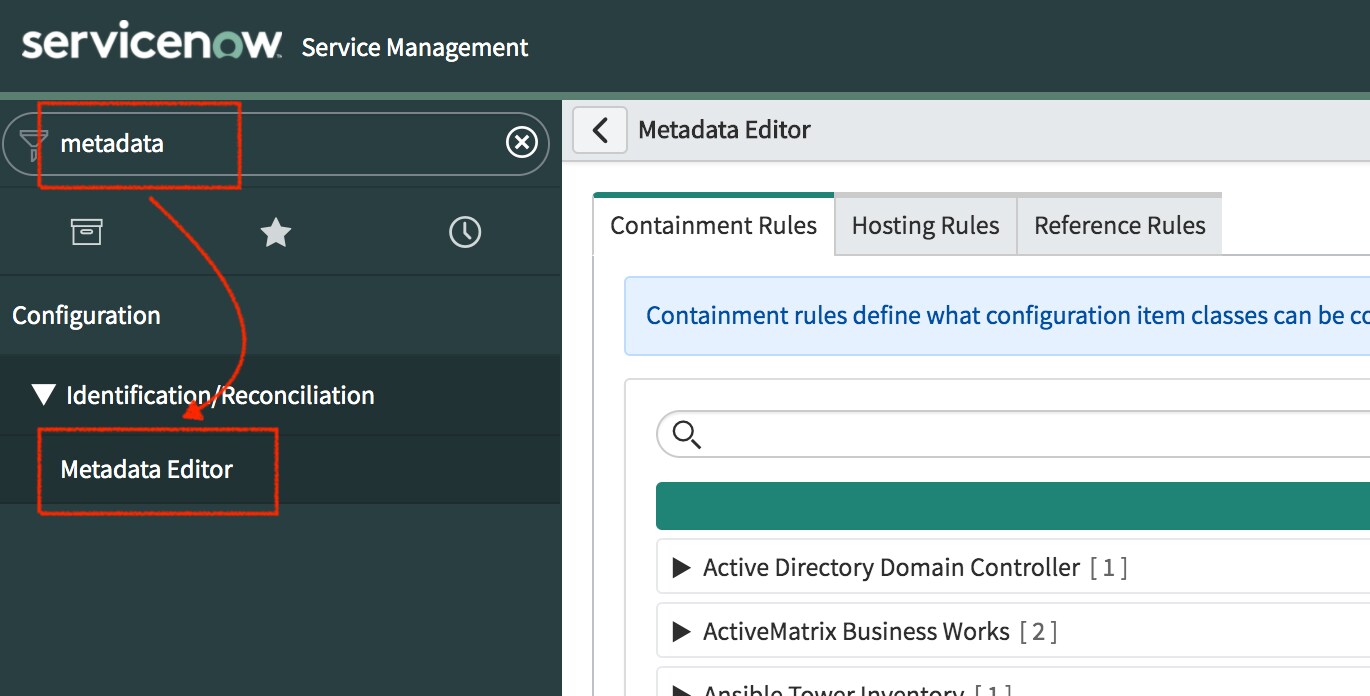
Get to the Metadata rules editor by "Main Menu ==> Identification/Reconciliation ==> Metadata Editor".
Then Click on the 'Reference Rules'.
Type in 'Personal Computer' and then add a new reference rule. Add the Virtualized By 'Virtual Desktop' relation.
This will enable the creation of the Virtualized By relation between an instance of Personal Computer and Virtual Desktop.
2.2 Product Type / Resource Type Associations
(The associated update set (https://developer.servicenow.com/connect.do#!/share/contents/4708895_targeted_discovery_of_aws_works... ) contains this information. Read it for understanding and if you would want to do it by yourself)
We need to create a product type definition for the new resource type. This basically implies that we need to create a record in the resource type table for the given resource type and associate it to a proper CI class. As explained earlier we need to create the resource type under a given product type.
(*The workspace Directory, Bundle are in a different color as we are not going to deal with in this article)
We will be creating a new Product type under AWS called 'AWS Workspace' and will tie it to 'Compute' category. Under this new product type we will create the resource type for AWS Workspace. Similarly you can do it for other resource types as well.
From the main menu, get to "Cloud API ==> Library ==> Provider ==> AWS".
Click on the 'New' under Cloud Products.
Then create the product type like this.
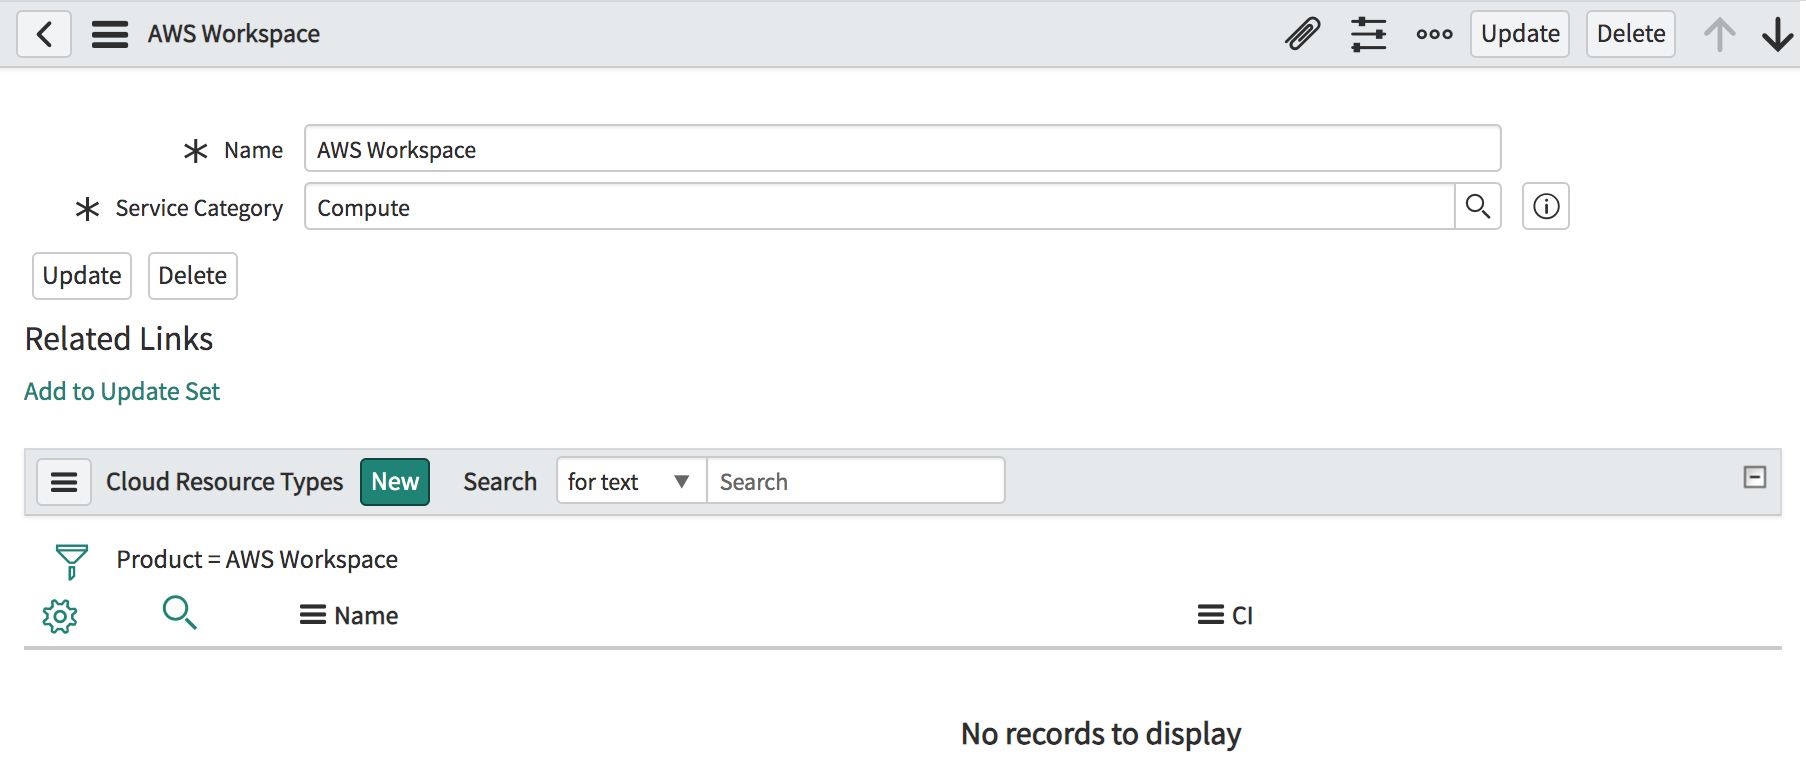
Click 'Submit' and create the record. Then go to the product type record. You will see a page like this with the product type and no associated record types.
Click on the 'New' button for the 'Cloud resource Types'. Create a resource type called 'AWS Workspace' and map to Virtual Descktop CI Class as shown below.
With these steps you have added metadata about AWS Workspace and its association in the CMDB landscape. The next step will be about how this data can be discovered and pushed into CMDB as defined in the association.
Configure Discovery of the Resource
(The associated update set (https://developer.servicenow.com/connect.do#!/share/contents/4708895_targeted_discovery_of_aws_works... ) contains this information. Read it for understanding and if you would want to do it by yourself)
In this case of AWS Workspace, we know it is a new resource type and we are not yet discovering it. So we need to write the code that will discover it. We will need to understand the API definitions of AWS Workspace as provided by AWS. Then make the call to get the needed info.
There are two steps here.
1) Add the Cloud API definitions to discover workspaces
2) Create an operation in AWS Datacenter to call this cloud API definition and then populate CMDB.
The AWS Workspace API info is provided here : https://docs.aws.amazon.com/workspaces/latest/api/welcome.html
The workspace listing API action is defined here: https://docs.aws.amazon.com/workspaces/latest/api/API_DescribeWorkspaces.html
When you get into the definitions deeper, you would know that this is a POST method and takes in a JSON for getting a subset of workspaces.
{ "BundleId": "string", "DirectoryId": "string", "Limit": number, "NextToken": "string", "UserName": "string", "WorkspaceIds": [ "string" ] }
For our need, we need to send a JSON which would look like this: { "WorkspaceIds": [ "workspace_id_here" ] }
The response looks like this:
{
  "Workspaces": [
    {
      "BundleId": "wsb-11111111",
      "ComputerName": "IP-2222222",
      "DirectoryId": "d-92672dcee1",
      "IpAddress": "172.16.0.7",
      "ModificationStates": [],
      "State": "STOPPED",
      "SubnetId": "subnet-0b14e8b12321",
      "UserName": "xxxx",
      "UserRealm": "corp.amazonworkspaces.com",
      "WorkspaceId": "ws-1111111",
      "WorkspaceProperties": {
        "ComputeTypeName": "STANDARD",
        "RecycleMode": "DISABLED",
        "RootVolumeSizeGib": 80,
        "RunningMode": "AUTO_STOP",
        "RunningModeAutoStopTimeoutInMinutes": 60,
        "UserVolumeSizeGib": 50
      }
    }
  ]
}
The workspace API is a bit different from the other infra API like EC2 where these Describe calls would be a GET. Here it is a POST.
Here we will use Cloud API feature to write the targeted discovery of a given workspace. We need to do the following in Cloud API:
- Create an interface called 'AWS Workspace Interface'. Add 'DiscoverWithPost' as an interface operation. Add Location and ObjectID as parameters for this operation.
- Create an API impl for the above interface and call it 'AWS Workspace API'. Create 'AWS Workspace' as the product when you create it.
Then add the API config overrides as described below. This is needed for credential mapping etc.
Then get to the 'CAPI Method Mappers' ==> DiscoverWithPost. Click on the 'Request Script' which is the scrip that will be invoked.
Then add the code chunk to call a mid script include that would do the discovery of the given workspace.
discoverCloudResourcesWithPost();

function discoverCloudResourcesWithPost() {
    ms.log("entered discoverCloudResourcesWithPost :");
    var awsAPI = new SampleWorkspaceDisco(this.parameters, this.headers);
    var action = 'WorkspacesService.DescribeWorkspaces';
    var payload = '{"WorkspaceIds":["'+this.parameters.get("ObjectID")+'"]}';
    var response = awsAPI.describeWorkspaces(action, payload);
    return response;
}
With this the Cloud API part is done.
The next step in this space is the creation of the resource operation.
Get to "Cloud Admin Portal ==> Design ==> Resource Block ==> AWS Datacenter".
Click on the 'Operations' tab. Then choose the 'Discovery Interface".
Provide 'DiscoverWorkspaces' as the name and other attributes as below.
Click on the 'Steps' tab and click the 'Add Step' button. Use 'AWS Workspace' as the provider, 'AWS Workspace Interface' as the API Interface, 'DiscoverWithPost' as the API method. Click submit.
So far we have tied this resource operation to call the cloud API that will get the data back from AWS. We now need to add code that will take this response and populate CMDB. For this we use the response processor. Response processors are scripts which take external data and create payload for CMDB's population API ( Identification and Reconciliation Engine).
We will be using the response mapping framework for creating the payload for CMDB. Additional details about this are present here: https://community.servicenow.com/community?id=community_article&sys_id=570d6c9e1b0f7f48ada243f6fe4bc...
The response mapping for the AWS workspace looks like this:
We create the response mapping script which calls this response mapping. We then associate this script to the resource operation step.
Now associate this response processor script to the resource oepration step.
With this the discovery of the resource and its population into CMDB is complete now. We will move to the next step which is about associating this resource operation to the resource type.
2.4 Associate Discovery to the Resource Type
(The associated update set (https://developer.servicenow.com/connect.do#!/share/contents/4708895_targeted_discovery_of_aws_works... ) contains this information. Read it for understanding and if you would want to do it by yourself)
The main step that is remaining is to associate the resource type to the resource operation. This is done in a mapping table called 'Cloud Resource Type Operations (sn_cmp_resource_type_operation)'.
Get to this table and create a new record here. Choose the resource type to be 'AWS::Workspaces::Workspace'. For Discovery Operation choose the recently created resource operation "DiscoverWorkspaces". For Discovery Step, choose the step under that operation which discovers the workspaces.
This record is also part of the update set.
This is pretty much it. In the next section we will go over a sample CFT that will create a workspace. We will bring this into the system and show the end to end.
3 Giving it a spin
|
Before creating the catalog item, you must have done the following: 1. Made the CMDB changes as per section 2.1 2. Done all the changes as per the other sections or imported the update set ( https://developer.servicenow.com/connect.do#!/share/contents/4708895_targeted_discovery_of_aws_works... ) |
We will take a CFT which will provision a AWS Workspace. Create a catalog item out of it and provision it. The CI classes should get properly populated at the end of provisioning.
The CFT for provisioning a workspace looks like this. You must replace the DirectoryId in the Mappings section with your specific ID.
AWSTemplateFormatVersion: '2010-09-09'
Description: >
  Amazon WorkSpaces Deployment Template.  This template will deploy the resources needed to
  deploy a single Amazon WorkSpaces desktop.
Mappings:
  WSTypeMap:
    Value-Win10-Desktop:
      BundleId: wsb-bh8rsxt14
      DirectoryId: REPLACE_WITH_YOUR_DIRECTORY_ID
    Standard-Win10-Desktop:
      BundleId: wsb-8vbljg4r6
      DirectoryId: REPLACE_WITH_YOUR_DIRECTORY_ID
    Performance-Win10-Desktop:
      BundleId: wsb-gm4d5tx2v
      DirectoryId: REPLACE_WITH_YOUR_DIRECTORY_ID

Parameters:
  UserName:
    Description: Your Windows login ID
    Type: String
  WorkstationType:
    AllowedValues:
      - Value-Win10-Desktop
      - Standard-Win10-Desktop
      - Performance-Win10-Desktop
    Description: Select the type of workstation
    Default: Value-Win10-Desktop
    Type: String

Resources:
  MyWorkSpace:
    Type: AWS::WorkSpaces::Workspace
    Properties:
      BundleId: !FindInMap
        - WSTypeMap
        - !Ref 'WorkstationType'
        - BundleId
      DirectoryId: !FindInMap
        - WSTypeMap
        - !Ref 'WorkstationType'
        - DirectoryId
      UserName: !Ref 'UserName'
      WorkspaceProperties:
        RunningMode: AUTO_STOP
Outputs:
  WorkSpaceID:
    Description: ID of the newly created WorkSpace
    Value: !Ref 'MyWorkSpace'
  UserName:
    Description: The username for WorkSpace
    Value: !Ref 'UserName'
  LogonURL:
    Description: Use this URL to download client software used to connect to your cloud desktop
    Value: 'https://clients.amazonworkspaces.com/'

Metadata:
  Comments: Template to deploy an Amazon WorkSpace
  LastUpdated: '2018-04-26'
  Version: 1.0.0
  AWS::CloudFormation::Interface:
    ParameterGroups:
    - Label:
        default: Setup
      Parameters:
        - UserName
        - WorkstationType
    ParameterLabels:
      UserName:
        default: User Name
      WorkstationType:
        default: Workstation Type
Get to the "Cloud Admin Portal ==> Design ==> Cloud Catalog Items" and create a new catalog item. Then ingest the CFT as usual. Activate the catalog item.
Get to the cloud user portal as usual and order it. You should get a stack something like this:
Click Submit. The backing workflow will start the work of provisioning the template and then populating CMDB properly.
- 22,512 Views
- Mark as Read
- Mark as New
- Bookmark
- Permalink
- Report Inappropriate Content
Hi Ashok,
Thanks for this insightful article!
I went through the scripts and looks like it'll only work in the case where we have ObjectID available.
For us there is a scenario where we are required to discover all the AWS workspaces in a particular datacenter. Is it possible to achieve this with the implementation you have explained?
- Mark as Read
- Mark as New
- Bookmark
- Permalink
- Report Inappropriate Content
Did you find any solution on this? i tried discovering all workspaces, but it only discovers 25 workspaces at a time. For the next lists of workspaces we need to use the next token id and get the rest of the workspaces
- Mark as Read
- Mark as New
- Bookmark
- Permalink
- Report Inappropriate Content
Yes, I figured it out and implemented the solution. Thanks!
- Mark as Read
- Mark as New
- Bookmark
- Permalink
- Report Inappropriate Content
That's great! When i use the next noken to get the next list of workspaces, i still get the old lists(25).
Would you mind sharing the way you have implemented?
Thanks
Hiran
- Mark as Read
- Mark as New
- Bookmark
- Permalink
- Report Inappropriate Content
Thanks Ashok, this was really helpful..
I tried to replicate the same (infact used the update set) but don't seem it is working. The Workspaces are still being discovered as Servers (Window).
The only call out I have is that we are not using the CMP, only basic discovery which I assume should not make any difference...
Is this can be an issue.. any thoughts?
- Mark as Read
- Mark as New
- Bookmark
- Permalink
- Report Inappropriate Content
Is the update set still available for this work? The links are not valid.