- Post History
- Subscribe to RSS Feed
- Mark as New
- Mark as Read
- Bookmark
- Subscribe
- Printer Friendly Page
- Report Inappropriate Content
on 04-18-2021 06:19 PM
RHEL Requirements - Installation - Terraform Enterprise - Terraform by HashiCorp
Go to AWS and setup
Terraform explained in 15 mins | Terraform Tutorial for Beginners - Bing video
Download Download Terraform - Terraform by HashiCorp
[root@rhel-7-1 terraform]# echo $PATH
/opt/rh/rh-postgresql10/root/usr/bin:/usr/local/sbin:/sbin:/bin:/usr/sbin:/usr/bin:/root/bin
copy extracted file to this location /usr/local/sbin
[root@rhel-7-1 sbin]# ls -ltr
total 77724
-rwxrwxr-x. 1 root root 79587950 Apr 19 01:34 terraform
[root@rhel-7-1 sbin]# terraform -help
Usage: terraform [global options] <subcommand> [args]
The available commands for execution are listed below.
The primary workflow commands are given first, followed by
less common or more advanced commands.
Main commands:
init Prepare your working directory for other commands
validate Check whether the configuration is valid
plan Show changes required by the current configuration
apply Create or update infrastructure
destroy Destroy previously-created infrastructure
All other commands:
console Try Terraform expressions at an interactive command prompt
fmt Reformat your configuration in the standard style
force-unlock Release a stuck lock on the current workspace
get Install or upgrade remote Terraform modules
graph Generate a Graphviz graph of the steps in an operation
import Associate existing infrastructure with a Terraform resource
login Obtain and save credentials for a remote host
logout Remove locally-stored credentials for a remote host
output Show output values from your root module
providers Show the providers required for this configuration
refresh Update the state to match remote systems
show Show the current state or a saved plan
state Advanced state management
taint Mark a resource instance as not fully functional
test Experimental support for module integration testing
untaint Remove the 'tainted' state from a resource instance
version Show the current Terraform version
workspace Workspace management
Global options (use these before the subcommand, if any):
-chdir=DIR Switch to a different working directory before executing the
given subcommand.
-help Show this help output, or the help for a specified subcommand.
-version An alias for the "version" subcommand.
terraform -install-autocomplete
Next download Docker
Docker installation on RHEL 7 Linux - LinuxConfig.org
How to install and setup Docker on RHEL 7/CentOS 7 - nixCraft (cyberciti.biz)
- Open the terminal application or login to the remote box using ssh command:
ssh user@remote-server-name - Type the following command to install Docker via yum provided by Red Hat:
sudo yum install docker - Type the following command to install the latest version of Docker CE (community edition):
sudo yum remove docker docker-common docker-selinux docker-engine
sudo yum-config-manager --add-repo https://download.docker.com/linux/centos/docker-ce.repo
sudo yum install docker-ce
Command line error: --add-repo option requires an argument
[root@rhel-7-1 sbin]# sudo yum-config-manager --add-repo https://download.docker.com/linux/centos/docker-ce.repo
Loaded plugins: product-id, subscription-manager
This system is not registered with an entitlement server. You can use subscription-manager to register.
adding repo from: https://download.docker.com/linux/centos/docker-ce.repo
grabbing file https://download.docker.com/linux/centos/docker-ce.repo to /etc/yum.repos.d/docker-ce.repo
repo saved to /etc/yum.repos.d/docker-ce.repo
[root@rhel-7-1 sbin]# sudo yum install docker-ce
Loaded plugins: product-id, search-disabled-repos, subscription-manager
This system is not registered with an entitlement server. You can use subscription-manager to register.
docker-ce-stable | 3.5 kB 00:00:00
epel/x86_64/metalink | 15 kB 00:00:00
google-cloud-sdk/signature | 844 B 00:00:00
google-cloud-sdk/signature | 1.4 kB 00:00:00 !!!
google-compute-engine/signature | 844 B 00:00:00
google-compute-engine/signature | 1.4 kB 00:00:00 !!!
rhui-rhel-7-server-rhui-debug-rpms | 1.8 kB 00:00:00
rhui-rhel-7-server-rhui-extras-debug-rpms | 1.8 kB 00:00:00
rhui-rhel-7-server-rhui-extras-rpms | 2.0 kB 00:00:00
rhui-rhel-7-server-rhui-extras-source-rpms | 2.1 kB 00:00:00
rhui-rhel-7-server-rhui-optional-debug-rpms | 1.8 kB 00:00:00
rhui-rhel-7-server-rhui-optional-rpms | 2.0 kB 00:00:00
rhui-rhel-7-server-rhui-optional-source-rpms | 2.1 kB 00:00:00
rhui-rhel-7-server-rhui-rh-common-debug-rpms | 2.1 kB 00:00:00
rhui-rhel-7-server-rhui-rh-common-rpms | 2.1 kB 00:00:00
rhui-rhel-7-server-rhui-rh-common-source-rpms | 2.1 kB 00:00:00
rhui-rhel-7-server-rhui-rpms | 2.0 kB 00:00:00
rhui-rhel-7-server-rhui-source-rpms | 2.1 kB 00:00:00
rhui-rhel-7-server-rhui-supplementary-debug-rpms | 2.1 kB 00:00:00
rhui-rhel-7-server-rhui-supplementary-rpms | 2.0 kB 00:00:00
rhui-rhel-7-server-rhui-supplementary-source-rpms | 2.1 kB 00:00:00
rhui-rhel-server-rhui-rhscl-7-debug-rpms | 2.0 kB 00:00:00
Running transaction check
Running transaction test
Transaction test succeeded
Running transaction
Installing : 2:container-selinux-2.119.2-1.911c772.el7_8.noarch 1/9
Installing : containerd.io-1.4.4-3.1.el7.x86_64 2/9
Installing : 1:docker-ce-cli-20.10.6-3.el7.x86_64 3/9
Installing : docker-scan-plugin-0.7.0-3.el7.x86_64 4/9
Installing : slirp4netns-0.4.3-4.el7_8.x86_64 5/9
Installing : fuse3-libs-3.6.1-4.el7.x86_64 6/9
Installing : fuse-overlayfs-0.7.2-6.el7_8.x86_64 7/9
Installing : 3:docker-ce-20.10.6-3.el7.x86_64 8/9
Installing : docker-ce-rootless-extras-20.10.6-3.el7.x86_64 9/9
Verifying : fuse3-libs-3.6.1-4.el7.x86_64 1/9
Verifying : docker-ce-rootless-extras-20.10.6-3.el7.x86_64 2/9
Verifying : fuse-overlayfs-0.7.2-6.el7_8.x86_64 3/9
Verifying : 3:docker-ce-20.10.6-3.el7.x86_64 4/9
Verifying : docker-scan-plugin-0.7.0-3.el7.x86_64 5/9
Verifying : slirp4netns-0.4.3-4.el7_8.x86_64 6/9
Verifying : 2:container-selinux-2.119.2-1.911c772.el7_8.noarch 7/9
Verifying : 1:docker-ce-cli-20.10.6-3.el7.x86_64 8/9
Verifying : containerd.io-1.4.4-3.1.el7.x86_64 9/9
rhui-rhel-7-server-rhui-extras-rpms/x86_64/productid | 2.1 kB 00:00:00
rhui-rhel-7-server-rhui-optional-rpms/7Server/x86_64/productid | 2.1 kB 00:00:00
rhui-rhel-7-server-rhui-rpms/7Server/x86_64/productid | 2.1 kB 00:00:00
rhui-rhel-7-server-rhui-supplementary-rpms/7Server/x86_64/productid | 2.1 kB 00:00:00
rhui-rhel-server-rhui-rhscl-7-debug-rpms/7Server/x86_64/productid | 2.1 kB 00:00:00
rhui-rhel-server-rhui-rhscl-7-rpms/7Server/x86_64/productid | 2.1 kB 00:00:00
Installed:
docker-ce.x86_64 3:20.10.6-3.el7
Dependency Installed:
container-selinux.noarch 2:2.119.2-1.911c772.el7_8 containerd.io.x86_64 0:1.4.4-3.1.el7 docker-ce-cli.x86_64 1:20.10.6-3.el7
docker-ce-rootless-extras.x86_64 0:20.10.6-3.el7 docker-scan-plugin.x86_64 0:0.7.0-3.el7 fuse-overlayfs.x86_64 0:0.7.2-6.el7_8
fuse3-libs.x86_64 0:3.6.1-4.el7 slirp4netns.x86_64 0:0.4.3-4.el7_8
Complete!
sudo systemctl enable docker.service
[root@rhel-7-1 terraform-docker-demo]# sudo systemctl enable docker.service
Created symlink from /etc/systemd/system/multi-user.target.wants/docker.service to /usr/lib/systemd/system/docker.service.
[root@rhel-7-1 sbin]# cd /etc
[root@rhel-7-1 etc]# mkdir terraform-docker-demo && cd $_
[root@rhel-7-1 terraform-docker-demo]# pwd
/etc/terraform-docker-demo
[root@rhel-7-1 terraform-docker-demo]#
[root@rhel-7-1 terraform-docker-demo]# ip a
1: lo: <LOOPBACK,UP,LOWER_UP> mtu 65536 qdisc noqueue state UNKNOWN group default qlen 1000
link/loopback 00:00:00:00:00:00 brd 00:00:00:00:00:00
inet 127.0.0.1/8 scope host lo
valid_lft forever preferred_lft forever
inet6 ::1/128 scope host
valid_lft forever preferred_lft forever
2: eth0: <BROADCAST,MULTICAST,UP,LOWER_UP> mtu 1460 qdisc mq state UP group default qlen 1000
link/ether 42:01:0a:80:00:05 brd ff:ff:ff:ff:ff:ff
inet 10.128.0.5/32 brd 10.128.0.5 scope global noprefixroute dynamic eth0
valid_lft 2136sec preferred_lft 2136sec
inet6 fe80::a724:8f3e:f952:e654/64 scope link noprefixroute
valid_lft forever preferred_lft forever
[root@rhel-7-1 terraform-docker-demo]# systemctl start docker
[root@rhel-7-1 terraform-docker-demo]# | g^C -ef
[root@rhel-7-1 terraform-docker-demo]# ps -ef | grep docker
root 3347 1 1 01:48 ? 00:00:00 /usr/bin/dockerd -H fd:// --containerd=/run/containerd/containerd.sock
root 3494 2084 0 01:48 pts/0 00:00:00 grep --color=auto docker
Test Terraform
Make a new file main.tf
terraform {
required_providers {
docker = {
source = "kreuzwerker/docker"
}
}
}
provider "docker" {}
resource "docker_image" "nginx" {
name = "nginx:latest"
keep_locally = false
}
resource "docker_container" "nginx" {
image = docker_image.nginx.latest
name = "tutorial"
ports {
internal = 80
external = 8000
}
}
[root@rhel-7-1 terraform-docker-demo]# terraform init
Initializing the backend...
Initializing provider plugins...
- Finding latest version of kreuzwerker/docker...
- Installing kreuzwerker/docker v2.11.0...
- Installed kreuzwerker/docker v2.11.0 (self-signed, key ID 24E54F214569A8A5)
Partner and community providers are signed by their developers.
If you'd like to know more about provider signing, you can read about it here:
https://www.terraform.io/docs/cli/plugins/signing.html
Terraform has created a lock file .terraform.lock.hcl to record the provider
selections it made above. Include this file in your version control repository
so that Terraform can guarantee to make the same selections by default when
you run "terraform init" in the future.
Terraform has been successfully initialized!
You may now begin working with Terraform. Try running "terraform plan" to see
any changes that are required for your infrastructure. All Terraform commands
should now work.
If you ever set or change modules or backend configuration for Terraform,
rerun this command to reinitialize your working directory. If you forget, other
commands will detect it and remind you to do so if necessary.
[root@rhel-7-1 terraform-docker-demo]# terraform apply
Terraform used the selected providers to generate the following execution plan. Resource actions are indicated with the following symbols:
+ create
Terraform will perform the following actions:
# docker_container.nginx will be created
+ resource "docker_container" "nginx" {
+ attach = false
+ bridge = (known after apply)
+ command = (known after apply)
+ container_logs = (known after apply)
+ entrypoint = (known after apply)
+ env = (known after apply)
+ exit_code = (known after apply)
+ gateway = (known after apply)
+ hostname = (known after apply)
+ id = (known after apply)
+ image = (known after apply)
+ init = (known after apply)
+ ip_address = (known after apply)
+ ip_prefix_length = (known after apply)
+ ipc_mode = (known after apply)
+ log_driver = "json-file"
+ logs = false
+ must_run = true
+ name = "tutorial"
+ network_data = (known after apply)
+ read_only = false
+ remove_volumes = true
+ restart = "no"
+ rm = false
+ security_opts = (known after apply)
+ shm_size = (known after apply)
+ start = true
+ stdin_open = false
+ tty = false
+ healthcheck {
+ interval = (known after apply)
+ retries = (known after apply)
+ start_period = (known after apply)
+ test = (known after apply)
+ timeout = (known after apply)
}
+ labels {
+ label = (known after apply)
+ value = (known after apply)
}
+ ports {
+ external = 8000
+ internal = 80
+ ip = "0.0.0.0"
+ protocol = "tcp"
}
}
# docker_image.nginx will be created
+ resource "docker_image" "nginx" {
+ id = (known after apply)
+ keep_locally = false
+ latest = (known after apply)
+ name = "nginx:latest"
+ output = (known after apply)
}
Plan: 2 to add, 0 to change, 0 to destroy.
Do you want to perform these actions?
Terraform will perform the actions described above.
Only 'yes' will be accepted to approve.
Enter a value: yes
docker_image.nginx: Creating...
docker_image.nginx: Creation complete after 6s [id=sha256:62d49f9bab67f7c70ac3395855bf01389eb3175b374e621f6f191bf31b54cd5bnginx:latest]
docker_container.nginx: Creating...
docker_container.nginx: Creation complete after 1s [id=1c66e5c573fc713cbabfa3f7c6037cc3ce22376e71b86c24fd4f0932561501b1]
Apply complete! Resources: 2 added, 0 changed, 0 destroyed.
[root@rhel-7-1 terraform-docker-demo]# docker ps
CONTAINER ID IMAGE COMMAND CREATED STATUS PORTS NAMES
1c66e5c573fc 62d49f9bab67 "/docker-entrypoint.…" About a minute ago Up About a minute 0.0.0.0:8000->80/tcp tutorial
Getting Started | Terraform Cloud
[root@rhel-7-1 ~]# terraform login
Terraform will request an API token for app.terraform.io using your browser.
If login is successful, Terraform will store the token in plain text in
the following file for use by subsequent commands:
/root/.terraform.d/credentials.tfrc.json
Do you want to proceed?
Only 'yes' will be accepted to confirm.
Enter a value: yes
---------------------------------------------------------------------------------
xdg-open: no method available for opening 'https://app.terraform.io/app/settings/tokens?source=terraform-login'
Open the following URL to access the tokens page for app.terraform.io:
https://app.terraform.io/app/settings/tokens?source=terraform-login
---------------------------------------------------------------------------------
Generate a token using your browser, and copy-paste it into this prompt.
Terraform will store the token in plain text in the following file
for use by subsequent commands:
/root/.terraform.d/credentials.tfrc.json
Token for app.terraform.io:
Enter a value:
Retrieved token for user anilvaranasi_02
---------------------------------------------------------------------------------
Success! Terraform has obtained and saved an API token.
The new API token will be used for any future Terraform command that must make
authenticated requests to app.terraform.io.
[root@rhel-7-1 .terraform.d]# git clone https://github.com/hashicorp/tfc-getting-started.git
Cloning into 'tfc-getting-started'...
remote: Enumerating objects: 127, done.
remote: Counting objects: 100% (127/127), done.
remote: Compressing objects: 100% (61/61), done.
remote: Total 127 (delta 60), reused 108 (delta 44), pack-reused 0
Receiving objects: 100% (127/127), 29.63 KiB | 0 bytes/s, done.
Resolving deltas: 100% (60/60), done.
[root@rhel-7-1 .terraform.d]#
[root@rhel-7-1 .terraform.d]# cd tfc-getting-started && ./scripts/setup.sh
It looks like 'jq' is not installed; please install it and run this setup script again.
How to Install jq(JSON processor) on RHEL/CentOS 7/8 | CyberITHub
[root@rhel-7-1 tfc-getting-started]# yum install jq -y
Loaded plugins: product-id, search-disabled-repos, subscription-manager
This system is not registered with an entitlement server. You can use subscription-manager to register.
Resolving Dependencies
--> Running transaction check
---> Package jq.x86_64 0:1.6-2.el7 will be installed
--> Processing Dependency: libonig.so.5()(64bit) for package: jq-1.6-2.el7.x86_64
--> Running transaction check
---> Package oniguruma.x86_64 0:6.8.2-1.el7 will be installed
--> Finished Dependency Resolution
Dependencies Resolved
====================================================================================================
Package Arch Version Repository Size
====================================================================================================
Installing:
jq x86_64 1.6-2.el7 epel 167 k
Installing for dependencies:
oniguruma x86_64 6.8.2-1.el7 epel 181 k
Transaction Summary
====================================================================================================
Install 1 Package (+1 Dependent package)
Total download size: 348 k
Installed size: 1.0 M
Downloading packages:
(1/2): jq-1.6-2.el7.x86_64.rpm | 167 kB 00:00:00
(2/2): oniguruma-6.8.2-1.el7.x86_64.rpm | 181 kB 00:00:00
----------------------------------------------------------------------------------------------------
Total 606 kB/s | 348 kB 00:00:00
Running transaction check
Running transaction test
Transaction test succeeded
Running transaction
Installing : oniguruma-6.8.2-1.el7.x86_64 1/2
Installing : jq-1.6-2.el7.x86_64 2/2
Verifying : oniguruma-6.8.2-1.el7.x86_64 1/2
Verifying : jq-1.6-2.el7.x86_64 2/2
Installed:
jq.x86_64 0:1.6-2.el7
Dependency Installed:
oniguruma.x86_64 0:6.8.2-1.el7
Complete!
[root@rhel-7-1 ~]# rpm -qa | grep -i jq
jq-1.6-2.el7.x86_64
[root@rhel-7-1 ~]# git clone https://github.com/hashicorp/tfc-getting-started.git
Cloning into 'tfc-getting-started'...
remote: Enumerating objects: 127, done.
remote: Counting objects: 100% (127/127), done.
remote: Compressing objects: 100% (61/61), done.
remote: Total 127 (delta 60), reused 108 (delta 44), pack-reused 0
Receiving objects: 100% (127/127), 29.63 KiB | 0 bytes/s, done.
Resolving deltas: 100% (60/60), done.
[root@rhel-7-1 ~]# ls -ltr
total 0
drwxr-xr-x. 4 root root 135 Apr 19 02:33 tfc-getting-started
[root@rhel-7-1 ~]# pwd
/root
[root@rhel-7-1 ~]# cd tfc-getting-started
[root@rhel-7-1 tfc-getting-started]# ./scripts/setup.sh
--------------------------------------------------------------------------
Getting Started with Terraform Cloud
-------------------------------------------------------------------------
Terraform Cloud offers secure, easy-to-use remote state management and allows
you to run Terraform remotely in a controlled environment. Terraform Cloud runs
can be performed on demand or triggered automatically by various events.
This script will set up everything you need to get started. You'll be
applying some example infrastructure - for free - in less than a minute.
First, we'll do some setup and configure Terraform to use Terraform Cloud.
Press any key to continue (ctrl-c to quit):
Creating an organization and workspace...
Writing remote backend configuration to backend.tf...
========================================================================
Ready to go; the example configuration is set up to use Terraform Cloud!
An example workspace named 'getting-started' was created for you.
You can view this workspace in the Terraform Cloud UI here:
https://app.terraform.io/app/example-org-a87d2c/workspaces/getting-started
Next, we'll run 'terraform init' to initialize the backend and providers:
$ terraform init
Press any key to continue (ctrl-c to quit):
Initializing the backend...
Successfully configured the backend "remote"! Terraform will automatically
use this backend unless the backend configuration changes.
Initializing provider plugins...
- Finding latest version of hashicorp/fakewebservices...
- Installing hashicorp/fakewebservices v0.2.1...
- Installed hashicorp/fakewebservices v0.2.1 (signed by HashiCorp)
Terraform has created a lock file .terraform.lock.hcl to record the provider
selections it made above. Include this file in your version control repository
so that Terraform can guarantee to make the same selections by default when
you run "terraform init" in the future.
Terraform has been successfully initialized!
You may now begin working with Terraform. Try running "terraform plan" to see
any changes that are required for your infrastructure. All Terraform commands
should now work.
If you ever set or change modules or backend configuration for Terraform,
rerun this command to reinitialize your working directory. If you forget, other
commands will detect it and remind you to do so if necessary.
...
========================================================================
Now it’s time for 'terraform plan', to see what changes Terraform will perform:
$ terraform plan
Press any key to continue (ctrl-c to quit):
Running plan in the remote backend. Output will stream here. Pressing Ctrl-C
will stop streaming the logs, but will not stop the plan running remotely.
Preparing the remote plan...
To view this run in a browser, visit:
https://app.terraform.io/app/example-org-a87d2c/getting-started/runs/run-fMUiHgiau7ZbJGTV
Waiting for the plan to start...
Terraform v0.15.0
on linux_amd64
Configuring remote state backend...
Initializing Terraform configuration...
Terraform used the selected providers to generate the following execution
plan. Resource actions are indicated with the following symbols:
+ create
Terraform will perform the following actions:
# fakewebservices_database.prod_db will be created
+ resource "fakewebservices_database" "prod_db" {
+ id = (known after apply)
+ name = "Production DB"
+ size = 256
}
# fakewebservices_load_balancer.primary_lb will be created
+ resource "fakewebservices_load_balancer" "primary_lb" {
+ id = (known after apply)
+ name = "Primary Load Balancer"
+ servers = [
+ "Server 1",
+ "Server 2",
]
}
# fakewebservices_server.servers[0] will be created
+ resource "fakewebservices_server" "servers" {
+ id = (known after apply)
+ name = "Server 1"
+ type = "t2.micro"
+ vpc = "Primary VPC"
}
# fakewebservices_server.servers[1] will be created
+ resource "fakewebservices_server" "servers" {
+ id = (known after apply)
+ name = "Server 2"
+ type = "t2.micro"
+ vpc = "Primary VPC"
}
# fakewebservices_vpc.primary_vpc will be created
+ resource "fakewebservices_vpc" "primary_vpc" {
+ cidr_block = "0.0.0.0/1"
+ id = (known after apply)
+ name = "Primary VPC"
}
Plan: 5 to add, 0 to change, 0 to destroy.
------------------------------------------------------------------------
Cost estimation:
Waiting for cost estimate to complete...
Cost estimation:
Resources: 0 of 5 estimated
$0.0/mo +$0.0
...
========================================================================
The plan is complete!
This plan was initiated from your local machine, but executed within
Terraform Cloud!
Terraform Cloud runs Terraform on disposable virtual machines in
its own cloud infrastructure. This 'remote execution' helps provide consistency
and visibility for critical provisioning operations. It also enables notifications,
version control integration, and powerful features like Sentinel policy enforcement
and cost estimation (shown in the output above).
To actually make changes, we'll run 'terraform apply'. We'll also auto-approve
the result, since this is an example:
$ terraform apply -auto-approve
Press any key to continue (ctrl-c to quit):
Running apply in the remote backend. Output will stream here. Pressing Ctrl-C
will cancel the remote apply if it's still pending. If the apply started it
will stop streaming the logs, but will not stop the apply running remotely.
Preparing the remote apply...
To view this run in a browser, visit:
https://app.terraform.io/app/example-org-a87d2c/getting-started/runs/run-tUTiPtBf9S7S9GEG
Waiting for the plan to start...
Terraform v0.15.0
on linux_amd64
Configuring remote state backend...
Initializing Terraform configuration...
Terraform used the selected providers to generate the following execution
plan. Resource actions are indicated with the following symbols:
+ create
Terraform will perform the following actions:
# fakewebservices_database.prod_db will be created
+ resource "fakewebservices_database" "prod_db" {
+ id = (known after apply)
+ name = "Production DB"
+ size = 256
}
# fakewebservices_load_balancer.primary_lb will be created
+ resource "fakewebservices_load_balancer" "primary_lb" {
+ id = (known after apply)
+ name = "Primary Load Balancer"
+ servers = [
+ "Server 1",
+ "Server 2",
]
}
# fakewebservices_server.servers[0] will be created
+ resource "fakewebservices_server" "servers" {
+ id = (known after apply)
+ name = "Server 1"
+ type = "t2.micro"
+ vpc = "Primary VPC"
}
# fakewebservices_server.servers[1] will be created
+ resource "fakewebservices_server" "servers" {
+ id = (known after apply)
+ name = "Server 2"
+ type = "t2.micro"
+ vpc = "Primary VPC"
}
# fakewebservices_vpc.primary_vpc will be created
+ resource "fakewebservices_vpc" "primary_vpc" {
+ cidr_block = "0.0.0.0/1"
+ id = (known after apply)
+ name = "Primary VPC"
}
Plan: 5 to add, 0 to change, 0 to destroy.
------------------------------------------------------------------------
Cost estimation:
Waiting for cost estimate to complete...
Cost estimation:
Resources: 0 of 5 estimated
$0.0/mo +$0.0
------------------------------------------------------------------------
Waiting for the apply to start...
fakewebservices_vpc.primary_vpc: Creating...
fakewebservices_vpc.primary_vpc: Creation complete after 0s [id=fakevpc-6sxT2yu6aVPPRLeR]
fakewebservices_server.servers[1]: Creating...
fakewebservices_server.servers[0]: Creating...
fakewebservices_database.prod_db: Creation complete after 0s [id=fakedb-zhUQeD3posqXGudJ]
fakewebservices_server.servers[1]: Creation complete after 0s [id=fakeserver-Sa2N2gNJCc5vYJ6F]
fakewebservices_server.servers[0]: Creation complete after 0s [id=fakeserver-9tZiFd1fBL5MZhu8]
fakewebservices_load_balancer.primary_lb: Creating...
fakewebservices_load_balancer.primary_lb: Creation complete after 0s [id=fakelb-4oy3kg2CtEgGJW1n]
Apply complete! Resources: 5 added, 0 changed, 0 destroyed.
Apply complete! Resources: 0 added, 0 changed, 0 destroyed.
...
========================================================================
You did it! You just provisioned infrastructure with Terraform Cloud!
The organization we created here has a 30-day free trial of the Team &
Governance tier features. After the trial ends, you'll be moved to the Free tier.
You now have:
* Workspaces for organizing your infrastructure. Terraform Cloud manages
infrastructure collections with workspaces instead of directories. You
can view your workspace here:
https://app.terraform.io/app/example-org-a87d2c/workspaces/getting-started
* Remote state management, with the ability to share outputs across
workspaces. We've set up state management for you in your current
workspace, and you can reference state from other workspaces using
the 'terraform_remote_state' data source.
* Much more!
To see the mock infrastructure you just provisioned and continue exploring
Terraform Cloud, visit:
https://app.terraform.io/fake-web-services
[root@rhel-7-1 tfc-getting-started]#
upload aws cli zip file, unzip in aws folder
/tmp/aws/aws
sudo ./aws/install
[root@rhel-7-1 aws]# sudo ./install
You can now run: /usr/local/bin/aws --version
[root@rhel-7-1 aws]# /usr/local/bin/aws --version
aws-cli/2.1.38 Python/3.8.8 Linux/3.10.0-1160.15.2.el7.x86_64 exe/x86_64.rhel.7 prompt/off
[root@rhel-7-1 aws]# /usr/local/bin/aws configure
AWS Access Key ID [None]: AKIAXNXXXXXXXXLBFB
AWS Secret Access Key [None]: XXXXXX
Default region name [None]: us-east-2
Default output format [None]:
mkdir learn-terraform-aws-instance
cd learn-terraform-aws-instance
touch main.tf
vi main.tf
terraform {
required_providers {
aws = {
source = "hashicorp/aws"
version = "~> 3.27"
}
}
}
provider "aws" {
profile = "default"
region = "us-east-2"
}
resource "aws_instance" "app_server" {
ami = "ami-0ebc8f6f580a04647"
instance_type = "t2.micro"
tags = {
Name = "ExampleAppServerInstance"
}
}
[root@rhel-7-1 aws]# mkdir learn-terraform-aws-instance
[root@rhel-7-1 aws]# cd learn-terraform-aws-instance
[root@rhel-7-1 learn-terraform-aws-instance]# touch main.tf
[root@rhel-7-1 learn-terraform-aws-instance]# vi main.tf
[root@rhel-7-1 learn-terraform-aws-instance]# terraform init
Initializing the backend...
Initializing provider plugins...
- Finding hashicorp/aws versions matching "~> 3.27"...
- Installing hashicorp/aws v3.37.0...
- Installed hashicorp/aws v3.37.0 (signed by HashiCorp)
Terraform has created a lock file .terraform.lock.hcl to record the provider
selections it made above. Include this file in your version control repository
so that Terraform can guarantee to make the same selections by default when
you run "terraform init" in the future.
Terraform has been successfully initialized!
You may now begin working with Terraform. Try running "terraform plan" to see
any changes that are required for your infrastructure. All Terraform commands
should now work.
If you ever set or change modules or backend configuration for Terraform,
rerun this command to reinitialize your working directory. If you forget, other
commands will detect it and remind you to do so if necessary.
[root@rhel-7-1 learn-terraform-aws-instance]# terraform fmt
[root@rhel-7-1 learn-terraform-aws-instance]# terraform validate
Success! The configuration is valid.
[root@rhel-7-1 learn-terraform-aws-instance]# terraform apply
Terraform used the selected providers to generate the following execution plan. Resource actions are indicated with the following symbols:
+ create
Terraform will perform the following actions:
# aws_instance.app_server will be created
+ resource "aws_instance" "app_server" {
+ ami = "ami-830c94e3"
+ arn = (known after apply)
+ associate_public_ip_address = (known after apply)
+ availability_zone = (known after apply)
+ cpu_core_count = (known after apply)
+ cpu_threads_per_core = (known after apply)
+ get_password_data = false
+ host_id = (known after apply)
+ id = (known after apply)
+ instance_state = (known after apply)
+ instance_type = "t2.micro"
+ ipv6_address_count = (known after apply)
+ ipv6_addresses = (known after apply)
+ key_name = (known after apply)
+ outpost_arn = (known after apply)
+ password_data = (known after apply)
+ placement_group = (known after apply)
+ primary_network_interface_id = (known after apply)
+ private_dns = (known after apply)
+ private_ip = (known after apply)
+ public_dns = (known after apply)
+ public_ip = (known after apply)
+ secondary_private_ips = (known after apply)
+ security_groups = (known after apply)
+ source_dest_check = true
+ subnet_id = (known after apply)
+ tags = {
+ "Name" = "ExampleAppServerInstance"
}
+ tenancy = (known after apply)
+ vpc_security_group_ids = (known after apply)
+ ebs_block_device {
+ delete_on_termination = (known after apply)
+ device_name = (known after apply)
+ encrypted = (known after apply)
+ iops = (known after apply)
+ kms_key_id = (known after apply)
+ snapshot_id = (known after apply)
+ tags = (known after apply)
+ throughput = (known after apply)
+ volume_id = (known after apply)
+ volume_size = (known after apply)
+ volume_type = (known after apply)
}
+ enclave_options {
+ enabled = (known after apply)
}
+ ephemeral_block_device {
+ device_name = (known after apply)
+ no_device = (known after apply)
+ virtual_name = (known after apply)
}
+ metadata_options {
+ http_endpoint = (known after apply)
+ http_put_response_hop_limit = (known after apply)
+ http_tokens = (known after apply)
}
+ network_interface {
+ delete_on_termination = (known after apply)
+ device_index = (known after apply)
+ network_interface_id = (known after apply)
}
+ root_block_device {
+ delete_on_termination = (known after apply)
+ device_name = (known after apply)
+ encrypted = (known after apply)
+ iops = (known after apply)
+ kms_key_id = (known after apply)
+ tags = (known after apply)
+ throughput = (known after apply)
+ volume_id = (known after apply)
+ volume_size = (known after apply)
+ volume_type = (known after apply)
}
}
Plan: 1 to add, 0 to change, 0 to destroy.
Do you want to perform these actions?
Terraform will perform the actions described above.
Only 'yes' will be accepted to approve.
aws_instance.app_server: Creating...
aws_instance.app_server: Still creating... [10s elapsed]
aws_instance.app_server: Still creating... [20s elapsed]
aws_instance.app_server: Still creating... [30s elapsed]
aws_instance.app_server: Creation complete after 34s [id=i-0f6c4a581190579ef]
Apply complete! Resources: 1 added, 0 changed, 0 destroyed.

[root@rhel-7-1 learn-terraform-aws-instance]# terraform show
# aws_instance.app_server:
resource "aws_instance" "app_server" {
ami = "ami-0ebc8f6f580a04647"
arn = "arn:aws:ec2:us-east-2:215495:instance/i-017bc1079c"
associate_public_ip_address = true
availability_zone = "us-east-2a"
cpu_core_count = 1
cpu_threads_per_core = 1
disable_api_termination = false
ebs_optimized = false
get_password_data = false
hibernation = false
id = "i-017bce6xxxx079c"
instance_state = "running"
instance_type = "t2.micro"
ipv6_address_count = 0
ipv6_addresses = []
monitoring = false
primary_network_interface_id = "eni-0a929dcfab"
private_dns = "ip-172-31-7-206.us-east-2.compute.internal"
private_ip = "172.31.7.206"
public_dns = "ec2-18-116-269.us-east-2.compute.amazonaws.com"
public_ip = "18.116.xx.9"
secondary_private_ips = []
security_groups = [
"default",
]
source_dest_check = true
subnet_id = "subnet-5xxxxe6c3b"
tags = {
"Name" = "ExampleAppServerInstance"
}
tenancy = "default"
vpc_security_group_ids = [
"sg-e9578a9d",
]
credit_specification {
cpu_credits = "standard"
}
enclave_options {
enabled = false
}
metadata_options {
http_endpoint = "enabled"
http_put_response_hop_limit = 1
http_tokens = "optional"
}
root_block_device {
delete_on_termination = true
device_name = "/dev/sda1"
encrypted = false
iops = 100
tags = {}
throughput = 0
volume_id = "vol-0ec7xxxxxx51c8842"
volume_size = 8
volume_type = "gp2"
}
}
[root@rhel-7-1 learn-terraform-aws-instance]# terraform state list
aws_instance.app_server
Terraform setup
*************
Organizations - Terraform Cloud and Terraform Enterprise - Terraform by HashiCorp

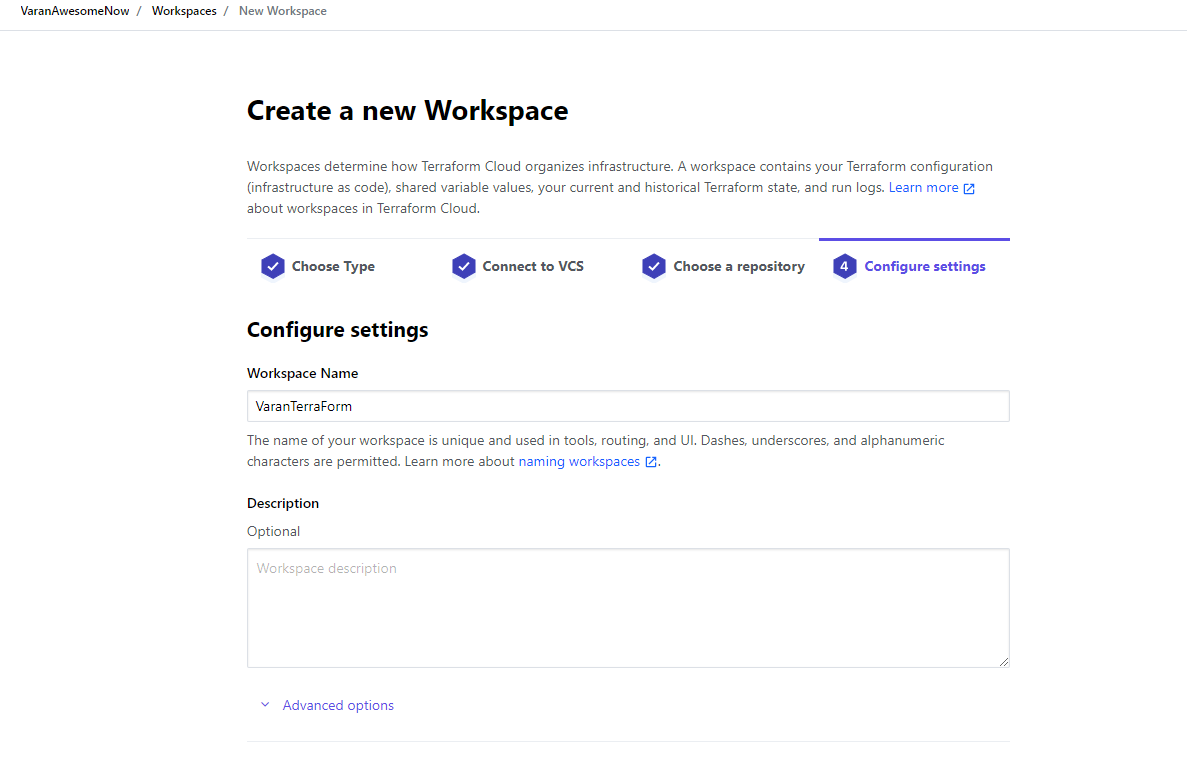
Create Organization


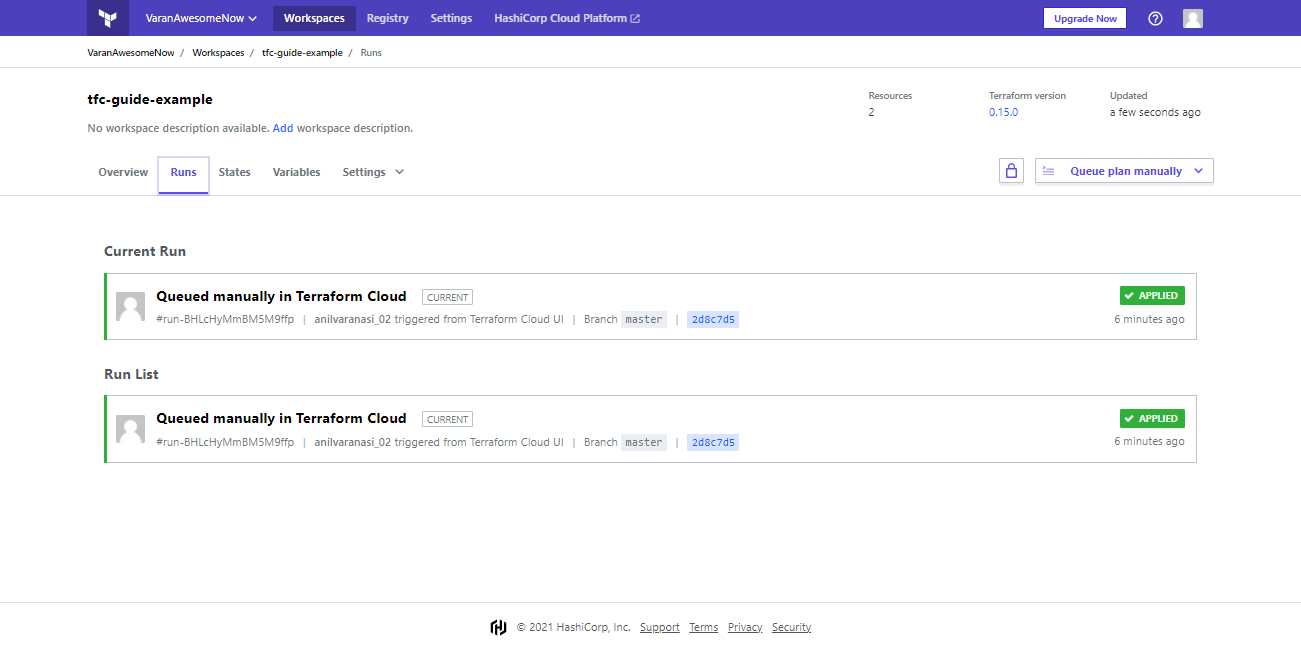
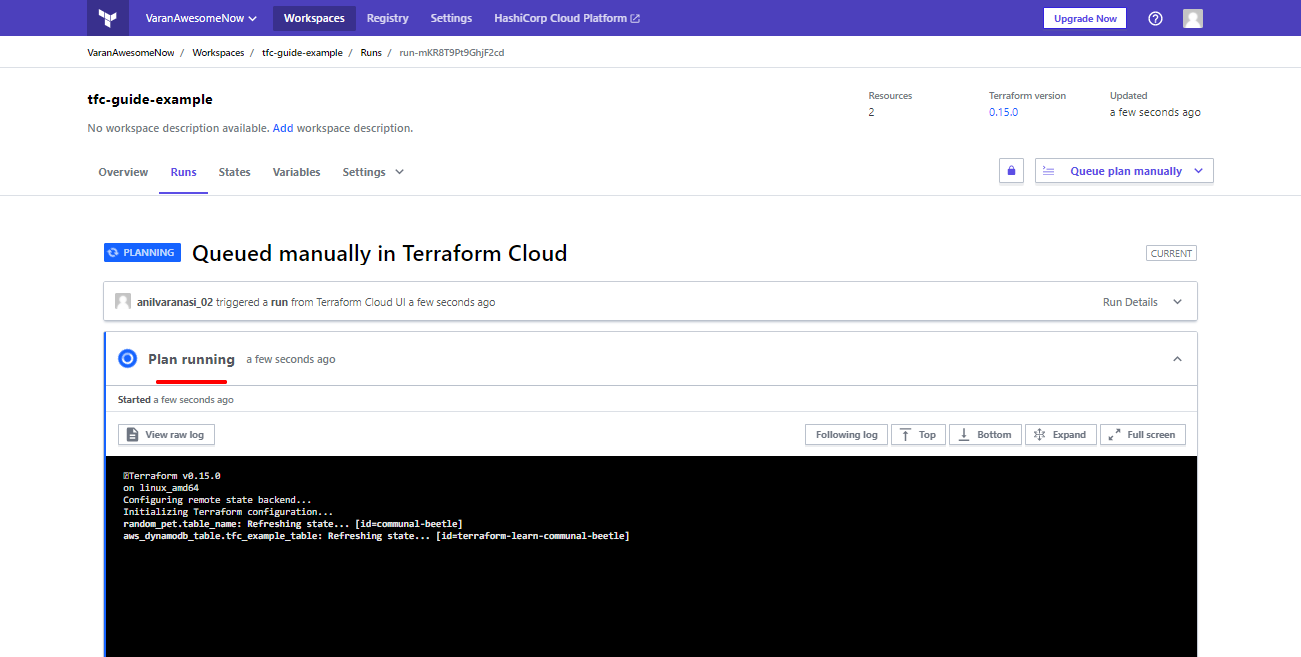
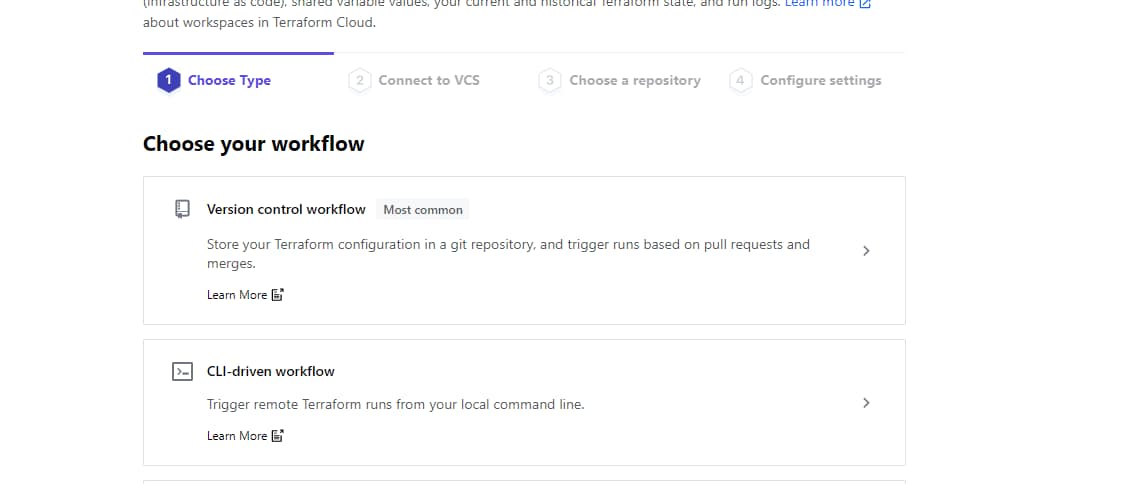
Create a workspace in terraform


[root@rhel-7-1 learn-terraform-aws-instance]# pwd
/tmp/terraform/learn-terraform-aws-instance
[root@rhel-7-1 learn-terraform-aws-instance]# vi main.tf
terraform {
backend "remote" {
organization = "VaranAwesomeNow"
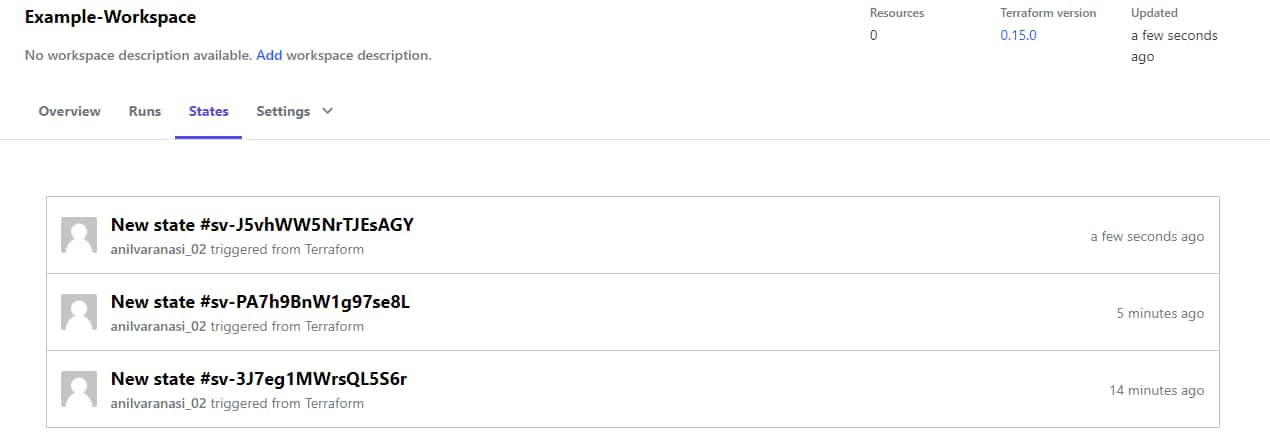
workspaces {
name = "Example-Workspace"
}
}
required_providers {
aws = {
source = "hashicorp/aws"
version = "~> 3.27"
}
}
}
provider "aws" {
profile = "default"
region = "us-east-2"
}
resource "aws_instance" "app_server" {
ami = "ami-0ebc8f6f580a04647"
instance_type = "t2.micro"
tags = {
Name = "ExampleAppServerInstance"
}
}
[root@rhel-7-1 terraform]# terraform login
Terraform will request an API token for app.terraform.io using your browser.
If login is successful, Terraform will store the token in plain text in
the following file for use by subsequent commands:
/root/.terraform.d/credentials.tfrc.json
Do you want to proceed?
Only 'yes' will be accepted to confirm.
Enter a value: yes
---------------------------------------------------------------------------------
xdg-open: no method available for opening 'https://app.terraform.io/app/settings/tokens?source=terraform-login'
Open the following URL to access the tokens page for app.terraform.io:
https://app.terraform.io/app/settings/tokens?source=terraform-login
---------------------------------------------------------------------------------
Generate a token using your browser, and copy-paste it into this prompt.
Terraform will store the token in plain text in the following file
for use by subsequent commands:
/root/.terraform.d/credentials.tfrc.json
Token for app.terraform.io:
Enter a value:
Retrieved token for user anilvaranasi_02
---------------------------------------------------------------------------------
Success! Terraform has obtained and saved an API token.
The new API token will be used for any future Terraform command that must make
authenticated requests to app.terraform.io.
[root@rhel-7-1 learn-terraform-aws-instance]# terraform init
Initializing the backend...
Successfully configured the backend "remote"! Terraform will automatically
use this backend unless the backend configuration changes.
Initializing provider plugins...
- Finding hashicorp/aws versions matching "~> 3.27"...
- Installing hashicorp/aws v3.37.0...
- Installed hashicorp/aws v3.37.0 (signed by HashiCorp)
Terraform has created a lock file .terraform.lock.hcl to record the provider
selections it made above. Include this file in your version control repository
so that Terraform can guarantee to make the same selections by default when
you run "terraform init" in the future.
Terraform has been successfully initialized!
You may now begin working with Terraform. Try running "terraform plan" to see
any changes that are required for your infrastructure. All Terraform commands
should now work.
If you ever set or change modules or backend configuration for Terraform,
rerun this command to reinitialize your working directory. If you forget, other
commands will detect it and remind you to do so if necessary.
[root@rhel-7-1 learn-terraform-aws-instance]# terraform apply
aws_instance.app_server: Refreshing state... [id=i-06ca0406ab22112fc]
Apply complete! Resources: 0 added, 0 changed, 0 destroyed.

[root@rhel-7-1 learn-terraform-aws-instance]# terraform destroy
aws_instance.app_server: Refreshing state... [id=i-06ca0406ab22112fc]
Terraform used the selected providers to generate the following execution plan. Resource actions are indicated with the following symbols:
- destroy
Terraform will perform the following actions:

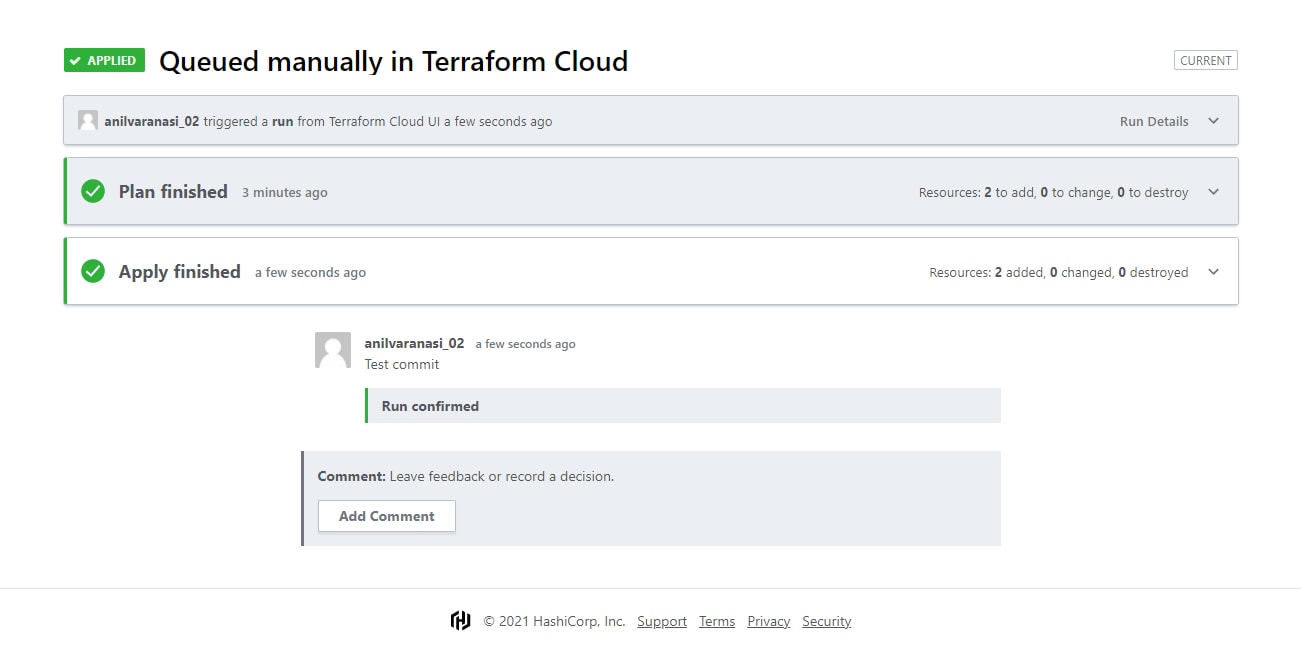
Terraform Cloud setup
*****************
Get Started - Terraform Cloud | Terraform - HashiCorp Learn


Create Infrastructure | Terraform - HashiCorp Learn


Change Infrastructure | Terraform - HashiCorp Learn


ServiceNow Setup
**************
Create a Terraform Open Source config provider and run Discovery | ServiceNow Docs
Map credentials between Cloud Provisioning and Governance and Terraform | ServiceNow Docs
Terraform Datacenter Mappings | ServiceNow (service-now.com)


How to get terraform token
Login to terraform cloud, open below url in another window
Tokens | Account | Terraform Cloud
Provide description and Terraform generates token.
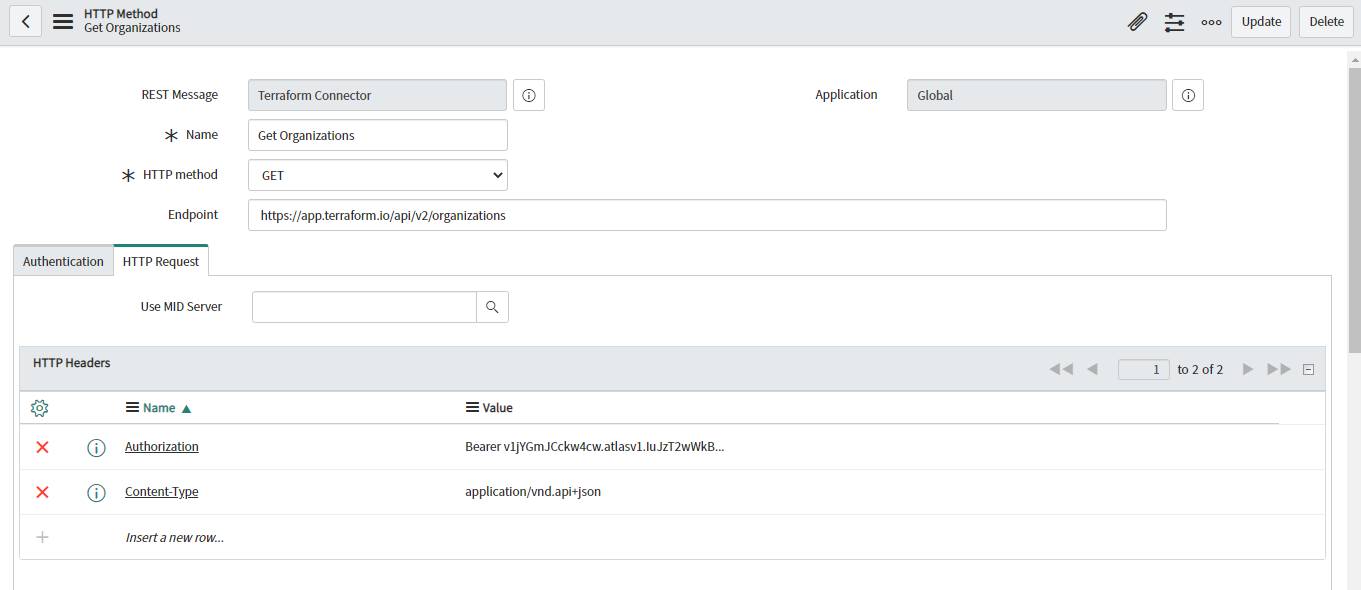
Format of authorization header is Bearer <token>
Bearer space token
Sample endpoint
Organizations - API Docs - Terraform Cloud and Terraform Enterprise - Terraform by HashiCorp
How to get list of organizations from Terraform
Organizations - API Docs - Terraform Cloud and Terraform Enterprise - Terraform by HashiCorp
curl \ --header "Authorization: Bearer $TOKEN" \ --header "Content-Type: application/vnd.api+json" \ --request GET \ https://app.terraform.io/api/v2/organizationsSample response
{"data":[{"id":"example-orgXXXXXX","type":"organizations","attributes":{"external-id":"org-XgEToe8XXXXXn","created-at":"2021-04-19T02:33:54.703Z","email":"anilvXXXXXXXXX@XXXXo.com","session-timeout":null,"session-remember":null,"collaborator-auth-policy":"password","plan-expired":false,"plan-expires-at":"2021-05-19T02:33:54.751Z","plan-is-trial":true,"plan-is-enterprise":false,"cost-estimation-enabled":true,"name":"example-orgXXXXXX","permissions":{"can-update":true,"can-destroy":true,"can-access-via-teams":true,"can-create-module":true,"can-create-team":true,"can-create-workspace":true,"can-manage-users":true,"can-manage-subscription":true,"can-manage-sso":false,"can-update-oauth":true,"can-update-sentinel":true,"can-update-ssh-keys":true,"can-update-api-token":true,"can-traverse":true,"can-start-trial":false,"can-update-agent-pools":false},"fair-run-queuing-enabled":true,"saml-enabled":false,"owners-team-saml-role-id":null,"two-factor-conformant":false},"relationships":{"oauth-tokens":{"links":{"related":"/api/v2/organizations/example-orgXXXXXX/oauth-tokens"}},"authentication-token":{"links":{"related":"/api/v2/organizations/example-XXXXX/authentication-token"}},"entitlement-set":{"data":{"id":"org-XgETXXXXXXXXXEsqzn","type":"entitlement-sets"},"links":{"related":"/api/v2/organizations/example-orgXXXXXX/entitlement-set"}},"subscription":{"links":{"related":"/api/v2/organizations/example-orgXXXXXX/subscription"}}},"links":{"self":"/api/v2/organizations/example-org-XXXXX"}},{"id":"XXXXORG","type":"organizations","attributes":{"external-id":"org-XXXXXXX","created-at":"2021-04-19T16:26:08.777Z","email":"anilvaranasi_02@yahoo.com","session-timeout":null,"session-remember":null,"collaborator-auth-policy":"password","plan-expired":false,"plan-expires-at":null,"plan-is-trial":false,"plan-is-enterprise":false,"cost-estimation-enabled":false,"name":"XXXXORG","permissions":{"can-update":true,"can-destroy":true,"can-access-via-teams":true,"can-create-module":true,"can-create-team":false,"can-create-workspace":true,"can-manage-users":true,"can-manage-subscription":true,"can-manage-sso":false,"can-update-oauth":true,"can-update-sentinel":false,"can-update-ssh-keys":true,"can-update-api-token":true,"can-traverse":true,"can-start-trial":true,"can-update-agent-pools":false},"fair-run-queuing-enabled":true,"saml-enabled":false,"owners-team-saml-role-id":null,"two-factor-conformant":false},"relationships":{"oauth-tokens":{"links":{"related":"/api/v2/organizations/XXXXORG/oauth-tokens"}},"authentication-token":{"links":{"related":"/api/v2/organizations/XXXXORG/authentication-token"}},"entitlement-set":{"data":{"id":"org-paW6Lv2e5kSnR2mZ","type":"entitlement-sets"},"links":{"related":"/api/v2/organizations/XXXXORG/entitlement-set"}},"subscription":{"links":{"related":"/api/v2/organizations/XXXXORG/subscription"}}},"links":{"self":"/api/v2/organizations/XXXXXXeNow"}}]}
Sample outbound rest message in ServiceNow

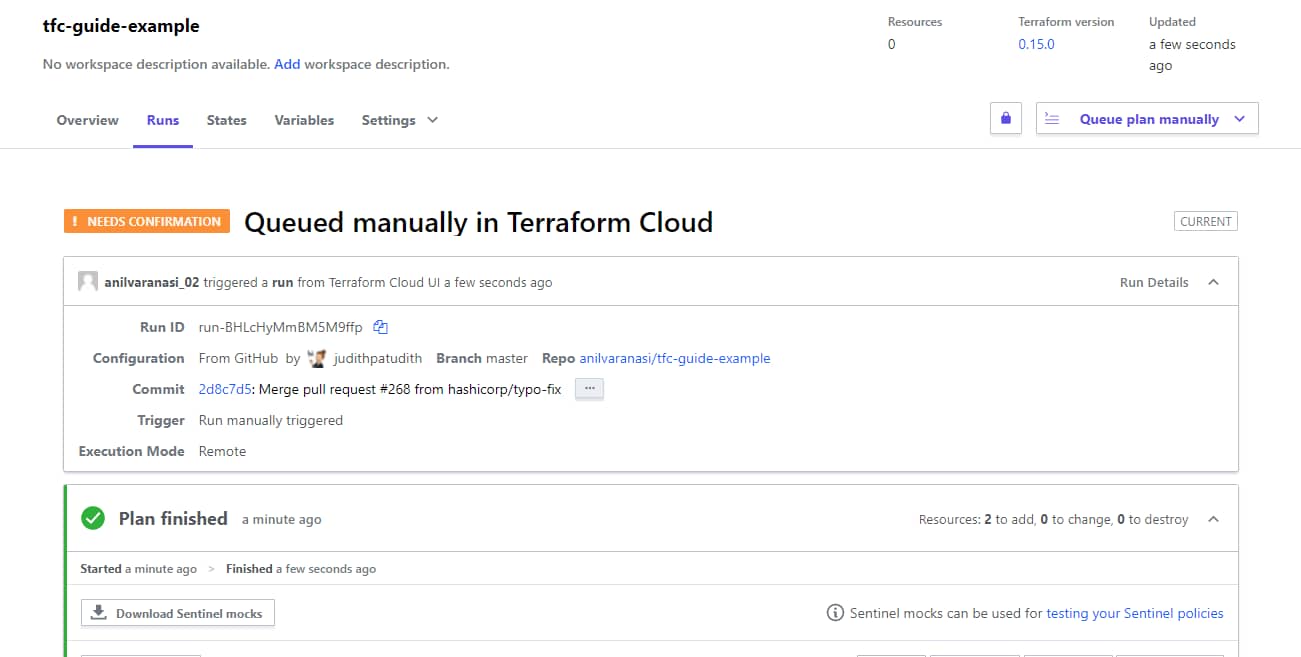
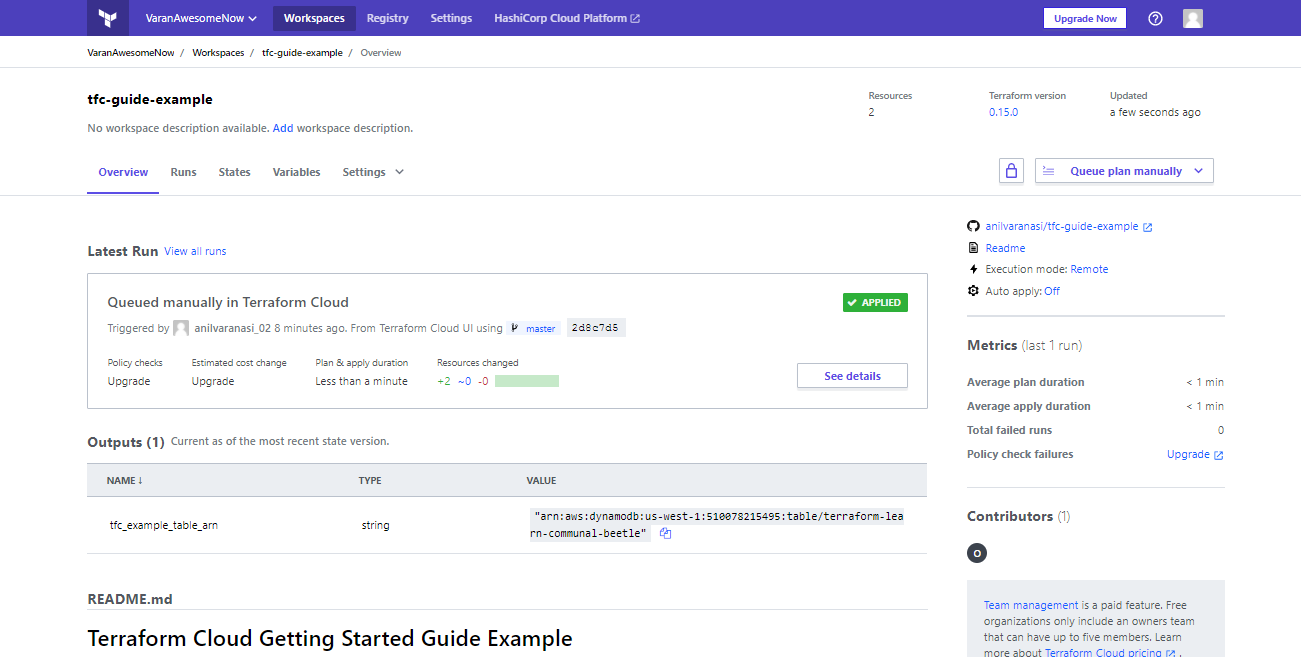
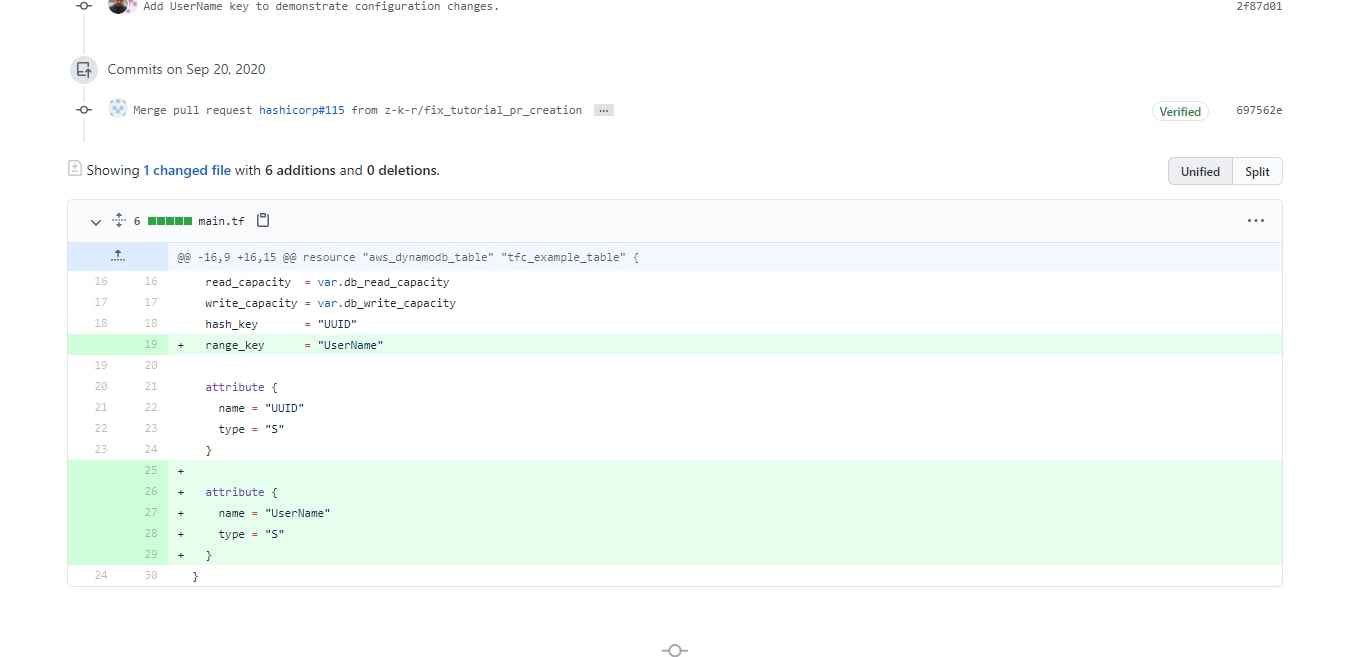
Output test result

References
*********
How to install and setup Docker on RHEL 7/CentOS 7 - nixCraft (cyberciti.biz)
Zipping and Unzipping Files under Linux - nixCraft (cyberciti.biz)
- 17,376 Views
- Mark as Read
- Mark as New
- Bookmark
- Permalink
- Report Inappropriate Content
Excellent writeup, wondering why Cloud Provisioning is not a much talked about concept in the ServiceNow world.