


Christina27

ServiceNow Employee
Options
- Subscribe to RSS Feed
- Mark as New
- Mark as Read
- Bookmark
- Subscribe
- Printer Friendly Page
- Report Inappropriate Content
12-21-2018
01:43 PM
Getting PortSwigger’s Burp Suite (https://portswigger.net/burp/) to work with Genymotion (https://www.genymotion.com/) isn’t straight forward so I've decided to share this knowledge so that others can avoid common pitfalls.
Genymotion is a powerful Android Emulator using Oracle's VirtualBox (https://www.virtualbox.org/) to emulate devicesIt is faster than Android's emulator, which comes standard with Android Studio. Burp Suite facilitates testing Web application security. We will use the proxy feature of Burp Suite to capture web traffic from the Android browser.
Step 1: Build a new Android Virtual Machine
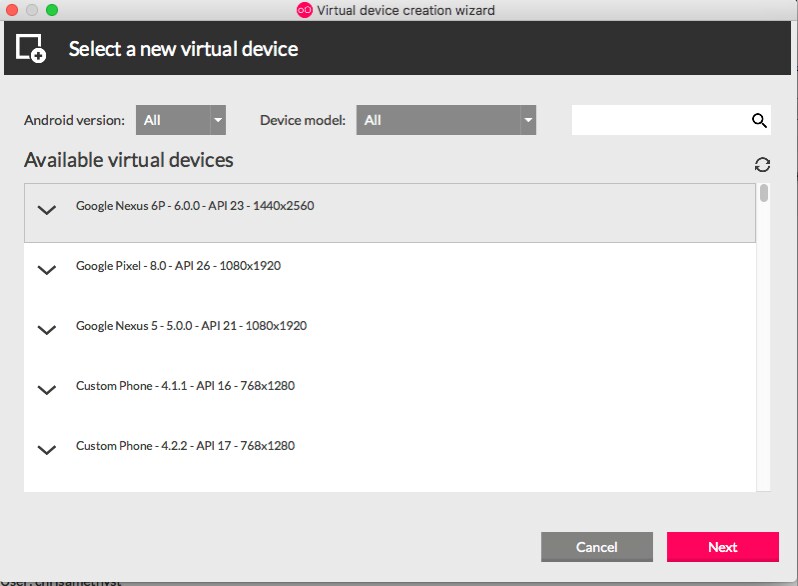
To ensure that we can proxy this traffic, let's create an Android Virtual Machine using Marshmallow (Android 6.0). Android Nougat and later do not allow end-users to install trusted CA Certificates. In this step, we will choose to emulate the Google Nexus 6P. Give the device a name and let’s move on to setting up networking.
Step 2: Find the IP address of Your Android Virtual Machine
This step is essential to route proxy traffic on Genymotion through this IP.
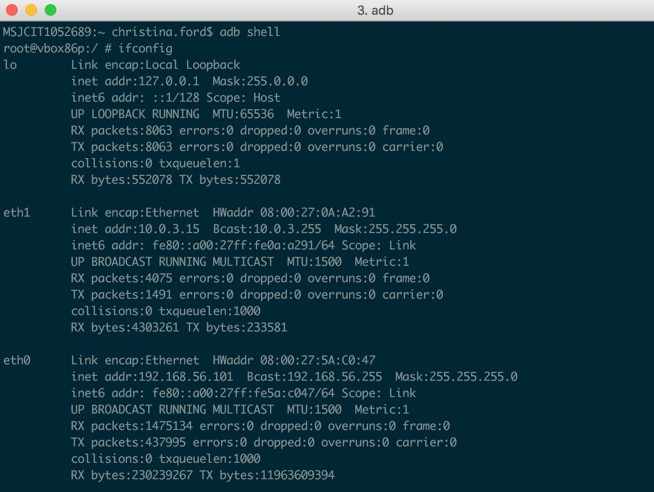
2a. Shell into the Android VM. Then use the ifconfigcommand to find the correct IP address.
In this case the IP address is on interface eth0 192.168.56.101and the router IP address is 192.168.56.1.
2b. Ping 192.168.56.1to ensure it is reachable.
We have verified that we can reach the router.
2c. Note the router IP address for later use for proxy traffic.
Step 3: Set up Burp to proxy traffic
3a. Open Burp Proxy
3b. Start a Temporary Project > Use Burp Defaults > Start Burp
3c. Navigate to the ProxyTab and Click Options
3d. Under Proxy Listenersselect the Binding Tab.
3e. Set the port to bind to an unused port (such as 9999).
3f. Set Burp to Listen on a specific address. (Use the router’s IP address from the previous step: 192.168.56.1).
Step 4: Set up Proxy Traffic on Genymotion
4a. On your Genymotion Android VM device, Navigate to Settings > Wifi and ensure that your VM is connected to Wi-Fi and can receive internet traffic.
4b. Navigate to your SSID and Long press on it. In this case the SSID is “WiredSSID”.
4c. The options “Modify Network” and “Forget Network” will pop up on screen. Select “Modify Network”.
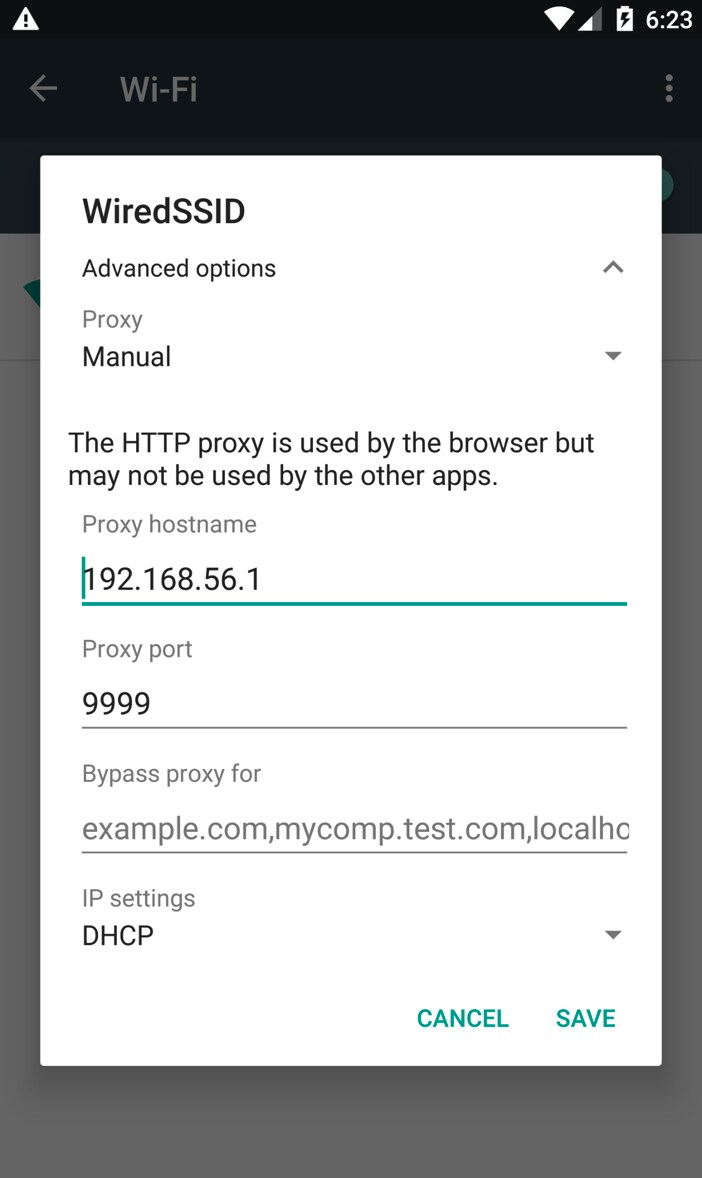
4d. Select the “Advanced” options choice and the proxy configuration menu will appear.
4e. Under “Proxy”Select Manual and Configure the HTTP proxy.
In our case the Proxy hostname is the IP address of our router, 192.168.56.1 and our Proxy port number is 9999.
This matches the settings in Burp
.
Now we are ready to start proxying traffic using Burp! Open the Android Browser and browse to http://example.com.
We are able to see traffic pass through Burp.
Step 5: Install Burp CA Certificate on the Android VM
We are not quite finished.
We still need to configure the Android VM to proxy TLS/SSL Encrypted traffic. To do this we must install Burp’s CA Certificate.
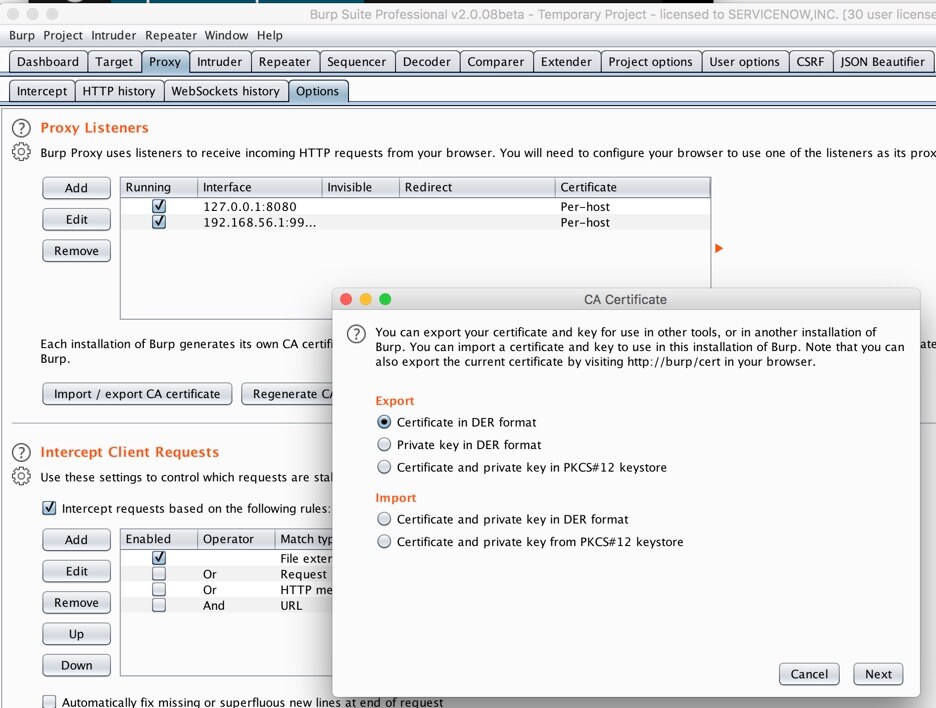
5a. In Burp Navigate to: “Proxy > Options > Import/Export CA Certificate> Export > Certificate in DER format>Next” and save the certificate.
5b. We must install this certificate on the Android VM. In a terminal, navigate to the directory where certificate is saved and push it to the device’s sdcard using adb. Rename the extension of the Burp CA certificate to .cer so that the complete filename is “burp.cer”.
5c. In the Android VM, we now navigate to “Settings> Security > Credential storage > Install from SD card”
5d. In the Internal Storage menu, select the Burp CA certificate. In this example, it is called “burp.cer”.
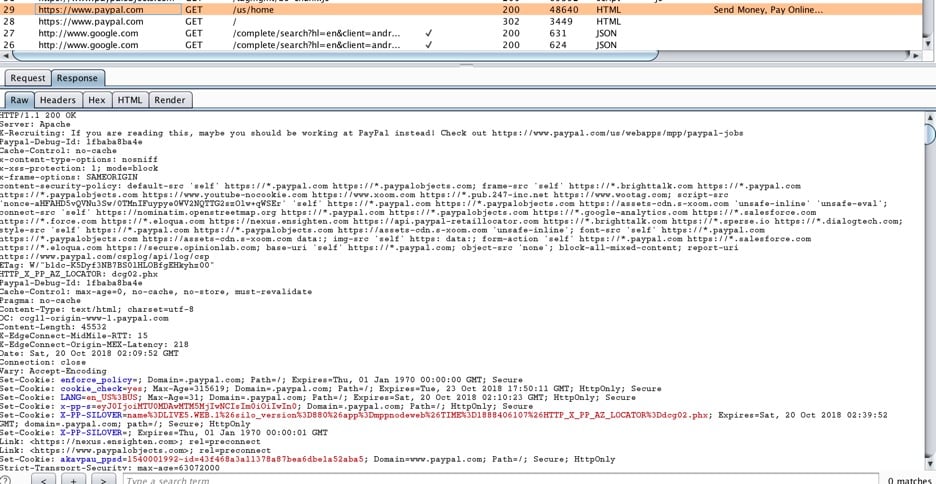
5e After selecting it the option to name it will be presented. Give the certificate a name and under “Credential use” select “Wi-Fi”. The certificate should now be installed, and the ability to proxy TLS/SSL traffic using Burp should also be available. To test this out, open up the browser on the Android VM and browse to a website that uses TLS. In this example, we will browse to: https://paypal.com.
Burp proxy will be tunneling this traffic through the proxy and all requests and responses will be seen in the tool.
Congratulations, after reading this blog post you should now be able to capture Android web traffic with Burp Suite using Genymotion as an Android VM. This tutorial can also be applied to Android applications that make use of WebViews.
Labels:
- 13,432 Views
You must be a registered user to add a comment. If you've already registered, sign in. Otherwise, register and sign in.
