- Post History
- Subscribe to RSS Feed
- Mark as New
- Mark as Read
- Bookmark
- Subscribe
- Printer Friendly Page
- Report Inappropriate Content
on 04-07-2021 12:41 PM
Let's put this baby to bed! The final thing we really need to do is integrate flow from the outside world into ServiceNow and then write it back to our original source to make our little REST API Trigger a true integration example. At this point we are just receiving messages from our endpoint through Postman, simulating "incidents" with a short description and an assignment group. One little hiccup about our test data - it's essentially anonymous. We need some way to distinguish who or what is sending the data. Let's start with something we all have and that's an email address. Email addresses are unique and they point to something and they are usually owned by one person unless it's a 'contact us at' email but even then that resides on one mailbox in a server. Using an email address as a unique filed will help understand this concept because we've all tried to add a duplicate user into a CRM and it shouts back at us "A user with the email blahblah@xyz.com already exists" don't you hate it when that happens?
We are going to add an email address to the test data and then look up the user with the associated email address and add that user to the incident record as the person who reported the incident. Being in Sales or Marketing you're probably thinking "why do I care?" well, first of all this hurts my feelings 😉 and secondly this is exactly how leads, and drip campaigns, and targeted marketing, and request for info forms, and all sorts of other sales and marketing activity is tracked. Through email addresses. ServiceNow just signed a strategic partnership with Qualtrics - how do those surveys get to users and then associated to users. Probably email addresses, maybe cookies, maybe both.
So we need to figure out a way to look up records in ServiceNow and then link those records to our Incident. Since I am in Customer Workflows I am probably not using Incident in real life all that much but that's where we started so we'll just build on this original example.
Ok hang on tight because we are going to ramp up fast. (Notice how these blogs are not as full of mirth like they were on part one?)
For API nerds like us, yes you're now one of us, one of the coolest things about ServiceNow is the API explorer. This lets you test the GET, PUT, POST, DELETE, PATCH from the platform. We have just done a POST but now we are going to do a GET and figure out what things look like to an API call. Browse to REST API Explorer in your Instance and click on Retrieve a Record (GET). You'll see 2 fields with *'s and that show's they're required fields. It want's the tableName and sys_id.

So, how did I find that sys_id? Good question!
In the flow we've been building there's a button called "Executions" - click on it.

Then we go to the latest execution of our REST API Trigger. You can even blast one over in Postman now if you want... it won't hurt.

next go to one of the incidents that was created in the For Each - hover over the (i) info link and then open the record.
Then look up in your web browser to the URL and you'll see that sys_id you're looking for. There's probably an easier way to find it but this works for me.
<yourIntsanceName>.service-now.com/incident.do?sys_id=fe682e721b5b6c10b60f8596dc4bcb50
now copy that id after the = sign and paste it back in the REST API explorer. You can see that I did that in the screenshot of the REST API explorer above.
Now hit the green send button and you'll see the API call. It's similar to the API call we did in Postman - instead of POSTing data into ServiceNow, we are GETting data from ServiceNow.
Now you'll see an API response code of 200 OK (that means it's OK 🙂 seriously, I'm not joking) and then you'll see the response body that you can scroll through.

I'm going to bet that we can modify the opened_by field, or maybe we'll use the caller_id field. Maybe we'll have to add a field to ServiceNow. Honestly I am just exploring the API at this point and I am just going to try it out.
I'll search the sys_user.list and pick up a couple of the email addresses in there and add them to the test data.
{
  "array" : [ {
    "assignment_group" : "5f6441efc0a8010e0177fcb589156352",
    "description" : "test test test 123",
    "reported_by":"lisa.ray@servicenow.com"
  }
  ,
  {
    "assignment_group" : "5f6441efc0a8010e0177fcb589156352",
    "description" : "test test test 2-123",
    "reported_by":"teddy.taylor@servicenow.com"
  }
  ,
  {
    "assignment_group" : "5f6441efc0a8010e0177fcb589156352",
    "description" : "xyz test test test 3-123",
    "reported_by":"alex.ray@servicenow.com"
  }

  ]
}
Now we need to add the reported_by field throughout out flow.
In the Trigger:

in the Action Convert JSON to Object Input

*don't forget to Publish
Reality check: Remember our goal is to integrate an external platform with ServiceNow. We need some way to correlate the two systems. To achieve correlation we need to do a lookup on the fly between two existing parts of the flow. Recall that we need a way to distinguish who is reporting the incident, or clicking on the link, or downloading the white paper. So we have some external unique information, the email address, so now we are going to look up the user by email address, correlate the ServiceNow incident with the user, and then write back the important info to our imaginary cloud platform, emulated at this time by Postman and we'll also introduce another tool shortly.
Let's add the Lookup step between the 'For Each' and the 'Create Incident Record'
Hover to reveal the (+)

Select your new Action as a Lookup and lookup the sys_user by email in the reported_by field from step 2 For Each:

You should be able to do this part without every step being screenshot. If I can do it you can do it! It's all man-made it's not magic someone built this and you can too.
This is really slick here... once you do the lookup the ServiceNow flow designer knows all the fields that sys_user has and you can just grab sys_id out of the data pill

It's way down there under 'S', notice the little arrow button showing nested data underneath the User Record. I am dragging the User Record Sys_ID into a new field - Caller.
Now we're going to write back to our Fake SaaS platform and truly Fake it 'til we Make it
I'd like to introduce you to RequestBin and you're going to request a public bin

When you request that public bin you're going to get a url and a space where you can see messages coming in to your URL endpoint. I cut off this screenshot so you can spam my endpoint 😛 but basically you have a console here where you can send messages from Postman or ServiceNow or anywhere else and see exactly what's coming across the internet. Notice also in the above screenshot with a subscription you can emulate all sorts of endpoints and test your integrations. This could be useful for you in the future if you choose to go down this road. For now a public bin is a great way to see exactly what's being sent to you and it's also a great tool for troubleshooting - sometimes you need to see what some undocumented API is sending over the web.
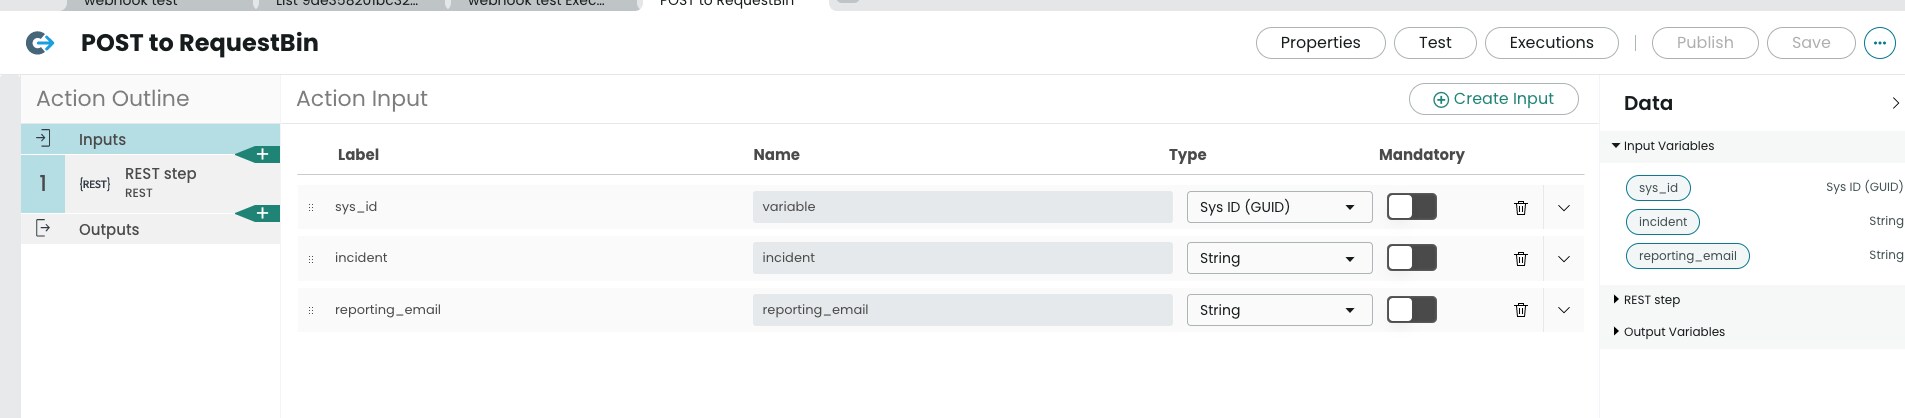
Now we have to create another Action. In flow designer hit the House Icon click on the New button and select Action.
Create your 3 inputs

Hit the Green Plus Arrow and Select Rest Integration from the pop up

Then paste your RequestBin URL into the form
Note: I noticed that I have the credential alias in this screenshot but I didn't set up on purpose.

also notice in the circle I have the request content written out manually. There's probably an easier way. I'm just playing around here and trying things out - and trust me - I did make some missteps along the way and needed to lookup some ServiceNow documentation. I never really got too far off-course in this endeavor.
{"sys_id":"dragDataPillHere","incident":"dragDataPillHere", "reporting_email":"dragDataPillHere"}(JSON for you here ^ be sure delete out the dragDataPillHere before you drag in the data pills in between the ""s)
Create the Output step:

Exit edit mode (see ^ circle above) and then drag in your data pill for status code.

Save! Publish! Go back to the Flow Designer - You're almost done configuring!!
Magic of television... you can see how I've already added the POST to RequestBin step by adding the step using the (+) button. Configuration of this part of the flow is easy too. We are just going to pull the data pills and nested data pills from Incident Record

Save it! Activate it!
Start sending Postman POSTs to it!
Hit the Execution Buttons, look at what's happening internally.
Look at RequestBin!

Here's what sent into RequestBin
{"sys_id":"18298b8f1b53ec10b60f8596dc4bcba0","incident":xyz test test test 3-123"", "reporting_email":"alex.ray@servicenow.com"}
What just happened? We just emulated an integration and showed what it's like to send data between two cloud platforms. We learned how to set up the new REST API Trigger, we did a For Each loop with no code, we looked up a sys_id for each user by email address, we created an incident for each object in the Postman sent JSON array, and then we responded back to our test endpoint with the newly created incident ID and the email address of the Caller.
Congratulations!
Thanks for the inspiration
- 5,831 Views