- Post History
- Subscribe to RSS Feed
- Mark as New
- Mark as Read
- Bookmark
- Subscribe
- Printer Friendly Page
- Report Inappropriate Content
on 08-16-2020 10:29 PM
Hi
Recently, I was answering a question about having trouble to use a Catalog Variable to select an Approver for a Catalog Item.
As I replayed that scenario in detail to figure out what might have been the issue, I took some screenshots which I would like to comment and sum up in a short article here.
You can find the Step-by-Step instructions below - have fun!
Scenario:
A Catalog Item shall be configurable with a Catalog Variable, which will allow the end-user to select the Approver.
Nothing more magic to find here. Magic will be added by you and your awesome solutions on ServiceNow.
Implementation - Steps:
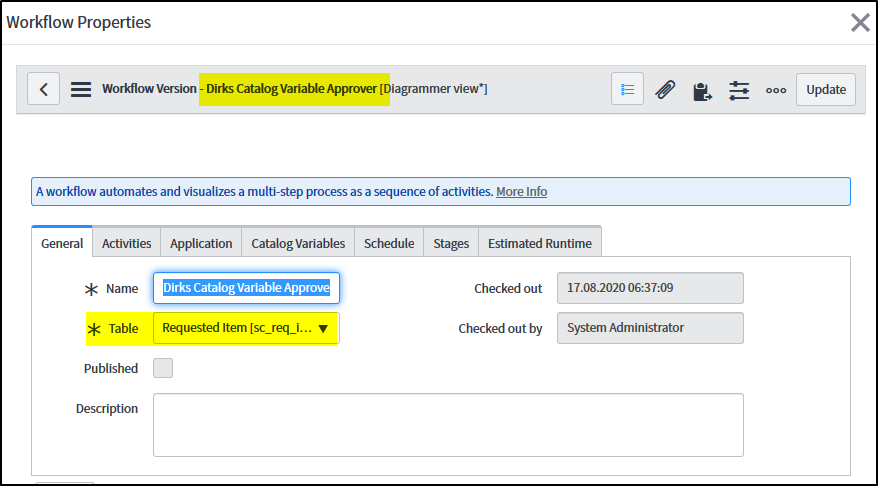
Step 1 - Create a new Workflow attached to the "Requested Item" [sc_req_item] table
Open the Workflow Editor and create a new Workflow, which runs on the "Requested Item" table. Do not change any of the "default" settings of the workflow for now. Then, it will do what we need for this test-drive. You can adopt the details for your concrete scenario later on.

Step 2 - For demonstration purposes, just add ONE "Approval - User" Workflow Activity
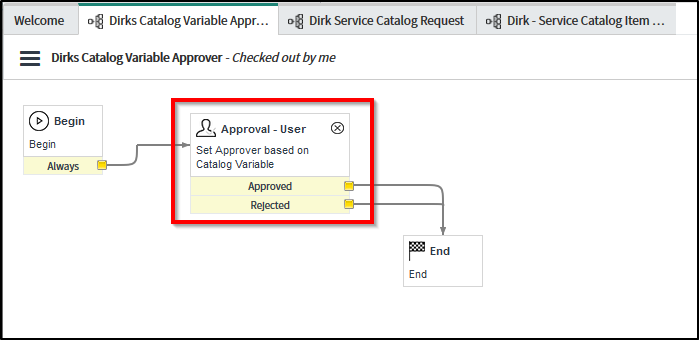
To review the specific use-case, where we want to have the Approval User comming from a Catalog Variable, we just add one Workflow Activity to the workflow (see screenshot below). Link both exits of the acitvity with the "End" Activity, to leave no path of the Workflow ending in nirvana.

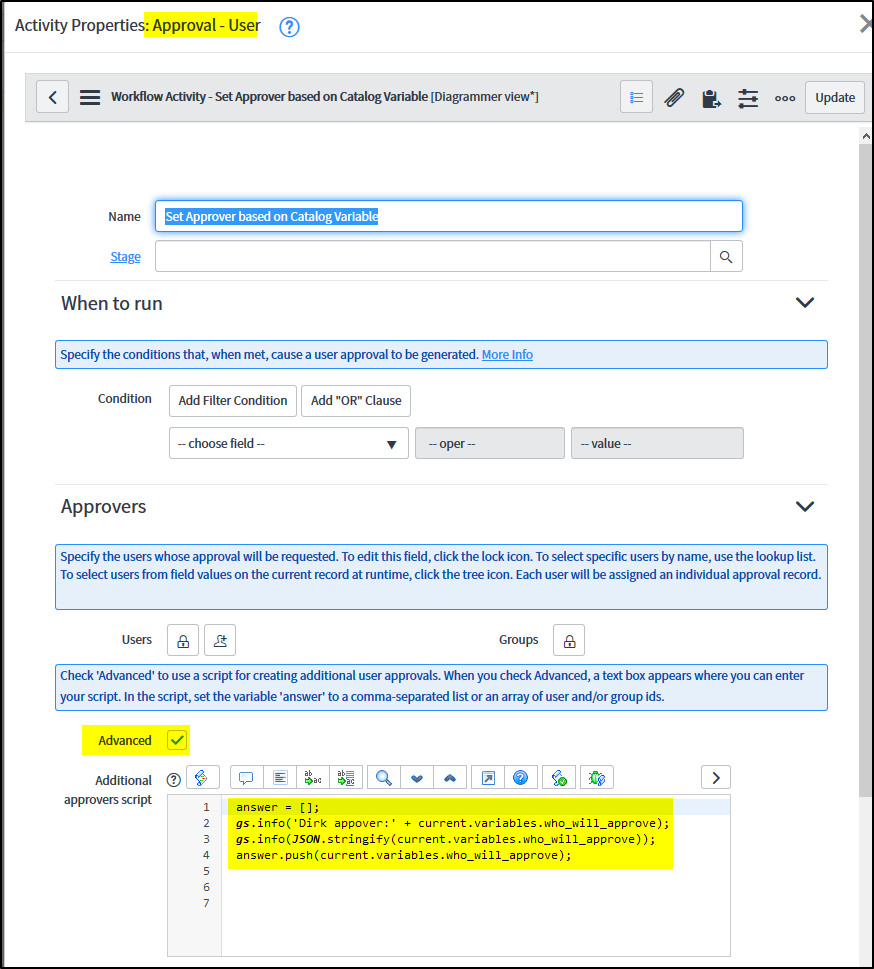
Step 3 - In the "Approval - User" Activity, check the "Advanced" Checkbox and added some Script code
Open the details of that Workflow Activity by double-clicking and mark the "Advanced" checkbox. This will show the "Additional approvers script" field (see screenshot below).
Add the lines shown in the screenshot below, knowing, that I will name my Catalog Variable as "who_will_approve" later.

Note:
You can of course comment the "gs.info()" lines out. And remember that my variable was named "who_will_approve". This will be the name of the Catalog Variable that we will create below.
Step 4 - Creat a new Catalog Item having the variable and attaching to that new workflow to it
Navigate to "Maintain Items" in the Backend and create a new Catalog Item, like I did in the screenshot below. Attach the newly created Workflow to this Catalog Item in the "Workflow" field.

The screenshot above already shows the Catalog Item Variable, which we will review in detail in the next step.
To create it, just click the "New" Button on the "Variables" Related List.
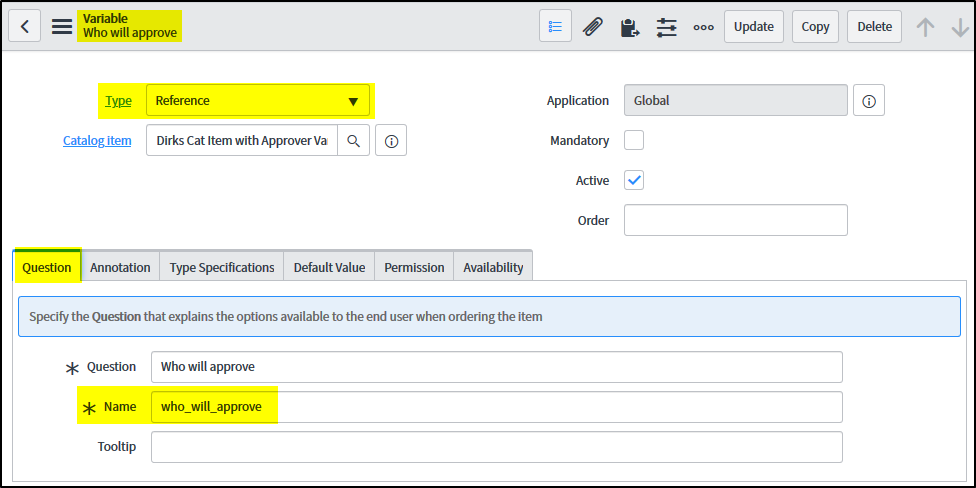
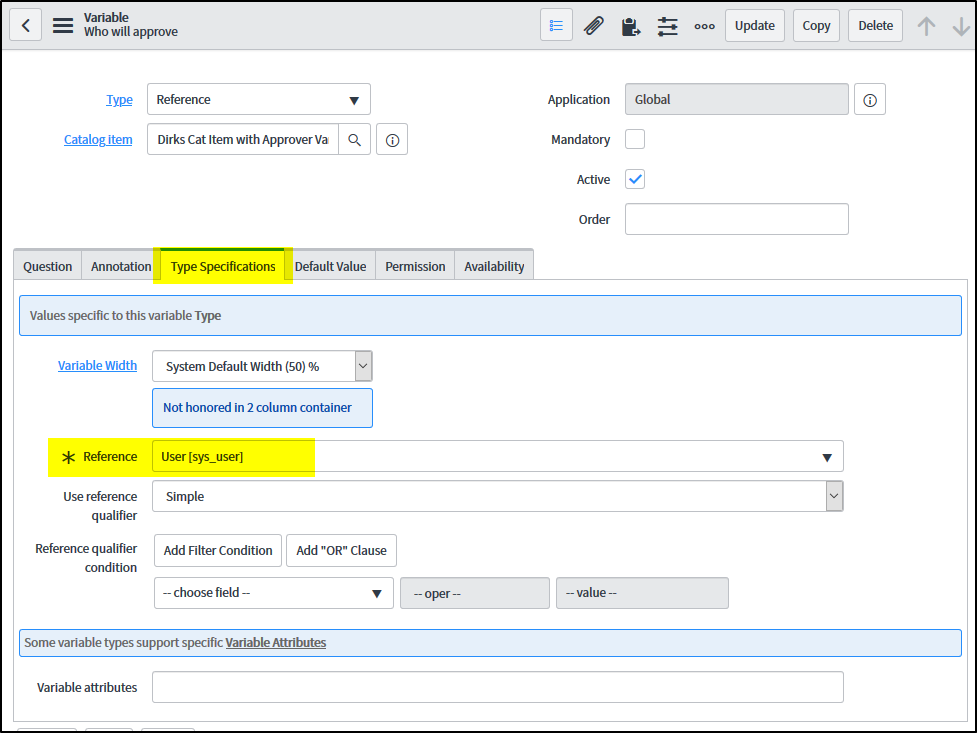
Step 5 - Create the Catalog Variable, which MUST be of type "REFERENCE"
Select the "Type" of the Catalog Item Variable to "Reference". This is important. It will not work, if you choose to use a "String" type field, where you just can enter the name of the user.
See below in the field "Name", the variable name "who_will_approve" is used. This must match with the name of the Variable referenced in the "Approval - User" Workflow Activity (in Step #3).

Step 6 - On the "Type Specification" Tab, add the "User" [sys_user] table as the referenced table
As this Catalog Variable is of type "Reference", we need to define the table referenced, just like you will do in a Dictionary Definition while defining table columns. In this case, we want to select Users in the Catalog Variable, so select the [sys_user] table (see screenshot below).

Hint:
When searching for the [sys_user] table, you will notice, that there are several tables found in the search/dropdown field "Reference". To shorten your search, just type the "]" character at the end of the table name "sys_user". This will bring you to the desired table immediately.

Note:
Just like on Dictionary records, you can specify any type of Reference Qualifier to define exactly which records should and may be selectable in the Catalog Variable for this Catalog Item.
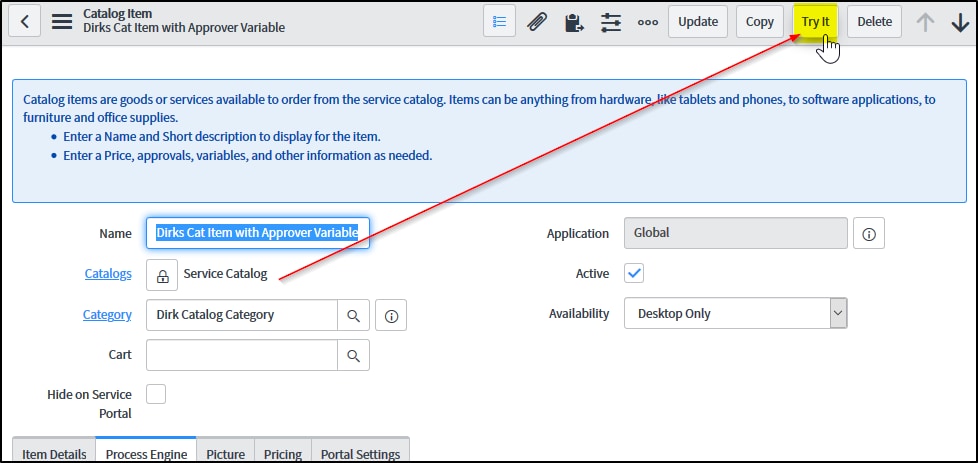
Step 7 - Click "Try It" on the Catalog Item Form to test the results
Back on your Catalog Item form, click the Button "Try It" on the right upper corner of the form.
This will navigate you directly to the Catalog for that specific Catalog Item, so that you can test the results.

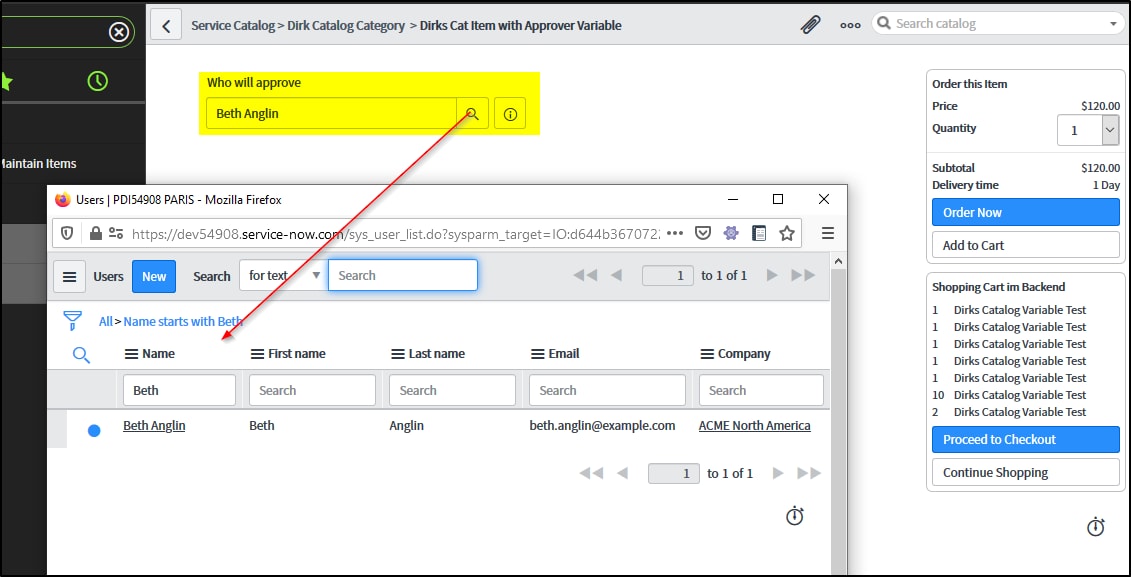
Step 8 - Select some user (e.g. "Beth Anglin") as the Approver in the Variable
The screenshot below shows the Catalog Item in Action, which currently only consists of the one Catalog Variable "Who will approve". Make sure that it works as expected and shows the correct Reference list by clicking the Magnify glass to select the user in the Reference List.

Step 9 - Click on "Order now" to check out this Catalog Item
After selecting the User, click the "Order now" button on the right bar to checkout this item immediately.
This will create a new Request and Requested Item from the Catalog Item, which also will start the Workflow we just created during the first steps.
The "Order Status" screen is shown, which shows a link to the newly created Request (see marked yellow in screenshot below).

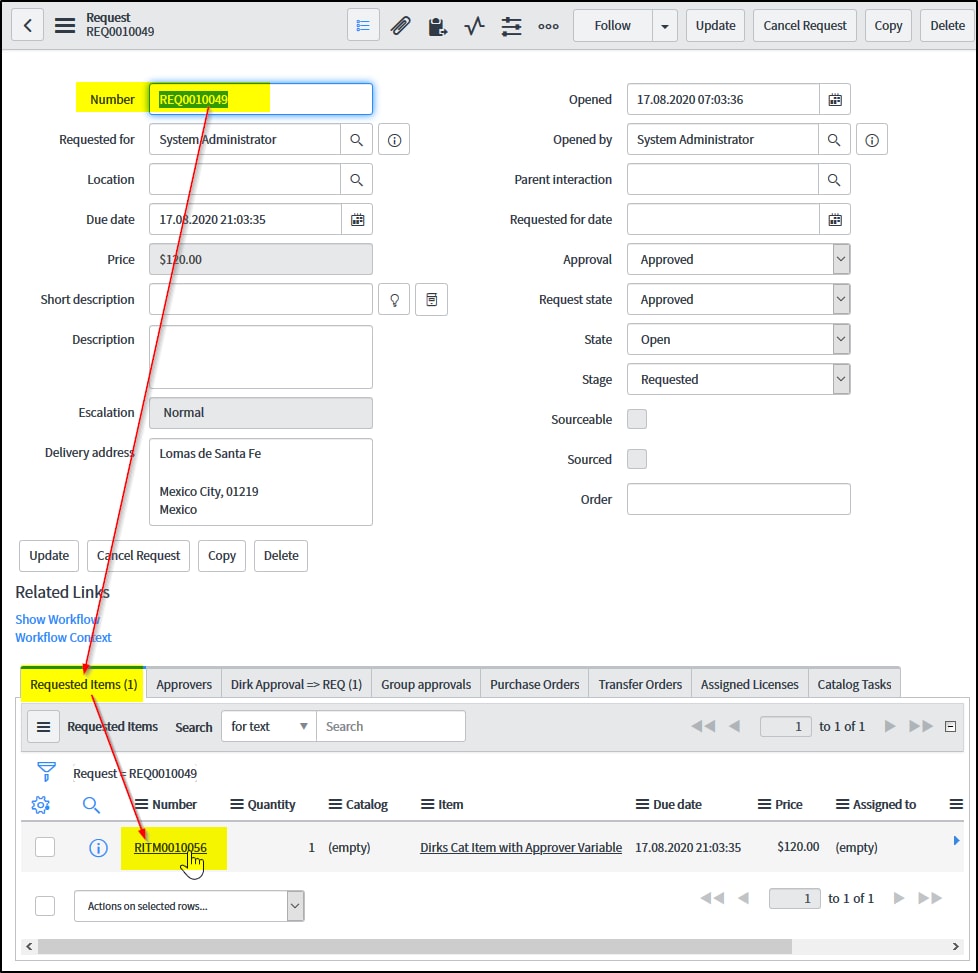
Step 10 - Click the link "Request Number" to open the new Request
After clicking the Request link shown in the screenshot above, the Request form is shonw. Scroll down to the "Requested Items" Related List, where you can now see the newly created Requested Item using our newly created Catalog Item with the Catalog Variable (see next screenshot).

Step 11 - Click the "RITMxxx" number to open the Requested Item Form
Open the Requested Item from the Related List (from the screenshot abovce) and find the Approval record in the Related List "Approvers" on the Requested Item form (see screenshot below).

Note:
You can see, that Beth Anglin now is set as the Approver in the Requested Item, just what we selected in the Catalog Variable during our test-drive to Order this Catalog item.
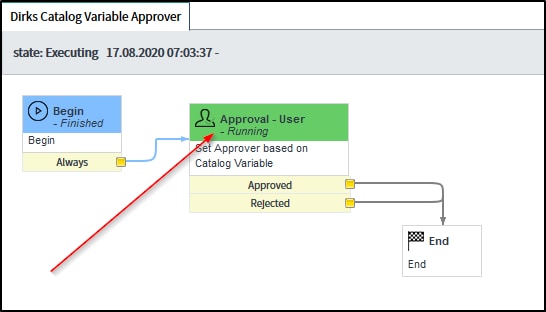
Step 12 - Click on the Related Link "Show Workflow" on the Requested Item Form
The Requested Item Form has the "Show Workflow" Related Link shown above the Related List Section, just when there is any Workflow running on the current record - which is the case for our Requested Item.
Click on that Link to open the executing Workflow in the Diagram view (see screenshot below).

Here you can review, that the "Approval - User" Workflow Activity is running. Which is the expected behavior, to wait until the Approval is answered.
That's it 🙂
Congratulations, you just created a Catalog Item using a Reference Type Catalog Variable, which is used to create and approval for the selected user during runtime.
I hope that explains in detail about how to setup such scenarios in your environment.
Just let me know what you think about this article.
Thanks a lot in advance for your feedback and comments on this article, you can leave here below!
Thanks for marking as helpful and bookmarking - that helps me determine your interest in further articles.
Enjoy ServiceNow & BR
Dirk
---------------------------------------------------------------------
If you like to also review my other articles on the ServiceNow Community, please have a look at the overview here:
NOTE: The content I provide here is based on my own experiences and does not necessarily represent my employer's views.
- 9,545 Views
- Mark as Read
- Mark as New
- Bookmark
- Permalink
- Report Inappropriate Content
Hello Dirk,
Can you please let know same process where a date needs to be captured in Variable when status get changed in Task to WIP.
- Mark as Read
- Mark as New
- Bookmark
- Permalink
- Report Inappropriate Content
Hi Abinaya
Can you please describe a bit more in detail about what you are looking for?
Do you want the end user capture some date in a catalog variable? BEFORE Check-out, or do you want to prevent setting the State to WIP when the date is empty?
What exactly are you looking for?