- Post History
- Subscribe to RSS Feed
- Mark as New
- Mark as Read
- Bookmark
- Subscribe
- Printer Friendly Page
- Report Inappropriate Content
on 11-27-2021 06:46 AM
The enablement of SSO is pretty simple when you know the Identity provider details. Mean how to register the instance payload with your identity provider & how to create the record within Servicenow instance with the Identity provider. Remaining all are basic configurations where you can find out in Servicenow docs website.
Now, we are going to see how it can be done using your personal instance (Rome)
Pre-requisites
Register yourself with https://www.ssocircle.com/en/ . You can give the user name as per your choice. Here I have given my user name as “ssoauth”. In realtime scenario, it will be your email address.

Once you register, You will get the confirmation email from ssocircle to your email id. Validate your account after receiving the email.
Install Microsoft Authenticator APP into your Mobile. This is needed for Account recovery of SSO.
Install “Integration - Multiple Provider Single Sign-On Installer” Plugin in Servicenow
Go to sys_user Table and update one of the Users email same as the one you gave while registering in SSOCircle. Here I have taken “abel.tuter” as a sample user for SSO testing

Procedure
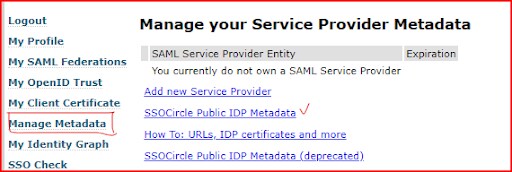
Login to SSOCircle with the credentials and click on “Manage Metadata” as shown below. Click on “SSOCircle Public IDP Metadata”.

Copy the XML code and paste it in some notepad
Access your Servicenow Instance and go to Multi-Provider SSO ⇒ Identity Providers
Click on “New” and click on “SAML” as shown below

You will be prompted with this popup window as shown below. Select “XML” and paste the xml that you have copied from SSOCircle.

Now, click on “Import” and all the information will be auto populated to the new form as shown below. Save this record.

Click on “Generate Metadata” UI Action and you will see a window as shown below. Copy this Metadata and go to SSOCircle Website

Go to “Manage Metadata” and click on “Add new Service Provider” and fill the form like this.
- Name = <yourinstance>.service-now.com
- Copy the XML here that you have got from the previous step
- Submit the form and now you have successfully registered your servicenow instance with the SSO Provider

Now, go to your servicenow instance and make the Identity provider as your “Default” Identity provider and save the record.

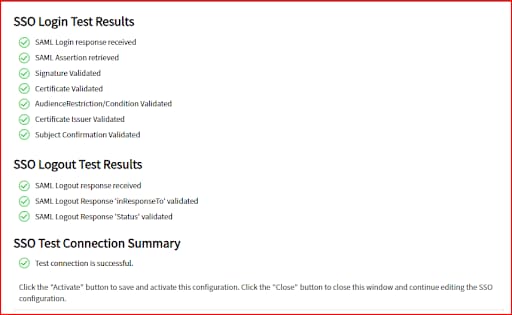
Now, click on “Test Connection” (Note: Sometimes you may be automatically kicked off from the snow console, but you can again login to the snow instance and continue with the test until you see the below screen)

Click on “Activate” UI Action to activate this IDP. Now, click on “Set as Auto redirect IDP” under Related Links. Make sure you are seeing this in your IDP Record.

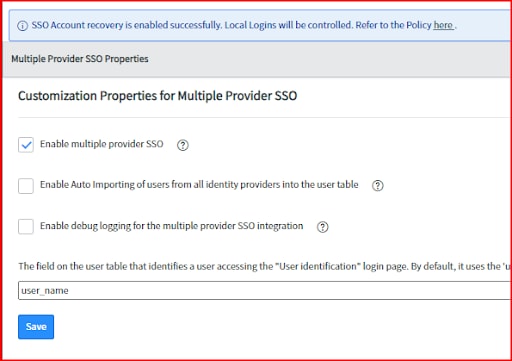
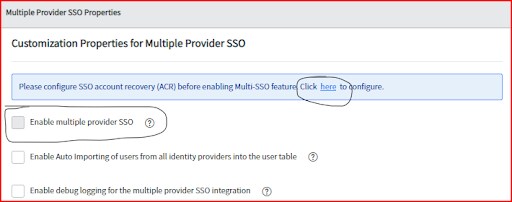
Go to the “Multi-Provider SSO ⇒ Administration ⇒ Properties and check “Enable Multi-Provider SSO”. (Note: By Default, it will be grayed out as you need to enable account recovery. Here your “Authenticator” APP will be useful)
- If “Enable Multi-Provider SSO” is grayed out, then first configure your account recovery as shown below. Scan using your Authenticator app, the Authenticator app automatically capture the account name as your instance name. Go to that account and take the 6 digit code from your app and fill that in 3rd step


Once the Account recovery is enabled, you will be able to select “Enable Multi-Provider SSO”

Now, you are all set to test the sso implementation. Remember while creating the profile on SSOCircle we have used one email and the same email was updated in “abel.tuter” in servicenow. So if you login with your sso credentials in servicenow, you will be redirected to Abel Tuter account. Log out from your servicenow instance and log back in. You will be able to observe it redirects you to the SSOCircle page as shown below.


Frequently Asked Questions
- Here we have shown for one user(Abel Tuter) on how to implement the SSO. Do I need to create multiple profiles like this in real time?
-
- No. In real time who ever is managing your Active Directory will have all the User profiles already stored in their domain. Each profile will have an email and the same email will be there in your sys_user table records.
- Do I need to collect the Identity provider information from my SSO Provider?
-
- Yes. In order to configure the SSO provider (e.g Azure, OKTA etc.,) in your Servicenow Instance. It can be either in an xml format / individual values to fill the form
- Do I need to install the Authenticator app / is it must to register for Account recovery?
-
- Not exactly. This configuration is optional, but Servicenow suggest you to register for it. If you don’t want, you can switch of by going through Multi-Provider SSO ⇒ Account Recovery ⇒ Properties ⇒ Uncheck “Enable account recovery feature”
- Is it the same procedure for any SSO Provider?
-
- Yes. This is the same procedure. Only the IDP will be changing
- Is the Password for a user in sys_user table and the password that a user provide in the sso auth are same?
- Not exactly and its not necessary to be the same as the sso auth once it redirects from the snow will always use the sso related password and not the one on the sys_user table.
Please bookmark & mark it as helpful so that you can refer anytime from your favorite lists. Let me know your comments in case of any updates needed in this Article.
Thanks,
Narsing
- 6,907 Views
- Mark as Read
- Mark as New
- Bookmark
- Permalink
- Report Inappropriate Content