- Post History
- Subscribe to RSS Feed
- Mark as New
- Mark as Read
- Bookmark
- Subscribe
- Printer Friendly Page
- Report Inappropriate Content
on 09-30-2020 05:20 AM
Hello Everyone,
This article is the second on a series of articles I will be publishing on how to integrate ServiceNow and UltiPro. This article will provide steps for creating new hire employee in a USA-based company.
In order to successfully to create a new hire in UltiPro using their Employee New Hire Service you will need to read through my first article Getting started integrating with Ultimate Software's UltiPro Web Services
Things you will need for this integration.
- Basic knowledge of REST and SOAP API's.
- Read and understand my previous article on how to get an authentication token Getting started integrating with Ultimate Software's UltiPro Web Services
- Postman I cannot recommend this app enough you will be using it for the entire integration and it is indispensable.
- ServiceNow Advanced admin training or comparable experience.
You should already have the prerequisite items from the going through the Getting Started article.
Prerequisites
In order to use the service, you will need the following items:
- An UltiPro Service Account username and password (created on the System Configuration > Service Account Administration page) or a UltiPro Web user account
- The Customer API key from the UltiPro Web Services page
- If you use an UltiPro Web Service account:
- You will need the User API key from the Service Account administrative page.
- You must have appropriate permissions granted to the Service Account for the Employee New Hire service on the Service Account administrative page.
- If you use an UltiPro Web User account:
- You will need the User API key from the Web Service administrative page.
In the last article we left off with getting an authentication token in workflow so we will continue from there. In my example workflow we are creating a new contractor but this concept will still work for full-time employees as well you will just need to pass the correct data in your outbound SOAP message.
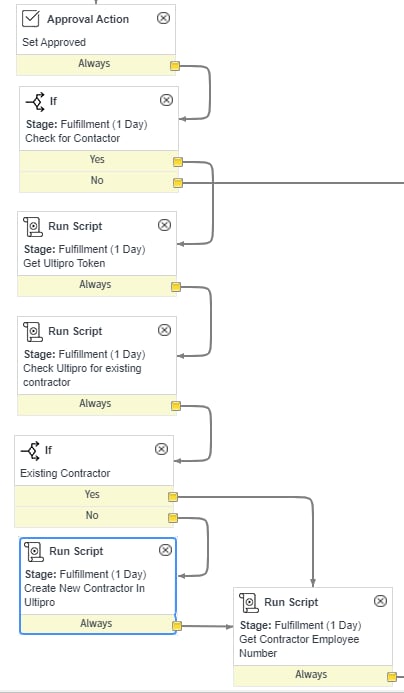
Here is how my workflow looks

Once the request is approved the following occurs,
- Check a variable to see if the person being onboarded is a Contractor
- Check Ultipro to see if the contractor already exists. The token is not needed in this step as the Run Script action is executing an outbound REST message.
- Get the Ultipro Authentication token for the next Run Script action which will execute an outbound SOAP message .
- Create the New Contractor in Ultipro. Executes the outbound SOAP and sends the variables for the new employee to the UltiPro New Hire Web Service
- Get the new employee number generated in UltiPro once the employee/contractor is created. Update the requested item with the employee number.
The Run Script actions in detail.
The first run script uses a outbound REST message that sends a variable with the new contractor email address to the UltiPro Employee ID Lookup Service. This will check to see if the contractor already exists.
Your environment may not need this step if you import users from UltiPro. Duplicates can be avoided other ways this is how we resolved our issue.
Implementation Notes
Look up Employee ID/Company ID. This operation is a POST due the sensitive nature of the lookup properties not appropriate for URI. This service also supports multiple records to be looked up in the body of the request (array of Identifier objects). Permissions - Ultipro service account must have the "View" and "Add" roles for the "Personnel Integration" Web Service. Headers - US-Customer-Api-Key, Authorization (base64 encoded {username}:{password})
Create a new Outbound REST Service.
Filter on REST Message- Click REST Message and from the REST Message list click new.

Give your REST message a name and proved the URL for the endpoint. You will also need to create a Basic authentication profile with your authentication username and password provided by your ultipro admin.

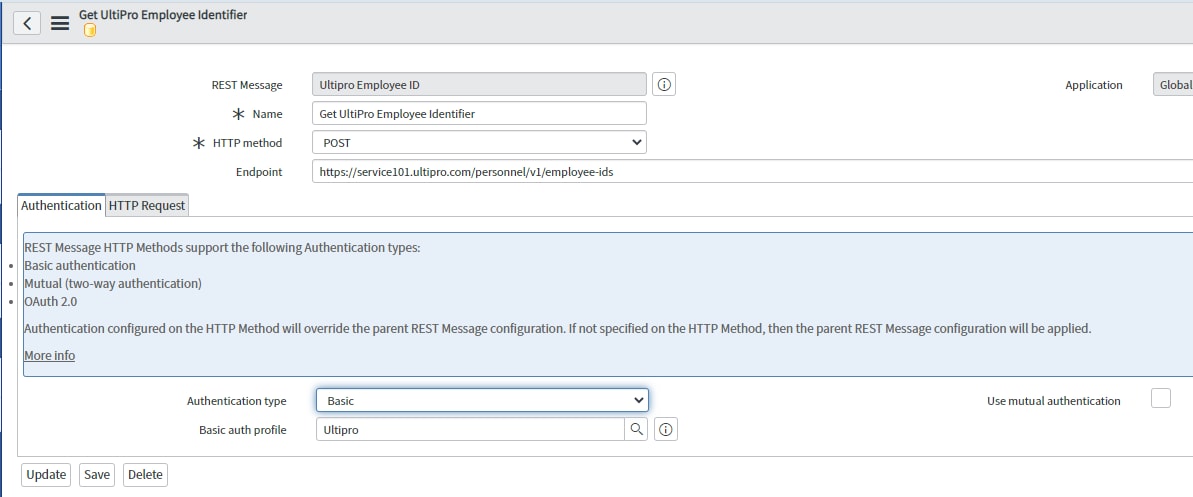
Once you save the record you will have a Default GET under related links. Click this record to edit it.

Give the record a more descriptive name. On the Authentication tab you can choose "Inherit from parent" or Basic and choose the authentication profile you already created.

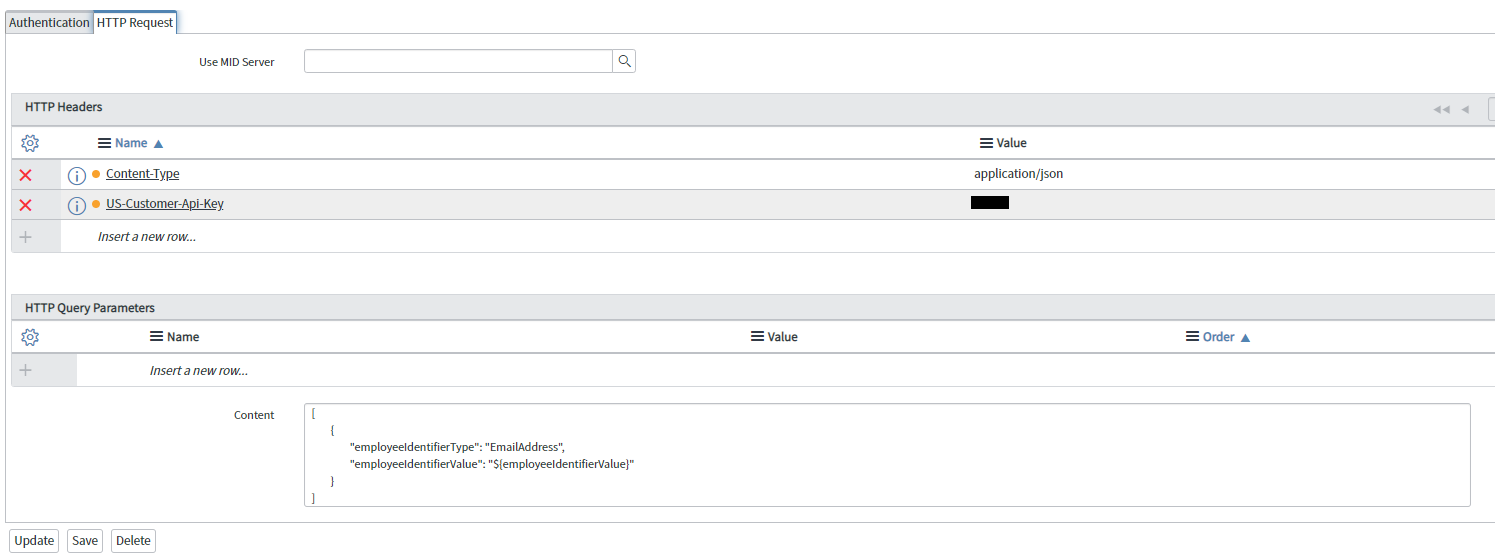
Click the HTTP Request tab. You will need to add the HTTP headers of Content-Type and your US-Customer-Api-Key as well as the JSON in the Content field.

JSON Content (you can have a different variable name)
[
	{
		"employeeIdentifierType": "EmailAddress",
		"employeeIdentifierValue": "${employeeIdentifierValue}"
	}
]
You can run test runs under related links unlike the SOAP messages for UltiPro. You can also use the Preview Script usage to help you build the script in the workflow which is the next step.
Add a Run Script action to your workflow. This is where you execute new outbound REST message. Your script should look something like this (you may have named your outbound REST message something other than 'Ultipro Employee ID' and have a different method name)
var email = current.variables.contractor_email;
var r = new sn_ws.RESTMessageV2('Ultipro Employee ID', 'Get UltiPro Employee Identifier');
r.setStringParameterNoEscape('employeeIdentifierValue', email);

var response = r.execute();
var responseBody = response.getBody();
var parsed = new global.JSON().decode(responseBody);
var httpStatus = response.getStatusCode();

var status = parsed.multistatus[0].status;
workflow.scratchpad.status = status;
If there is a matching email address this will return a a status of 200 OK which is what we are looking for. Anything else like,
would mean that the email doesn't exists so the employee/contractor should not exist in Ultipro. I have not found a better way to check for an existing user.
Add an IF Action after the run script to check for the 200 OK result. The script should look something like this.
// This script needs to set answer to 'yes' or 'no' to indicate the state of the activity.
//
// For example,
//
answer = ifScript();

function ifScript() {
    if (workflow.scratchpad.status == '200 OK') {
        return 'yes';
    }
    return 'no';
}
Creating the new hire in UltiPro using the Employee New Hire Service.
This next Run Script action uses an outbound SOAP message to create the employee. Navigate to creating a new outbound SOAP message. Give the message a name and paste your URL for the WSDL. Check the Download WSDL checkbox.

You can click the Generate sample SOAP messages and ServiceNow will generate them but like the previous article I could not get the NewHireUSA XML Envelope to work with what ServiceNow generated. I needed to use the attached document and help of UltiPro Support. I will post a sample XML file I know works on my instance but you will need to replace variables with what would be allowed in your instance.
You will need some dedicated time and information from your Ultipro Admin for this next step
After clicking the Generate sample SOAP messages link you should see a NewHireUsa. Click the record to edit the XML Envelope. Here is a sample XML envelope.
<s:Envelope xmlns:s="http://www.w3.org/2003/05/soap-envelope" xmlns:a="http://www.w3.org/2005/08/addressing">
	<s:Header>
		<a:Action s:mustUnderstand="1">http://www.ultipro.com/services/employeenewhire/IEmployeeNewHire/NewHireUsa</a:Action>
        <UltiProToken xmlns="http://www.ultimatesoftware.com/foundation/authentication/ultiprotoken">${token}</UltiProToken>
		<ClientAccessKey xmlns="http://www.ultimatesoftware.com/foundation/authentication/clientaccesskey">${YOUR CLIENT ACCESS KEY}</ClientAccessKey>
		<a:MessageID>urn:uuid:c5b414c6-f192-45b9-bf7a-6bbd375126a4</a:MessageID>
		<a:To s:mustUnderstand="1">https://servicet.ultipro.com/services/EmployeeNewHire</a:To>
	</s:Header>
	<s:Body>
		<NewHireUsa xmlns="http://www.ultipro.com/services/employeenewhire">
			<entities xmlns:b="http://www.ultipro.com/contracts" xmlns:i="http://www.w3.org/2001/XMLSchema-instance">
				<b:Employee>
					<b:AddressLine1>42 Wallaby Way</b:AddressLine1>
					<b:AddressLine2/>
					<b:AlternateEmailAddress/>
					<b:AlternateTitle></b:AlternateTitle>
					<b:BenefitSeniorityDate>${benefitsenioritydate}</b:BenefitSeniorityDate>
					<b:BirthDate>1970-01-01T00:00:00</b:BirthDate>
					<b:City>Sydney</b:City>
					<b:CompanyIdentifier i:type="b:CompanyCodeIdentifier">
						<b:CompanyCode>${COMPANY CODE IN ULTIPRO FROM YOUR ADMIN}</b:CompanyCode>
					</b:CompanyIdentifier>
					<b:Country>AUS</b:Country>
					<b:County/>
					<b:DeductionBenefitGroup>NONE</b:DeductionBenefitGroup>
					<b:DirectDeposits/>
					<b:DistributionCenterCode/>
					<b:EarningsGroup>NONE</b:EarningsGroup>
					<b:EmailAddress>${email}</b:EmailAddress>
					<b:EmployeeNumber/>
					<b:EmployeeType>${EMPLOYEE TYPE IN ULTIPRO FROM YOUR ADMIN}</b:EmployeeType>
					<b:EthnicOrigin>1</b:EthnicOrigin>
					<b:FederalAdditionalAmountWithheld>0</b:FederalAdditionalAmountWithheld>
					<b:FederalDeductionAmount>0</b:FederalDeductionAmount>
					<b:FederalDependentAmount>0</b:FederalDependentAmount>
					<b:FederalEmployeeClaimsExempt>false</b:FederalEmployeeClaimsExempt>
					<b:FederalFilingStatus>H</b:FederalFilingStatus>
					<b:FederalOtherIncome>0</b:FederalOtherIncome>
					<b:FederalSubjectToBackupWithholding>false</b:FederalSubjectToBackupWithholding>
					<b:FederalTotalAllowancesClaimed>1</b:FederalTotalAllowancesClaimed>
					<b:FederalW2Pension>false</b:FederalW2Pension>
					<b:FirstName>${firstname}</b:FirstName>
					<b:FormerLastName/>
					<b:FullOrPartTime>F</b:FullOrPartTime>
					<b:Gender>${gender}</b:Gender>
					<b:HireDate>${benefitsenioritydate}</b:HireDate>
					<b:HireSource/>
					<b:HomePhone/>
					<b:HourlyOrSalaried>H</b:HourlyOrSalaried>
					<b:I9Verification>P</b:I9Verification>
					<b:JobCode>${JOB CODE IN ULTIPRO FROM YOUR ADMIN}</b:JobCode>
					<b:JobGroup />
					<b:LastName>${lastname}</b:LastName>
					<b:LocalWorkInTaxResidentStatus>R</b:LocalWorkInTaxResidentStatus>
					<b:LocationCode>${LOCATION CODE IN ULTIPRO FROM YOUR ADMIN}</b:LocationCode>
					<b:MailStop/>
					<b:MaritalStatus>${mstatus}</b:MaritalStatus>
					<b:MiddleName>${middlename}</b:MiddleName>
					<b:NextPerformanceReviewDate>2020-10-01T00:00:00</b:NextPerformanceReviewDate>
					<b:NextSalaryReviewDate>2020-10-01T00:00:00</b:NextSalaryReviewDate>
					<b:OrgLevel1 />
					<b:OrgLevel2/>
					<b:OrgLevel3/>
					<b:OrgLevel4/>
					<b:OtherPhone/>
					<b:OtherPhoneExtension/>
					<b:OtherPhoneType/>
					<b:OtherRate1>1.5</b:OtherRate1>
					<b:OtherRate2 i:nil="true"/>
					<b:OtherRate3 i:nil="true"/>
					<b:OtherRate4 i:nil="true"/>
					<b:PTOPlans />
					<b:PayAutomatically>false</b:PayAutomatically>
					<b:PayGroup></b:PayGroup>
					<b:PayRate>0.00</b:PayRate>
					<b:PayRateType>Y</b:PayRateType>
					<b:PayScaleCode i:nil="true"/>
					<b:PreferredFirstName>${firstname}</b:PreferredFirstName>
					<b:Prefix/>
					<b:Project/>
					<b:ResidentCounty i:nil="true"/>
					<b:ResidentJurisdiction i:nil="true"/>
					<b:ResidentStateAdditionalAllowances>0</b:ResidentStateAdditionalAllowances>
					<b:ResidentStateAdditionalAmountWithheld>0</b:ResidentStateAdditionalAmountWithheld>
					<b:ResidentStateDeductionAmount>0</b:ResidentStateDeductionAmount>
					<b:ResidentStateDependentAmount>0</b:ResidentStateDependentAmount>
					<b:ResidentStateEmployeeClaimsExempt>false</b:ResidentStateEmployeeClaimsExempt>
					<b:ResidentStateFilingStatus>M</b:ResidentStateFilingStatus>
					<b:ResidentStateOtherIncome>0</b:ResidentStateOtherIncome>
					<b:ResidentStateTotalAllowancesClaimed>0</b:ResidentStateTotalAllowancesClaimed>
					<b:SSN>999999999</b:SSN>
					<b:ScheduledHours>80</b:ScheduledHours>
					<b:SelfServiceProperties i:nil="true" xmlns:c="http://schemas.microsoft.com/2003/10/Serialization/Arrays"/>
					<b:SeniorityDate>${benefitsenioritydate}</b:SeniorityDate>
					<b:ShiftCode/>
					<b:ShiftGroup/>
					<b:StateGeographicCode/>
					<b:StateOccupationalCode/>
					<b:StateOrProvince>New South Wales</b:StateOrProvince>
					<b:StepNo i:nil="true"/>
					<b:Suffix/>
					<b:Supervisor i:type="b:EmployeeNumberIdentifier">
						<b:EmployeeNumber>${supervisor}</b:EmployeeNumber>
					</b:Supervisor>
					<b:TimeClock/>
					<b:UnionLocal/>
					<b:UnionNational/>
					<b:WorkExtension/>
					<b:WorkPhone/>
					<b:WorkStateAdditionalAllowances>0</b:WorkStateAdditionalAllowances>
					<b:WorkStateAdditionalAmountWithheld>0</b:WorkStateAdditionalAmountWithheld>
					<b:WorkStateDeductionAmount>0</b:WorkStateDeductionAmount>
					<b:WorkStateDependentAmount>0</b:WorkStateDependentAmount>
					<b:WorkStateDisabilityPlanType>P</b:WorkStateDisabilityPlanType>
					<b:WorkStateEmployeeClaimsExempt>false</b:WorkStateEmployeeClaimsExempt>
					<b:WorkStateFilingStatus>s</b:WorkStateFilingStatus>
					<b:WorkStateOtherIncome>0</b:WorkStateOtherIncome>
					<b:WorkStatePlan/>
					<b:WorkStateTotalAllowancesClaimed>1</b:WorkStateTotalAllowancesClaimed>
					<b:ZipOrPostalCode>2000</b:ZipOrPostalCode>
				</b:Employee>
			</entities>
		</NewHireUsa>
	</s:Body>
</s:Envelope>
As you can see some of the data can be defaulted or hard-coded. The data with ${} is data from variables in your catalog item, business rule or data that you need to obtain from your UltiPro Admin.
Your Run Script action in your workflow for the variables in the XML envelope will look like this.
Be sure to set the Content-Type to 'application/soap+xml
var n = new sn_ws.SOAPMessageV2('Ultipro New Hire', 'NewHireUsa');

	n.setRequestHeader('Content-Type', 'application/soap+xml');
	n.setStringParameterNoEscape('token', token);
	n.setStringParameterNoEscape('benefitsenioritydate', current.variables.emp_start_date);
	n.setStringParameterNoEscape('email', current.variables.contractor_email);
	n.setStringParameterNoEscape('lastname', current.variables.new_employee_last_name);
	n.setStringParameterNoEscape('firstname', current.variables.new_employee_first_name);
	n.setStringParameterNoEscape('middlename', current.variables.new_employee_middle_initial);
	n.setStringParameterNoEscape('supervisor', current.variables.supervisor_empnum);

	var nresponse = n.execute();
    var nresponseBody = response.getBody();
    var nstatus = response.getStatusCode();
Getting the Employee Number in UltiPro using the Employee Employment Information Service.
The next run script action retrieves the new employee's UltiPro Employee Number which was assigned during creation of the employee. It is highly likely this employee number will be needed to complete certain tasks in your continuing workflow so I will include that in this article.
You will need to create a new outbound SOAP message to use the UltiPro API Employee Employment Information Service.

When you click Generate sample SOAP Message three message functions should be generated. Click the FindEmploymentInformations record to update it.

Your XML envelope should look something like this example that is just passing in the catalog item variable of firstname and lastname but you may also need supervisor last name in case there is someone else with the same first and last name in your organization.
<s:Envelope xmlns:a="http://www.w3.org/2005/08/addressing" xmlns:s="http://www.w3.org/2003/05/soap-envelope">
<s:Header>
<a:Action s:mustUnderstand="1">http://www.ultipro.com/services/employeeemploymentinformation/IEmployeeEmploymentInformation/FindEmploymentInformations</a:Action>
<UltiProToken xmlns="http://www.ultimatesoftware.com/foundation/authentication/ultiprotoken">${token}</UltiProToken>
<ClientAccessKey xmlns="http://www.ultimatesoftware.com/foundation/authentication/clientaccesskey">${YOUR CLIENT ACCESS KEY}</ClientAccessKey>
</s:Header>
<s:Body>
<FindEmploymentInformations xmlns="http://www.ultipro.com/services/employeeemploymentinformation">
<query xmlns:b="http://www.ultipro.com/contracts" xmlns:i="http://www.w3.org/2001/XMLSchema-instance">
<b:CompanyCode />
<b:CompanyName />
<b:Country />
<b:EmployeeNumber />
<b:FirstName>${firstname}</b:FirstName>
<b:FormerName />
<b:FullOrPartTime />
<b:Job />
<b:LastHire />
<b:LastName>${lastname}</b:LastName>
<b:Location />
<b:OrganizationLevel1 />
<b:OrganizationLevel2 />
<b:OrganizationLevel3 />
<b:OrganizationLevel4 />
<b:OriginalHire />
<b:PageNumber />
<b:PageSize />
<b:PayGroup />
<b:Status />
<b:SupervisorLastName />
<b:TerminationDate />
<b:TimeClockId />
</query>
</FindEmploymentInformations>
</s:Body>
</s:Envelope>
Your Run Script Action should look something like this.
var s = new sn_ws.SOAPMessageV2('Ultipro Employee Information', 'FindEmploymentInformations');
	var firstname = '=' + current.variables.new_employee_first_name;
	var lastname =  '=' + current.variables.new_employee_last_name;

    s.setRequestHeader('Content-Type', 'application/soap+xml');
    s.setStringParameterNoEscape('token', workflow.scratchpad.token);
	s.setStringParameterNoEscape('firstname', firstname);
	s.setStringParameterNoEscape('lastname', lastname);

    var response = s.execute();
    var responseBody = response.getBody();
    var status = response.getStatusCode();
	var xmlDoc = new XMLDocument2();
	xmlDoc.parseXML(responseBody);
	var empnum = xmlDoc.getNode("//b:EmployeeNumber").getTextContent();
		current.description += "\nEmployee Number " + empnum;
		workflow.scratchpad.empnum = empnum;
Set workflow.scratchpad.empum in case you would like to use it to create any tasks necessary for your workflow.
That's it! I hope this helps anyone working on integrating ServiceNow with UltiPro. I will be composing other articles with ways to POST or GET data from UltiPro so I hope you enjoy them as well.
Let me know if you have any questions in the comments below.
Thank you,
David Whaley
- 16,470 Views
- Mark as Read
- Mark as New
- Bookmark
- Permalink
- Report Inappropriate Content
Is this still relevant in Washington release? Integration Hub Spoke for UKG seems very limited to Kronos, but I wanted to do what this article does, push new users (and changes) from UKG to ServiceNow.
- Mark as Read
- Mark as New
- Bookmark
- Permalink
- Report Inappropriate Content
Hi @Sue L
It is just using standard outbound REST and SOAP API's. We are not on Washington but I can verify it works for Vancouver. I would expect it would work on Washington as well. We will be upgrading to Xanadu later this year so I will update the thread if there are any issues but I do not anticipate any.
Thanks,
David
- Mark as Read
- Mark as New
- Bookmark
- Permalink
- Report Inappropriate Content
Hi @David Whaley -
Great content! Thank you so much for sharing.
I do have two questions: Are you able to bypass process hires & the onboarding gateway in UKG PRO with this API? Additionally, if the API fails, or there is a connection issue, how do you troubleshoot and correct?
Thanks in advance!
- Mark as Read
- Mark as New
- Bookmark
- Permalink
- Report Inappropriate Content
Hi @ArleeS
I will need to get with our UKG admins for the first question. It just uses the NewHireUsa endpoint to get the data into UKG. What UKG does with the data after a successful transaction I am not sure.
We have had performance issues and connection in UKG in the past so what I did is put in a loop that checks to see if the employee was actually created by using the FindEmploymentInformations endpoint and passing in the First and Last name of the employee that was entered. If the response had a valid employee number and not an error then the flow would continue. If it returned an error it would wait 5 minutes and retry the POST 3 times. After 3 times a task was created for our UKG team to enter and look at the issue.