- Post History
- Subscribe to RSS Feed
- Mark as New
- Mark as Read
- Bookmark
- Subscribe
- Printer Friendly Page
- Report Inappropriate Content
on 08-29-2022 06:42 AM
The document template is a powerful feature of the ServiceNow platform, it allows you to create HTML and PDF document templates to generate standard letters or documents. You can automate and simplify the process of filling, signing, and reviewing a document online.
Some of the major features are:
- Document blocks: have parts of documents appear based on when specific conditions are satisfied.
- Document variables: easily populate dynamic data from ServiceNow
- Document Template Script: Powerful tool to fetch/modify variables.
However, there are some limitations in the Out of the Box (OOTB) functionality one of the major ones encountered was that the headers and footers are static and are attached to the document template.
Problem:
The customer has 10 legal entities and needs a contract/documents generated for each of them. The body of the documents is the same or can be made the same with the usage of blocks and variables. However, the header and footers of each Legal entity are different.
Since the header and footers are static and are by the document templates, a document template needs to be created per legal entity and maintained. This can cause considerable development and maintenance effort.
The problem increases exponentially if the customer has many legal entities.


Solution:
The HTML documents can have CSS scripts in them. We can use it to our advantage to introduce the dynamic header and footer functionality.
In the HTML code of the document introduce the below at the beginning of the code:
“<style>
@page {
@top-center {
content: element(pageHeader);
}
}
#pageHeader{
position: running(pageHeader);
}
</style>
<style>
@page {
@bottom-center {
content: element(pageFooter);
}
}
#pageFooter{
position: running(pageFooter);
}
</style>
<style type="text/css">
@page {
@bottom-right {
content: counter(page) " of " counter(pages);
}
}
</style>
<div id="pageHeader">${template_script:header}</div><div id="pageFooter">${template_script:footer}</div>”
<<actual document text from here on>>
Let’s breakdown the above code for a bit of better understanding.
““<style>
@page {
@top-center {
content: element(pageHeader);
}
}
#pageHeader{
position: running(pageHeader);
}”
The above tells the system to have the header in the top center position. You can also change it to top-left or top-right. The running(pageHeader) ensures that the header is present on each page.
The same logic applies to the footer code.
The code:
“<div id="pageHeader">${template_script:header}</div><div id="pageFooter">${template_script:footer}</div>”
This is how we call the header and footer values. Instead of the script if you call a static text or image then the document template will have just that, however, using script we can fetch the appropriate header and footer. The logic for the script would be:
if (target,subject_person.Legal_Entity == “Legal entity A”) {
return “Legal entity header 1.png”;
}
elseif (target.subject_person.Legal_Entity == “Legal entity B”) {
return “Legal entity header 2.png”;
}
… and so on…
Same logic for the footer template script.
Using the dynamic header and footer you can have the same document for the various legal entities and the system would populate the document with the right Header and footer and the appropriate variables. This would significantly reduce the development and maintenance time.
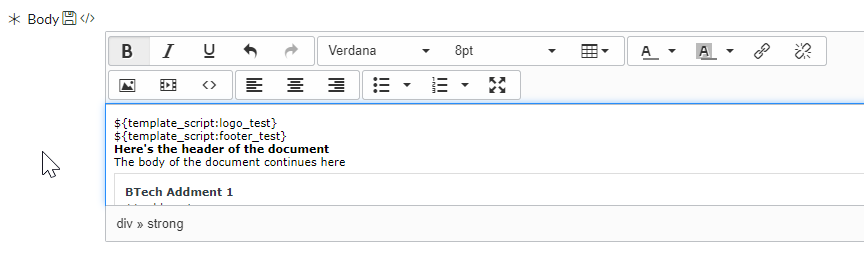
Your document template body would end up looking something like this:

Things to note:
- The image of the header and footers should be uploaded in ServiceNow. The URL might take a while to be figured out, in my experience, it might be better to put the full URL and the image config such as height and width.
Example:
return '<img style="align: baseline;" title="" src="https://<your-instance-url-here>/headerAImage.png" alt="" width="227" height="25" align="baseline" border="" hspace="" vspace="" />';
- Do not upload the header/footer/page number directly in the document template where you are adding it currently as it will conflict with the code. Leave it blank/default settings.
- If you are on San Diego version or later you might have to change the property; snc.pdfgenerator.html2pdf.api.version to 1. Please note that the Table of content will also not work after you switch this property.
- The logic for page numbers is also provided in the code.
- If you need to edit the document template, ensure that you are clicking on an actual text inside the document template and then clicking on the “<>” button. Failure to do so will introduce a <span> tag on the header and will prevent it from working.
- The preview view will look a bit different so after you click preview, go for the preview as PDF.
- The logic of this article is only valid for HTML document type.


I hope this article helps you in creating the document templates. Please do feel free to provide feedback/questions.
