- Post History
- Subscribe to RSS Feed
- Mark as New
- Mark as Read
- Bookmark
- Subscribe
- Printer Friendly Page
- Report Inappropriate Content
01-03-2021 12:39 AM - edited 06-07-2024 07:34 AM
!!! UPDATE !!!
You can find the complete Article attached as working PDF file at the end of the post.
Have Fun.
BR
Dirk
Hi
Did you ever need to find records in your database, having NO referencing records available? (e.g. any Requests without Requested Items, or Incidents without Tasks, or Groups without Users, or Users without Roles, etc..)
This can be achieved in a convenient way, by using database views.
What are Database Views used for?
Database views in general are used to create custom "VIEWs" on your tables and columns. You can e.g. create a view of an existing table and show just five of the 25 columns of that table (filtering horizontally) AND you can create a view on a table and filter for some conditions, to limit the rows shown by the view (e.g. all records with the "Location" = "Mexico".
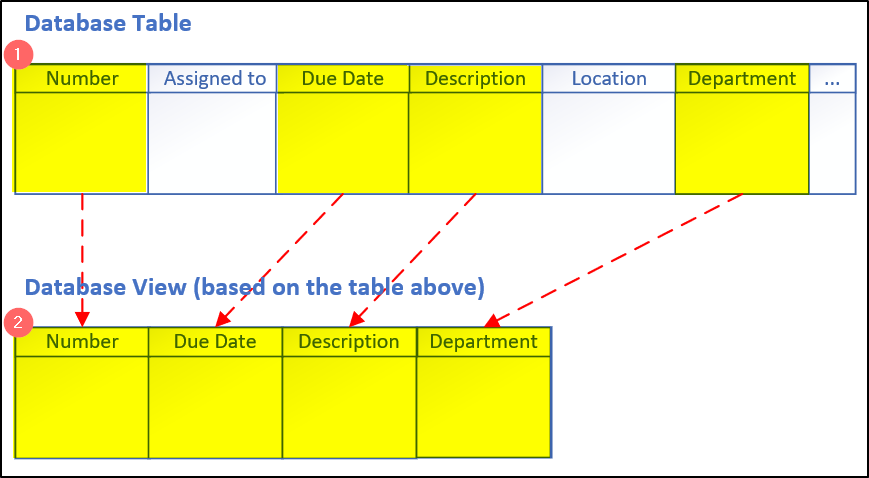
Below, you can see a diagram for a database view filtered horizontally. Only the yellow marked columns of the table (1) will be visible in the View (2😞
<Missing Picture - see attached PDF File>
The next diagram shows a View, which is slicing the database table vertically. You can see, that only records of the underlying table having the "Location" set to "Mexico", will be visible in the view.
<Missing Picture - see attached PDF File>
Note:
Views can slice tables in a horizontal and vertical way at the same time. One view is NOT limited to slice in only one direction (as you already can see in the second example above).
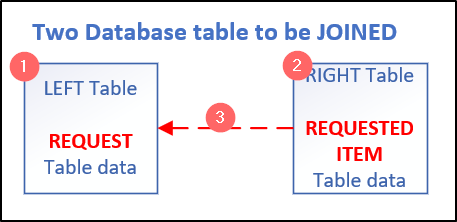
Furthermore, you can use database views to combine / link and JOIN two or more database tables in their logical relations (e.g. Users to Groups, Requested Items to Requests, etc.).
The diagram below shows two tables that are linked (JOINED) via the "Request" column, which is available in both tables.
The result is shown in the Database View below, which consists of only the selected fields from both tables.
<Missing Picture - see attached PDF File>
Note:
It is important to know, that the result is something also often called a "flat-file" (or the data in the de-normalized fashion). That means, that you will have one record for EACH resulting combination of both tables in your view. That way, the first column "Request" (1) is showing the "REQ04711" in BOTH resulting records (repeatedly), because there are TWO records related / available with that same number in the related table showing the Requested Items.
Also make sure, that you can see data LINKED (JOINED) from BOTH tables in one new table (View). Column "Request" (1) is taken from the upper table, and the columns (2), (3), and (4) are taken from the lower table.
The next example shows two Requests, where the second Request does NOT have any records in the Requested Items table
<Missing Picture - see attached PDF File>
QUESTION?
- The question now is, what do you expect to see in the Database view?
- What will be shown for the Request "REQ04712" in the View?
Well, as often, what you CAN see depends... Let me show you the possible options:
1) Show only those records in the View, that have matching records in BOTH tables
In SQL terms, this is called an "INNER JOIN" (or simply a "JOIN", because this is the standard behavior). The result will just look as if there is NO record in the Request table for "REQ04712".
Keep that in mind: You will NOT see records, which only have records in ONE of both joined tables.
The result for the example above will look like shown in the diagram below:
<Missing Picture - see attached PDF File>
2) Show all records from the LEFT table and matching records from the RIGHT table
Maybe you may ask, what is the "LEFT table" and what is the "RIGHT table"?!?
Here is the answer:
<Missing Picture - see attached PDF File>
When you JOIN two tables, you mention the "LEFT" table (1) as the first to join and the "RIGHT" table (2) as the second table using the JOIN conditions (3) which define, which fields must match for the output in the View.
The diagram below shows the resulting output for a "LEFT JOIN" View. Ther Request "REQ04712" is shown, but all other columns which are derived from the Requested Item table, are empty.
<Missing Picture - see attached PDF File>
This type of querying data in SQL terms is called an "OUTER JOIN" in this case a "LEFT OUTER JOIN", or also in short just "LEFT JOIN". The word "OUTER" indicates, that records outside of any matching will be shown.
NOTE:
Searching for Requests WITHOUT attached Requested Item is now possible, to filter the view by records, that have NO values in the columns derived from the Requested Item table.
3) Show all records from the RIGHT table and matching records from the LEFT table
This is just very similar to the "LEFT JOIN" option shown above, but just showing all records from the RIGHT table, and only the matching from the LEFT table. In fact, you do NOT need that at all, when you know the "LEFT JOIN" option, because you can implement a "RIGHT JOIN" just by exchanging both tables involved. Make the LEFT table the RIGHT one and vice versa... Think about it to become clear about it.
That's your homework 🙂
Use Case: Finding Users without any Role assigned to them
In the following steps, I will show you how to set up a Database View in ServiceNow and how to JOIN two tables with a "LEFT JOIN" to filter for Users that do not have any Role assigned to them. This is a general question that may occur again and again from time to time. So, your next homework is to transfer the knowledge from above, using the Request and Requested Item tables, to the User and User had Role tables.
- The database table "User" [sys_user] holds one record for each User configured in the Instance
- The database table "User Roles" [sys_user_has_role] holds one record for each assignment for a user to a Role.
So, the logical solution will be to set the "User" table as the "LEFT" table and the "User Roles" table as the "RIGHT table, like shown in the diagram below.
<Missing Picture - see attached PDF File>
In my example, I will use the tables "sys_user" and "sys_user_has_role" to show all users, that do NOT have any Roles assigned.
So, I am searching the List of Users and will join the HasRoles Table to the users.
This will create a list with one line per User and assigned role.
If one user has 5 Roles assigned, there will be 5 records in the result.
For the current use case, I need to set up a database view, that ALSO shows user records WITHOUT any HasRole records (which is done using a "LEFT JOIN". Then, I just need to filter the View by records with EMPTY fields on the HasRoles table.
Step #1 - Create a new Database View
Navigate to "System Definition > Database Views" and click on "New" in the List. This will open a new Form to create a new Database View (see screenshot below). Fill in some meaningful Name, Label, and Plural and "Save" the record. The "name" is the internal "technical" name for a Database view, just like the name for a table, and the Label and Plural are both labels for SINGLE and MULTIPLE records labeling (e.g. "one cookie" and "two cookies").
<Missing Picture - see attached PDF File>
After Saving the record, the Related List "View Tables" is shown, which is holding a list of tables, participating in the View. In our example, we use the "sys_user" table as the FIRST and "LEFT" table (having the LOWER Order number = 100), and the "sys_user_has_role" table as the SECOND and "RIGHT" table (having the HIGHEST Order number = 200). IN the screenshot above, both tables are already added, but we will do that in the following steps below together.
Note:
You are logically not limited to only join two tables, you can also add more tables to the Related List. Always remember, that the tables with the LOWER Order number will be the "LEFT" table to those ones with a higher Order number (where they are the "RIGHT" tables in that relation).
Step #2 - Add the [sys_user] table to the Database View
The next screenshot shows the details, you need to capture for the [sys_user] table when added to the Related List of "View Tables".
Note, that you may need to add the field "Left join" to your form (by ">Configure > Form Design"), because this field now is mandatory for this use case.
Make sure to add a unique "Variable prefix", which must be unique among all tables participating in your View.
To create a "LEFT JOIN" Database view, you now have to mark the "Left join" Checkbox!
<Missing Picture - see attached PDF File>
If you want to horizontally slice your View, you can add "View Fields" to the Related List of the "View Table" definition. If you do NOT specify and "View Fields" in that Related List, ALL (*) fields will be included in the View. As soon as you add one single column/field to the Related List, you need to add ALL fields you would like to appear in your Database View from THAT table (in this case, the columns/fields of the "sys_user" table.
Step #3 - Add the [sys_user_has_role] table to the Database View
As the second and "RIGHT" table (with the HIGHER Order value), we will add the "sys_user_has_role" table, as you can see in the screenshot below. Remember to also check the "Left join" checkbox for this table and capture a unique meaningful "Variable prefix" for this table.
The same as for the "sys_user" table, you can define which fields/columns from this table ("sys_user_has_role") are included in the View. Again, NO entries in the Related List "View Fields" will take ALL (*) fields from that table. Defining at least ONE field in the Related List means you need to add all fields you want to be added to the VIEW from THIS table.
<Missing Picture - see attached PDF File>
NOTE:
The important part to capture here is the value of the "Where clause" field of that Form. In this field, you need to add a Condition (Best done in parenthesis) and define, which fields need to match for the JOIN to take place.
Because you need to link/join ONE field from the LEFT table (sys_user) with ONE field from the RIGHT table (sys_user_has_role), you need to qualify the table to use for the fields to match. This is done using the previously defined "Variable prefix" from each table ("use" and "role") with an underscore, followed by the field name of that table ("(usr_sys_id=role_user)").
- Using "usr_sys_id" will be translated to "sys_user.sys_id" (which means to use the field "sys_id" from the "sys_user" table.
- Using "role_user" will be translated to "sys_user_has_role.user" (which means to use the field "user" from the "sys_user_has_role" table.
Note, that the "user" field of the "sys_user_has_role" table holds a Reference to the "sys_user" table. Therefore, the value of that column is a "Sys ID" of the User in the "sys_user" table. With that in mind, it makes sense to MATCH those records with the SAME "Sys ID" of the users to match. The result is, that for EACH User in the Database View, the records in "User Role" having the reference to that particular user, are matched.
Step #4 - TEST-DRIVE - Show the new Database View
Navigate to the new table created. I could do so, by typing in "u_dirk_demo_view.list" in the Application Navigator and press <ENTER>.
This will show the List of records, that the Database View (the joined tables) returns.
Configure the fields of the List to look similar to what is shown below, or whatever makes sense for you 🙂
<Missing Picture - see attached PDF File>
Remember: The "magic" lies in the "LEFT JOIN" switch that we configured on the tables. If you do NOT set that Checkbox, the view will ONLY show users, that have a least ONE Role, but NO users without any role.
Step #5 - Filter the new Database View to Users WITHOUT Role
Now, you need to filter to all those records on that View, that has NO value in any field of the [sys_user_has_role] table fields (because they do not have any matching records there).
Open the Filter Editor in the List as shown below and select the marked field.
<Missing Picture - see attached PDF File>
Note:
You need to select the "sys_id" field on the "role" [sys_user_has_role] table. Take care NOT to take the [sysid from the "usr" table!!!
As condition select "is empty" (see below):
<Missing Picture - see attached PDF File>
Now Click on "Run" in the Filter Editor and you find ALL Users, which have NO Record in [sys_user_has_role].
That's it.
Now, you know the basics and can play around with Database Views. You can slice them horizontally and vertically. YOu can JOIN and LEFT JOIN tables (and even more than TWO tables).
I would be happy to receive your feedback on this article in the comments below. Even "thumbs up" is a great thing to make the stay even more motivated to contribute future articles in the Community. Thanks!
Thank you for reading, and I hope you enjoyed this article.
Please provide your feedback on this article in the comments below.
If you like it, just mark this article as helpful and bookmark it using the "Bookmark" button above for later access.
Have fun and built something on ServiceNow
Dirk
---------------------------------------------------------------------
If you like to also review my other articles on the ServiceNow Community, please have a look at the overview here:
NOTE: The content I provide here is based on my own experiences and does not necessarily represent my employer's views.
- 8,815 Views