- Post History
- Subscribe to RSS Feed
- Mark as New
- Mark as Read
- Bookmark
- Subscribe
- Printer Friendly Page
- Report Inappropriate Content
on 05-27-2021 01:13 AM
Hi
Did you already take your first test drive on "Remote tables"?
If not, you are right here to take some minutes and get you up and running with the great and powerful NOW Platform feature.
Scenario
Remote Tables have been introduced in the "New York" Release of ServiceNow. The main intention for Remote Tables is, to create a local table schema, which can be used like any other table inside of ServiceNow, but the difference is, that the data read when accessing Remote Tables, is NOT retrieved directly from the local ServiceNow Database, but will be populated by a Script, that is executed to fill the table with data.
Remote Tables data is not stored or imported into the ServiceNow Database. Instead, the data is "generated" by a Script "on-demand" - as soon as the Remote table is accessed to read data. The data read/generated by the script is stored in your instance's memory and can be cached for subsequent read operations (this can be configured as needed).
Remote Tables are "Read Only" and you cannot insert/update/delete records in it, as you do with other normal ServiceNow tables.
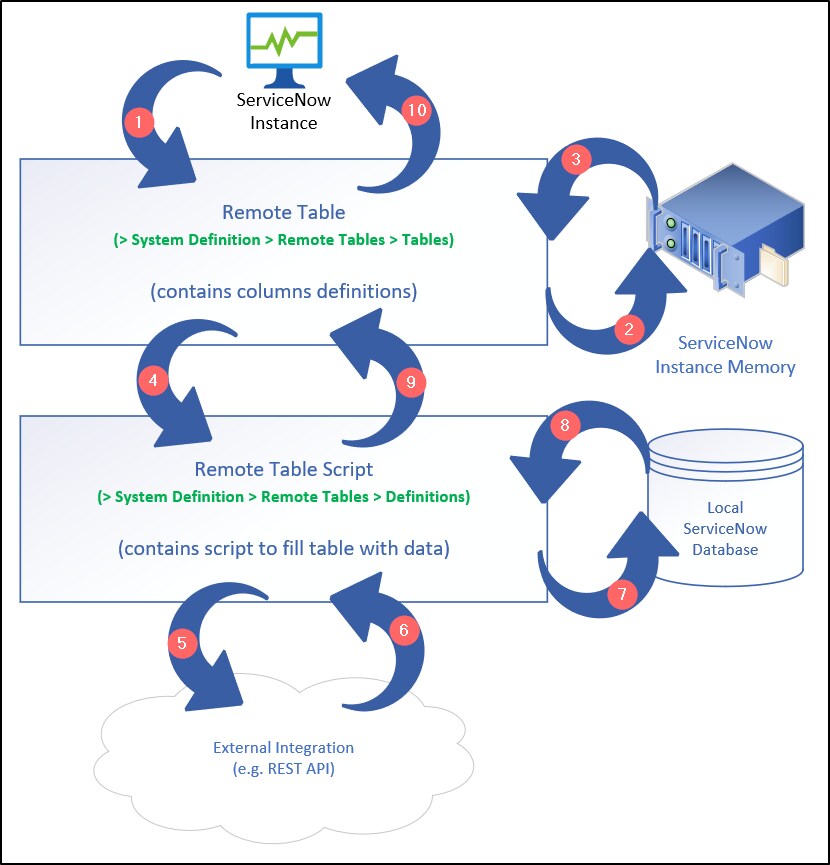
The following schema (see diagram below) shows the main process steps when accessing Remote tables:
- The ServiceNow system accesses the Remote table (within the Classic UI, a GlideRecord query, etc.)
- By accessing the table, the instance recognizes the access of a Remote Table and checks if there is a valid cached version of the queried data in the instance's memory
- If there is valid cached data for this Remote table (indicated by the query executed against the Remote table), the cached data will be returned and continues with step 10
- If there is NO valid cached data in the instance's memory to be returned to the query, the system executes the Remote Table Script (details on the Table script - read on below 🙂 )
- The script may (alternatively or inclusively to step 7) call any external source, like REST or SOAP API calls to get data from remote systems
- The remote systems return data which will be processed by the script to populate the Remote Table records (always the WHOLE Table data is refreshed on executing the script)
- The script may (alternatively or inclusively to step 5) read data from the local ServiceNow Database
- The Data from the ServiceNow Database can be used to create (scripted) records to be inserted into the Remote table
- The results created by the Remote Table script will be stored in the ServiceNow instance Memory (for caching)
- The results will be returned to the Client (Classic UI, the GlideRecord query, etc.)

Now, let's just experiment and experience creating an own Remote Table in a very basic form for demonstration purposes.
In the ServiceNow Application Navigator, you can find only two relevant Application Modules for working with Remote Tables, which you can find below "> System Definition > Remote Tables" (see screenshot below).

The first Module "Tables" (1) is used to create the table schema, which defines the columns/fields to be used in the Remote table, and the second Module "Definitions" (2) is used to manage the Remote Table Scripts (only one ACTIVE record per Remote table is allowed), which is leveraged to create the data returned by the Remote table at runtime.
Steps to walkthrough
1) Create the table structure/schema of the Remote table
Navigate to the List of (Remote) tables using the module "> System Definition > Remote Tables > Tables" and click on "New" to open the form to create a new Remote table.
Note:
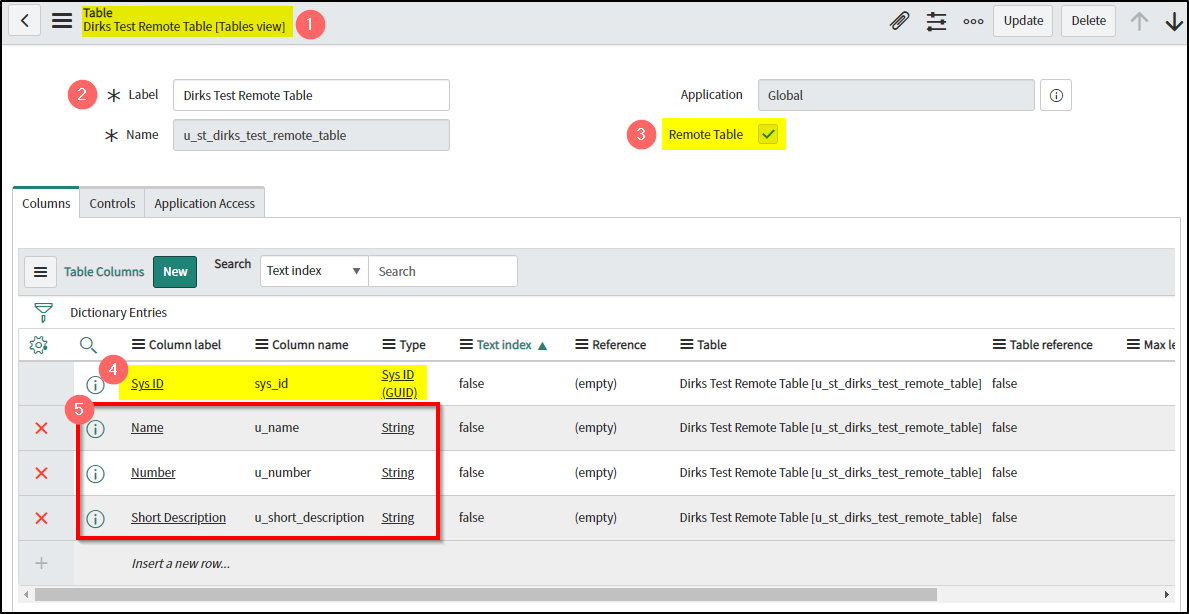
For this exercise, you should be familiar with how to create standard database tables in ServiceNow. You will notice, that you access the same Form as for normal tables (running on the [sys_db_object] table) with the field "Remote Table" (3) preselected.

The form "Table" (1) is used to manage the schema of tables (the same is also used for normal ServiceNow tables schema). Capture a "Label" for your new table (2) and make sure, that you leave the field "Remote Table" (3) checked.
The column "Sys ID" (4) is already created for you in the new table schema and cannot be changed or removed. Add the fields to the table schema as shown in the screenshot above (5). I just added three String type fields, each at 40 characters ("Name", "Number" and "Short Description").
Note:
Remote Tables cannot be extended, and you cannot create Remote Tables that extend from other tables. Anyhow, the same ACLs will also be created for Remote Tables and applied, just like for other normal database tables in ServiceNow.
Make sure to save your changes to make your table schema permanent.
Note:
The (technical) name of the table is generated automatically (see the "Name" field in the screenshot above), and always has the prefix "u_st_". If anyone knows, what "st" stands for in this prefix, please write down your ideas in the comments below (my best guess is "Scripted Table").
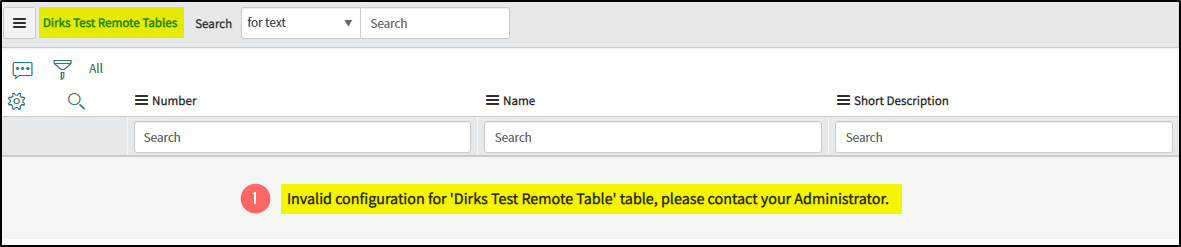
From now on, you can open the Remote table in your Instance, e.g. by opening it in the Classic UI, like shown in the screenshot below.

But wait! The message tells you about an "Invalid configuration...". Do you know why?
This message appears because the Remote Table does not know how to populate it with data. And exactly this is done by implementing the Remote Table script inside the Remote Table "Definition" record. This one will be created in the next step below.
2) Create the table definition/table script
In this example, we will just create a very simple table script, which just shows the way this script is to be set up. Once you understand the principles, you will easily be able to extend your script as needed to make your Remote table reflect the data you want to.
Navigate to the List of Remote table script using the module "> System Definition > Remote Tables > Definitions" and click on "New" to open the form to create a new Remote table Script.
Note:
You cannot create the Remote Table Script before creating the Table schema (done in the previous step), because the Remote Table Definition references the Remote Table to be populated with data by the script.

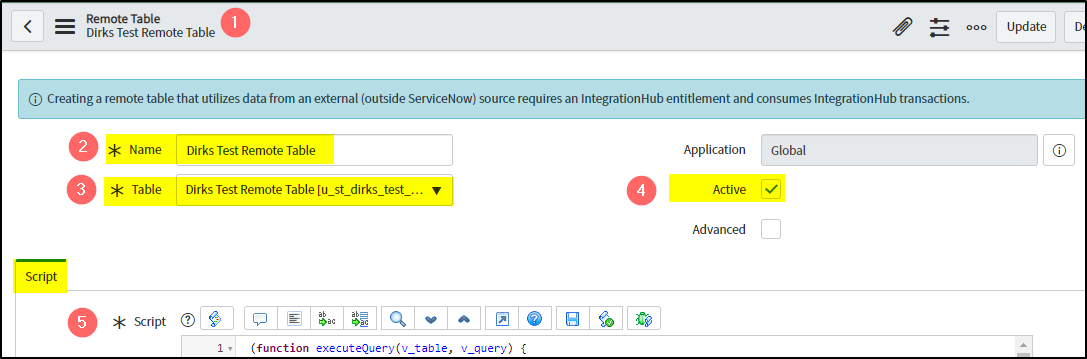
In the Remote Table (1) form, enter a meaningful Name (2) for the Definition (script) record and select the newly created (Remote) table in the "Table" (3) field. Make sure, the definition is set to "Active" (4) so that the script will be executed on accessing the table.
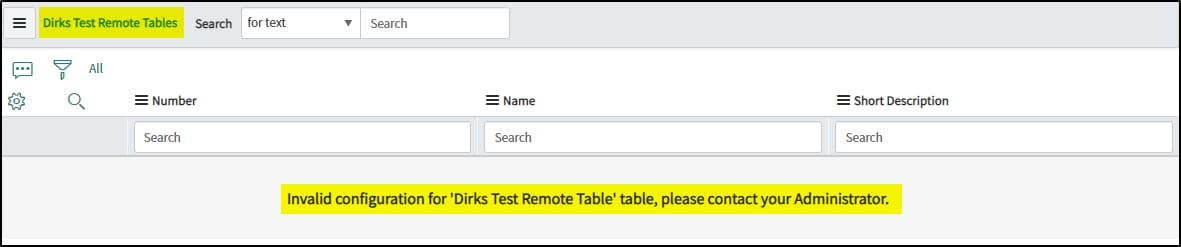
Note:
You can "deactivate" the Remote Table Script executing at any later time, by unchecking the "Active" field (4). Even having the Definition and Script in place, you then will receive the same error message like shown above, stating an "Invalid configuration...".
As you can see, the script receives two input parameters to the "executeQuery()" function, which is executed on reading data from the given Remote table.

The "v_table" (1) parameter is used to add records to the resulting output table of the query. It only has one API function found here, which is the "addRow()" function.
The "v_query" (2) parameter is used to access values from the query, that were run against the table when accessing from the platform (e.g. from the List in the Classic UI). The function "getEncodedQuery()" for example will return the Encoded Query (e.g. set up in the List filter's query builder) used.
The script field is pre-loaded with some comments to guide you to the available API, each for the "v_table" and the "v_query" object.
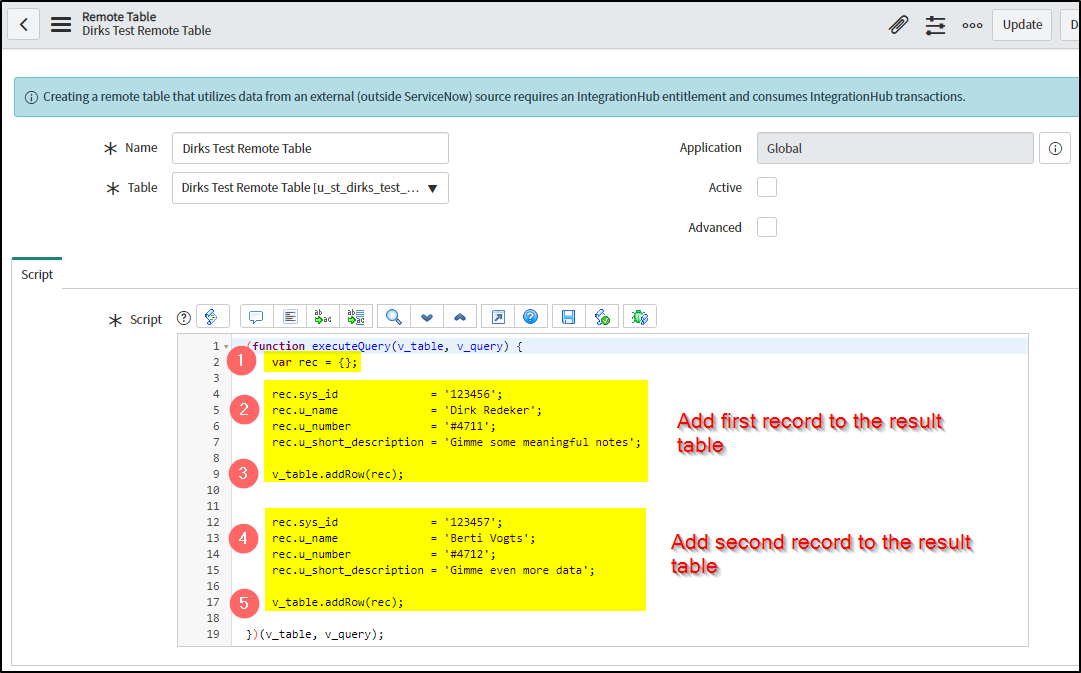
Add the following code to the Script field (see screenshot below - and the script for copy/paste below):
The code below will just add TWO (fixed) rows to the Remote table when executed. The field names used as object variable elements must match the column names defined in the table schema of the Remote table. Use "rec.u_name" for the "u_name" column of the Remote table, etc.

In line 2 of the script (1), an object variable "rec" is created to be used to create row objects, to be added to the output table using the "addRow()" function (in line 9 (3) and 17 (5)). The blocks (2) and (4) are used to fill in the object variables elements, which refers to the column names of the table columns, e.g. in line 5, the "Name" column (having the technical column name "u_name") is set.
Note, that YOU are responsible to even fill in the "sys_id" column with a UNIQUE value for each record/row added to the resulting output table. The Sys ID is of type String. ServiceNow will not fill the SysID field for you automatically.
Even if there are APIs, to create new SysIDs, this example is kept absolutely simple, for demonstration purposes and simplicity.
Save this Remote Table Definition record when done.
Below, you can find the script for Copy/Paste:
(function executeQuery(v_table, v_query) {
	var rec = {};

	rec.sys_id              = '123456';
	rec.u_name              = 'Dirk Redeker';
	rec.u_number            = '#4711';
	rec.u_short_description = 'Gimme some meaningful notes';

	v_table.addRow(rec);


	rec.sys_id              = '123457';
	rec.u_name              = 'Berti Vogts';
	rec.u_number            = '#4712';
	rec.u_short_description = 'Gimme even more data';

	v_table.addRow(rec);
})(v_table, v_query);
3) Review the data in the platform UI
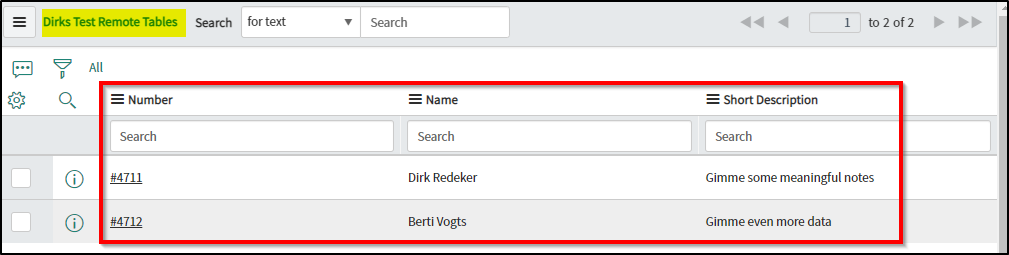
After Saving the Remote table Definition record (which is holding the script), open the Remote Table once more in the Classic UI. You now can find the two records created by the Remote Table Script - see screenshot below.

You can see, that there is no "New" Button available, and you can also try to update or delete records in the List. This will not be possible, because Remote Tables are always Read-Only.
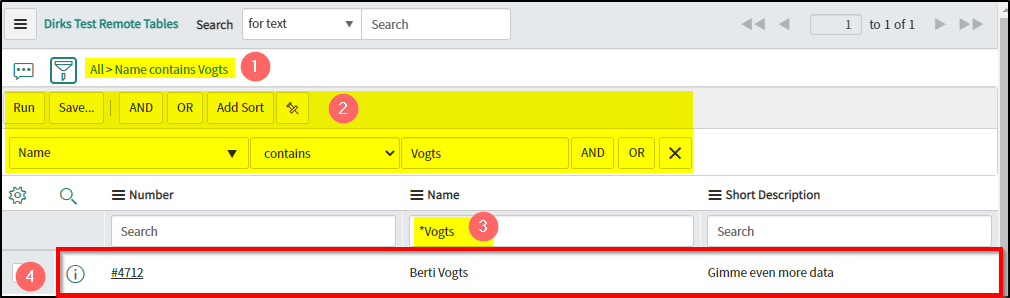
Anyhow, having this table read-only does not prevent the system to also run filtered queries against this Remote table. The screenshot below shows the Remote table filtered. You do not need to care about filtering in the Remote Table script. The filter is applied automatically to the records generated by the script.

So the process to fetch data from the Remote Table in details will do:
a) Check if Data is in the Cache (based on the query)
b) If (query matching) data is not in the cache, run the script to populate the cache
c) Grab the data from the cache to the data in the Cache
d) Return the remaining resultset/records to the client
I am quite sure, that in step b), only data matching the Query conditions will be put into the Cache/Instance Memory, to save system ressources. If you have further information or any different insights, just leave your comments below this article.
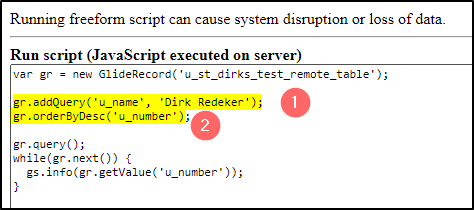
4) Access Data from Scripting
In addition to showing the data in the Classic UI (shown in the previous step), you can access the table also from scripts, like shown in the screenshot below. You can filter and sort, etc. just like for normal ServiceNow native tables.

Below, you can find the test script for Copy/Paste:
var gr = new GlideRecord('u_st_dirks_test_remote_table');

gr.addQuery('u_name', 'Dirk Redeker');
gr.orderByDesc('u_number');

gr.query();
while(gr.next()) {
  gs.info(gr.getValue('u_number'));
}
Executing the script will show the following output:

The following two steps are just for a bit more deep diving.
Go ahead if you want some more...
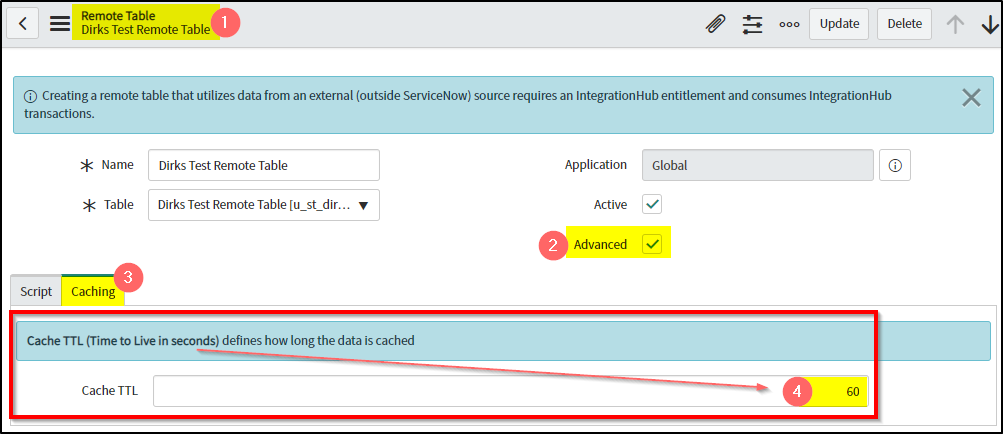
5) Review the advanced option for caching data
Navigate back to the table schema definition of your Remote Table via the List Module:
> System Definition > Remote Tables > Tables
and open your newly created Remote Table (1).
Check the "Advanced" field (2) which makes the "Caching" (3) section/tab visible on the form. Select that tab to make the "Cache TTL" (4) field appear (like shown in the screenshot below). The value to be entered in this field defines, how long (in a number of seconds) the data generated from the Remote Table Script, will be kept as valid in the instance's memory cache. During this time, the Remote Table script will NOT be re-executed if the same data is queried again from the instance. The "same" in this case means, that the same query conditions are used for reading the data.
Note:
The default value for the TTL is set to "0" (zero), which means that the data is not cached at all and every query to the table will result in executing the Remote Table Script.

If you query all data from the Remote Table (without any query conditions) at 13:00:00, the data will be put in the cache and will be seen as valid until 13:01:00. So if another query (e.g. by refreshing a UI List or UI Form) runs with the same query conditions (in this case NO conditions), the data does not be re-created by the script but can be re-used from the data cache instead.
After the TTL (time to live) has passed (which is at or after 13:01:00), the data in the cache will be invalid and any further query (with the same conditions) will force the system to run the Remote Table script again.
Note:
If the query conditions are changing, for EACH different set of query conditions, a separate cached version will be created, and a separate Script execution will be forced. For example Query 1 searches for the "Name = Dirk" and Query 2 searches for the "Name = Fred" within the TTL, even then for each query condition the script will be executed and a separate cached version is stored in memory.
Note:
Keep that in mind, because this can affect the performance and memory impact from a high number of users querying the table with different conditions.
6) Debugging your table script
Adding two more lines of code to the Remote Table Script will allow you to debug your script and review when and how it is called at runtime.

This will get the EncodedQuery String used when accessing the table from the platform and log it to the System Log (and print it out in "Scripts - Background"), where we can go and review the results.
Let's save this Remote table script and start running some test drives.
a) run the Scripts - Background script from above:

If you run this script you can learn two interesting facts about the Remote Table script.
The one thing is, that at the FIRST execution of the Background Script, the Remote Table has NO cached data, and need to execute the Remote Table Script to populate the Instance memory with the cached version of the records (remember, that we have set the TTL field on the Remote Table Definition Record to 60 seconds).

The second thing is, that for any subsequent executions of THE SAME Background Script (having the same Query Conditions), the data can be fetched from the Instance Memory cache and the Remote Table Script does not need to be executed. This can be reviewed in the screenshot below, where the "gs.info()" output is missing, and also the execution time for the Background Script is less (compare 612ms is the screenshot above with only 86ms in the screenshot below).

As soon as the TTL of 60 seconds has passed, the Script will be executed again and the "gs.info()" call with print out the debug info again.
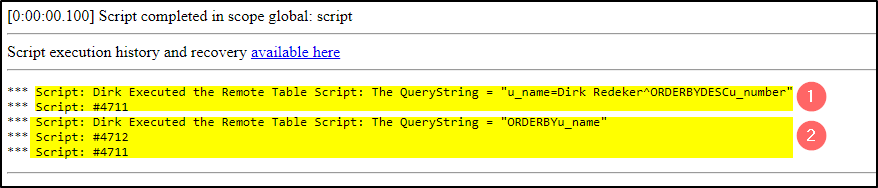
b) Using two different query conditions
In this example, I will execute two different GlideRecord queries with each different QueryString values (review the code in the box below).
var gr = new GlideRecord('u_st_dirks_test_remote_table');

gr.addQuery('u_name', 'Dirk Redeker');
gr.orderByDesc('u_number');

gr.query();
while(gr.next()) {
  gs.info(gr.getValue('u_number'));
}

// ======================================

var gr = new GlideRecord('u_st_dirks_test_remote_table');

gr.orderBy('u_name');

gr.query();
while(gr.next()) {
  gs.info(gr.getValue('u_number'));
}
The first execution again will force the Remote Table Script to be executed (on every single unique Query Condition). The screenshot below shows the output from the first execution of the Background Script, which shows the Remote Table Script was executed twice (because there are two outputs of the "gs.info()" function in the Remote Table Script).

Any subsequent executions of the same script within the 60 seconds TTL will result in reading the data from the instance memory cache and will be visible by NOT showing the "gs.info()" output from the Remote Table script.

Challenge
Now that you know how to debug the Remote table script, how about YOU finding out, if the Cache is shared between different users, or if there will be a separate cache being created per user, even if the query conditions stay the same.
Give it a shot and make your own test drive on this. I would be happy to read about your experiences on this and about the outcome of the challenge.
Have fun and learn by doing!
Wrap up
Remote Tables can be used in a wide variety of different scenarios. From creating "custom" tables filled with local (calculated) data or with data from remote locations, where data can be pulled in via Web Services.
You can also MIX and TRANSFORM data from different locations, do some CALCULATIONS, etc.
The options are endless, and you are always working on a Read-Only in-memory set of the data. I would like to hear about your projects and scenarios, where you already implemented Remote Tables, or where you intend or think about leveraging this great and powerful platform feature.
I would be pleased if you can leave your comments below this article and give me some feedback.
Thank you for reading, and I hope you enjoyed this article.
Please provide your feedback on this article in the comments below.
If you like it, just mark this article as helpful and bookmark it using the "Bookmark" button above for later access.
Have fun and built something amazing on ServiceNow
Dirk
--------------------------------------------------------------------------------------------------------
If you like to also review my other articles on the ServiceNow Community, please have a look at the overview here:
NOTE: The content I provide here is based on my own experiences and does not necessarily represent my employer's views.
- 17,751 Views
- Mark as Read
- Mark as New
- Bookmark
- Permalink
- Report Inappropriate Content
- Mark as Read
- Mark as New
- Bookmark
- Permalink
- Report Inappropriate Content
Hi @DirkRedeker ,
Thank you for the great article, it is very helpful!
I noticed just a minor mistake that could lead to confusion for somebody. The first rows of point 5 should look like that:
5) Review the advanced option for caching data
Navigate back to the table schema definition of your Remote Table via the List Module:
> System Definition > Remote Tables > Tables Definitions
and open your newly created Remote Table Definition (1).
- Mark as Read
- Mark as New
- Bookmark
- Permalink
- Report Inappropriate Content
How to create records in remote table using background script/scheduled job? DirkRedeker
- Mark as Read
- Mark as New
- Bookmark
- Permalink
- Report Inappropriate Content
Great breakdown. Each query being cached makes sense. So the next question is, can these Remote tables be read through the Table API?
- Mark as Read
- Mark as New
- Bookmark
- Permalink
- Report Inappropriate Content
Can we increase the Cache TTL of Remote table beyond 3600 seconds? if yes what steps we need to follow.
Ans also can we refresh/reload the Remote table using scheduled Jobs?