- Post History
- Subscribe to RSS Feed
- Mark as New
- Mark as Read
- Bookmark
- Subscribe
- Printer Friendly Page
- Report Inappropriate Content
on 05-21-2020 02:47 AM
Hi
Did you ever struggle with setting up a Scripted SOAP WebService in ServiceNow?
I did hard time for my first try.
So, I want to give you a short step-by-step instruction on how to create your own SOAP WebService in your ServiceNow instance, and how to consume it afterward from Postman for testing it.
This means you will have an endpoint in your instance, that can be called from outside.
Scenario
My simple example WebService will just accept ONE input parameter as a value, that the Client can submit to the WebService. In return, the Client will receive just ONE output parameter holding the result.
As logic to execute, the service will just echo your input, which is a nice starting point for your own adventures afterwards.
Because my WebService will need some logic, I will implement a "Scripted SOAP Service".
Note: I went through the steps in my ORLANDO Release Personal Developer Instance
Steps to implement the Scripted SOAP Service
Creating a new Scripted SOAP Service is done in very few steps:
SOAP WebServices can be found and managed by navigating to
> System Web Services > Scripted Web Services > Scripted SOAP Service
I create a new Scripted SOAP Service by clicking on new. The screenshot below shows the few values that need to be filled in for creating.
Make sure, that you chose a meaningful name (1) for your Scripted SOAP Service WITHOUT any whitespace and special characters because the given name will be part of the URL (4) to call the WebService later.
The "Short description" (2) is optional, but make sure to leave at least a small piece of information for the ones who will find this definition later (maybe it's your future you as well :-))

We will leave the "Script" (3) field as-is for the moment. We already can see, that the system created a function in the Script field, that we can use to fill in our logic for the WebService to execute, when called.
Note, that the function has two parameters "request" and "response". Both will be used to communicate.
The "request" variable will hold values, that the WebService receives (input), and the "response" variable will be filled with the values being returned to the caller, as the result of the WebService processing. We will use them shortly.
After Saving the definition, two Related Lists are shown in the "Scripted Web Service" Form.
a) In the "Input Parameters" Related List, I add one record with the name "input_parm1". This will be the name of the parameter for sending data from the Client to the WebService later. Or in other words: The name of the "request" variable, that will receive data from the Client.

b) In the "Output Parameters" Related List, I add one record with the name "output_parm1". This will be the name of the parameter for returning data back to the client. This will be part of the "response" variable.

Now, I have one record in each of the Related Lists on the "Scripted SOAP Service" Form.
The last thing to do is to fill in the Script, which builds up the logic of the Scripted SOAP Service. In my case, I will just echo the input parameter to the output parameter (see marked in yellow in the screenshot below).

After Saving the "Scripted Web Service", it is already available for usage (in spite you set up something special in your instance, which is different to the OOB functionality, which may prevent accessing Web Services).
Note: The Scripted Web Service would also work, even without defining the "Input Parameters" and "Output Parameters" in the Related Lists. But this is NOT best practice. The definition of the parameters will be used to construct the WDSL (Web Service Description Language).
Steps to TEST Scripted SOAP Service from POSTMAN
Now, that we have the simple Web Service up and running (make sure, the field "Active" on the "Scripted Web Service" record in ServiceNow is checked), we can easily consume it from POSTMAN. If you do not have POSTMAN installed, search for it on the web to download and install it.
1) Open Postman and create a new "Request" definition for calling the WebService just created:

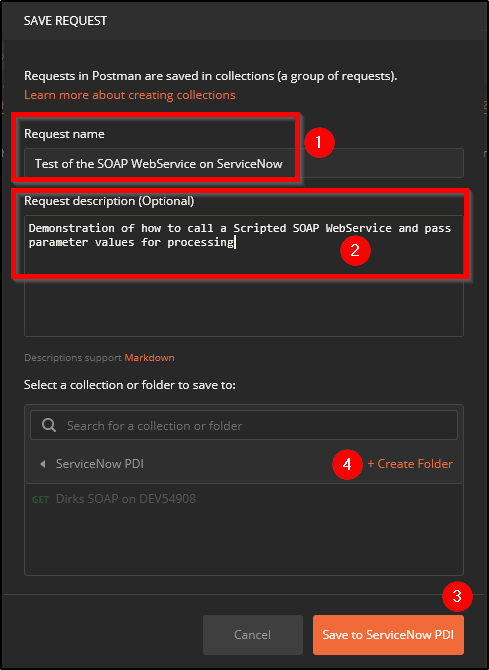
2) Fill in the "Request name" and "Request description"
Fill in a name (1) and description (2) for your new request and click "Save on xxxx" (3).
If the "Save on xxxx" button is inactive, you can create a new "collection" (4) first, where you can save the definition afterward.

3) Set POST method
Open the dropdown list op methods (1) and select the "POST" (2) method. Calling SOAP WebServices will need to use the "POST" method. Using "GET" will not work and throw an error when calling the WebService.

3) Copy the WebService URL from ServiceNow to the Clipboard
Copy the full URL from your newly created WebService in ServiceNow to the Clipboard (see screenshot below).

4) Paste the URL to Postman and change "WSDL" to "SOAP" at the end
Paste the URL of your WebService to the address field (1) in Postman (see screenshot below), and change the "WSDL" (at the end) to "SOAP" as shown below (2). This automatically creates a "Query Parameter" for the call to the Service (3), which you can find on the "Params" Tab (4).

If you click on "Send" (1) - the blue-button upright, the response message (4) will tell you, that the call was NOT successful, because you need to authenticate for using that WebService (see screenshot below).
You will find this on the "Body" (2) TAB, which has the output format set to "XML" (3).

5) Enter the credentials to access the SOAP WebService
Select the "Authorization" TAB (1) and select "Basic Auth" (3) from the "Type" (2) dropdown field.

Enter the credentials for the test. I just start using the system administrator (admin) for my testing here.

Check, that you typed username and password correctly (by showing the password with the "Show Password" checkbox).
6) Create the XML Envelope to send data to the SOAP WebService
Data exchanged between the Server (ServiceNow) and the Client (Postman) will be put into a special XML format, which is called an "envelope" (an "Envelope" like sending good old "PAPER" mails in "those days" - are you one of those who can remember???).
For sending data, we need to create such an envelope manually. There are also tools on the web, which will help to create the envelope for you. For this time, just type in, what you find on the screenshot below (go for it, you can make it!).
Select the "Body" (1) TAB, set the format of the Body to "raw" (2), and chose the "XML" format (3). Then type in the XML like shown below:

OK, maybe its too much to type 🙂 Here it is for copy/paste:
<Envelope xmlns="http://schemas.xmlsoap.org/soap/envelope/">
    <Body>
        <execute xmlns="http://www.service-now.com/DemoEchoSOAP">
            <input_parm1>Give me some honor on the ServiceNow Community by marking as helpful and bookmarking</input_parm1>
        </execute>
    </Body>
</Envelope>
The important thing to know is, that the function of the WebService we will call is "execute" (see line 3) and that function gets a parameter called "input_parm1" (see line 4) having the String / value enclosed in the XML tags <input_parm1> ... </input_parm1>.
7) Test the Web Service Call again
Click the blue "Send" button (1) once more and review the results on the "Body" TAB (2).
Select the XML format (3) and review the content. Maybe you will receive an error again, but this time a different one (4).
This time, the error states, that you have a wrong "Content-type".

We can make sure, that Postman uses the correct Content-type by defining that in the HTTP Header (see next screenshot).
Switch to the "Headers" TAB (2) and add a new Header (3) like shown in the screenshot. This definition will overwrite the one that Postman created for you automatically (4).
You need to type in the "Key" EXACTLY ("Content-Type") as indicated in the screenshot - check for upper/lower case and also for the Value "text/xml".

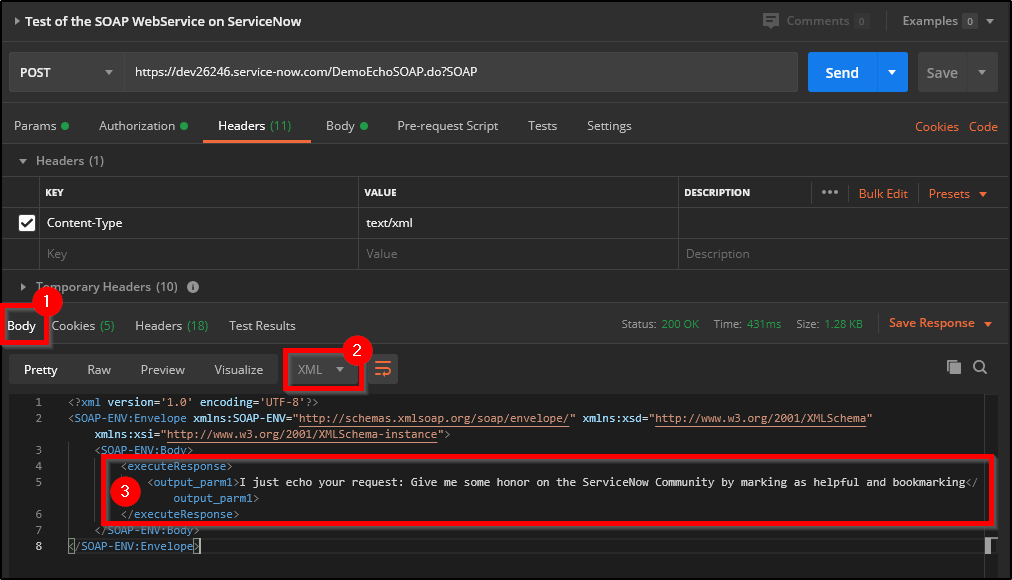
Now, click on "Send" (1) once more and review the results below:
Again, the output can be reviewed on the "Body" Tab (1) and shown in the "XML" (2) format.
The Response is now a clean "Envelope", which holds the value returned in the "<output_parm1>" Tab (3).

You can find the string used as the parameter value of "input_parm1" echoed to the resulting envelope in the "output_parm1" tag.
Great! That's it!
Thank you for reading, and I hope you enjoyed this article.
Please provide your feedback to this article in the comments below.
If you like it, just mark this article as helpful and bookmark it using the "Bookmark" button above for later access.
Have fun and built something on ServiceNow
Dirk
---------------------------------------------------------------------
If you like to also review my other articles on the ServiceNow Community, please have a look at the overview here:
NOTE: The content I provide here is based on my own experiences and does not necessarily represent my employer's views.
- 18,741 Views
- Mark as Read
- Mark as New
- Bookmark
- Permalink
- Report Inappropriate Content
Hi Dirk,
Thank for such a detail explanation. It is really helpful for me.
- Mark as Read
- Mark as New
- Bookmark
- Permalink
- Report Inappropriate Content
Thank You.It's really Helpful for me.
- Mark as Read
- Mark as New
- Bookmark
- Permalink
- Report Inappropriate Content
Hi Priya
Thanks a lot for your feedback.
I am happy, that you like my article.
Enjouy ServiceNow
BR
Dirk
- Mark as Read
- Mark as New
- Bookmark
- Permalink
- Report Inappropriate Content
Excellent article . This was very helpful.
- Mark as Read
- Mark as New
- Bookmark
- Permalink
- Report Inappropriate Content
Thank you so much.
It was realy helpfull and I was ables to solve my problem with your explanations,