- Post History
- Subscribe to RSS Feed
- Mark as New
- Mark as Read
- Bookmark
- Subscribe
- Printer Friendly Page
- Report Inappropriate Content
on 03-14-2017 01:04 AM
Update: There is now an app in the ServiceNow store that provides integration to Azure Automation. The below still works, but if you prefer a supported solution, you should check out the app here.
There is also a video explaining how to set this up, which can be located here.
I needed to setup integration between ServiceNow an Microsoft Azure with the goal of having ServiceNow provision and maintain Servers in Microsoft Azure. To do so I have previously been using webhooks in Azure to facilitate the integration, but decided to try to use the Azure Automation API instead, as this gives more options and seems like a more secure approach. I however quickly found that there was not much documentation on the topic available which is why I decided to write this guide on my findings.
This document is split in two steps. The first step will setup everything needed in Azure and the second will configure ServiceNow. Following step two I will provide two examples of first starting a job by running runbook in Azure and secondly how to get the status of the job.
Step 1: Setup Azure
For ServiceNow to be able to integrate to Azure there is some configuration that is needed to be done on the Azure side. Go to portal.azure.com and login with your azure credentials.
To complete this guide you need to have sufficient rights in your Azure platform. First check that "App Registration" is activated. Click on "Azure Active Directory" in the menu to the left and then select "User Settings". Ensure that the option "Users can register applications" is set to yes.

If this is set to "No" you need to be "Global Administrator" in order to register an app. Either ensure that you have this access or ask your administrator to enable app registration.
Next verify that you have sufficient rights for the subscription in Azure. Again select "Azure Active Directory" in the menu to the left then click "Users & Groups" - "All Users". Click on your own user and then click "Azure resources". Verify that you have at least the "Contributor" role for the subscription that you wish to integrate to. In below picture I have the "Owner" role so I am good to go.

Now we are ready to configure Azure. Go to "Azure Active Directory" in the menu to the left. Then click on "App registrations". This will give you a list of registered Apps. If ServiceNow is already on this list, simply click on it to open it. If not you can add it by clicking the little "+ Add" in the top left of the list.

Under "Name" you enter "ServiceNow" or something that makes sense to you. Under the "Application Type" you must select "Web app / API". Under sign-on URL add the link to your instance followed by "/login.do". Ex. https://myinstance.service-now.com/login.do. Then click the "Create" button at the bottom.
Once the Application is created you will see a page that looks like below. If the menu to the right is not visible, click the "Settings" button in the upper left corner.

Copy and store the "Application ID" as you will need this later to configure ServiceNow. Then click the "Keys" under "API Access".

Enter something meaningful in the "Description" field and select an expiration date. For ease of use I selected "Never". Then click "Save".

Once you click "Save" a key will be generated. This is the only time that you will be able to see this key, so make sure that you copy it and store it somewhere safe.
Now we need to obtain your Subscription ID and the name of the Resource Group in which your runbooks are stored. To find this go to "Resource groups" in the menu to the left, then click on the name of the Resource Group in which you have placed your runbooks.

In the upper right corner you can see the Subscription ID. Copy this and save it somewhere safe. We will need this later to Configure ServiceNow. Also copy the name of the Resource Group. In this case "SNOW-TEST". Scroll down the list to the right and copy the name of the "Automation Account" in which you runbooks are stored. Then click the "Access control (IAM)" link in the menu to the left.

Click the "+ Add" icon the the top left to give ServiceNow access.

Since I need to have ServiceNow both read and update objects in Azure I select the "Contributor" role. If you only need read access, then consider using the "Reader" role. Then click "Select" at the bottom of the page.

Search for the ServiceNow application that we previously created and select it. Then click "Select" followed by "OK".

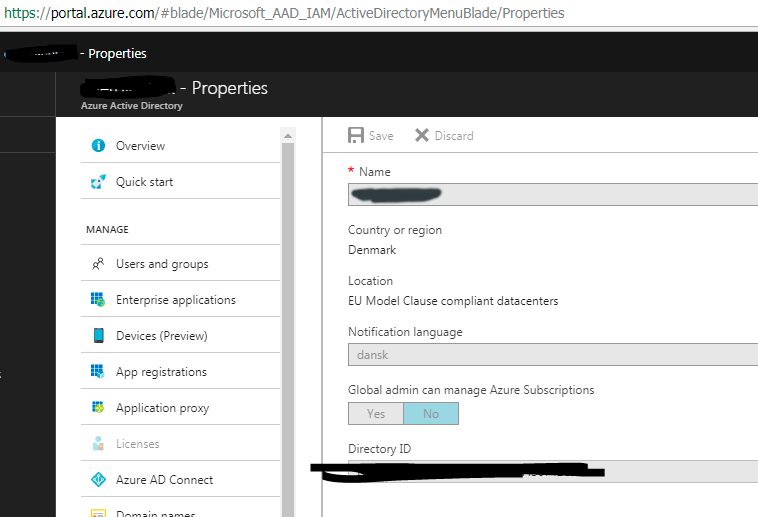
Lastly we need to copy your tenant ID. There are multiple ways to get this, but go to https://portal.azure.com/#blade/Microsoft_AAD_IAM/ActiveDirectoryMenuBlade/Properties and copy the ID in the "Directory ID" field.
We are now done setting up Azure and are ready to configure ServiceNow. Ensure that you have recorded the following information:
- Application ID
- Key
- Subscription ID
- Name of Azure Resource Group in which you runbooks are stored
- Name of Automation Account in which you run books are stored
- Tenant ID
Step 2: Configure ServiceNow
In ServiceNow you need to have the "admin" role in order to configure the integration. I will be using javascript to create the connection. This can then be used in a script include, a business rule etc. Basic understanding of scripting is assumed, but please do let me know if there is anything that is unclear.
First click on "Application Registry" under "System OAuth" in the menu to the left.

Click the "New" button at the top of the list and then pick "Connect to a third party OAuth Provider"

Next fill out the form with below information.
- Name: In this example we will call the it "Azure OAuth", but you can call it something that makes for sense to you
- Client ID: Insert the "Application ID" that we saved earlier in the Azure configuration
- Client Secret: Insert the "Key" that we saved earlier in the Azure configuration
- Default Grant type: Set this to "Client Credentials"
- Refresh Token Lifespan: You can leave this at the default of 8.640.000.
- Token URL: Set this to "https://login.microsoftonline.com/<your_tenant_id>/oauth2/token" where <your_tenant_id> is the tenant ID that we saved in the Azure configuration
- Redirect URL: Set this to "https://<your_instance>.service-now.com/oauth_redirect.do" where <your_instance> is the name of your ServiceNow instance.

Click "Submit" to save the OAuth Provider. We are now ready to start scripting.
First we will create a new OAuth object
var oAuthClient = new sn_auth.GlideOAuthClient();
Next we will set the params for the OAuth object
var params = {grant_type:"client_credentials",resource:"https://management.azure.com/"};
We will then get the token response by specifying the name of the OAuth Provider we created earlier and add the parameters
var tokenResponse = oAuthClient.requestToken('Azure OAuth',global.JSON.stringify(params));
From this we will extract the token
var token = tokenResponse.getToken();
We will then create a REST object to start querying the Azure API. In this example we will do a simple GET to get the status of a given job. First we create the object
var r = new sn_ws.RESTMessageV2();
Next we add the token that we just acquired
r.setRequestHeader('Authorization','Bearer ' + token.getAccessToken());
You are now ready to start constructing your request.
Step 2.1 Start a new job in Azure using a PUT request.
In this example we will continue to build on the script defined in step 2 start a new job in Azure. You need to know the name of the runbook that you wish to start as well as the Subscription ID, Resource Group and Account Name that you noted down earlier in the Azure configuration step. I will refer to them as:
runbook, subscription_id, resource_group, account_name
Firstly we need to generate a GUID for the new job. I use the below code to do so.
var guid = 'xxxxxxxx-xxxx-4xxx-yxxx-xxxxxxxxxxxx'.replace(/[xy]/g, function(c) {var r = Math.random()*16|0,v=c=='x'?r:r&0x3|0x8;return v.toString(16);});
I will then create the URL which will be the endpoint that we will communicate with.
var url = 'https://management.azure.com/subscriptions/' + subscription_id + '/resourceGroups/' + resource_group + '/providers/Microsoft.Automation/automationAccounts/' + account_name + '/jobs/' + guid + '?api-version=2015-10-31';
Then we need to specify the runbook and set the parameters that the runbook needs in order to execute. In the below example we set the name to the value of the variable 'runbook' and set two parameters called 'var1' and 'var2'. Change this so that it suits your needs.
var aRequest = { 'properties' : { 'runbook' : { 'name' : runbook }, 'parameters' : { 'var1' : 'some value', 'var2' : 'some other value' } } };
Next we add the above to the request body.
r.setRequestBody(global.JSON.stringify(aRequest));
Secondly set the http method to "put".
r.setHttpMethod('put');
Next you need to set the content type in the header for Azure to understand your request. Eg:
r.setRequestHeader('Content-Type','application/json;odata=verbose');
We then add the URL to the REST object. I like to strip all white spaces just in case somebody accidentally added a whitespace somewhere, since this will break the URL. Alternative url_encode can be used.
r.setEndpoint(url.replace(/\s+/g,''));
Execute the REST object to get the response.
var response = r.execute();
Next I add the response to the work_notes of the current record (current), but this can also be logged with gs.info().
current.work_notes = 'Return message: ' + response.getBody() + '\nHTTP response: ' + response.getStatusCode(); current.update();
Finally, since I usually work on a table that is extended from the task table of ServiceNow I like to save the guid to the correlation_id of the table. This makes it easy to later check for the status os the job that we have now started.
current.correlation_id = guid;
Update the record to save the work_notes and the correlation_id
current.update();
Step 2.2 Do a GET request to get the status of a job
In this example we will query Azure to get a status of a job, that we have already started. We will start with the script defined in step 2 and need the following variables to be filled out.
subscription_id, resource_group, account_name, guid
The subscription_id, resource_group and account_name you already noted down earlier in the Azure Configuration part of this guide. The guid is the guid of the job that you wish to get the status of. If you followed step 2.1 to start the job, then this is saved in the correlation_id field of the record.
Then we construct the URL used as the endpoint.
var url = 'https://management.azure.com/subscriptions/' + subscription_id + '/resourceGroups/' + resource_group + '/providers/Microsoft.Automation/automationAccounts/' + account_name + '/jobs/' + guid + '?api-version=2015-10-31';
Next we set the HTTP method. In this example we will do a simple "GET":
r.setHttpMethod('get');
Next add the URL to the REST object. I like to strip all white spaces just in case somebody accidentally added a whitespace somewhere, since this will break the URL. Alternative url_encode can be used.
r.setEndpoint(url.replace(/\s+/g,''));
Execute the REST object to get the response.
var response = r.execute();
Next I add the response to the work_notes of the current recored (current), but this can also be logged with gs.info().
current.work_notes = 'Return message: ' + response.getBody() + '\nHTTP response: ' + response.getStatusCode(); current.update();
You are now done and can take further actions with the response. To work with the response I usually convert the response to an object like so:
var resObject = global.JSON.parse(this.response.getBody());
In the above example we are getting the status of a job, so I would then subsequently look for the status property in the response object:
if(('properties' in resObject)) { if(('status' in resObject.properties)) { if(resObject.properties.status == 'Completed') // The job has completed else if(resObject.properties.status == 'Failed') // The job has failed } }
You can find a complete list of Azure endpoints that you can use here: Operations on Automation. I hope that you will find this helpful. If you have any input, suggestions or comments please let me know 🙂
- 53,516 Views
- Mark as Read
- Mark as New
- Bookmark
- Permalink
- Report Inappropriate Content
Lasse,
First off, thank you so so so so much for publishing this. These are all the detailed steps I needed that neither ServiceNow nor Microsoft could provide clearly!!
Second, In the first section where you talk about where runbooks are stored in Azure...What does this mean? I don't believe my org has the proper subscription for Resource Groups, is this feature necessary to get the Azure AD REST and other Orchestration activities working?
Thanks in advance!
Ashley
- Mark as Read
- Mark as New
- Bookmark
- Permalink
- Report Inappropriate Content
Hi Ashley,
I am very happy that you found this guide useful.
When you create an automation account in Azure you store this in a Resource Group. If you do not have an Automation Account then you need to set one up.
Please consult your Microsoft Partner in terms of cost and license issues before doing so as I do not know your license agreement with Microsoft and thus cannot say if this is part of your subscription or not. If you need help on this, just let me know 🙂
Anyway - here is how I did it:
Go to portal.azure.com and click on the "New" icon in the top left.

Then select "Developer Tools"

Click on "See all"

Then locate "Automation" and click on it

Read about it and click "Create" at the bottom.

You should now be able to create an Automation Account in which you can create your runbooks. Notice that it asks you to specify the Resource Group in which it will save the Automation Account. You can either create a new one or use an existing one if you already have one.

I hope this helps 🙂
Kind regards
Lasse
- Mark as Read
- Mark as New
- Bookmark
- Permalink
- Report Inappropriate Content
Thanks! Where are you writing the above scripts? Are those script includes?
I wanted to use the OOB Azure AD Rest Messages and Workflow Activities, but I am not able to get a token. I'm so close!!
- Mark as Read
- Mark as New
- Bookmark
- Permalink
- Report Inappropriate Content
I have added my code in script include as a class. I am then creating an object from the class in different workflows as well as scheduled jobs. Mainly using the workflows for creating stuff and the scheduled jobs to monitor that jobs are not failing - and if they are failing then ensure that appropriate action is being taken.
Getting a token requires that you follow the steps described in "Step 2" in the guide. Putting in the information when creating the OAuth record should be enough and you should be able to test that you can get a token directly from the UI. The reason I am doing it via the script is so that I can set the "Authorization" header value in the subsequent REST request.
- Mark as Read
- Mark as New
- Bookmark
- Permalink
- Report Inappropriate Content
Fantastic guide. Works great.
Also found that you don't need to create the job ID and format it like a Microsoft GUID - you can just use the 32 character string with no hyphens and it still works. Azure apparently auto-adds the hyphens to match its format.
Example:
Instead of:
var guid = 'xxxxxxxx-xxxx-4xxx-yxxx-xxxxxxxxxxxx'.replace(/[xy]/g, function(c) {var r = Math.random()*16|0,v=c=='x'?r:r&0x3|0x8;return v.toString(16);});
You can use this to produce a 32 character sys_id in ServiceNow's own format, which is just fine for sending to Azure as a job ID (because they will format it for you).
var guid = GlideGuid.generate(null);
- Mark as Read
- Mark as New
- Bookmark
- Permalink
- Report Inappropriate Content
Hi Patrick,
I am really happy that you found this guide useful.
Also a big thanks for pointing out, that one can use the ServiceNow GUID generater, rather than the script that I provided. I was not aware that Azure provided this conversion and the code surely becomes more readable and clean that way 🙂
Kind regards
Lasse
- Mark as Read
- Mark as New
- Bookmark
- Permalink
- Report Inappropriate Content
Hi Lasse
This is a very good and helpful article, thank you.
Can you please review the following two items that did not work for me:
1. Token URL: You recommend "Set this to "https://login.microsoftonline.com/<your_subscription_id>/oauth2/token" where <subscription_id> is the subsection ID that we saved in the Azure configuration" - In my case this did not work, instead I had to set the Token URL to "https://login.microsoftonline.com/<tenant_id>/oauth2/token" where <subscription_id>. This is also shown in the picture in paragraph "OAuth 2.0 authorization flow" Understand the OAuth 2.0 authorization code flow in Azure AD | Microsoft Docs . Also, one way to get the correct end point URL is to use the Azure Classic portal, go to Default Directory -> Applications, choose your app from the list and then choose View End Points from the bottom strip. In my case this shows a list of 7 URL, the one you need is OAuth 2.0 Token Endpoint.
2. In the PUT code, in the following paragraph:
-------------------------------------------------------
var aRequest = { 'properties' : { 'runbook' : { 'name' : runbook }, 'parameters' : { 'var1' : 'some value', 'var2' : 'some other value' } } };
Next we add the above to the request body.
r.setRequestBody(global.JSON.stringify(params));
------------------------------------------------------
I believe what you meant for the last instruction is:
r.setRequestBody(global.JSON.stringify(aRequest));
Cheers
John
- Mark as Read
- Mark as New
- Bookmark
- Permalink
- Report Inappropriate Content
Hi John,
Thank you very much for the feedback. I am happy that you found this useful. Regarding the two points:
1) I am not sure about this. It seems strange that it worked for me, but did not work for you. I will check up on this and update the guide accordingly.
2) Yes, that is a typo on my part. Will correct this now 🙂
Kind regards
Lasse
- Mark as Read
- Mark as New
- Bookmark
- Permalink
- Report Inappropriate Content
Hi Lasse
Yet another topic I am investegating where I find one of your tutorials - how great it is that you take the time to help others pass hurdles surrounding missing documentation!
[Edit: After writing this post, I am actually uncertain what grant type is best suited for letting ServiceNow authenticate it self against Azure AD - do you have an opinion?]
I am fiddling around with importing data from Azure via Graph-calls and into ServiceNow. As a variant of your example I am using the OAuth2 "Authorization Code" grant type (your example uses "Client Credentials").
My screenshot below reveals settings that works in Postman, in that the setup authenticates fine - I am able to pull data from Azure like in the Graph Explorer:

But I can't get the same settings working from ServiceNow using "Application Registries"

and "REST Message". When I press "Get OAuth Token" I this long error:
"AADSTS50001 The application named https://graph.microsoft.com? was not found in the tenant named This can happen if the application has not been installed by the administrator of the tenant or consented to by any user in the tenant. You might have sent your authentication request to the wrong tenant."
ServiceNow seems to treat the Authorization URL "https://login.microsoft.com/common/oauth2/authorize?resource=https://graph.microsoft.com" different than Postman.
Do you have any clues what I should look for?
-Anders fra Randers
- Mark as Read
- Mark as New
- Bookmark
- Permalink
- Report Inappropriate Content
Hi @lasse@anderspræstegaard@armbrusa@johntelstra
Thanks for this article, i am looking to integrate service now with Azure using REST.
Can you please help me understand step 2.1, my understanding is after creating OAuth application in Service now application registry.
I need to create a script include for the remaning steps? Please clarify this point.
I want to also understand after creating the script include how can i test this for one particular record.
Thanks in advance for your feedback.
@lasse@anderspræstegaard@armbrusa@johntelstra
- Mark as Read
- Mark as New
- Bookmark
- Permalink
- Report Inappropriate Content
Hi Renuka,
You could store your script in a script include or you can enter it directly in a script activity in a workflow etc. Where you store it is really up to you. I like to keep my code in script includes as I can then reference the code from elsewhere and only have to update it in one place if I need to make any adjustments.
I hope this helps.
/Lasse
- Mark as Read
- Mark as New
- Bookmark
- Permalink
- Report Inappropriate Content
Hi @lasse
We're trying to integrate with an Azure service using OAuth but with Grant Type Authorisation Code. We seem to be stuck with situation where SN is parsing the authentication response body but the auth code is in the query string. This means our subsequent req for token is failing. Do you know how we can access the auth code from the query parameters? Can it be done in OAuth API Script somehow?
Thanks
- Mark as Read
- Mark as New
- Bookmark
- Permalink
- Report Inappropriate Content
Hi @craigwall,
I am not sure that I follow you. Could you share the code that you are having issues with?
/Lasse
- Mark as Read
- Mark as New
- Bookmark
- Permalink
- Report Inappropriate Content
@lasse
Thank you Lasse for the clarification.
But i am failing to understand the enpoint URL.
My requirement is to create tags[like org unit, legal unit]mapped per resource group from Service now[VMware instance table] to Azure.
In the url, i have added subscription id and Api Version, however i am not sure of account name, can you please share some inputs on this.
Thanks in advance.
- Mark as Read
- Mark as New
- Bookmark
- Permalink
- Report Inappropriate Content
Hi Renuka,
In the above article I focus on creating a job in Azure. A job is an instance of a runbook which typically would execute some powershell code either in Azure or on a "Hybrid Worker" (Like a MID Server) on you network.
If what you need is to update or create resource groups this can also be done directly. If you complete the above guide from 1.0 to 2.1 you can also do the following:
1) Instead of only giving contributor access on one Resource Group you can open your subscription in Azure and click the Access Management (IAM) for your subscription. Add your ServiceNow app as a contributor on the subscription level.
2) Instead of starting a job, you can include the token from step 2.0 and use the Azure API to update / create a resource group.
Here is the documentation needed:
https://docs.microsoft.com/en-us/rest/api/resources/resourcegroups/createorupdate
I hope this helps!
/Lasse
- Mark as Read
- Mark as New
- Bookmark
- Permalink
- Report Inappropriate Content
Hi there,
We are trying to grab communication info from Azure directory API, but have no success.
We are wondering if you could help us.
We could not get the Azure to provide a token for us to login, is it possible to not do it with the Automation Acct ?
Please let us know if we need to provide more info
Thanks
- Mark as Read
- Mark as New
- Bookmark
- Permalink
- Report Inappropriate Content
This is what worked for me.
In the above when the original poster says "let's start scripting" he means that you will be modifying the script you would generate from your Outbound REST.
This is the code I get when I used the UI action "Preview Script Usage" from my "Default GET" HTTP Method
try {
 var r = new sn_ws.RESTMessageV2('Get Azure Resource Groups', 'Default GET');

//override authentication profile
//authentication type ='basic'/ 'oauth2'
//r.setAuthenticationProfile(authentication type, profile name);

//set a MID server name if one wants to run the message on MID
//r.setMIDServer('MY_MID_SERVER');

//if the message is configured to communicate through ECC queue, either
//by setting a MID server or calling executeAsync, one needs to set skip_sensor
//to true. Otherwise, one may get an intermittent error that the response body is null
//r.setEccParameter('skip_sensor', true);

 var response = r.execute();
 var responseBody = response.getBody();
 var httpStatus = response.getStatusCode();
}
catch(ex) {
 var message = ex.message;
}
And this is the code I get when I modify it based on the original post above:
try {


	var oAuthClient = new sn_auth.GlideOAuthClient();
	var params = {grant_type:"client_credentials",resource:"https://management.core.windows.net/"};
	var tokenResponse = oAuthClient.requestToken('SBX Azure Lab',global.JSON.stringify(params));
	var token = tokenResponse.getToken();


	//var r = new sn_ws.RESTMessageV2();
  var r = new sn_ws.RESTMessageV2('Get Azure Resource Groups', 'Default GET');


	r.setRequestHeader('Authorization','Bearer ' + token.getAccessToken());


 	var response = r.execute();
 	var responseBody = response.getBody();
 	var httpStatus = response.getStatusCode();


   gs.info(responseBody);


}
catch(ex) {
 var message = ex.message;


}
And here is the successful output, as run from server side XPlore window (background script / can be used in business rules / script includes etc.

- Mark as Read
- Mark as New
- Bookmark
- Permalink
- Report Inappropriate Content
From scripting part , I am able to get token, but in Rest message , I am getting 403
- Mark as Read
- Mark as New
- Bookmark
- Permalink
- Report Inappropriate Content
Did you remember to add the token to your subsequent REST request? Is there any error message received? Eg. what does response.getBody() return?
- Mark as Read
- Mark as New
- Bookmark
- Permalink
- Report Inappropriate Content
I am able to get it working.
Thanks Lasse.
- Mark as Read
- Mark as New
- Bookmark
- Permalink
- Report Inappropriate Content
Thanks a lot, working great!
is somebody succeed to retrieve full output from Azure?
I checked a test runbook and the action is taking 9 sec on Azure side.
We need to be able to fetch output message from Azure after job is finished.
in this example, seems like the request for response is testing Azure runbook status at the same time runbook is triggered.
The result here:
gs.log('Tomer - Output message:' +resObject.properties.status,"tomer");
is 'New'.
My full return message (response.getBody())

did anybody create such functionality: sampling Azure every some period of time until runbook is done and sending back an output?
I found this:
https://docs.microsoft.com/en-us/rest/api/automation/job/getoutput#code-try-0
But not sure how to get it.
Thanks,
Tomer.
- Mark as Read
- Mark as New
- Bookmark
- Permalink
- Report Inappropriate Content
Hi Lesse,
this is a great document, it is really useful.
I have a question, but it is from opposite side, I want to call a Servicenow REST API from Azure Data Factory.
I am getting an error when I try to connect Servicenow with OAuth2 authentication type. For Basic Authentication, there is no issue.
All required information is in ok Azure part. (endpoint, user, password, ClientId, Client Secret) in ADF side.
The Error message is:
Maybe there is a problem in my Servicenow service configuration, but I could not find any documentation about how to configure service on Servicenow for Azure calls.
Thanks in advance.
- Mark as Read
- Mark as New
- Bookmark
- Permalink
- Report Inappropriate Content
Hi Tomer,
You would need to create that logic somehow in your ServiceNow instance. You may find the easiest solution to be to create a custom table to store the state and the URI for the job that you have started and then have a scheduled job, that checks the status of the URI and update the record until the state changes to a completed state. Note that this may apply the need for additional licenses.
I would recommend that you take a look at Automize Azure Automation as this will provide you with what you need a very low price. There is a free 30 day trial. I know that I am totally biased as I am the main developer behind the app, but I really think that this is a great app and it will save you a lot of time!
/Lasse
- Mark as Read
- Mark as New
- Bookmark
- Permalink
- Report Inappropriate Content
Hi Mustafa,
From the error message that you shared it seems that Azure Data Factory is getting a response, but the data (body) of the response is not in the format that it expected.
You could look into configuring OAuth in your ServiceNow instance. The documentation is located here:
https://docs.servicenow.com/bundle/orlando-platform-administration/page/administer/security/concept/c_OAuthApplications.html
What you would need would be to create an endpoint, which is described here:
https://docs.servicenow.com/bundle/orlando-platform-administration/page/administer/security/task/t_CreateEndpointforExternalClients.html
However from your message it seems that you have already done the above. Do have the possibility to see the response body in ADF?
If not - you could consider using a free tool like Postman (or similar) to setup and test the OAuth 2.0 against your ServiceNow instanse. This way you can verify if everything works in ServiceNow.
/Lasse
- Mark as Read
- Mark as New
- Bookmark
- Permalink
- Report Inappropriate Content
Where did you write the script to modify the response?.Can you please clarify on this?
- Mark as Read
- Mark as New
- Bookmark
- Permalink
- Report Inappropriate Content
Hello Hema,
May I know how you resolved your issue. We are getting 403 error but success in getting token.
- Mark as Read
- Mark as New
- Bookmark
- Permalink
- Report Inappropriate Content
If I m understanding this correctly - you received token from login.microsoftonline.com URL?
- Mark as Read
- Mark as New
- Bookmark
- Permalink
- Report Inappropriate Content
Hi lasse,
This is really a great document. here I have question how can we limit only few tables access to azure from Servicenow.
currently the team is able to pull all(cmdb, etc., ) the table details from servicenow. but i would like to restrict the tables access and want to limit only few tables like incident,change
your reply would really help us.
- Mark as Read
- Mark as New
- Bookmark
- Permalink
- Report Inappropriate Content
Very helpful as every step is explained clearly.
- Mark as Read
- Mark as New
- Bookmark
- Permalink
- Report Inappropriate Content
Thanks for this. I needed the OAuth token code to use in a data stream where I couldn't get the resource parameter in any other way.