- Post History
- Subscribe to RSS Feed
- Mark as New
- Mark as Read
- Bookmark
- Subscribe
- Printer Friendly Page
- Report Inappropriate Content
on 01-03-2020 11:45 AM
Recently, I was asked conceptualize a build up CMDB records based on BigFix asset data. If you have ever investigated the possibilities, you probably ran into using the REST API using "Relevance" statements. This method works, but is pretty much overkill if you are simply building asset/ci records for referencing in incident, change and problem management as it requires a fairly deep knowledge in the REST API and use of the Relevance language.
If your only desire is to set up a recurring update of assets from BigFix to ServiceNow, this guide may be able to help. The "trick" is to understand the role of the BES_COLUMN_HEADINGS view in the BigFix BFEnterprise database. To start, you will need:
- A BigFix ComputerID value for a known working computer. I used my own computer..
- Working (read-only) credentials to the BigFix MSSQL database "BFEnterprise"
- A working mid-server
- General knowledge of import sets, scheduled jobs and transform maps
First, let's take a look at a record using the BigFix API. The base URL should be:
https://<BigfixServerName>:52311/api/computer/<BigFixComputerID>

Note the property names as these will come useful later (lots should be available). Keep this record open on another monitor (in another browser if possible) for easy access. I have highlighted a few attributes we are going to capture in our integration.
Next, create an Import Set Table (extend Import Set Row) named BigFix Asset Import (u_import_bigfix_assets) with columns ComputerID (u_computerid | integer 40), Property Name (u_property_name | string 255) and Value (u_value | string 4000).
Once your import set table has been created, create a data source under System Import Sets > Administration > Data Sources. use the following SQL statement as your query:
SELECT ComputerID, Name as
'Property Name', Value FROM BES_COLUMN_HEADINGS WITH (NOLOCK) WHERE NAME IN ( 'ID', 'Computer Name', 'OS', 'CPU')
AND ComputerID = '1079944497'
order by ComputerID
Notice in this example, we are currently limiting our SQL Select statement to only one record. This is the same record that is opened in the API Query. Remove this "AND" line once you are comfortable with your testing results to import more records. Also, notice that in the SQL query, we have identified ID, Computer Name, OS and CPU as some of the attributes we wish to populate in the CMDB.

Feel free to use the "Test load 20 Record" to test the Data Source. The result should be 4 records in your target table, one for each attribute we wish to import.

Next, we will want to create a transform map so that our CMDB is populated properly. Our transform map target table will be CMDB_CI_COMPUTER to keep this simple, however you may want to include transform map scripting to populate cmdb_ci_server tables based on operating system values if needed. To avoid duplicate records coming from BigFix, we will need to store the BigFix ComputerID value on our CI records. For this we will create a Field Map from ComputerID to the "out-of-the-box" field "Correlation ID" (cmdb_ci_computer.correlation_id). We will choose to Coalesce on this field.

Now that we have a unique identifier (ID), we are ready to do something with the remaining fields: OS, CPU and Computer Name. For this, we will create a new Field Map, but we will want to point this map to a Target Field that we don't care about as the "work" will be done by our Source Script. Make sure you set your Choice action to Ignore and populate your source script as below.
answer = (function transformEntry(source) {

	var id = source.u_computerid;
	var property = source.u_property_name;
	var value = source.u_value;

	if (property == 'Computer Name'){
		target.name = value;
	}
	if (property == 'OS'){
		target.os = value;
	}
	if (property == 'CPU'){
		target.cpu_type = value;
	}

})(source);
Note that the script identifies each property and value individually and all we have to do is create an "if" statement for each property...basically mapping the BigFix Property to the ServiceNow field name and dropping the 'value' in appropriately.
Your resulting Table Transform Map:

Finally, set up your scheduled job to run as often as you wish. As a best practice, I usually purge my "transform" table before populating it each time.

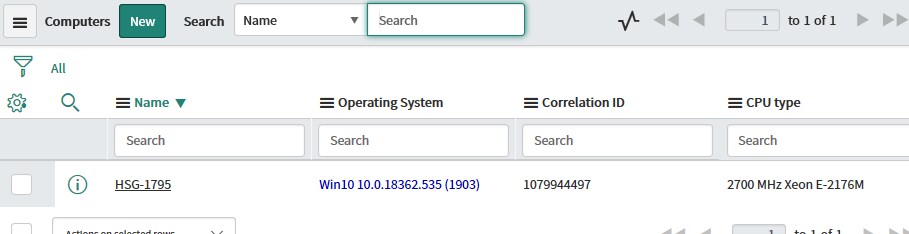
Execute the job to begin populating your CMDB:

Some important notes:
- As it has for years, the OS field in the CMDB is a choice list...which is why the value shows up in blue (not in choice list). As a result, you may want to consider "normalizing" the OS value with additional transform scripting...
- This does not include scripting for identifying and classifying computers based on operating system, so additional scripting would be required to classify Linux, Windows, AIX etc. servers.
- This method is expandable based on the values that you see in the API return mentioned in the first step. When adding a new variable, simply add it to the select statement and the field map that processes "property" values
- You may want to consider importing "Last Report Time" and using that value to "Expire" computers. For example, if a computer does not report in in 30 days, update the "Operational Status" to "non-operational" (or other status)
- You may want to consider creating new fields on the CMDB_CI_COMPUTER table (and sub-tables) to capture fields such as the various serial numbers, last logged on "user name", etc.
- Special scripting would be required for "Installed Software" parsing that you see at the bottom of the API result
Hope some of this helps !
Thanks
John Duchock