- Post History
- Subscribe to RSS Feed
- Mark as New
- Mark as Read
- Bookmark
- Subscribe
- Printer Friendly Page
- Report Inappropriate Content
on 07-29-2015 09:35 PM
Often times when migrating from an older tool into ServiceNow it is a requirement that the file attachments be migrated from that tool into their associated records in ServiceNow. I was recently faced with this task and as I dug into the process I chose to use PowerShell to issue XML SOAP calls to ServiceNow for uploading of the file attachments into ServiceNow's Attachment Creator Web Service (http://wiki.servicenow.com/index.php?title=AttachmentCreator_SOAP_Web_Service).
My goal was to set out to create a fully automated solution of loading files as attachments into ServiceNow and in doing this I found that there were a number of obstacles that needed to be overcome.
Before the files are imported, the following must be completed:
- The MIME type of the file needs to be discovered (https://en.wikipedia.org/wiki/MIME)
- The file needs to be converted to BASE64 (https://en.wikipedia.org/wiki/Base64)
- The Sys_ID of the record the file will be attached to must be discovered (http://wiki.servicenow.com/index.php?title=Unique_Record_Identifier)
Once again, my goal was to develop a process that would programmatically fulfill each of these prerequisites while being simple enough for most anyone to be able to incorporate into their own import scenarios.
The output of this exercise is a robust PowerShell script (attached to this document) that performs all of the above tasks by easily attaching files to records within a wide array of tables with a single execution of the script.
Before I get into the script itself, I would like to go cover some of the pre-work I went through in prepping my system for this import.
MIME TYPE
If you are unfamiliar with MIME, you can follow the link I included earlier to WIKIPEDIA for a detailed explanation. On a very high level, MIME was originally designed for e-mail to be embedded into the transmission of the e-mail letting the software client know what kind of file was attached. Similarly, other Internet based services utilize the MIME to determine the file type to determine what application should be used to open it.
In working towards an automated solution of discovering this, I chose to query the registry of the computer that the PowerShell script is running on to determine the MIME type of a file. The top level of the registry (HKEY_CLASSES_ROOT) contains the entries for file extensions as well as their MIME types.

In the image above, I highlighted the .bmp extension registry key. Windows stores the MIME type of that extension as the Content Type data element within that key.
To query the MIME type, the script maps a new drive path to HKEY_CLASSES_ROOT. PowerShell is very powerful in this way as it lets you map out not just file systems, but any system that is built out to be a PowerShell provider. Once the registry is mapped, the script simply checks for the existence of the Content Type data element under the extensions associated registry key and stores it as a variable.
There are a few limitations to using this approach, the biggest of which is that the Registry needs to have all of the MIME types for the file types that are being uploaded. I used the following approach to combat this. First, I obtained a list of all of the extensions that were present within the files that were going to be imported and then I manually verified the registry for each of them notating which were present and which were not. Second, I created a registry file with the missing extensions of which was later used to merge the missing extensions and MIME types into the registry.
In a perfect world, there would be a web service that would be current and up to date with all of the most recent extensions and MIME types. If that were the case, one could simply utilize such a service instead of querying the registry. Unfortunately, there are gaps present in these systems so I have found it to be most thorough to check the extensions in http://www.stdicon.com (a web service that gives the MIME type of an extension) and then manually Google for any that are missing from its database. By using a URL formatted like http://www.stdicon.com/ext/bmp where the extension is listed after the last forward slash, their web service will output the associated MIME. In this example, it returns image/bmp. Armed with this knowledge it is possible to create a registry import file with the following contents:
Windows Registry Editor Version 5.00
 [HKEY_CLASSES_ROOT\.bmp]
 "Content Type"="image/bmp"
Once the registry file is fully loaded with all of the missing extensions, it is imported into in to the registry by simply right clicking it and choosing Merge. At this point, the system running the script is ready. This process took me about an hour to complete for 72 extensions. I have attached a sample registry import file that contains many of the more common extensions and MIME types to this document.
The system that I was exporting the attachments from had no file type restrictions. This brought about the inevitability that there would be some extensions that were either customized or just plain old typos resulting in invalid MIME types. ServiceNow requires a valid MIME, to remedy this scenario the script errors when verifying the registry as the MIME type doesn't exist. This error is caught by the script and it forces the file to go through a conversion process where it is compressed into a ZIP file and loaded with the .zip MIME type.
Note:
Updating the Extensions / MIME types in the registry is not required for running the PowerShell script, though by NOT doing this there will be more files loaded as ZIP files as the MIME types will be unknown.
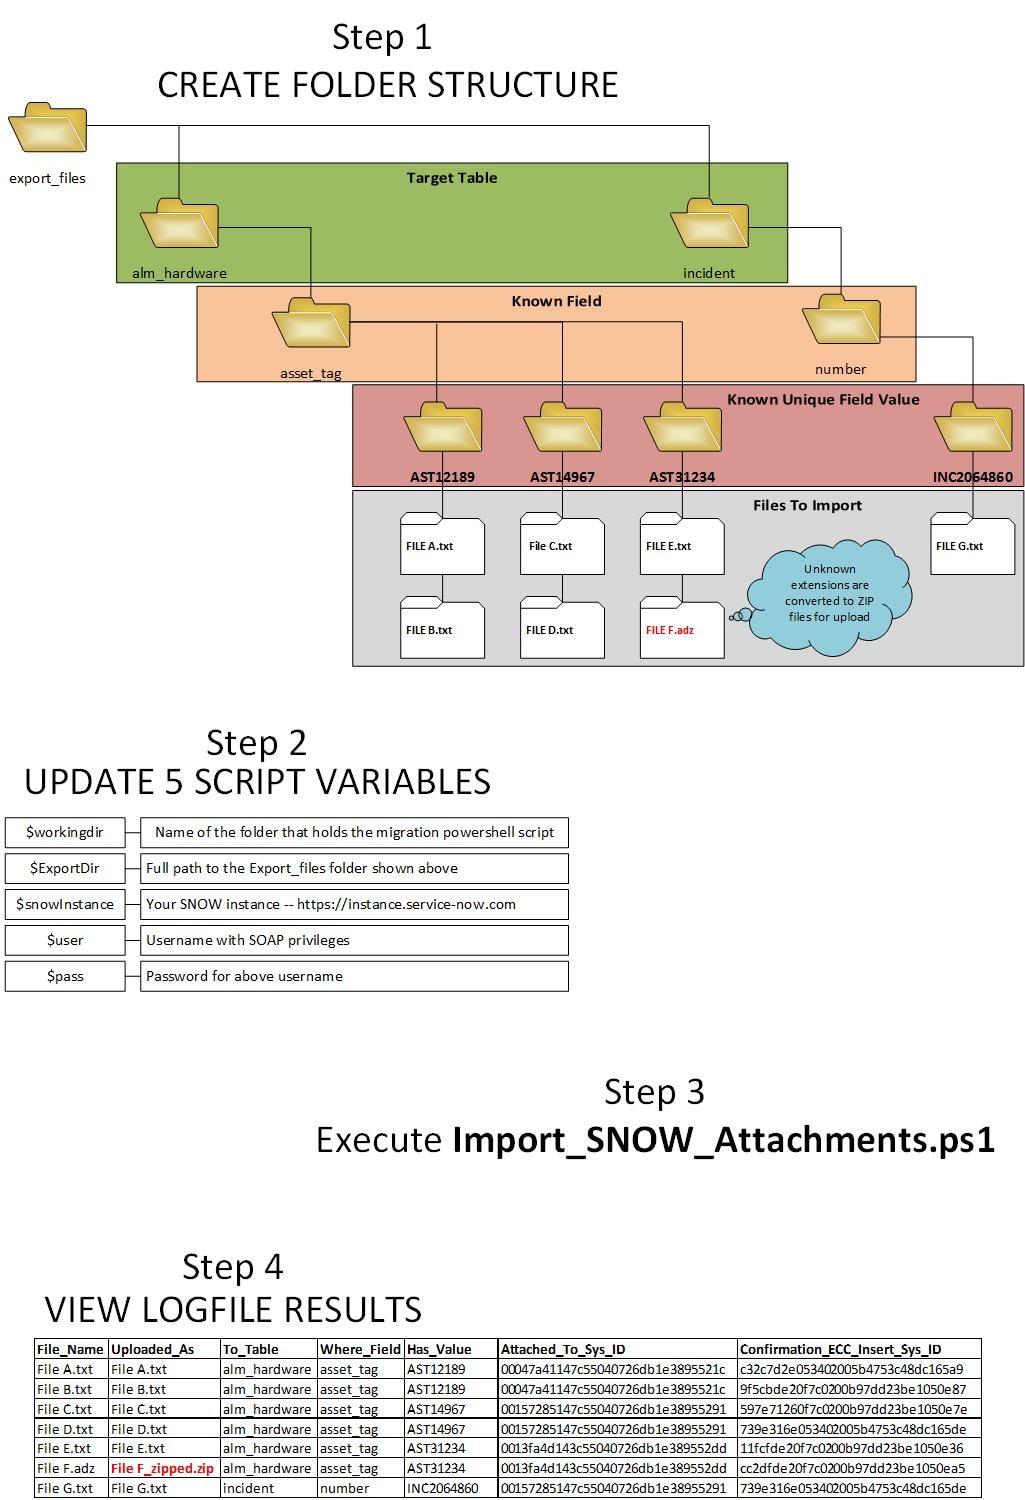
Export Folder Structure
This step is crucial to the PowerShell script functioning properly. The script actually utilizes the folder structure containing the attachments to determine what Table and Record the file should be attached to in ServiceNow
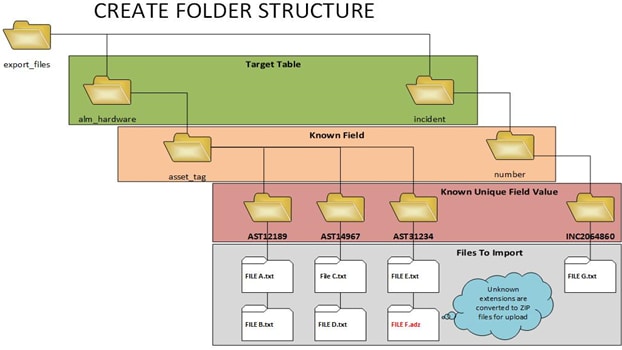
When exporting file attachments from the old system, it is important to do it in a fashion that lets the PowerShell script know what record it is supposed to be attached to in ServiceNow. As an example, if Assets are being exported from another Asset Management tool, the attachment could be exported into a folder that is named after the ASSET TAG or SERIAL NUMBER of the device. The most important thing to remember is that this value must be a unique value in ServiceNow's Asset table. In the example below, File A.txt and File B.txt were attached to an asset in the old asset management system with an Asset Tag of AST12189 so they were exported into a folder named as such.

Once the export of all of the files is complete, there are a number of folders named after various unique ASSET TAGs, each containing the files that were attached to that asset.
The next step is to create a folder named after the FIELD NAME (not label) that is being mapped to in ServiceNow and then move all of the ASSET TAG folders into it.
Last, create a folder that is named after the TABLE NAME that is being mapped to in ServiceNow and move the FIELD NAME folder into it.
That might sound a bit complicated so here is a visualization of what this looks like.

In the above import, there are 7 attachments being loaded between three assets and one incident. As seen here, the script is capable of handling imports to multiple tables. For AST12189 it will import to the record where the Table = alm_hardware and the Asset Tag field = AST12189. The script will loop through all of the assets and then move on to the Incident import where based on the folder structure it will import File G.txt to the record where the Table = Incident and the Number field = INC2064860.
Notice File F.adz has an invalid extension, this file is converted to a zip file before it is uploaded to the Asset Table where the Asset Tag = AST31234.
The PowerShell Script (COPY IT)
At this point, the script (Import_SNOW_Attachments.ps1) is copied to the machine that it is going to be executed from. I saved it to my desktop in a folder named SOAP and then I moved the export_files folder and sub folders (as shown above) into that directory. When creating the directory structure, the PowerShell script and Export folders can be placed anywhere locally and they do not have to be in the same folder structure. The reason for this is explained in the next step.
The PowerShell Script (MODIFY IT)
Open the PowerShell script in an editor, there are 5 variables listed right at the top of the script. These variables along with their definitions are detailed in the image below. Once these are set to their correct values for your setup and instance, the script is ready to execute.

NOTE:
In order to execute the SOAP queries against an instance, the ServiceNow user account that is used for the import requires the correct SOAP Roles (http://wiki.servicenow.com/index.php?title=SOAP_Web_Service#SOAP_Roles). The account also requires Read / Write access to the tables and records that the files are being targeted towards (http://wiki.servicenow.com/index.php?title=Using_Access_Control_Rules).
As the script runs and loops through the files to be attached, the PowerShell will output feedback to the screen as well as to a log file for final verification of upload.

The log file gets written (logfile.csv) into the same directory that contains the PowerShell script. This is the output for the example shown in the screenshot above.

By viewing the Asset in ServiceNow (shown below) it is seen that the attachment is successfully added to the Asset record.

Another logfile from the earlier Folder Structure example is shown below. Take notice of line 7 and how the file had an invalid extension causing it to be renamed and compressed to a ZIP file. These actions are all tracked in the log file (Red highlighting added - not present in actual log file).

Included below is a graphic that quickly summarizes the REQUIRED steps to completing this process. As I stated before, the first step of updating the registry of the computer running the PowerShell script is optional, but in my opinion yields the best end results.

The Techie Stuff
How Does it convert the file to BASE64?
BASE64 is another one of those things that if you are not familiar with it and would like a detailed explanation you can refer to the Wikipedia link I included earlier. Briefly, it is a method of encoding a compiled file into a text string to be sent over e-mail and it plays hand in hand with the files MIME type. To convert the file to BASE 64, the PowerShell script utilizes a native Windows utility called CERTUTIL (https://technet.microsoft.com/en-us/library/Cc732443.aspx). This is a command line utility that takes a FULL PATH of a file as an input and provides a BASE64 encoded string into an output file. This output contains two lines designating START and END that are parsed out and removed from the file before storing it's contents in a variable that is used in the as a payload in the SOAP envelope.
How Is the Sys_ID of the Target Record Discovered?
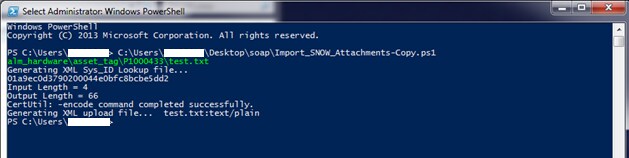
Actually this is where the proper Folder structure comes into play. The PowerShell script parses the directory structure and stores the various folder names in three variables: $qTable (target table) , $qField (known field), and $qValue (known field value). There is a small piece of code (shown below) that uses these three variables to create the XML envelope for querying the SYS_ID. The script uses this to query against the Target Table to get the value of the Sys_ID.

Earlier I displayed a screen grab of PowerShell as it uploaded a file, shown below is the XML that was generated from the above code for that lookup.

Once the XML is created, authentication is established and the web request is sent to the ServiceNow instance. The request itself is stored as an XML object that is later parsed for the SYS_ID record result and stored as a variable named $Sys_ID.

How Does the File get Attached to the Record?
Similarily to the lookup, this portion of the script makes use of the folder structure to create the XML file. It also makes use of two other variables that we discussed earlier, $mime (MIME type)and $fileContentEncoded (Base64 encoding). The actual contents of the lookup is created with the code as shown below.


Again, the following XML file was generated from the above code for the upload example shown earlier.

It is noticeable here that the payload of the file is vary small. The test.txt file only contained the word test and that payload is the BASE64 encoding of that file.
The code for executing this is nearly the same as the lookup file so I won't show it here. The difference is that the query itself returns a SYS_ID when it is successful.
This SYS_ID is the ID of the Record that was inserted into the ECC Queue and is sent to the logfile as a confirmation that they file was uploaded to the queue.
A Quick Note About the Log File
The LogFile is generated throughout the process of execution and is written at the end of each file upload. While all of the files are being loaded, the logifile has a TXT extension. This is by design as it allows the user executing the script to be able to open the logfile while it is executing without putting a lock on the file. When openeing TXT files the system is still able to write to it. As soon as the last file is uploaded to ServiceNow, the logfile is renamed to a CSV file so that it will open natively in Excel.
A Final Note About PowerShell
If you are running an older version of PowerShell, you may need to upgrade it to the latest version that supports SOAP queries. Info for upgrading PowerShell to V.4 can be found at How to Install Windows PowerShell 4.0 - TechNet Articles - United States (English) - TechNet Wiki
Attached you will find the full PowerShell script ready for use, a sample output log file, a registry file with common MIME types, a word version of this document and a PDF of the overview graphic shown above.
I truly hope you find this to be useful in automating your file uploads into ServiceNow.
--John VanBruggen
Credits:
Travis Toulson for his assistance with Has anyone successfully imported multiple files as attachments to multiple records?
http://poshcode.org/4845 - PowerShell function for creating ZIP files natively
- 111,376 Views
- Mark as Read
- Mark as New
- Bookmark
- Permalink
- Report Inappropriate Content
Great article great documentation - let's see more of these!
- Mark as Read
- Mark as New
- Bookmark
- Permalink
- Report Inappropriate Content
Thanks. This is something I was looking for.
However I am only having partial success.
For testing I created 2 folders with subfolders:
alm_hardware
asset_tag
P000123
attachments
incidents
number
INC0000054
attachments
Only attachments for the asset is uploaded. For the incident the script does not get a sys_id returned so nothing is attached to the incident. I tried a couple different incident with some result.
- Mark as Read
- Mark as New
- Bookmark
- Permalink
- Report Inappropriate Content
hmm maybe you need to look for the sys_id for Incident's parent table, (task)?
Not sure but something to try...
- Mark as Read
- Mark as New
- Bookmark
- Permalink
- Report Inappropriate Content
Hello, sorry it took so long to get back to you.
The folder name should be incident you have it in its plural form.
If you rename that folder to match the table name in SNOW and the user has the correct permissions it should work. Let me know how it goes.
- Mark as Read
- Mark as New
- Bookmark
- Permalink
- Report Inappropriate Content
Once the folder names match, I briefly touched on this, but you need to ensure that the credentials being used for the SOAP call have the proper permissions in SNOW to read the tables that you are querying. If the user has access to alm_hardware but does not have access to incident it would work for alm_hardware but not for incident.
- Mark as Read
- Mark as New
- Bookmark
- Permalink
- Report Inappropriate Content
Hi
Thanks for responding.
I made a typo in the post here. The folder is in fact named "incident". I copy/pasted the name directly from ServiceNow,
- Mark as Read
- Mark as New
- Bookmark
- Permalink
- Report Inappropriate Content
Thanks, I will verify permissions and let you know the result.
- Mark as Read
- Mark as New
- Bookmark
- Permalink
- Report Inappropriate Content
Thank you. It was a permission issue.
- Mark as Read
- Mark as New
- Bookmark
- Permalink
- Report Inappropriate Content
John, Thanks a lot, this is very helpful.
We are having near about thousand records, is there a easy way on which I can create the folder hierarchy for such huge number of records.
- Mark as Read
- Mark as New
- Bookmark
- Permalink
- Report Inappropriate Content
The easiest way is to create the folder structure when you are exporting the data, using a known attribute to name the folder after.
I had to create the folder structure 'after the fact' for literally 2 Gigs of attachments. Luckily, I had the file names and I was able to query a SQL db that had record info for the file it was attached to. Obviously, the file names need to be unique for this. It was for an HR system. The script was able to query the DB for the record that had the file name that matched the name of the file and then it moved the file into a folder named after the case #.
- Mark as Read
- Mark as New
- Bookmark
- Permalink
- Report Inappropriate Content
Hi, I am trying to use your script. But after a lot of tries, I ended up finding a message in teh log saying: Basic authentication failed for user : B50692.
I have admin rights and all teh possible soap rights.
Our SNOW system is onpremise and not the cloud, using https.
Do anybody have a clue to what I can do to get on.
Thanks
Peter Durup - Danske Bank DK
- Mark as Read
- Mark as New
- Bookmark
- Permalink
- Report Inappropriate Content
This worked great for me, and is a wonderful piece of work. I noticed that it would still send the attachment if it didn't get a sys_id for the target ticket. I made some small changes to the code to "fix" this. While I was at it, I added a time/date stamp to the log file.
I've uploaded it to my Google Drive.
Again, all it does is skip a file (and log the skip) if the sys_id of the target ticket isn't returned, and add a time/date stamp to each row of the log file.
- Mark as Read
- Mark as New
- Bookmark
- Permalink
- Report Inappropriate Content
Thanks!
- Mark as Read
- Mark as New
- Bookmark
- Permalink
- Report Inappropriate Content
Great catch on the addition of skipped files. I totally missed that. In our scenario we had an assumption that every file would be mapped to a record in ServiceNow that exists. Thanks for re-posting!
- Mark as Read
- Mark as New
- Bookmark
- Permalink
- Report Inappropriate Content
Thank you for an excellent detail on how it works as well as how to implement it. I've bookmark this for future reference.
- Mark as Read
- Mark as New
- Bookmark
- Permalink
- Report Inappropriate Content
I have a separate requirement where i need to insert a new record and attach a attachment to that record.
Any idea how to achieve that in powershell
- Mark as Read
- Mark as New
- Bookmark
- Permalink
- Report Inappropriate Content
Wow, this approach is fantastic! We received an export of 6,000+ files from our client for data migration to ServiceNow (and that is only the sample prior to the final migration!). I was able to write a batch script to create the folder structure as you specified, and the PowerShell script worked perfectly from there. I cannot thank you enough! This saved us so much time. Many thanks for sharing!
- Mark as Read
- Mark as New
- Bookmark
- Permalink
- Report Inappropriate Content
I have recorded a video walk through for this process and it is located at https://youtu.be/YgFTjevCZdE?t=43s
- Mark as Read
- Mark as New
- Bookmark
- Permalink
- Report Inappropriate Content
Hi John,
Thanks for the document. I could able to implement the same in my instance however facing issues in uploading huge files like of size 10 MB. Can you help me in that. DO I need to modify the powershell script file to support large files.
Regards,
Priyanka
- Mark as Read
- Mark as New
- Bookmark
- Permalink
- Report Inappropriate Content
I don't think it is so much of an issues with the PowerShell as much as it is an issue with the instance timing out. I was able to load up to 20 MB files without issues.
- Mark as Read
- Mark as New
- Bookmark
- Permalink
- Report Inappropriate Content
John,
Thank you so much for this guide it helped me out a lot. I did have one hickup/issue but I was able to solve it myself. Posting it here in case anyone else runs into the same issue.
So I had this up and running without issue for a PDI, but when I tried it with the production instance where I needed to use it I was getting the following error.
Invoke-WebRequest : The request was aborted: Could not create SSL/TLS secure channel.
At C:\soap\Import_SNOW_Attachments.ps1:282 char:20
+ ... eccInsert = Invoke-WebRequest $snowECC -Headers $Headers -Method Post ...
+                 ~~~~~~~~~~~~~~~~~~~~~~~~~~~~~~~~~~~~~~~~~~~~~~~~~~~~~~~~~
    + CategoryInfo          : InvalidOperation: (System.Net.HttpWebRequest:HttpWebRequest) [Invoke-WebRequest], WebExc
   eption
    + FullyQualifiedErrorId : WebCmdletWebResponseException,Microsoft.PowerShell.Commands.InvokeWebRequestCommand
I believed this was due to the fact that the Instance I was trying to upload was hardened. But what was odd is that instance did not have any logs showing any errors.
After stepping back I figured out that the hardened instance was not accepting the old tls/ssl session that was being sent from power-shell and I needed to increase that for it to work.
So to fix it I added this line at the top of your script.
[Net.ServicePointManager]::SecurityProtocol = "tls12, tls11, tls"Once I did that it worked like a charm once again.
-Casey
- Mark as Read
- Mark as New
- Bookmark
- Permalink
- Report Inappropriate Content
Thanks for the update Casey. This was very helpful!
- Mark as Read
- Mark as New
- Bookmark
- Permalink
- Report Inappropriate Content
I had the exact same problem trying to upload additional attachments to an instance where I had successfully done so 3 months earlier. I resolved it the same way, but I have not had the problem on all instances. It seems to depend on which version they are running.
- Mark as Read
- Mark as New
- Bookmark
- Permalink
- Report Inappropriate Content
I am trying to load attachments with the help of this script. This is working great on developer instance. However I am getting below error while running for my client. I have checked there is not issue with firewall. Any help will be greatly appreciated.
Invoke-WebRequest : The remote server returned an error: (500) Internal Server Error.
At line:289 char:15
+ ... eccInsert = Invoke-WebRequest $snowECC -Headers $Headers -Method Post ...
+ CategoryInfo : InvalidOperation: (System.Net.HttpWebRequest:HttpWebRequest) [Invoke-WebRequest], WebException
+ FullyQualifiedErrorId : WebCmdletWebResponseException,Microsoft.PowerShell.Commands.InvokeWebRequestCommand
- Mark as Read
- Mark as New
- Bookmark
- Permalink
- Report Inappropriate Content
Thank you John!
ServiceNow has been disabling earlier security protocols. Force use of TLS 1.2
[Net.ServicePointManager]::SecurityProtocol = [Net.SecurityProtocolType]::Tls12But for some reason still could not get the records sys_id using Invoke-WebRequest, though no error was given.
For me, I was able to use Invoke-RestMethod instead after some research, without having to generate the lookupXML file.
# Create SNOW authentication and execute SOAP Web request
	$encodedCreds = [Convert]::ToBase64String([Text.Encoding]::ASCII.GetBytes(("{0}:{1}" -f $user, $pass)))

	$Headers = New-Object "System.Collections.Generic.Dictionary[[String],[String]]"
    $headers.Add('Authorization',('Basic {0}' -f $encodedCreds))
    $headers.Add('Accept','application/Json')

	$snowLookup = "https://(YOUR-INSTANCE).service-now.com/api/now/table/"+$qTable+"?sysparm_query="+$qField+"="+$qValue+"&sysparm_limit=1"
    $method = "get"

    $response = (Invoke-RestMethod -Method $method -Headers $headers -Uri $snowLookup -ContentType "application/json").Result

	$Sys_Id = "$($response.sys_id)"

Write-Host $Sys_Id- Mark as Read
- Mark as New
- Bookmark
- Permalink
- Report Inappropriate Content
Hi John VanBruggen,
i am trying to implement this in policy and compliance in GRC.
Basically i have to import the attachment in the attachment field i have created in the policy form. The attachment does get attached to the policy record but not to the attachment field.
I have no knowledge of powershell, what changes can i do in your script to make the file import on my target field.
Thanks,
- Mark as Read
- Mark as New
- Bookmark
- Permalink
- Report Inappropriate Content
I am not sure exactly. I haven't done an import to an attachment field before.
- Mark as Read
- Mark as New
- Bookmark
- Permalink
- Report Inappropriate Content
This was a really big help to my own POC, thank you for putting so much time into the methodology and explanation!
- Mark as Read
- Mark as New
- Bookmark
- Permalink
- Report Inappropriate Content
You are very welcome. Rock on!
- Mark as Read
- Mark as New
- Bookmark
- Permalink
- Report Inappropriate Content
You are very welcome James!
- Mark as Read
- Mark as New
- Bookmark
- Permalink
- Report Inappropriate Content
Many thanks! Great tool and also a lot of information how it works - even commercial tools are rarely documented in that level of detail! Really helpful!
- Mark as Read
- Mark as New
- Bookmark
- Permalink
- Report Inappropriate Content
Hello Elyse,
Can you share with us the batch script that you create for creating folder structure as specified please ?
Regards
- Mark as Read
- Mark as New
- Bookmark
- Permalink
- Report Inappropriate Content
Hi John and Experts,
I am using this method retrieve the data, i am able to get file less than 4MB into servicenow, but greater than 4MB files are not uploading, i have seen to increase the timeout in instance, Could you please help me on where needs to be increased
- Mark as Read
- Mark as New
- Bookmark
- Permalink
- Report Inappropriate Content
Hi John, can you please help me how to increase the instance timing, I am also facing the same issue, unable to load higher data
- Mark as Read
- Mark as New
- Bookmark
- Permalink
- Report Inappropriate Content
Hi rahul,
Did you find any solution regarding this problem?
- Mark as Read
- Mark as New
- Bookmark
- Permalink
- Report Inappropriate Content
Thanks!!!
- Mark as Read
- Mark as New
- Bookmark
- Permalink
- Report Inappropriate Content
- Mark as Read
- Mark as New
- Bookmark
- Permalink
- Report Inappropriate Content
I noticed the only thing I had to change was making sure the user account that was doing the import had at least itil and soap_create roles.
- Mark as Read
- Mark as New
- Bookmark
- Permalink
- Report Inappropriate Content
@John VanBruggen and All,
We are not getting Confirmation_ECC_Inser_Sys_Id populated in the log file. The User we are using has all the correct roles. Any ideas?
Thank you,
Laurie
- Mark as Read
- Mark as New
- Bookmark
- Permalink
- Report Inappropriate Content
@Laurie Marlowe1 What error(s) or warning(s) are you seeing in the system log?
- Mark as Read
- Mark as New
- Bookmark
- Permalink
- Report Inappropriate Content
@Aaron Duncan Here is what we are seeing. We are not PowerShell gurus, so not sure what needs to be changed.


- Mark as Read
- Mark as New
- Bookmark
- Permalink
- Report Inappropriate Content
I'd start with the Invoke-WebRequest: Cannot find path 'C:\SOAP\lookupXML.xml' because it does not exist.
The other errors are showing that they can't find the value for the expression. If the values are stored in the XML document, that could be causing most of the errors.
- Mark as Read
- Mark as New
- Bookmark
- Permalink
- Report Inappropriate Content
@Aaron Duncan - thanks! Much appreciated! We take a look and see...
- Mark as Read
- Mark as New
- Bookmark
- Permalink
- Report Inappropriate Content
This script is amazing, and it is helping us move attachments from a legacy system into ServiceNow. However, we are running into an issue where anything bigger than about 4MB are showing up in the ECC queue with the following error message: Attachment creation failed.
The AttachmentCreator SOAP web service page says the following:
Important: The AttachmentCreator SOAP web service is not recommended. Instead, use the REST Attachment API to manage attachments with web services.
Using the AttachmentCreator SOAP web service, you can attach a single document to a message that is a maximum of 5 MB.
Has anyone been able to get around this 5MB limit, or modified the script to use the REST Attachment API instead?
- Mark as Read
- Mark as New
- Bookmark
- Permalink
- Report Inappropriate Content
Hi @jkessler1 ,
I remember when we use this script to increase the length of size greater than 5MB we created a property for rest content length. Please use below knowledge article
https://hishowcase.service-now.com/kb?id=kb_article_view&sysparm_article=KB0747638
Kindly mark this as helpful if it helps for you.
Thanks
- Mark as Read
- Mark as New
- Bookmark
- Permalink
- Report Inappropriate Content
You post link how to setup Creator Web Service but this link is not working
this is new link : AttachmentCreator SOAP web service (servicenow.com)
old link : http://wiki.servicenow.com/index.php?title=AttachmentCreator_SOAP_Web_Service