- Post History
- Subscribe to RSS Feed
- Mark as New
- Mark as Read
- Bookmark
- Subscribe
- Printer Friendly Page
- Report Inappropriate Content
on 06-07-2018 02:55 PM
This is a simple but complete walk-through of creating a Flow that calls an external REST service for anyone who, like me, is new to Flow designer. In fact, as of this draft, I'm new to ServiceNow altogether. I welcome input from anyone who has a faster, stronger, cleaner, or better smelling way to do this.
1. In Studio, Create Application File and search for "action" to find and select the Action for Flow Designer. After Create, just add a value for Name. I called mine MyRestAction because I'm creative.

2. An Action may have Inputs and Outputs, but to start, let's add a REST step using the + button between them. We'll consider inputs and add outputs later.
3. Select Rest from the steps
Note that if you don't see a REST step as pictured below, you may not have the IntegrationHub plugin. Assuming you're in your developer instance, you can get this plugin from developer.servicenow.com. Log in, select Instance from the Manage menu, then select Activate Plugin from the Action button. You'll see ServiceNow IntegrationHub Installer in the list. Activate it. If you're not in developer for this experiment, you can request the plugin from the HI portal.
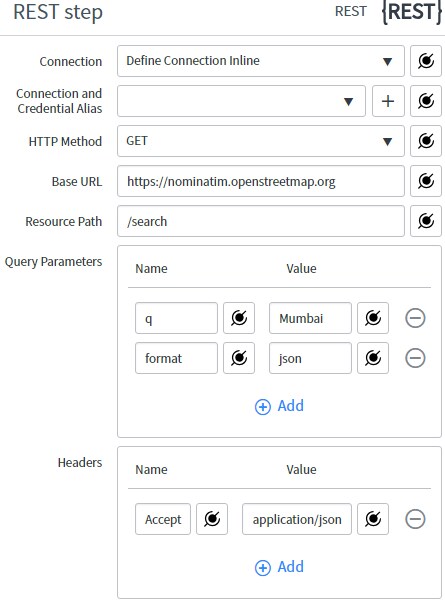
4. Complete the form exactly as pictured in order to use the unauthenticated service at openstreetmap.org. Note that the URL, Path, and Query Parameters make up the entire REST address. In other words, they're the same as https://nominatim.openstreetmap.org/search?q=Mumbai&format=json.
5. Use the + button after our new REST step to add a Script step.
6. Like the overall Action, the Script step has inputs and outputs. Also, on the right of the screen, you should see the Data Panel. If it's just a little gray vertical bar, click it. The data elements listed are called "pills" in Flow parlance. These can be dragged into fields with a next to it. Create input variables exactly as shown below:
7. Add the following code inside of the pre-filled function:
var responseBody = JSON.parse(inputs.response);
 if(inputs.status!=200){
   var errorMsg = responseBody.error.message;
   var errorDetail = responseBody.error.detail;
   throw "Error retrieving incident. Message: "+errorMsg + " Details:"+errorDetail;
 }
 else {
   var result = responseBody[0];
   outputs.placeId = result.place_id;
   outputs.displayName = result.display_name;
 }
8. Add the Output Variables as pictured below. Note that the inputs and outputs objects in the script contain the input and output variables defined for the step. Note also that I found this script somewhere else and so far have had some issues with the error handling in other REST experiments. Also, one thing to observe right away is that the responseBody[0] assumes the result was an array, and that we only want the first element. True in this case, not in others.
9. Now we go back to the Inputs and Outputs of the overall Action. In this case, I did not put any Inputs in, though you could try setting the q value in the REST Query String using an input variable data pill. Give it a go! I did, however, output some values from that first element of the array:
10. Before you can use an Action, you have to publish it. Remember this for future edits. In fact, I'll repeat: before you can use an Action, you have to publish it. Click Save, wait for the blue notification message, then click Publish and wait for the blue notification. Close the Action dialog. And don't forget: before you can use an Action, you have to publish it.
11. Now, just like the first step, click Create Application File and search for "flow" to find and select the Flow for Flow Designer. After Create, just add a value for Name. I called mine MyRestTest because I'm still feeling creative.
12. Add a start trigger. I'm going to just add Run Once because I'll only be running tests manually. The Run on date does not matter for this.
13. Add an Action. Use search actions field to find the action you created. Since there are no inputs for this example, there is nothing else to do here.
14. Finally, add an action to email yourself so you can see the results of your effort, maybe get a little endorphin rush, and have a memento to keep of our time together. Don't forget to put it on a blockchain for posterity! Click Action, search for Send Email, then complete it as follows (but with your email, not youremail):
15. Your Flow should look something like this:
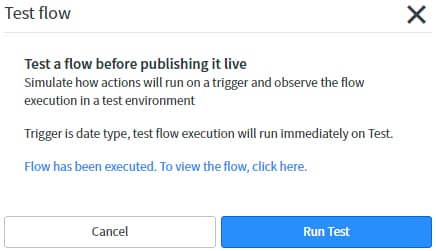
16. Finally finally, click Save, then click Test, then click Run Test. A new link will appear indicating the the Flow has been executed. Click that too.
17. Finally for real, you should see something like the following, with Completed all the way down on the State column. You or your Spam filter should shortly receive an email from your test instance.
This was fun, and kind of easy right? Next time, maybe tomorrow, I'm going to share how to add a REST action using OAuth to connect to the SalesForce API. I did it a couple weeks ago and it was not fun nor easy. But hopefully it will be easier for you than me because somebody (I'm not naming names) took the time to write it up for you.
- 24,316 Views
- Mark as Read
- Mark as New
- Bookmark
- Permalink
- Report Inappropriate Content
Getting below error while testing flow:
Invalid values passed to the API, details: Subject is mandatory and must be filled in
Can someone help?
- Mark as Read
- Mark as New
- Bookmark
- Permalink
- Report Inappropriate Content
Hi Foster, Thanks for this great article.
Waiting eagerly for your next article: "how to add a REST action using OAuth to connect to the SalesForce API"
- Mark as Read
- Mark as New
- Bookmark
- Permalink
- Report Inappropriate Content
Thanks Foster. Nice article. I just completed a free training on NowLearning that also includes a lesson on creating a REST integration using IH
which is a nice compliment to this article. https://nowlearning.service-now.com/lxp?id=overview&type=course&sys_id=4f63e5f7db3f4010785e2a5913961...
- Mark as Read
- Mark as New
- Bookmark
- Permalink
- Report Inappropriate Content
Great Post Foster, Thank You!
- Mark as Read
- Mark as New
- Bookmark
- Permalink
- Report Inappropriate Content
3 years, and I'm curious about the "how to add a REST action using OAuth"
- Mark as Read
- Mark as New
- Bookmark
- Permalink
- Report Inappropriate Content
We also cover alot of scenarios using IH in this Now Learning course. REST scenarios are covered at the end.
https://nowlearning.service-now.com/lxp?id=overview&sys_id=4f63e5f7db3f4010785e2a59139619a7&type=course
How to configure a UI action to consume a REST Endpoint is one of the videos that might be helpful.
- Mark as Read
- Mark as New
- Bookmark
- Permalink
- Report Inappropriate Content
Well documented. Thanks Foster.