- Post History
- Subscribe to RSS Feed
- Mark as New
- Mark as Read
- Bookmark
- Subscribe
- Printer Friendly Page
- Report Inappropriate Content
on 12-30-2020 09:25 PM

Workspaces represent a new user experience and meanwhile are an indispensable working platform in the world of service desk agents.
There is a workspace called "Agent Workspace", which serves as a container for the various applications and from which it is not possible to break out at first glance.
But what if you need a separate workspace to run a single application only? For example you may want to run the Operator Workspace on a display hanging on the wall but without the other modules like "Inbox".
This article demonstrates how to do that.
(0) Examine operator dashboard
For later use we need to examine the dashboard page and grab the Sys ID for the root component. So right click just above the headline and choose - depending on your browser - the option to examine the page. This will open the so-called "developer tools".
At the "Elements" section look for the tag "<sn-component-nocpit" and save the value of the attribute "component-id" for later use:

(1) Decide for an application scope
Check with the help of the application picker which is the current application scope and change it if needed. I think it should be possible to instantiate a custom scope but for the sake of simplicity the following additions and customizations were made in "Global" scope.
(2) Create a new Workspace
ServiceNow supposes at Documenation Portal to create a new workspace via the "Guided Application Creator".
 |
To leave the custom application in the "Global" scope it is mandatory to set a certain property.
|
 |
|
         |
|
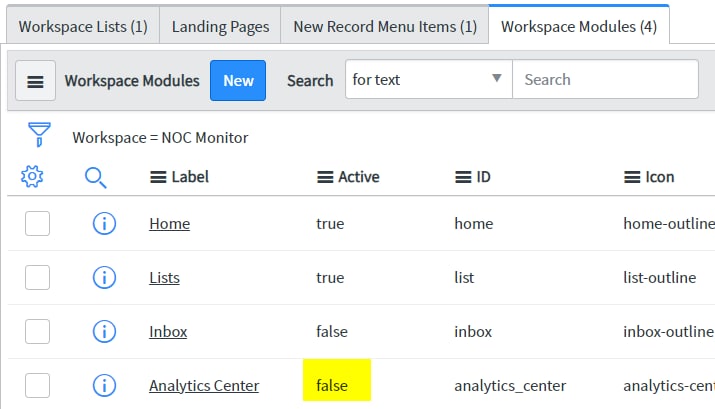
After opening the new workspace at http://<instance>.service-now.com/now/workspace/monitor I found a module "Analytics Center" I did not configured:

To clarify what configuration ServiceNow has created navigate to Workspace Experience > All Workspaces. You should find there a new corresponding record for the new workspace:

At related list "Workspace Modules" you will find the corresponding record to be deactivated:

(3) Relocate Operator Workspace Module
Now it's time to move the existing module for the operator workspace to the new monitor workspace.
 |
|
 |
|
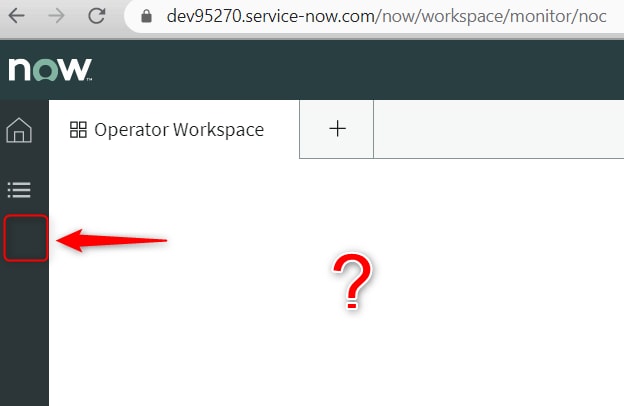
After refreshing the browser window only a blank page is displayed, so it seems that something is still missing:

A workspace is a nested construct of individual components. This implies that there must be component for rendering the contents somewhere, which also have to be relocated.
One of that components were identified in step 1. But we only have a Sys ID and no table. For this purpose you can use my solution "Open record page by Sys ID" or just believe, that table sys_ux_custom_content_root_elem will be found.
So the next steps are:
 |
|
 |
|
After refreshing browser the Operator Workspace should be loaded and look like this:

(3) Optional: Relocate List Actions
If you want to work with list you probably will miss some buttons from Agent Workspace:

At Workspace such buttons are called "Action Assignment" and for relocating them to the new workspace the following steps are necessary:
 |
|
 |
|
 |
|
| 🛈 |
If this article was helpful to you, I would appreciate it if you would mark it accordingly. If you want to read more from me, you can go to the list of all my articles. |
- 9,225 Views
- Mark as Read
- Mark as New
- Bookmark
- Permalink
- Report Inappropriate Content
Hello,
Thank you very much for your article.
I can confirm it does work but you need to have the Paris release. This trick doesn't work on Orlando version.
I have been able to achieve the same with a scopped Workspace but you need to allow 6 cross scrope privilegies:
noc_favorites, noc_conf, noc_layout, noc_tilemap_conf, noc_user_view and noc_service_preview_conf from your scopped application to Nocpit.
Cheers,
Ben