- Post History
- Subscribe to RSS Feed
- Mark as New
- Mark as Read
- Bookmark
- Subscribe
- Printer Friendly Page
- Report Inappropriate Content
on 05-30-2022 07:33 AM
Add the Form component to the Page
- Drag and drop the Form component on your page.
Add a "Glide Form" data resource
- Go to Data Resources ( icon database on the left toolbar)
- Click +Add
- Search for "glide form"
- In the section, "@servicenow/now-record-form-connected", select "Glide Form"
- Click Add

Configure the data resource
- Set the following values:
- Table: User (sys_user)
- Sys Id:
-
- Set the value to "-1" if you want to create a new record
- Set the value dynamically by referencing a page variable
- As an example, we'll set the value to "62826bf03710200044e0bfc8bcbe5df1"

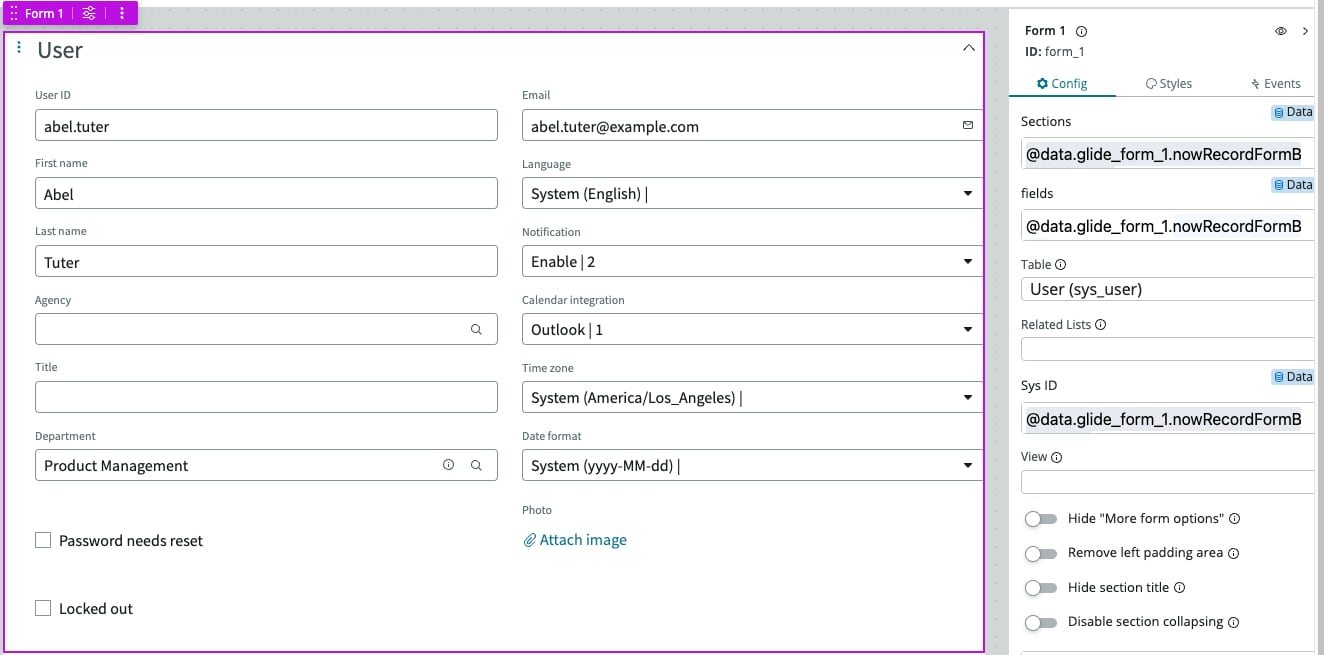
Configure the Form component
- Select your form component
- Go to the component configuration panel and set the following values: (when the value starts with '@', click the dynamic data binding icon first)
-
- Sections: @data.glide_form_1.nowRecordFormBlob.sections
- Fields: @data.glide_form_1.nowRecordFormBlob.fields
- Table: <your table>. Ex: "User (sys_user)"
- SysId : @data.glide_form_1.nowRecordFormBlob.sysId

Add a Save button
- Add a button "Save"
- Select the button, go to the Events configuration panel
- Set the click event to Glide Form > Save
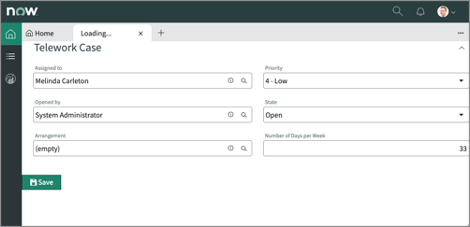
And here you have a Form ready to be used.

- 15,245 Views
- Mark as Read
- Mark as New
- Bookmark
- Permalink
- Report Inappropriate Content
Thanks Marc. This was helpful. However, now I am getting all the fields available for the user in the user table. How do I restrict it to show only : Email/User ID/Timezone/Mobile phone etc.
- Mark as Read
- Mark as New
- Bookmark
- Permalink
- Report Inappropriate Content
Create a custom view in the user table with the fields you need and set the name of the view in the data resource. As you can see in the screenshot below, by specifying the view "ITIL", the form shows different fields.

- Mark as Read
- Mark as New
- Bookmark
- Permalink
- Report Inappropriate Content
Thanks,
- Mark as Read
- Mark as New
- Bookmark
- Permalink
- Report Inappropriate Content
PS: if you want the content useful, click the helpful 👍 link
- Mark as Read
- Mark as New
- Bookmark
- Permalink
- Report Inappropriate Content
(Just back from vacation, thus delay.) No errors,
- Mark as Read
- Mark as New
- Bookmark
- Permalink
- Report Inappropriate Content
Console screenshot.
- Mark as Read
- Mark as New
- Bookmark
- Permalink
- Report Inappropriate Content
You can add "Action bar" control above or after the form and fill configuration as following:
| Actions: | @data.glide_form_1.nowRecordCommonUiactionbar.actionNodes |
| Declarative action form model: | @data.glide_form_1.nowRecordCommonUiactionbar.daModel |
| Declarative action contract: | @data.glide_form_1.nowRecordCommonUiactionbar.daClientActionContract |
The "Action bar" control should show "Save" and other actions. Try to use it for saving the form.
- Mark as Read
- Mark as New
- Bookmark
- Permalink
- Report Inappropriate Content
Thanks,
- Mark as Read
- Mark as New
- Bookmark
- Permalink
- Report Inappropriate Content
Hi @Marc Mouries ,
Thanks for this, it is very helpful.
I have few more questions on it, let's say a field is of type Multi Select choice, why it is not showing the dropdown options and how can we show the related lists.
- Mark as Read
- Mark as New
- Bookmark
- Permalink
- Report Inappropriate Content
@Vivek Joshi to see other fields and the related lists, you simply add them to the form in the Workspace view and they will show up automatically.
- Mark as Read
- Mark as New
- Bookmark
- Permalink
- Report Inappropriate Content
@Marc Mouries
How can i retrieve the SysId ,
Lets say,i have used a client Parameter, initiated to -1 and after clicking on save, it has got saved and now the client State parameter should be updated with the sysId,
for that reason, i need the SysId of the saved record. How can i get the record sysId .
TIA.
- Mark as Read
- Mark as New
- Bookmark
- Permalink
- Report Inappropriate Content
@Kumar_Raja I recommend using the more recent data resource "Create Record" data resource and add an event handler on the "Operation Succeeded" event and then select "Update Client State Parameter" or use a script to grab the sys id of the new record from the event payload.
- Mark as Read
- Mark as New
- Bookmark
- Permalink
- Report Inappropriate Content
Summary
- Client parameters
- Data resources: create a record
- Data resources: look up a single record (optional)
- Static Table
- Bind Record
- Return values
- Custom Modal
- Header: Rich Text HTML
- Body: Input, Dropdown, etc
- Input: Event=>Input value set
- Dropdown: Event=>Dropdown selected items set
- Footer
- Button
- Events:
- EXECUTE – Data resource: Create Record 1
- Data Binding FOR EXECUTE – Data resource: Create Record 1 FIELDS
- Bind all fields to State parameters
- Client states.pre_defined_client_state
- Open or close modal dialog: set to true
- Open or close modal dialog: set to false
- Bind all fields to State parameters
- Trigger Button
- Event Handler
- Button clicked: Open or close modal dialog
- Modal: custom 1
- Event Handler
- Data Binding FOR EXECUTE – Data resource: Create Record 1 FIELDS
- Mark as Read
- Mark as New
- Bookmark
- Permalink
- Report Inappropriate Content
Thanks Marc!!