- Post History
- Subscribe to RSS Feed
- Mark as New
- Mark as Read
- Bookmark
- Subscribe
- Printer Friendly Page
- Report Inappropriate Content
on 07-14-2020 12:00 PM
Purpose?
The purpose of this document is about ServiceNow Clone Process, Frequency, Pre-requisites and Checklist elements to be followed pre & post clone.
Clone Process
System Clone process is to copy everything in a database from one environment to another. Cloning typically used to copy a production environment to a pre-production environment to test changes. In addition, it would be ideal to ensure you have a like-for-like setup between Non-Production and Production so that there are no "missing links" in the items being developed as well as new developments.
Cloning data comes from the most recent, nightly backup.

Frequency?
- This is going to vary from organization to organization. It really depends how often you want to refresh the data in sub-prod environments. That is the big benefit of doing a clone.
- Some people do this once a year, some quarterly, some more often. It’s based on project requirements, development/release cycle, and other parameters (Ex. before any major development efforts).
- Therefore you would want to have frequent refreshes of the development environments, but not too frequent where this should not be a hindrance for your developers.
Frequency: Every quarter for each environment (Recommended in General Scenario)
Order of Environments to be cloned: ACC/UAT, TEST, DEV
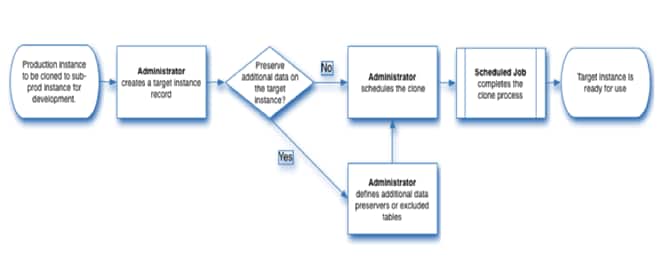
How to Do?
Please refer to the below step-by-step procedure to perform a system clone for a service-now environment.
Prior to Request a Clone, remember the below important points before raising a clone request.
- Lead time to raise/schedule a request – At least 4 hours.
- At-most backup - 36 hours old. (however latest back up will be picked by clone engine)
- Cancel a clone – Any time while clone is in progress.
- System Clone > Active Clone > Open the record > Click ‘Cancel Clone’ related link.(link will be visible until the clone is in-progress).
- Maximum time for a roll back of clone – within 24 hours reach HI team.
- Inform to all the developers to take back up of their work.
Terminology
Source Environment – Source for copy
Target Environment – Destination for overwritten
Intended Audience
Service-now administrators.
Pre-Clone Checklist
On Source Environment
- Define the Exclude tables list.
- Define the Preservers tables list.
- Preserve any unpublished applications on the target environment.
- Review and update post-clone cleanup scripts, as it required.
Note: If you want to retain your target instance table data AS IS, please ensure to mention your table in both Preserver and Exclusion list of source instance. For more details, please refer to the KB article Clone results based on Exclusion and Preserver configuration
On Target Environment
Please take the back up (Excel & xml as applicable) for below check items to validate the target environment configurations would not override.
- Pending Update Sets.
- Active Plugins. (In Application Navigator, v_plugin.LIST)
- Active Schedule Jobs.
- System Properties (Environment Specific).
- MID Server configurations.
- (Optional) SSO Configurations. (Environment Specific)
- (Optional) Integration end-points and environment specific parameters.
- (Optional) Important table records. Ex. Group Members, User Roles and Group Roles.
- (Optional) Data source.
Raise a Clone Request
- Login into Source Environment.
- Go to System Clone > Request Clone
- Fill the mandatory fields’ information (Note: Start time is at least with 4 hours lead-time).
- Review and understand the available “Options” on request form.
- Select the applicable “Options” with right value. Note: The check box label "Exclude audit and log data" is misleading. It actually means if this is ticked it will honour the exclude tables module, if it is unticked then the exclude tables module will not be honoured.
- Clikc Submit.
- In the Usernameand Password fields, enter the username and password for an administrator account on the target environment and then click Authenticate.
- Review the clone settings and click
Post-Clone Checklist
After clone, please verify the below elements on Target environment,
- System Properties
- Welcome Page
- System Definition > Scheduled Jobs
- System LDAP
- User Accounts
- Glide List (Prevent emails being sent out to non-testers in a non-prod environment)
- Data Clean-up (to prevent notifications from non-prod systems)
- SSO Hash Key
- (Optional) Data Cleanout Checklist
Refer to the attached document (Post_Clone_Check_List.pdf) for step-by-step procedure for the above checklist elements.
- Finally verify the Pre-Clone Check List elements.
- Sanity check of the system – Run the ATF Test Suites.
References
- Cloning Resources Page
- ServiceNow Wiki Page
- CLONE - Frequently asked Questions (FAQ)
- Post-Cloning Checklist
- Importance of "Exclude audit and log data" and "Exclude large attachment data"
- Clone results based on Exclusion and Preserver configuration
Regards,
Vijay Talupula
- 21,633 Views
- Mark as Read
- Mark as New
- Bookmark
- Permalink
- Report Inappropriate Content
Rather than going on definitions, I will try to explain ServiceNow "Preserve" and "Exclude" outcome in cloning.
Although "Preserve" and Excludes go hand in hand while cloning but sometimes it may create confusion on the outcome. So, I'm trying to make it simple here.
Assume you are cloning the Production instance (Source) over the Dev instance (Target).
Any particular table (INC, PRB, CHG etc. ) in the Production instance has records (1, 2, 3) and the same table in the Dev Instance has records (A, B, C).
Please Mark helpful if this helps.

Regards
Pawan K Singh
- Mark as Read
- Mark as New
- Bookmark
- Permalink
- Report Inappropriate Content
Hello @Vijay Talupula I see this article is 2020, is this the most up to date information?