
Harsh_Deep

Giga Sage
Options
- Subscribe to RSS Feed
- Mark as New
- Mark as Read
- Bookmark
- Subscribe
- Printer Friendly Page
- Report Inappropriate Content
10-08-2024
02:14 AM
Why Does ServiceNow Use Encryption?
Sensitive data is better protected when it is encrypted and stored in a format that only authorized individuals or systems can read. This is essential for ServiceNow users to know when working with data that has to be shielded from unwanted access. You can set up field-level encryption using the Column Level Encryption (CLE) plugin, making sure that sensitive data is secure and only available to authorized users.
Prerequisites:
Please refer attachment for all the steps
Plugin - Column Level Encryption Starter (com.glide.encryption)
Note- elevate_role
Key Management Administration -> add users
Before beginning the setup, ensure that the following roles are assigned to the admin user:
- sn_kmf.admin: Allows the granting of KMF roles to other users.
- sn_kmf.cryptographic_manager: Provides permissions to create, read, and update Encryption Modules and Module Access policies.
- itil_admin: Grants the ability to delete incidents, problems, and changes.
Steps to Configure an Encryption Module
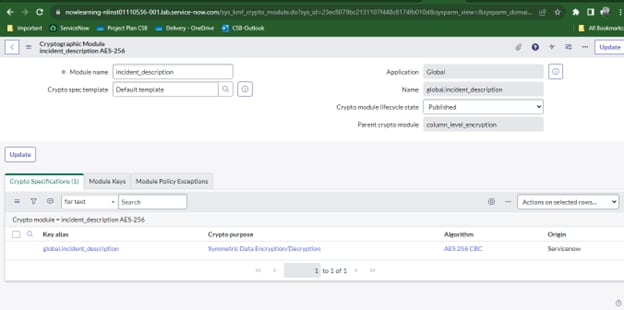
Step 1: Set Up the Encryption Module
- Navigate to System Security > Field Encryption Modules in the Application Navigator.
- Click New to create a new encryption module.Configure the following fields:
- Module Name: incident_description
- Crypto spec Template: Default template
- Crypto module lifecycle state: Published
- Parent crypto module: Pre-populated as column_level_encryption (read-only)
Save the configuration by right-clicking on the form header and selecting Save.
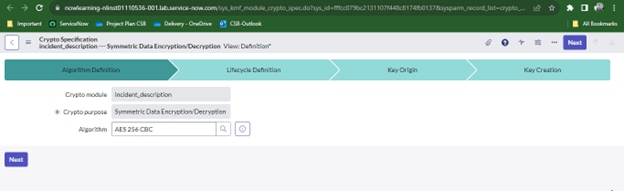
Step 2: Configure the Crypto Specification
- On the Cryptographic Module form, click the global.incident_description record under the Crypto Specifications related list.
- In the Algorithm Definition form, confirm the pre-populated fields and click Next.
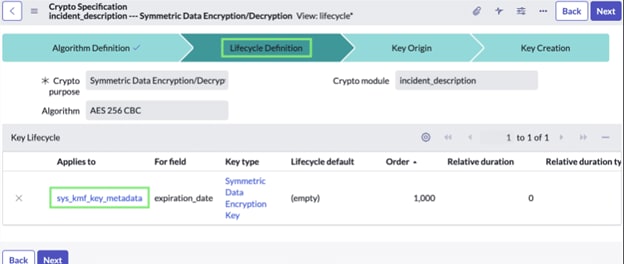
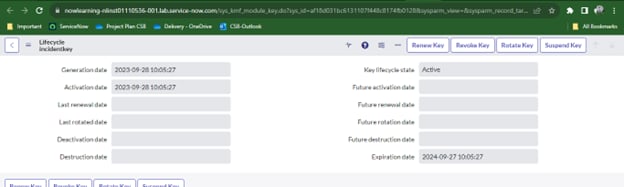
- Open the auto-generated Key Lifecycle record and update the following fields on the Field Lifecycle Template form:
- Expiration date [expiration_date]: Set to expire 1 year after activation.
- Relative duration: 1 year, relative to the Activation date.
Click Update, and then Next.
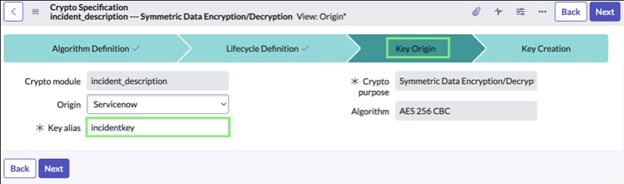
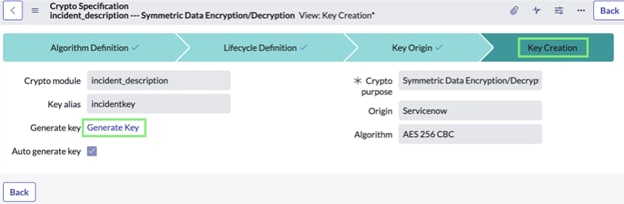
Step 3: Generate the Encryption Key
- On the Key Origin form, set the Key alias to incidentkey (overwrite the existing value).
- Click Next, and on the Key Creation form, click Generate Key.
- You’ll return to the Cryptographic Module form, where a new record with the encryption key will appear under the Module Keys related list. The key will have an expiration date of 1 year after activation.
Step 4: Create a Module Lifecycle Policy
Module Lifecycle Policies track and limit the validity of a specific encryption module. Follow these steps:
From the Module Policy Exceptions related list of the incident_description Encryption Module, click New.
Configure the policy:
- Key type: Symmetric Data Encryption Key
- Policy condition: Expiration date is more than 2 years after activation.
- Result: Track
- Click Submit to save the policy.
Step 5: Define a Module Access Policy
A Module Access Policy determines which roles can access the encrypted data. For this example, we'll create a policy for the itil_admin role:
Navigate to Key Management > Module Access Policies > All.
- Click New and configure the following fields:
- Policy name: Incident Policy
- Crypto module: incident_description AES-256
- Type: Role-based
- Target role: itil_admin
- Result: Track
- Click Submit to finalize the access policy.
Step 6: Configure Encrypted Field Configuration
An Encrypted Field Configuration specifies which fields on a table should be encrypted with a certain module:
- Navigate to System Security > Field Encryption > Encrypted Field Configurations.
- Click New and fill in the following details:
- Type: Column Table: Incident [incident]
- Column: Description [description]
- Crypto module: incident_description AES-256
- Method: Single Module
- Click Submit to save the configuration.
Examining the Setup
You can test the encryption by adding and modifying records in the incident table once you've finished these steps. Verify that the designated fields are encrypted and available to users who possess the relevant roles.
You have successfully set up encryption for ServiceNow's incident_description field by following this instructions. This adds an additional level of protection to your company by guaranteeing that critical data is safely stored and accessible only by authorized staff.
Mark 👍 Helpful if you find my response worthy based on the impact.
Thanks,
Harsh Deep Singh
- 12,065 Views
1 Comment
You must be a registered user to add a comment. If you've already registered, sign in. Otherwise, register and sign in.

