Catalog Item Annotation HTML Variable Instructions on form
- Mark as New
- Bookmark
- Subscribe
- Mute
- Subscribe to RSS Feed
- Permalink
- Report Inappropriate Content
05-31-2017 06:25 PM
I'm using the CMS and wanted to annotate my catalog item form with some instructions without using the help text facility. I know you can create a UI Macro but it seems a waste to have to create and link a new ui macro for each annotation on every item.
I also am going to service portal soon too and I read you can use the widget selector under the "default value" tab on the macro variable to display a widget on the service portal and you can pass a value to the widget through the default value field. This got me thinking.
Then I read this post https://community.servicenow.com/thread/226154 about the instructions field on a variable and how it is shown in service portal. "Brilliant" I thought - thats exactly what I need but for the CMS. (I always wondered what that field did).
So I built a UI Macro, which gets the html from the instructions field on the variable. This way you only have to have 1 UI Macro to display an annotation. You also get a WYSWIG HTML Editor and as an added bonus its future compatible with service portal! (Because UI Macros dont show in SP, but the instructions field does).
Heres the UI macro:
Name: variable_html
<j:jelly trim="false" xmlns:j="jelly:core" xmlns:g="glide" xmlns:j2="null" xmlns:g2="null">
<g:evaluate jelly="true">
var gr = new GlideRecord('item_option_new');
gr.get(jelly.jvar_question_id);
gr
</g:evaluate>
<div class="help-block text-muted col-xs-6">
<g:no_escape>${gr.instructions}</g:no_escape>
</div>
</j:jelly>
Heres a screencap of the UI macro.

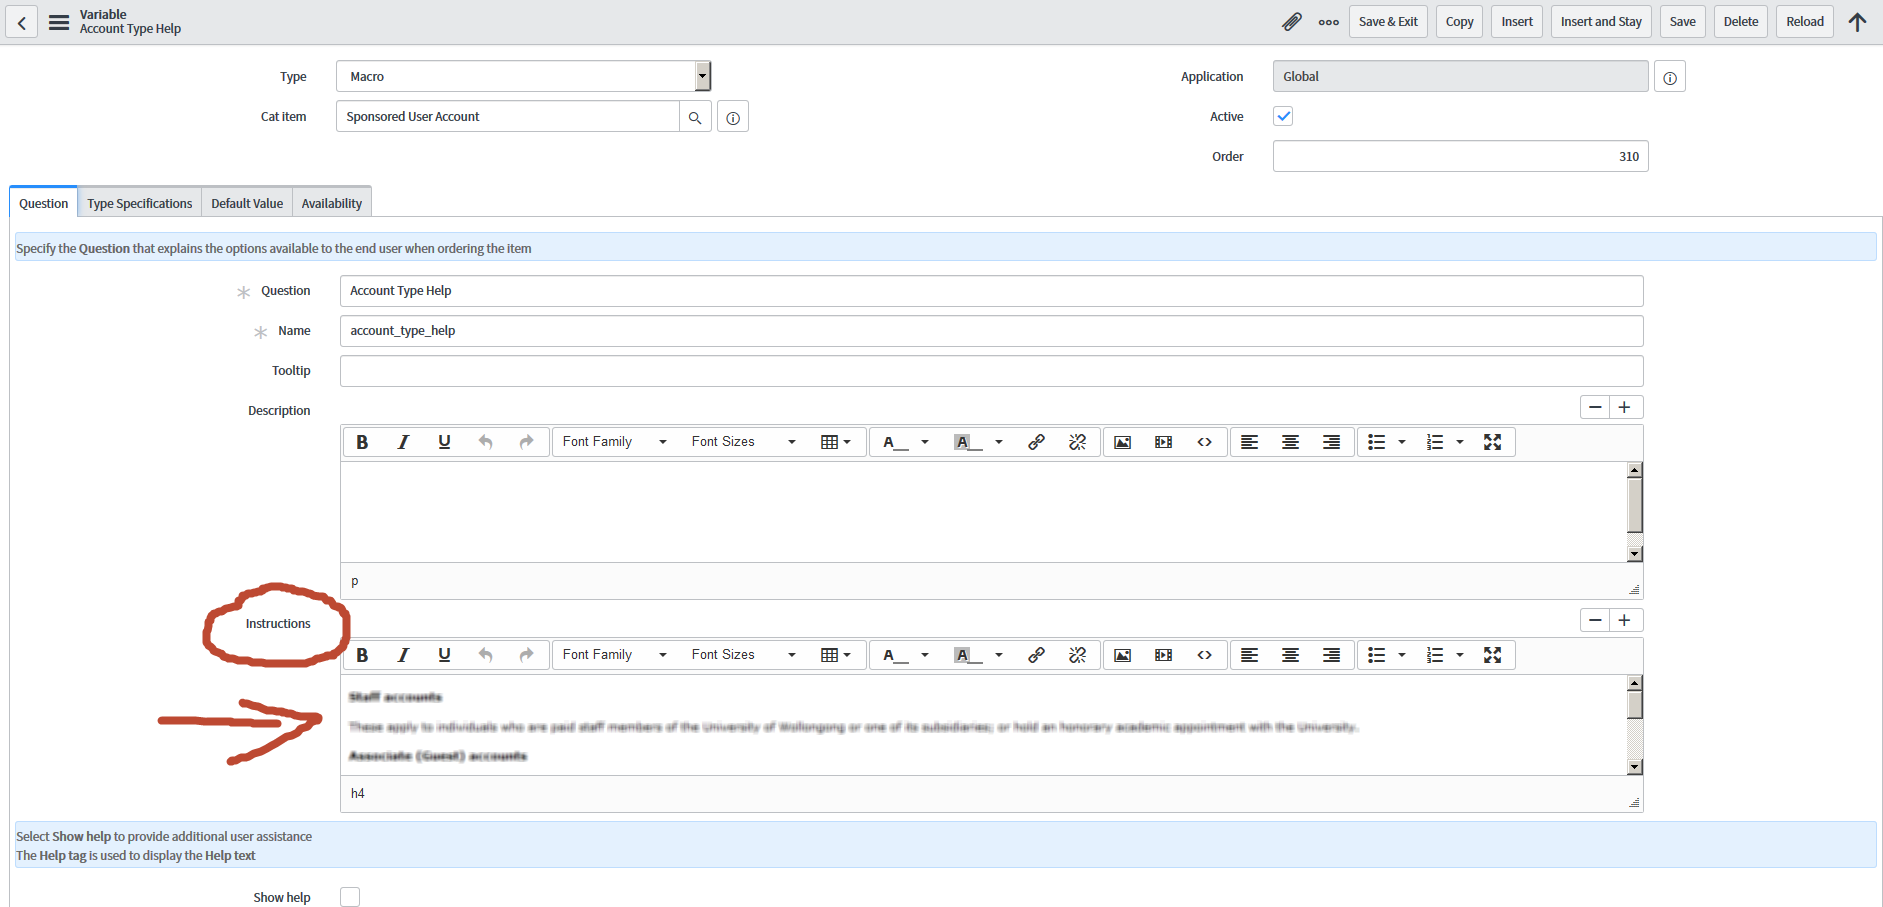
Here a screencap of the UI Macro Variable on a catalog Item and where to put the HTML for your annotation.

This is where to specify the new "variable_html" UI Macro on the catalog item variable.

And this is what it looks like on the CMS

And this is what it looks like on the service portal.

- 22,732 Views
- Mark as New
- Bookmark
- Subscribe
- Mute
- Subscribe to RSS Feed
- Permalink
- Report Inappropriate Content
09-06-2019 09:59 AM
Thanks for this! I was disappointed when they changed how the instructions field worked in the SP and was looking for a way to get this back working as it originally did. Your widget code worked for me with a small snag that may not effect everyone (but i thought i would reply just in case its not just me). For some reason some of our portal css was stripping out a lot of the formatting I had set in the editor and overriding it with its own (mainly font size & color). I made a few adjustments to your code and merged it together with a another bit of code I found elsewhere that was working for me but wasn't nearly as elegant on the configuration side of things. (FYI - this is on Madrid SP5)
SP Widget
HTML Template
<div ng-bind-html="labelHTML"></div> Client Script
function ($scope, $sce) {
	var c = this;

	// Variable sys_id
	$scope.data.sys_id = $scope.$parent.$parent.field.sys_id;
	c.server.update().then(function (infoResponse ){

		$scope.labelHTML = $sce.trustAsHtml(c.data.instructions);

	});

}
Server Script
(function() {

	if (input) {
		var gr = new GlideRecord('item_option_new');
		gr.get(input.sys_id);
		data.instructions = gr.getValue('instructions');
	}
})();
Configuration/Use
To make this fully work you still need to use the original UI Macro on this page to make the instructions text show on the Catalog Task (or anywhere in advanced view) without being in a help text box. The above widget enables that same information to be shown in the SP (without any of field labels or "more information" text/drop-down)
1. Create a Macro Variable on your catalog item.
2. On the Annotation Tab - fill in your desired text/images in the "instructions" field. DO NOT NEED TO CHECK "Show Help"

3. On the Type Specifications Tab set the MACRO field to the UI Macro you created using the original post above (which will display the instruction text on the tasks.)
4. Also On the Type Specifications Tab set the WIDGET field to the widget you created using the code above.

Results
Service Portal

Catalog Task

- Mark as New
- Bookmark
- Subscribe
- Mute
- Subscribe to RSS Feed
- Permalink
- Report Inappropriate Content
09-08-2019 03:13 PM
Nice work!
- Mark as New
- Bookmark
- Subscribe
- Mute
- Subscribe to RSS Feed
- Permalink
- Report Inappropriate Content
03-03-2020 07:21 AM

- Mark as New
- Bookmark
- Subscribe
- Mute
- Subscribe to RSS Feed
- Permalink
- Report Inappropriate Content
03-03-2020 07:21 AM
This works absolutely perfectly, thank you!!
Every other solution I tried looked so unpolished.

- Mark as New
- Bookmark
- Subscribe
- Mute
- Subscribe to RSS Feed
- Permalink
- Report Inappropriate Content
03-03-2020 07:22 AM
This works absolutely perfectly, thank you!!
Every other solution I tried looked so unpolished.
