- Mark as New
- Bookmark
- Subscribe
- Mute
- Subscribe to RSS Feed
- Permalink
- Report Inappropriate Content
02-11-2016 03:57 PM
Hey there, I recently was being asked by a client how to setup OAuth2 authentication for ServiceNow web services integrations. After searching online, I couldn't find anything that's straightforward to explain the configuration/test process. So after I figure this out, I think I should share what I did in here so people can reference this topic in the future.
What I experimented are between ServiceNow instances. When work with third party application, it could be a slight different but the concept remains the same. Both OAuth consumer and OAuth provider can be a third party or ServiceNow.
Here we go.
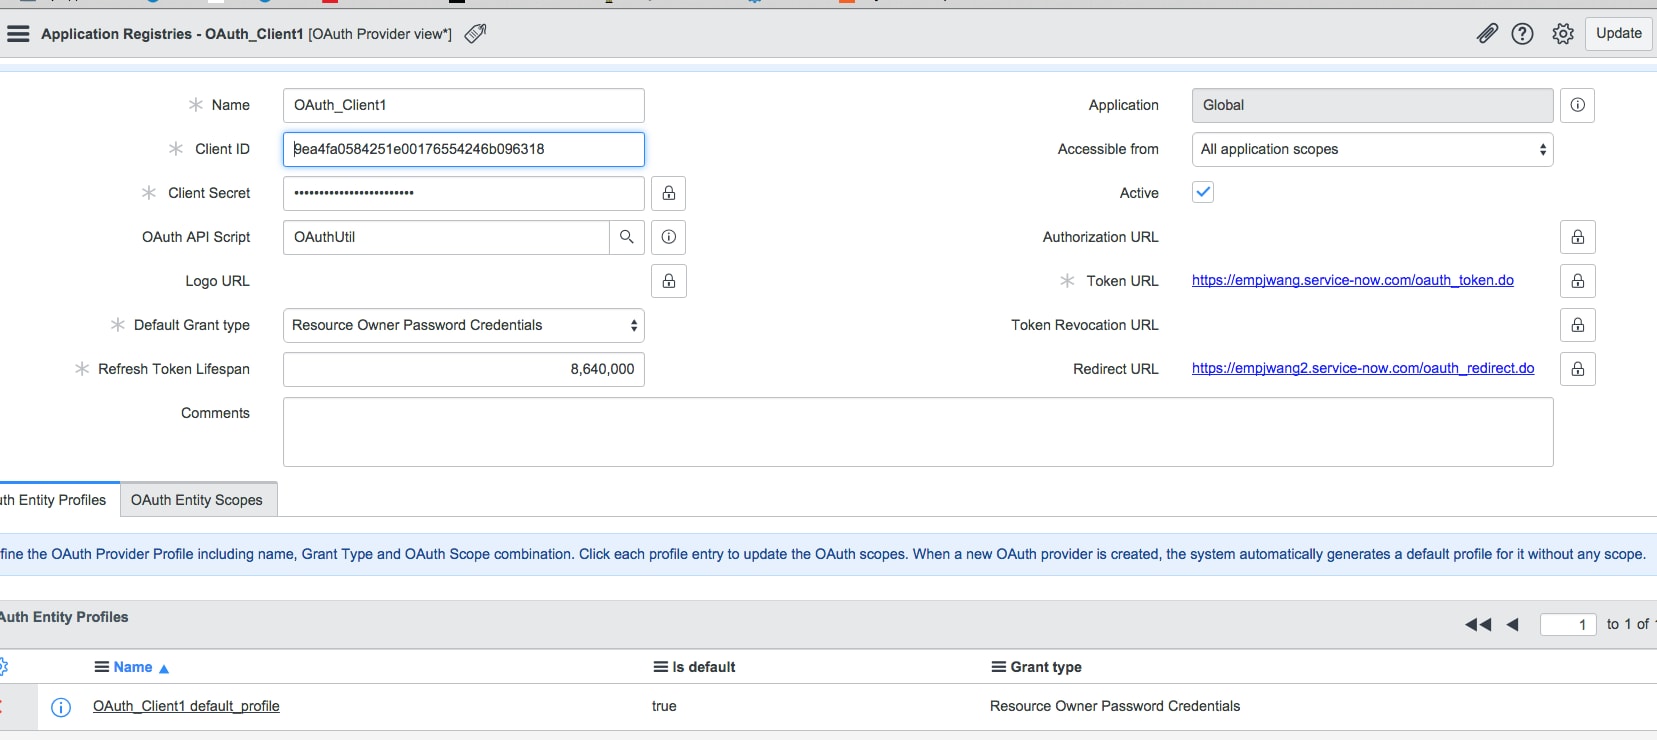
1. Configure OAuth provider on instance 1 (OAuth Application Registry -> Create an OAuth API endpoint for external clients)
- Create unique provider profile name.
- We need to generate client ID along with Client Secret. Both can be generated by system normally.
- Token lifespan are optional, generated by default system policy.

2. Configure OAuth consumer on instance 2 (OAuth Application Registry -> Connect to a third party OAuth Provider)
- Create unique consumer profile name. (very important, script will need pass in this consumer profile name as parameter)
- Client ID and Client secret are the values were generated from step 1.
- Grant type. Value can be either "password" or "refresh_token". Suggest to use password since you won't have refresh_token info initially. This refresh_token only will be generated during first time when access token is generated.
- Token URL will be provided by OAuth provider. In this example, it would be the https://oauth_provider_instance1.service-now.com/oauth_token.do

3. Test tokens generation script to OAuth provider instance 1 (from OAuth consumer instance 2).
var oAuthClient = new sn_auth.GlideOAuthClient();
var params = {grant_type:"password", username:'user_id from provider that will grant OAuth access', password:'user_pwd from provider that will grant OAuth access'};
var json = new global.JSON();
var text = json.encode(params);
var tokenResponse = oAuthClient.requestToken('unique consumer profile name from step 2.1', text);
var token = tokenResponse.getToken();
gs.log("AccessToken:" + token.getAccessToken());
gs.log("AccessTokenExpiresIn:" + token.getExpiresIn());
gs.log(" RefreshToken:" + token.getRefreshToken());
//You should be getting proper Access Token long with Refresh Token info. This token will be used in future web service request.

4. Setup proper outbound message on consumer instance 2 to the endpoint on provider instance 1.
- In this REST example, choose OAuth 2.0 as authentication type.
- You may use UI action "Get OAuth Token" to test you are able to get token info successfully.


5. Test outbound REST message along with token generation script to Web Service provider/OAuth provider instance 1 (from OAuth consumer instance 2).
var r = new sn_ws.RESTMessageV2('P2 Incidents', 'get');
r.setStringParameter('priority', '2');
r.setStringParameter('active', 'true');
r.setStringParameter('sysparm_fields', 'number,state,priority');
//override authentication profile
//authentication type ='basic'/ 'oauth2'
//This line below is optional if you have configured OAuth as authentication type in your outbound REST
r.setAuthentication('oauth2', 'OAuth_Client1');
var response = r.execute();
var responseBody = response.getBody();
var httpStatus = response.getStatusCode();
gs.log(responseBody);

6. Special Case1 - User is in Fuji or earlier version, don't have same menu as my Geneva screenshot
7. Special Case2 - grant type is not 'password' or 'refresh_token'
Solved! Go to Solution.
- 54,994 Views
- Mark as New
- Bookmark
- Subscribe
- Mute
- Subscribe to RSS Feed
- Permalink
- Report Inappropriate Content
03-14-2016 02:26 PM
I have created a formal blog post about How to Setup OAuth2 authentication for RESTMessageV2 integrations. Also added two special cases for user in Fuji or earlier releases or using unsupported OAuth grant type. Happy coding!
- Mark as New
- Bookmark
- Subscribe
- Mute
- Subscribe to RSS Feed
- Permalink
- Report Inappropriate Content
09-09-2019 10:54 AM
I hope you've used ClientId & Client Secret in your oAuth profile configuration, then the userid & password is not required.
if your flow completed successfully, the new token will be under "Your OAuth Profile" --> "Auth Credentials" (related list). Every time, you use 'Get oAuth Token' from your REST Message, the new token value will be updated in the oAuth Credential.
- Mark as New
- Bookmark
- Subscribe
- Mute
- Subscribe to RSS Feed
- Permalink
- Report Inappropriate Content
01-18-2022 02:15 AM
Hi Ankur,
Can you please explain where we have to write two scripts which are given in above script.
Mine is also outbound integration and need to generate access token for every 10 mins (access token should be valid for 10 mins)
Regards
Anuhsa
- Mark as New
- Bookmark
- Subscribe
- Mute
- Subscribe to RSS Feed
- Permalink
- Report Inappropriate Content
01-18-2022 01:32 PM
Please create a new thread so its easy to help you on the issue.
I am thinking, you have 2 options
1. store the OAuth key and use it to make API calls. The decision to store the OAuth key depends on the number of outbound calls that would happen from source instance.
When there is a Invalid Key error is returned, then you make the request for a refresh token .
2. instead of storing the OAuth key, every time you make API call you make the OAuth token API first, use the retrieved token to tie it to your authentication header.
- Mark as New
- Bookmark
- Subscribe
- Mute
- Subscribe to RSS Feed
- Permalink
- Report Inappropriate Content
11-06-2022 10:24 AM
Hi I was trying the same with the grant type as "Authorization Code". Could you please let me know the structure for Params?