- Post History
- Subscribe to RSS Feed
- Mark as New
- Mark as Read
- Bookmark
- Subscribe
- Printer Friendly Page
- Report Inappropriate Content
on 08-05-2022 09:02 AM
Introduction:
I have read lot of questions on community regarding the integrations for custom REST API.
May this article will helps you to gain knowledge on the scripted REST API and you can build some custom APIs on your own.
Using the scripted REST API feature you can build custom web service APIs.
Using this define service endpoints, query parameters, and headers for a scripted REST API, as well as scripts to manage the request and response.
Using this scripted REST API you can have full control over the data. You can add custom response messages as per business need.
Use case:
- In this article you will see the integration with the incident table take this as reference and implement with the required tables in ServiceNow.
- Here in the Script section checking the 3 scenarios.
- If it is a new request from the Source system(SAP, ServiceMax, AX, Sales force, D365 or other) then in Target system(ServiceNow) will create a new incident with the received data.
- If the incident already created then will update the data for existing incident in the ServiceNow.
- Last one if Source system sending invalid data then ignore and will not create in ServiceNow.
Steps:
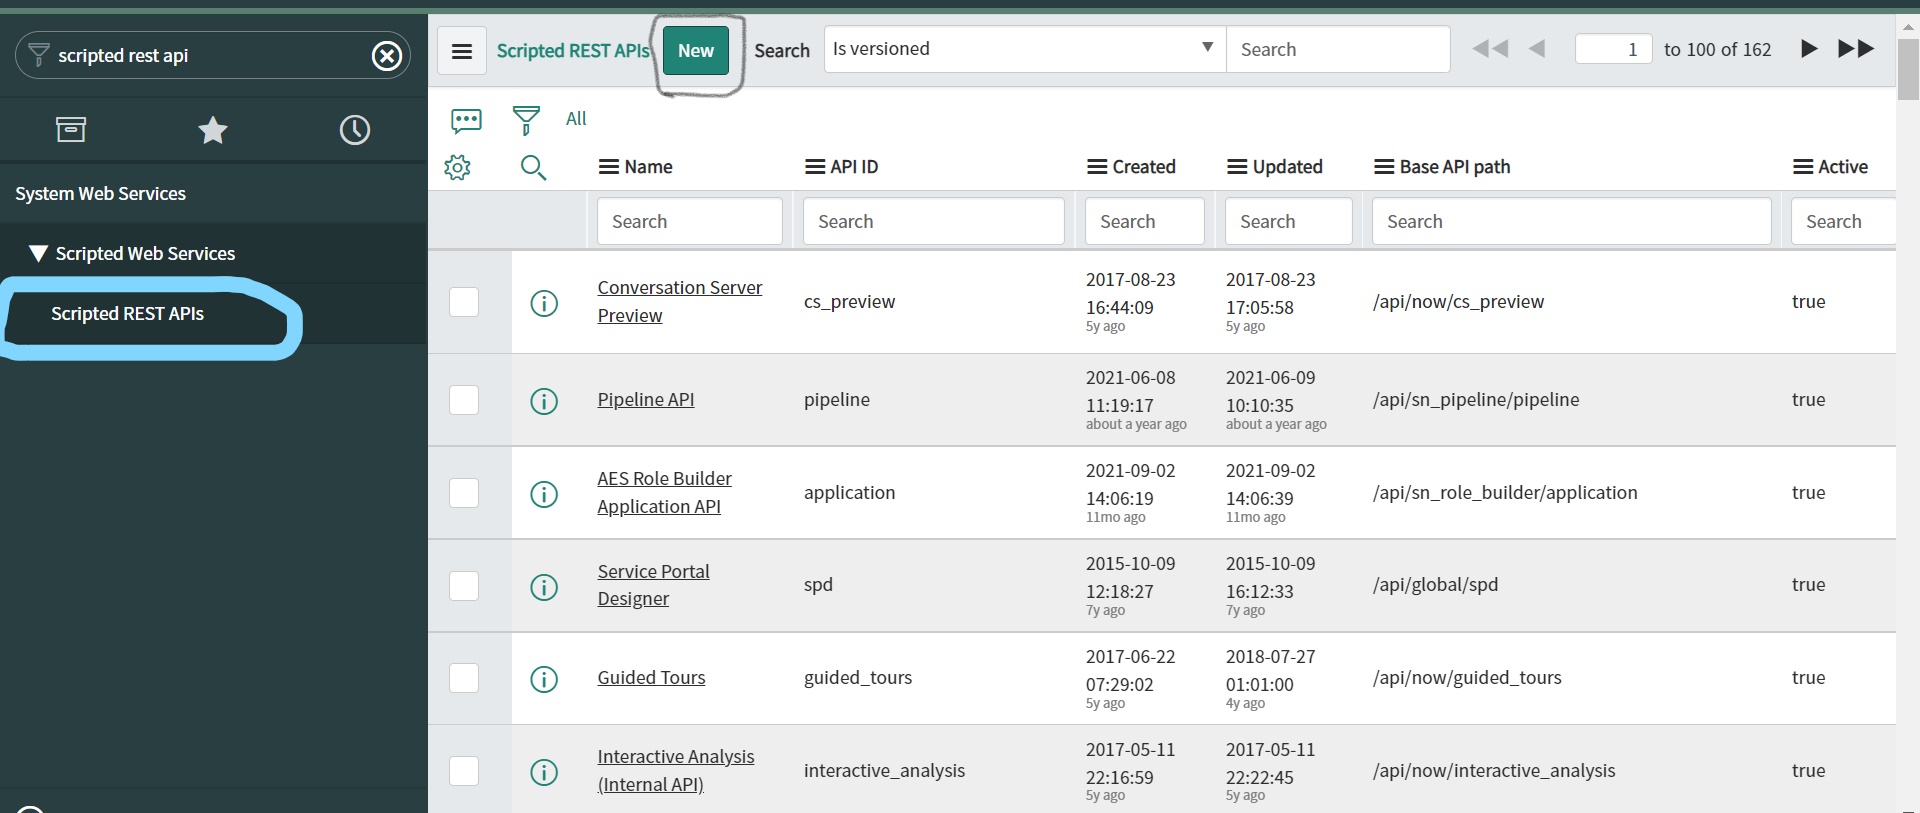
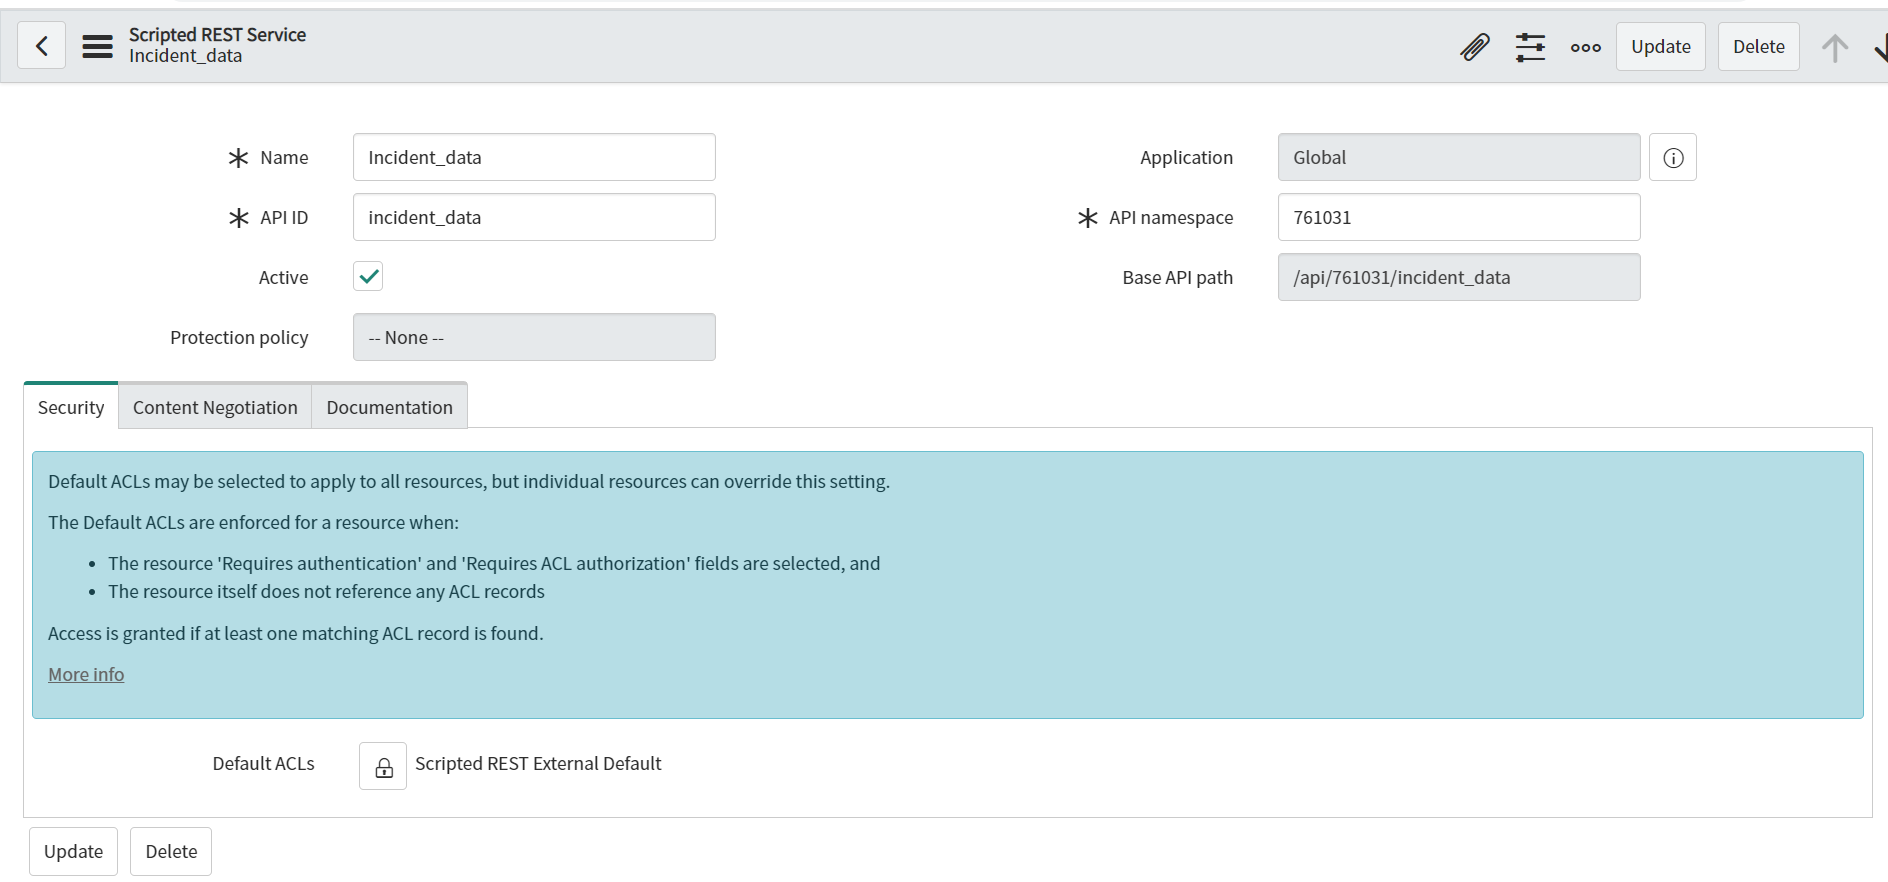
1. Create the new scripted REST API using the new button as shown below.

2. Complete the form and provide the Name and API ID will populate accordingly. Save the form.
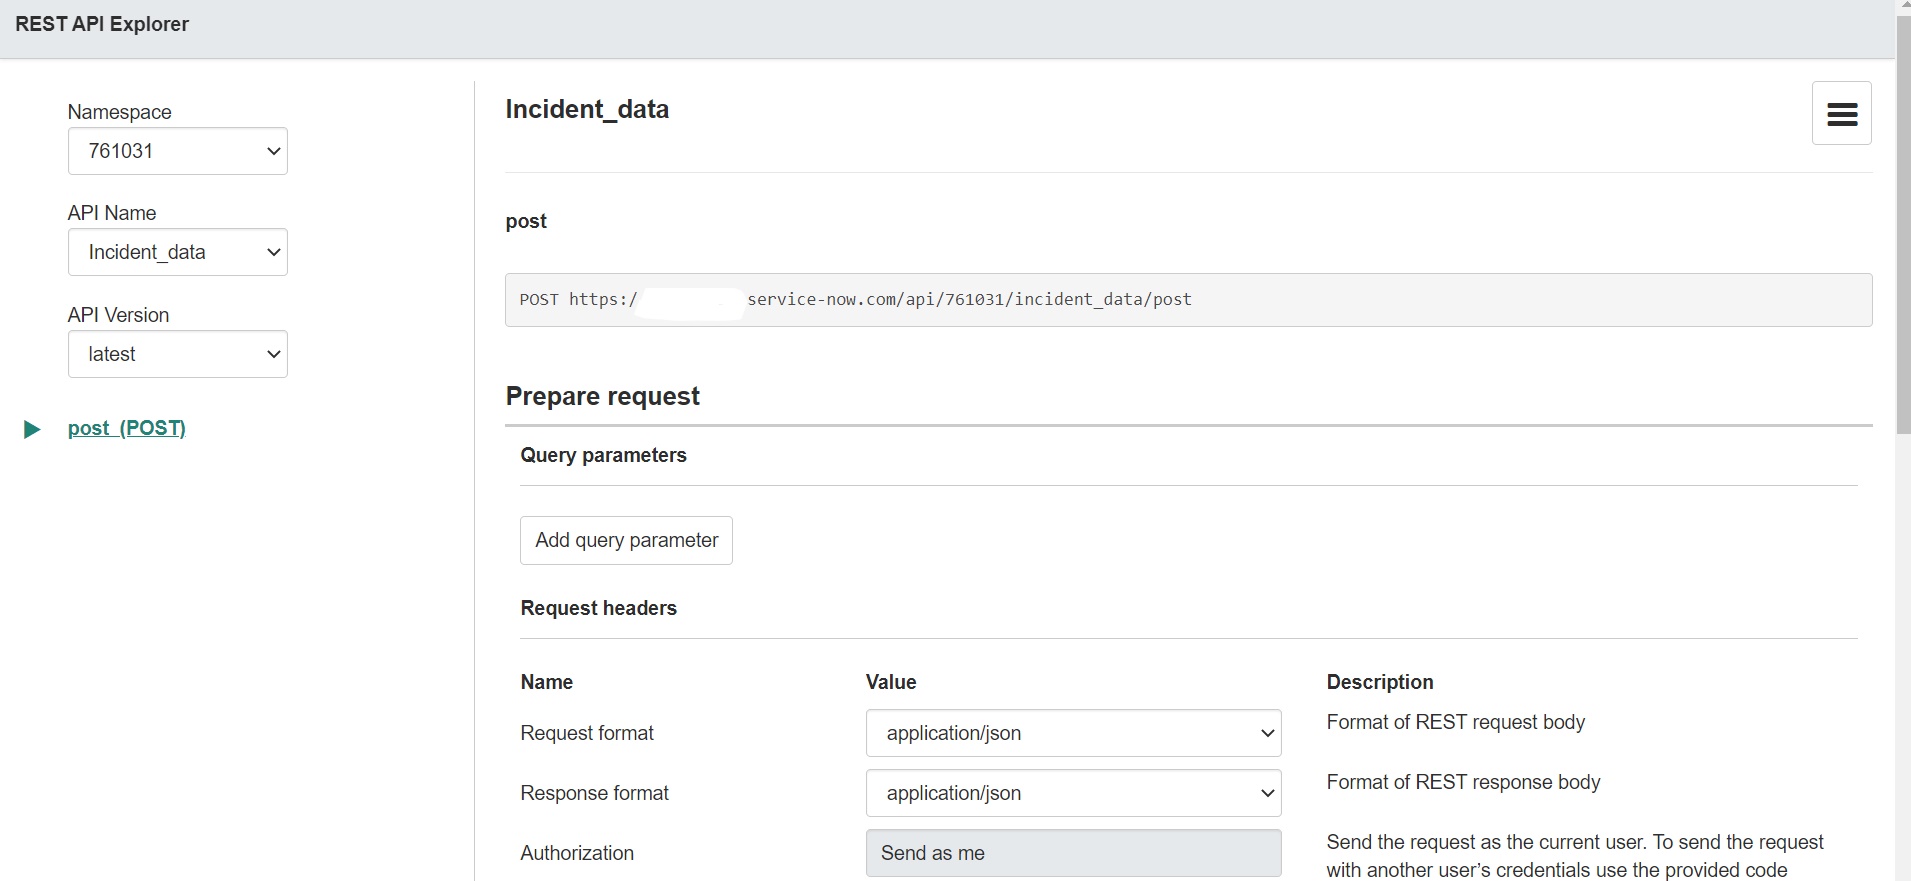
End Point or URL will extend the https://instancename.service-now.com + Base API path +Relative path
Base API path you can see below but Relative path will be available on Resource
Refer below one to create scripted API.

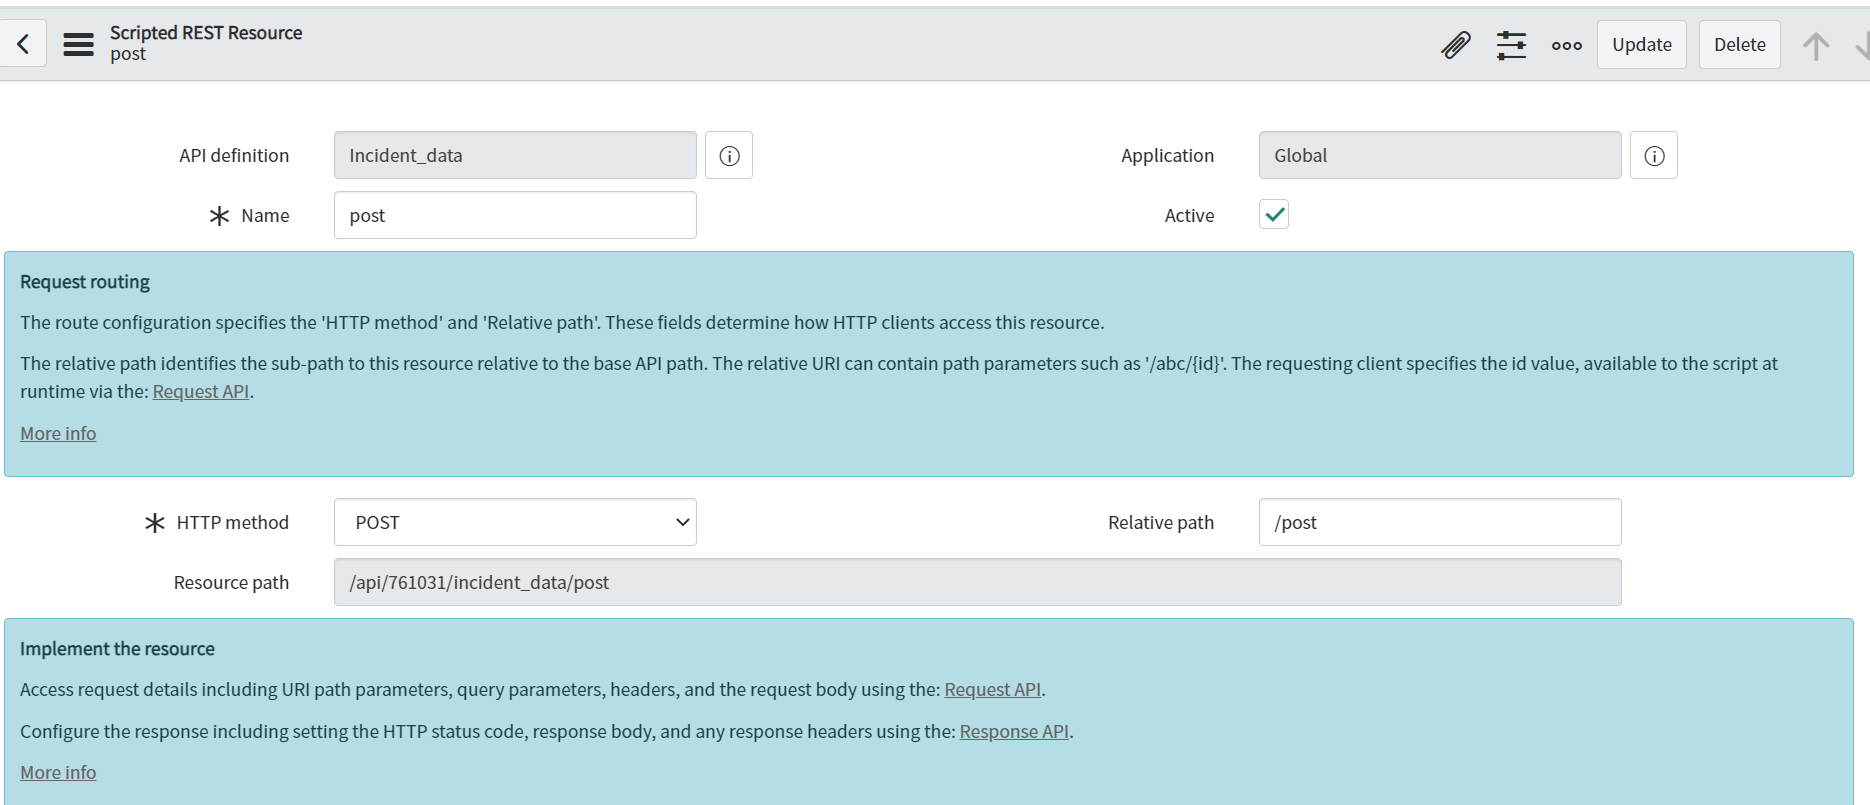
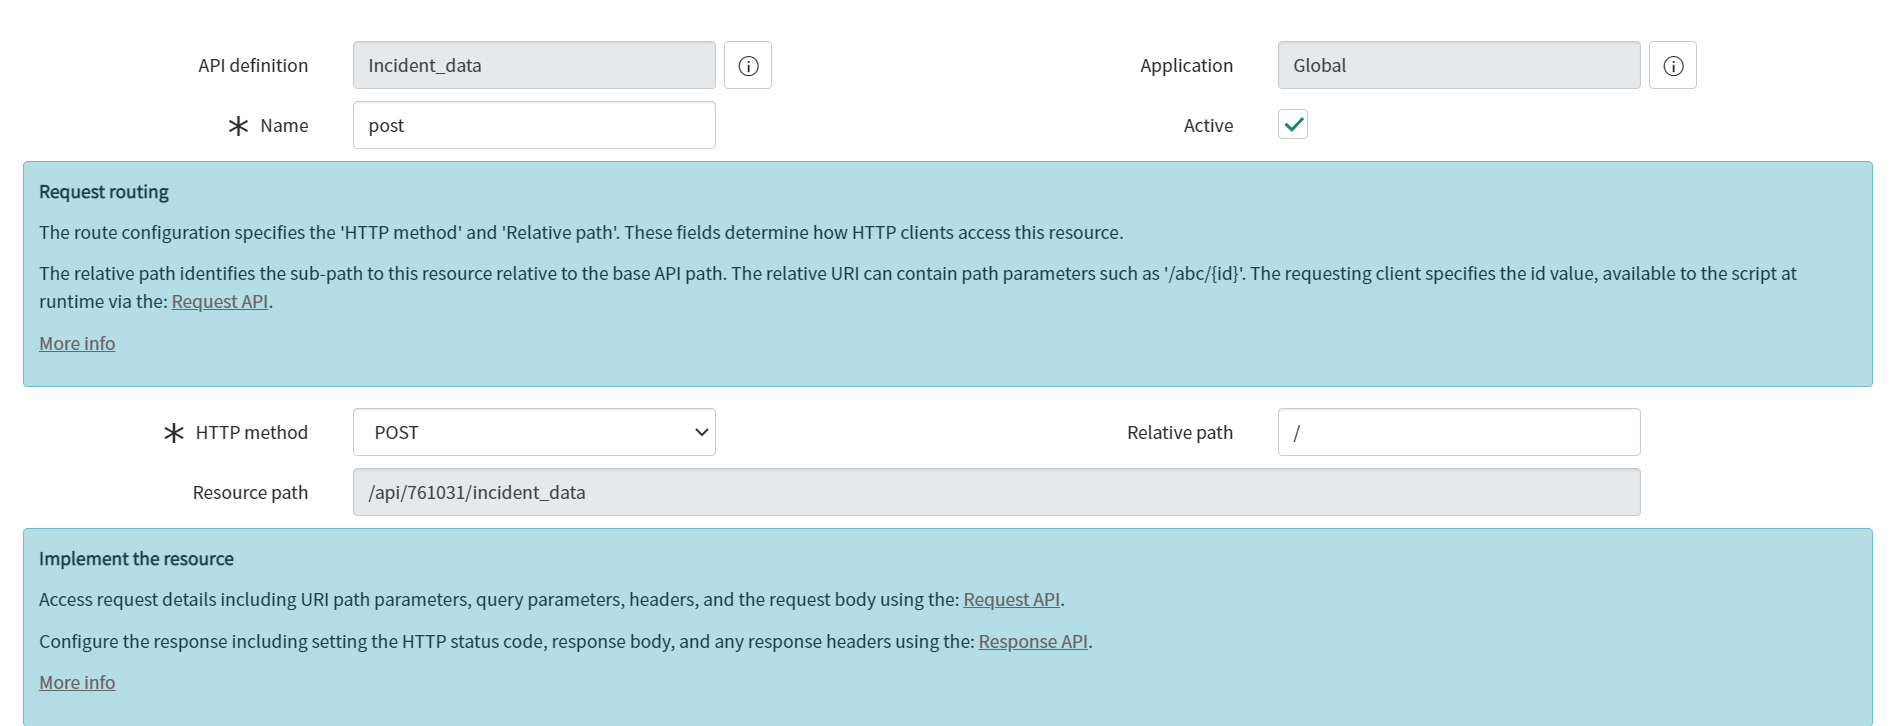
3. On related list on Resources create new Resource. Give name and select HTTP method as POST and save the form.

4. Once you save form will look like below and Relative Path is empty and you can see the Resource Path
Imp Note: Resource path = Base API path + Relative path

5. In below you can compare the Resource path after providing the Relative path.
Relative path will append to the Resource path.

6. In the script section we can push the request and response objects to the script include and we can implement the integration logic there but I am implementing it on script section itself to understand it easily.
7. Script: You can add fields as per your business requirement but here I am integrating few fields of incident table.
(function process( /*RESTAPIRequest*/ request, /*RESTAPIResponse*/ response) {
this.status = '200';
var respObj = {}; //declare the response object
var payload = request.body.data; //retrieving the JSON body
var number = payload.number; //getting the number from JSON
var callerid = payload.callerid;
var state = payload.state;
var category = payload.category;
var impact = payload.impact;
var urgency = payload.urgency;
var short_description = payload.short_description;
var description = payload.description;
var grinc = new GlideRecord("incident");
grinc.addQuery("number", number);
grinc.query();
if (grinc.next()) { // To update data on the existing incidents
grinc.caller_id = callerid;
grinc.state = state;
grinc.category = category;
grinc.impact = impact;
grinc.urgency = urgency;
grinc.short_description = short_description;
grinc.description = description;
grinc.update();
this.status = '200';
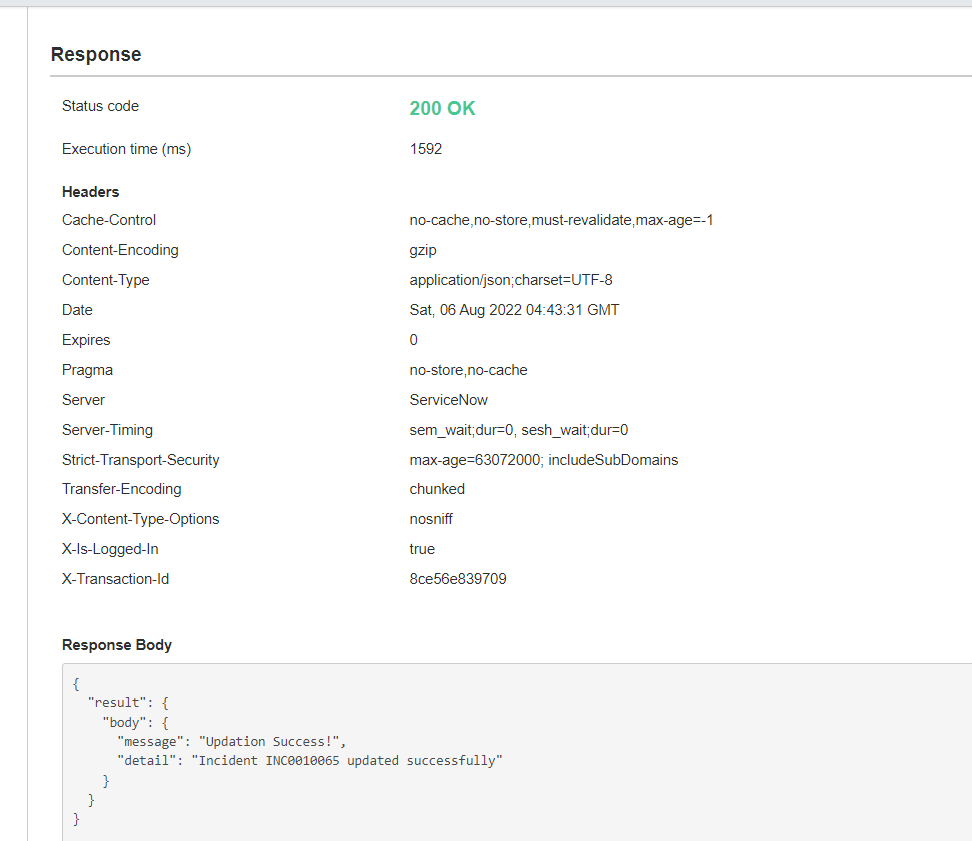
respObj.body = {
"message": "Updation Success!",
"detail": "Incident " + grinc.number + " updated successfully"
};
} else if (callerid) { //create incident if when callerid is not empty
grinc.initialize();
grinc.caller_id = callerid;
grinc.state = state;
grinc.category = category;
grinc.impact = impact;
grinc.urgency = urgency;
grinc.short_description = short_description;
grinc.description = description;
grinc.insert();
this.status = '200';
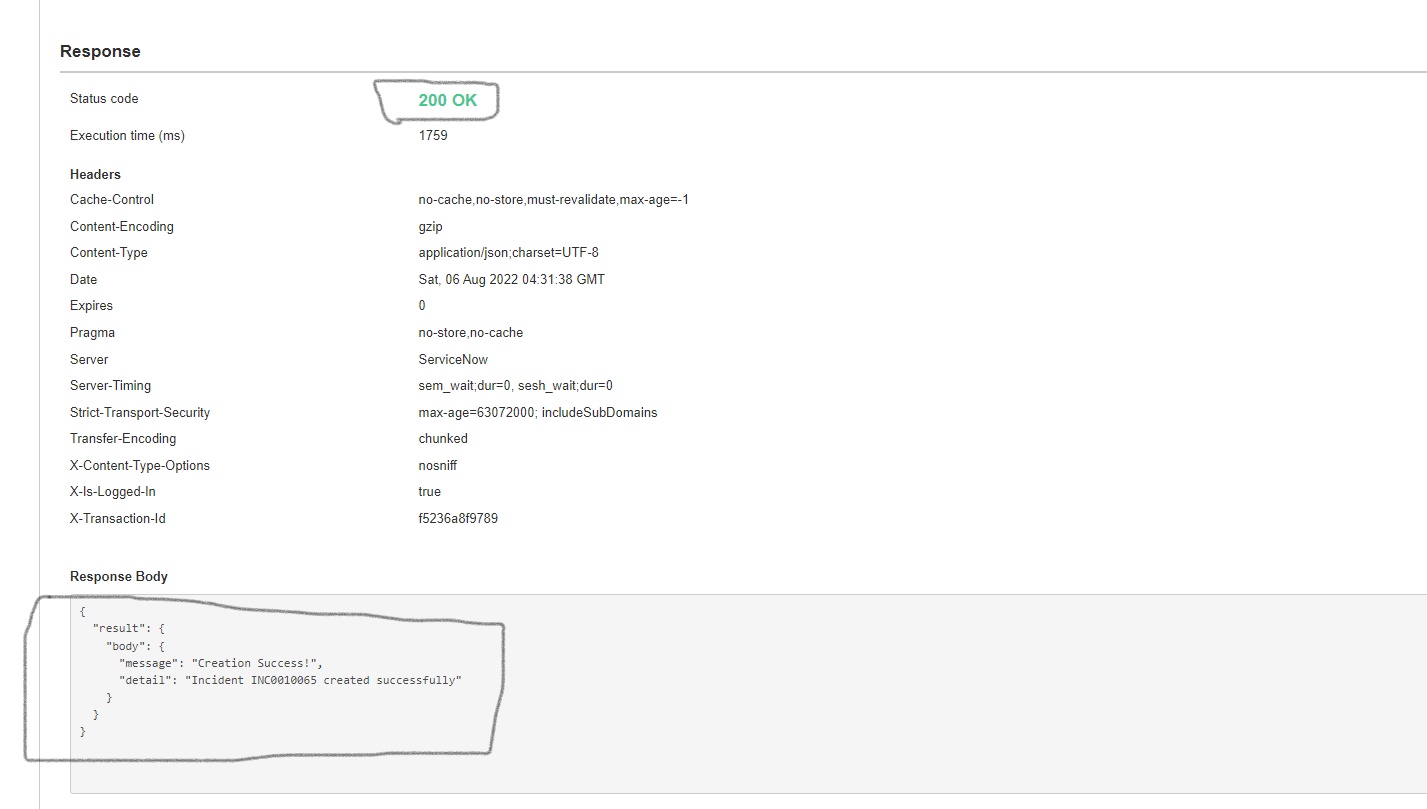
respObj.body = {
"message": "Creation Success!",
"detail": "Incident " + grinc.number + " created successfully"
};
} else { //ignore the creation if there is no caller info
this.status = '400';
respObj.body = {
"message": "Incident Ignored",
"detail": "Caller email is not received from Request"
};
}
if (this.status == '200') {
response.setBody(respObj);
response.setStatus(this.status);
return response;
} else {
var setError= new sn_ws_err.ServiceError(); //this API used to set the custom error messages
setError.setStatus(this.status);
setError.setMessage(respObj.body.message);
setError.setDetail(respObj.body.detail);
return setError;
}
})(request, response);
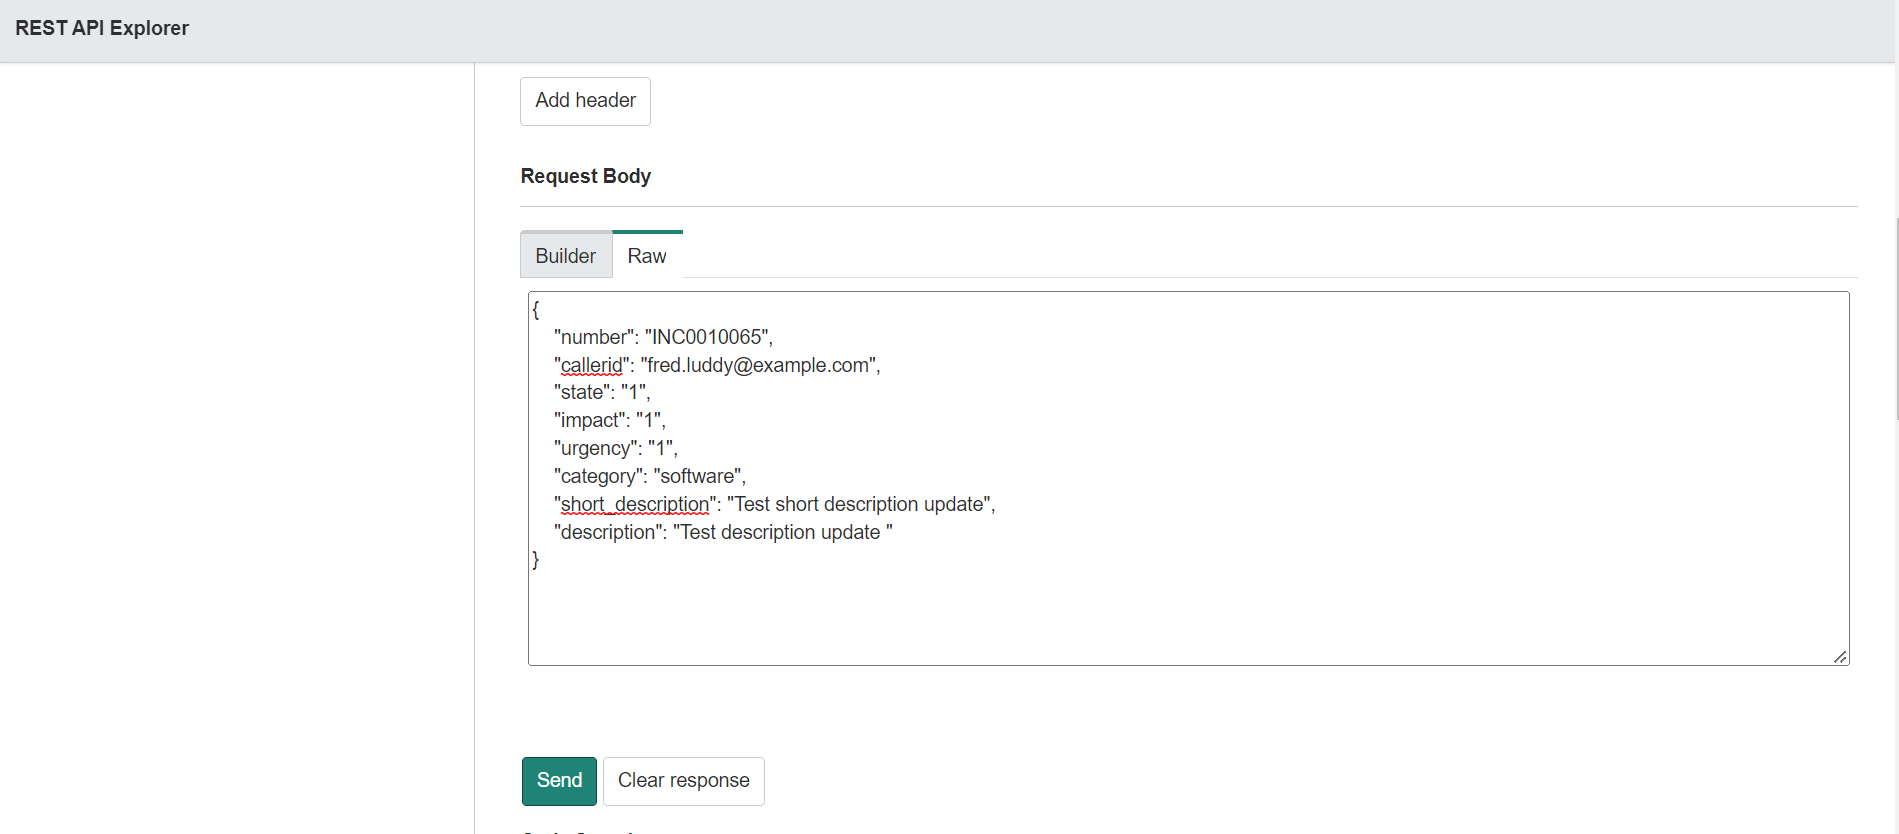
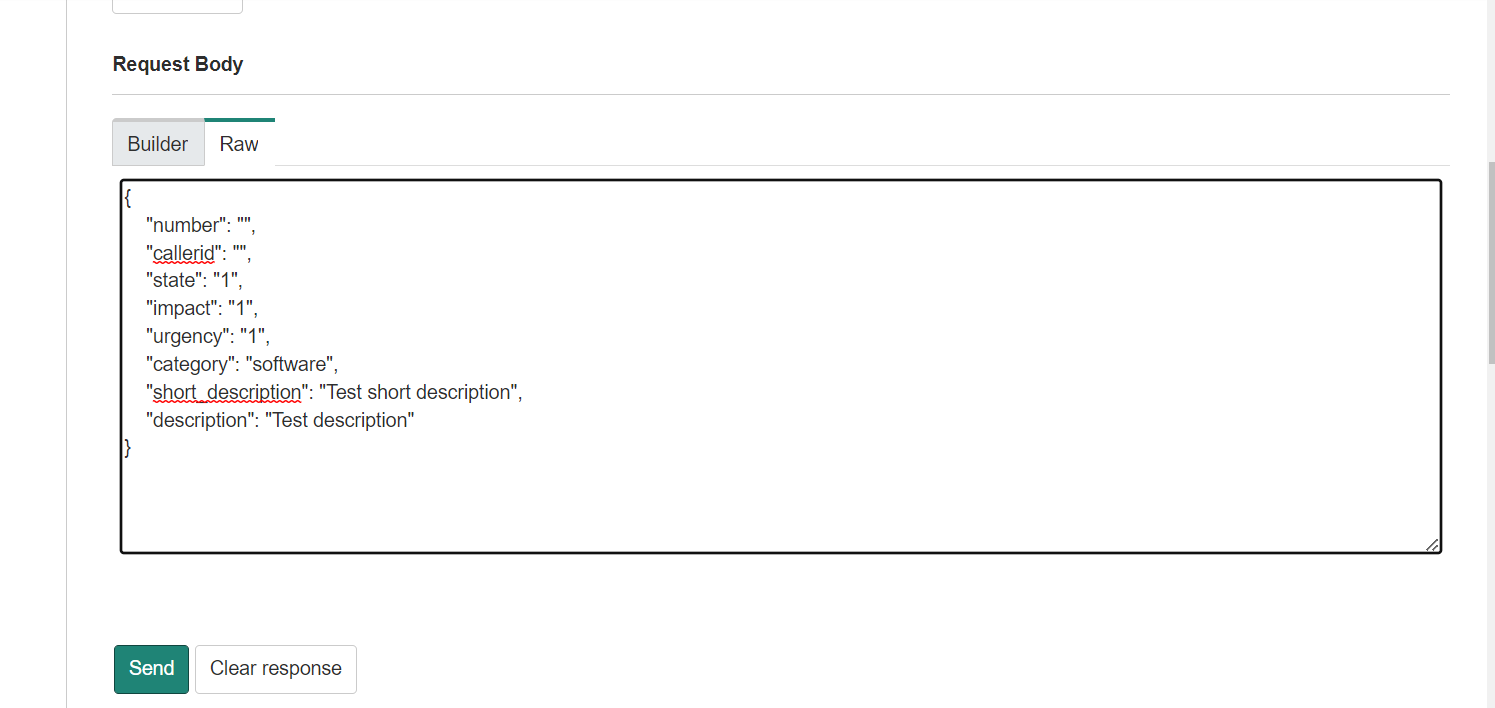
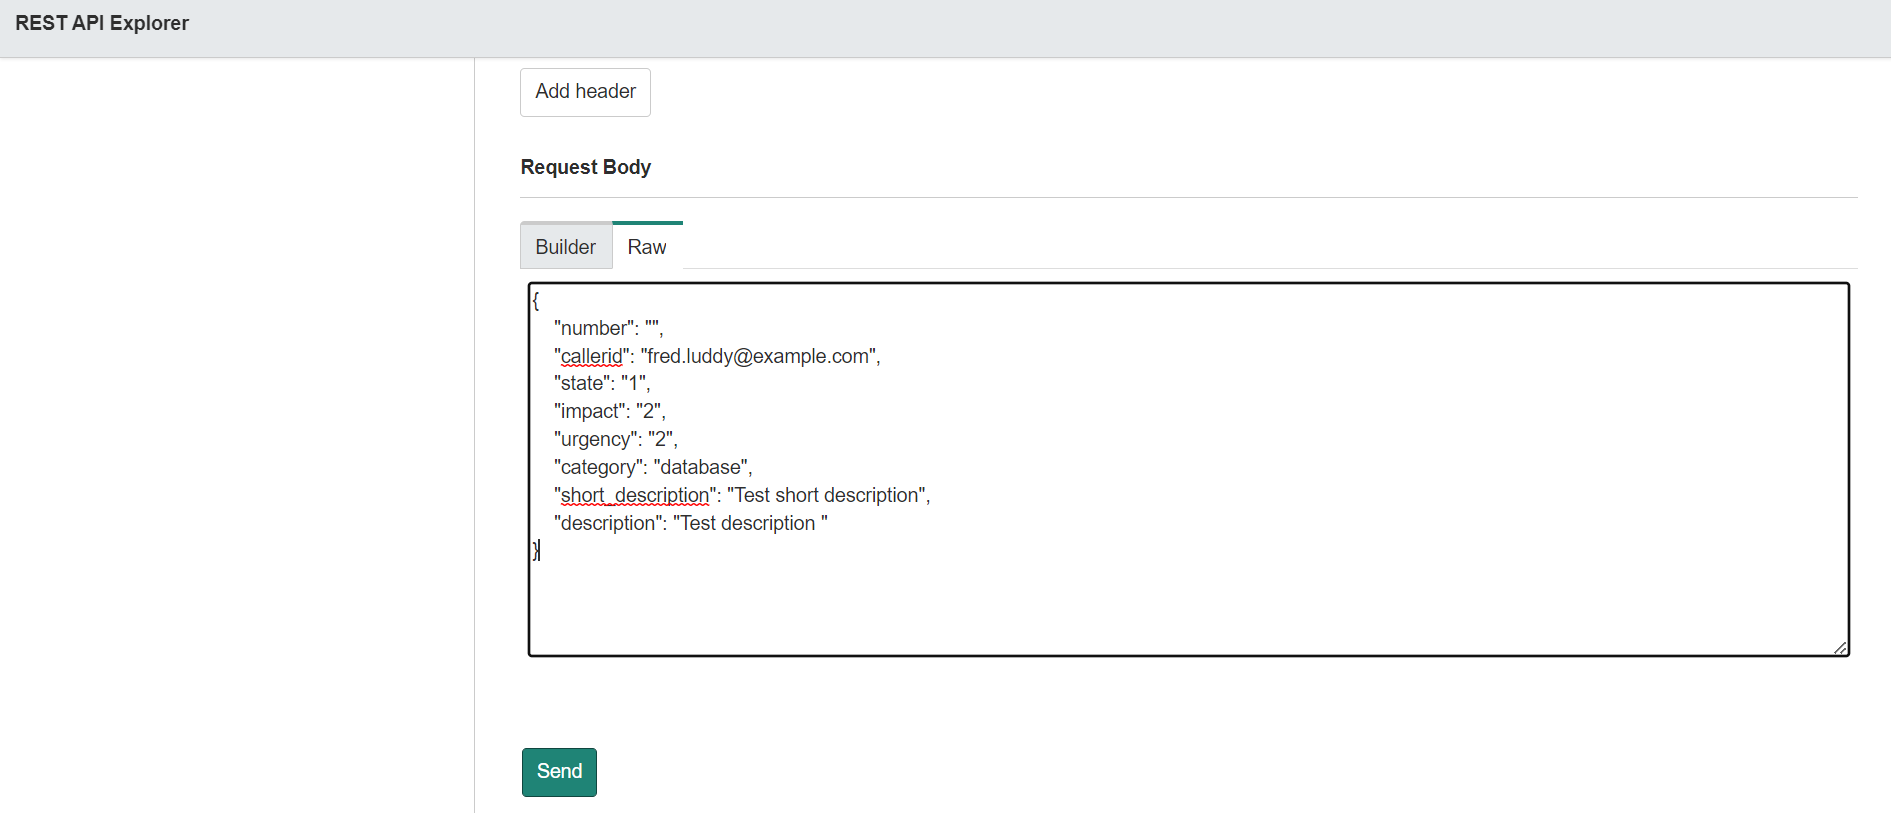
8. JSON Format: Below is the JSON format which will test using the postman.


If it helps to you please Mark it as helpful and add comment if you have anything. Thanks!!
- 26,324 Views
- Mark as Read
- Mark as New
- Bookmark
- Permalink
- Report Inappropriate Content
i trying the same for change table its not updating the record.
iam not getting anything in the response body.

(function process( /*RESTAPIRequest*/ request, /*RESTAPIResponse*/ response) {
this.status = '200';
var respObj = {}; //declare the response object
var payload = request.body.data; //retrieving the JSON body
var changenumber = payload.number; //getting the number from JSON
var statechange = payload.state;
var grchange = new GlideRecord("change_request");
grchange.addQuery('number', changenumber);
grchange.next();
if (grchange.next()) {
grchange.state = statechange;
grchange.update();
this.status = '200';
respObj.body = {
"message": "Updation Success!",
};
}
})(request, response);


.jpg)
.png)
.png)
.png)
.jpg)
.jpg)
.png)
.png)
.png)
.jpg)
.png)
.jpg)
.png)
.png)
- Mark as Read
- Mark as New
- Bookmark
- Permalink
- Report Inappropriate Content
s
- Mark as Read
- Mark as New
- Bookmark
- Permalink
- Report Inappropriate Content
Hi,
Post this request as question and tag me. I'll respond
Thank you,
Palani
- Mark as Read
- Mark as New
- Bookmark
- Permalink
- Report Inappropriate Content
ANSWER HERE:
https://community.servicenow.com/community?id=community_question&sys_id=da832129dbb59198bb4a474d13961996
- Mark as Read
- Mark as New
- Bookmark
- Permalink
- Report Inappropriate Content
Hi @surya76 ,
Sorry if it too late.
Yes that is expected because you re not setting the response after update you are just storing response.
Try below code.
(function process( /*RESTAPIRequest*/ request, /*RESTAPIResponse*/ response) {
this.status = '200';
var respObj = {}; //declare the response object
var payload = request.body.data; //retrieving the JSON body
var changenumber = payload.number; //getting the number from JSON
var statechange = payload.state;
var grchange = new GlideRecord("change_request");
grchange.addQuery('number', changenumber);
grchange.query(); //it is required to query the data
if (grchange.next()) {
grchange.state = statechange;
grchange.short_description = sdchange;
grchange.update();
this.status = '200';
respObj.body = {
"message": "Updation Success!"
};
}
//Need to set the response based on status code
if (this.status == '200') {
response.setBody(respObj);
response.setStatus(this.status);
return response;
}
})(request, response);
Thanks,
Pavankumar
- Mark as Read
- Mark as New
- Bookmark
- Permalink
- Report Inappropriate Content
For integration need to create username and password via which third party will create incident. Where to create that user and provide third party?
- Mark as Read
- Mark as New
- Bookmark
- Permalink
- Report Inappropriate Content
Sharing this tutorial to complement the article that demonstrates good coding practices like object oriented programming, service oriented architecture, global logging techniques, SOLID design patterns. Implementing a fully reliable, scalable and reusable code.
How to Call Third Party REST API Integrations in ServiceNow Using GlideAjax & Script Includes
Dynamic Script Include and GlideAjax in ServiceNow: Scalable & Reusable Code for Architects