


sabell2012

Mega Sage
Options
- Subscribe to RSS Feed
- Mark as New
- Mark as Read
- Bookmark
- Subscribe
- Printer Friendly Page
- Report Inappropriate Content
09-25-2016
03:28 AM
NOTE: MY POSTINGS REFLECT MY OWN VIEWS AND DO NOT NECESSARILY REPRESENT THE VIEWS OF MY EMPLOYER, ACCENTURE.
DIFFICULTY LEVEL: INTERMEDIATE
Assumes basic knowledge and/or familiarity of CMDB and CI Relationships in ServiceNow.
____________________________________________________________________________
In my previous two articles on Business Services I mentioned a couple of things that needed to be done after installing the Software Asset Management plug-in.
My two articles (in case you wanted to see the use-cases for these modifications):
Pragmatic Patterns — Basic Business Service Management Patterns
Pragmatic Patterns — Hybrid Business Service Management Patterns
The two labs I will be presenting here are:
Lab 1.1 How to Establish a new Relationship between Software Packages and Software Installs (this was mentioned in my first article)
Lab 1.2 How to Remove the Old Software Installs Related List Tab on a Computer CI Form and Replace With the New (Ibid.)
Pre-requisites:
Installation of the Asset Management plug-in.
Installation of the Software Asset Management plug-in.
So let's get started!
Lab 1.1 How to Establish a new Relationship between Software Packages and Software Installs
In this first I will be using a technique that Ben Sweetser (bsweetser) used to help someone else on the community (see: Software Installs not listed in the CMDB?).
The technique? Creating a related list between a parent table and the child (list) table using a System Definition -> Relationship record. Cool beans!
1. Navigate to Configuration -> Base Items -> Software. The Software Packages list will be displayed.
2. Pick your favorite software package. The Software Package form will be displayed.
At the bottom of the form you should see two tabs displayed. One will be the Installed On tab. You will notice that it is empty. If you go to any other Software Package records you will observe that this is the same for them as well. This is expected behavior as the Software Asset Management Plug-in shifts that data, and populating code out from the Software Instance table and moves it to the the SAM Software Installs table.
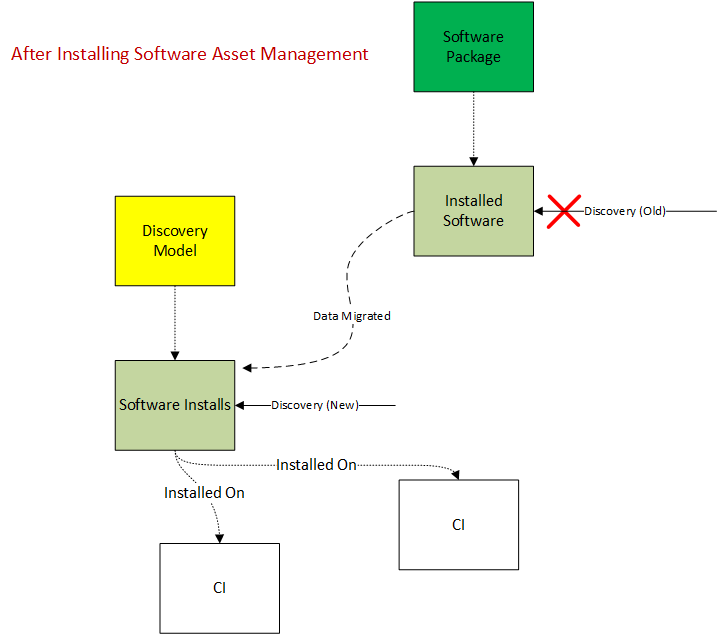
The tables described here are: Software Package (cmdb_ci_spkg), Software Instance (Installed On) (cmdb_software_instance), Software Installs (cmdb_sam_sw_install), and Discovery Model (cmdb_sam_sw_discovery_model).
So the Software Packages form looks a bit like this after SAM Plug-in Install:
Next we will need to create a Relationship query that will establish a link between the parent table (Software Package), and the child table (Software Installation).
3. Navigate to System Definition -> Relationship. The Relationships list view will be displayed.
4. Click on the New button. The New Relationship form will be displayed.
5. Fill out the form with the following:
a. Name: Software Installations for Software Pkg
b. Applies to table: Software [cmdb_ci_spkg]
c. Queries from table: Software Installation [cmdb_sam_sw_install]
d. Query with:
(function refineQuery(current, parent) {
current.addQuery('display_name', parent.name);
current.addQuery('version', parent.version);
})(current, parent);
e. Click on the submit button to save your work.
Note: As you can see we are keying off of the software name and version to establish the parent/child link. Applies to table is the parent. Software Installation is the child.
Your form should look something like this:
To finish up, all we have to do is go back to the Software Package form and swap out the related lists.
6. Navigate to Configuration -> Base Items -> Software. This will display a list view of the Software Package form.
7. Pick any of the existing Software Packages. This will display the chosen Software Package form.
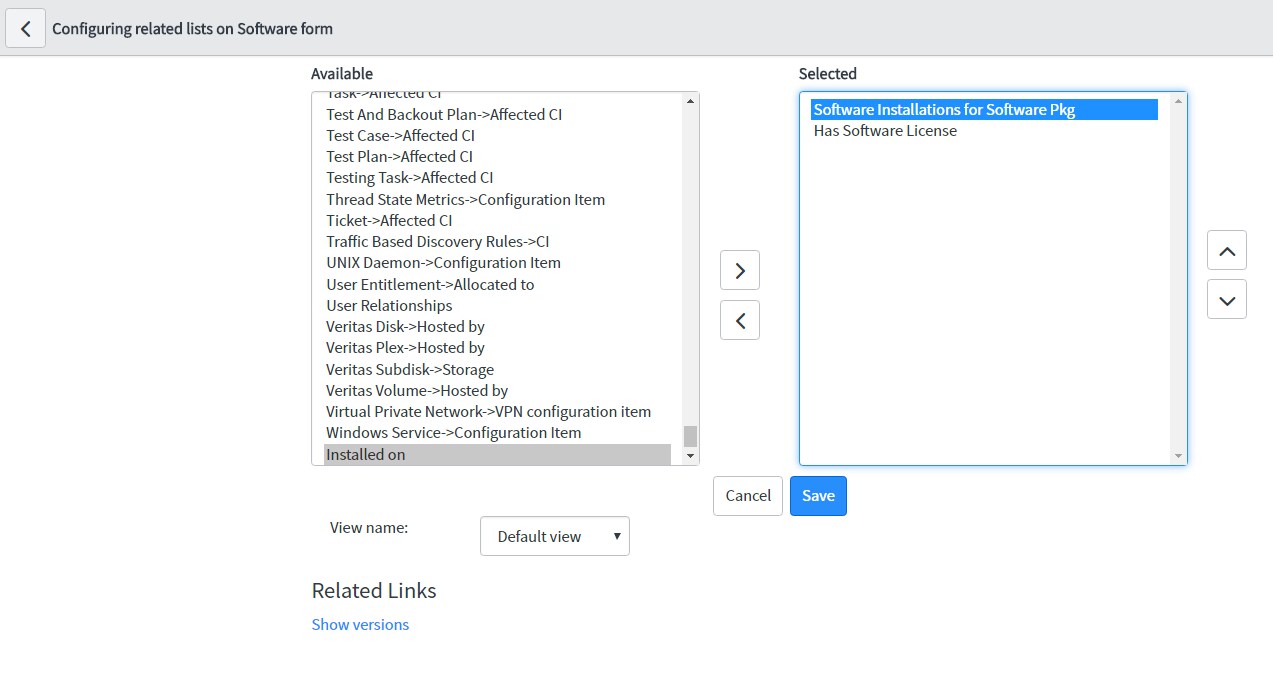
8. Right click on the form head and choose Configure -> Related Lists from the context menu. This will display the related list choice form.
9. Remove the Installed on related list, and search for and add the new Software installation for Software Pkg related list.
10. Click on the Save button to save your work.
Your Software Package form will be redisplayed with the new related list. You should now see a populated list view (if any records exist). Your form should look something like this:
The new architecture is now this:
11. As a final step you will need to go to the Discovery Probe Results Cache (discovery_probe_results_cache) table and delete all the records in the table. This forces the Discovery process to repopulate the Software Install relationships. If you do not do this step you will find possibly a considerable number of records not updating in the Software Installs and Discovery Models tables. This step is NOT automatically done for you when installing the SAM plug-in. This must be done to rebuild those relationships! (Thanks Richard Mallard - richardfmallard for pointing this final step out)
That's it for restoring the Software Installs back onto the Software Package form. Now let's move on to cleaning up the Computer CI form.
Lab 1.2 How to Remove the Old Software Installs Related List Tab on a Computer CI Form and Replace With the New
So if you have installed the SAM plug-in you probably noticed that the Software Installed related list at the bottom of some of the CI forms was no longer populated. This is the same problem we ran into with the Software Package table. Well we resolve this in exactly the same way as we did with that.
1. Navigate to Configuration -> Base Items -> Computers. The Computers list view will be displayed.
2. Choose one of the computers listed. The computer form will be displayed.
This is what your form will look like prior to the modification:
3. Right click on the form head and choose Configure -> Related Lists from the context menu. This will display the related list choice form.
4. Remove the Software Installed related list (this is the same as the Installed On in the Software Package table). Search for and add an already existing related list named Software installation->Installed on. This was created by the SAM plug-in for this purpose.
5. Click on the Save button to save your work.
Your form should now look something like this with the related list showing what software is installed on that device:
You have now completed the two cleanup tasks that I consider necessary after the installation of the SAM plug-in.
Have fun!
Steven Bell
For a list of all of my articles: Community Code Snippets: Articles List to Date
Please Share, Like, Bookmark, Mark Helpful, or Comment this blog if you've found it helpful or insightful.
Also, if you are not already, I would like to encourage you to become a member of our blog!
- 3,881 Views
You must be a registered user to add a comment. If you've already registered, sign in. Otherwise, register and sign in.
