- Post History
- Subscribe to RSS Feed
- Mark as New
- Mark as Read
- Bookmark
- Subscribe
- Printer Friendly Page
- Report Inappropriate Content
on 08-15-2022 05:09 AM
Welcome to another episode of:

Recently there have been multiple articles covering tabs in configurable workspaces, so why not make it a series 😉
This article will cover how to add Playbook as a Record Page Tab to a Configurable Workspace using UI Builder.
The end result will look something like the below:

Before going through this guide, I recommend watching this video explaining some concepts of pages in UI Builder.
This guide you can follow along with the video below, as well as via the written directions and needed snippets you can copy/paste below.
This tutorial assumes you have the following installed on your instance:
- Playbook Experience
- CSM / FSM Configurable Workspace
- Process Automation Experience Demo
This demo is done in a Tokyo instance, afaik the process is the same in San Diego / Rome, except for some cosmetics.
Watch the video and follow along in this article!
1. Create a Playbook helper page in UI Builder
In UI Builder we will create a helper page. As we have seen in the intro video, we can not fully configure the tab page in UI Builder, however, it can be a great foundation that easily gets the basic UI and component configuration of our page in place. Refer to the video for detailed steps
Recommended values:
Name: Playbook Helper
Add properties to body component: table, sysId
Test values for Body Component:
Table: interaction
sysId: -1
Note: the values table and sysId will be passed in by the Record Page tabs component. In the helper page we will keep them hardcoded, later we will change it to be dynamic in the actual Playbook Tab screen.
Values for Playbook 1 Component:
Parent table: @context.props.table (dynamic data binding)
Parent Sys Id: @context.props.sysId (dynamic data binding)
Activity view: Focused (This view looks better imho)
2. Create Screen collection record (sys_ux_screen_type)
Your screen collection is a set of one or more tabs that can show up in the tabs section of your record in your Workspace. (They may be used for other purposes as well).
In this case, we only define one tab.
Create a new record in sys_ux_screen_type
Recommended value:
Name: Playbook Tab
3. Create Route record
After saving the collection record, the route record can be created via the related list in the collection record
Recommended values:
Name: Playbook (This is the value that will show in the workspace as the tab name)
Route: playbook-tab
Screen collection: Playbook Tab (Prefilled, Name of the screen collection, step 2)
App Configuration: Name of your Workspace
Parent Macroponent: Record Page Tabs (important)
Parent Macroponent Composition Element ID: ckiiwfdnffoaaaabbbbddghhdamgvmbbbba
(OOB value. Be sure to double-check your configuration, as shown in the video.)
Order: 0 (Note the order field is not on the form, but it is in the related list. The Details tab has an order of 100, below 100 shows playbook left of the details tab, above 100 to the right)
4. Create UX Screen record
We will first get the basics of the screen record in place, latter this must be amended, in order to get the properties passed.
Recommended values:
Screen Name: Playbook Tab
Screen Collection: Playbook Tab (Prefilled, Name of the screen collection, step 2)
Page Defenition: Playbook Helper (Name of the UI Builder Page, step 1, may get a suffix: default)
Parent Macroponent: Record Page Tabs
5. Check if tab is present in UI Builder
Create a new interaction. The playbook record should now be visible, but with an error.
6. Modify UX Screen from step 4
Open the Playbook Helper variant definition in UI Builder via Menu > Developer > Open variant
Copy the JSON of the field Macroponent Configuration. Paste the value in the Macroponent Configuration field of the created Playbook Tab UX Screen Record.
In the Playbook Tab UX Screen record, replace the configuration of the table and sysId field. Modifying this in UI Builder would break UI builder, as the parent component of Playbook Helper does not have these properties, whereas the parent Record Page Tabs of Playbook Tab does have these properties.
The new JSON for table and sysId is:
  "sysId": {
    "type": "CONTEXT_BINDING",
    "binding": {
      "address": [
        "sysId"
      ],
      "category": "props"
    }
  },
  "table": {
    "type": "CONTEXT_BINDING",
    "binding": {
      "address": [
        "table"
      ],
      "category": "props"
    }
  },
Probably the Event Mapping field of the variant is empty, if not copy this as well to the Playbook Tab screen.
7. Refresh Workspace
Refresh the workspace tab. It should now show the correct Playbook for the record. In our case a Record Generator.
We now finished the foundation, in the next steps we need to wire up event handlers and a condition script.
8. Add record generated event
When using a record generator, we need to add an event handler, that redirects to the newly generated record when we save or complete our first step in the playbook.
First, let's create a client script in UI Builder
Name: Playbook Record Generated
Script:
function handler({api, event, helpers, imports}) {
    helpers.screen.updateStatus({
        "screenParams" : {
            "table" : event.payload.table,
            "sysId" : event.payload.sysId
        }
    });
}
Save the record and assign this event to the Record Generated Event of the playbook component.
You can test the step by refreshing the Workspace and clicking Continue. This should now create an Interaction and open it.
Note: The client script is attached at the macroponent level, not the screen level. In this case, we do not need to copy the event mapping details from the Playbook Helper screen to the Playbook Tab screen.
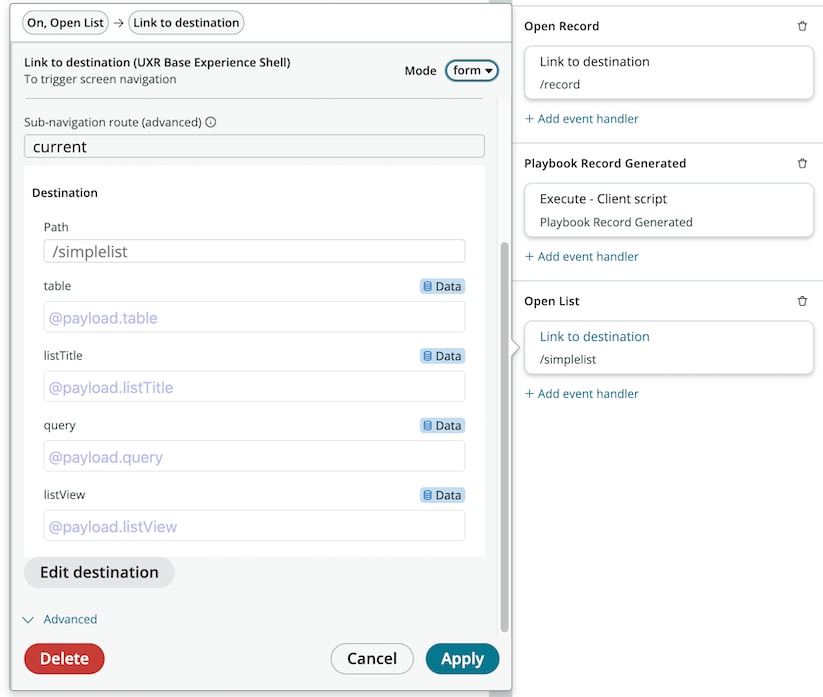
9. Add Open Record event handler
Within the playbook there may be links to other records, that is why we need to handle the Record Open event.
Add an event mapping to the Open Record event. From Inherited event handlers, select:
Link to destination
From there click Edit destination and enter the following values
Path: /record
table: @payload.table
sysId: @payload.sys_id
Sub-navigation route: current
Add an event to the Open Record

Note: In the next step, we will sync the event mapping data from the Helper SCreen to the Tab Screen. At this point, the event will not work in the tab.
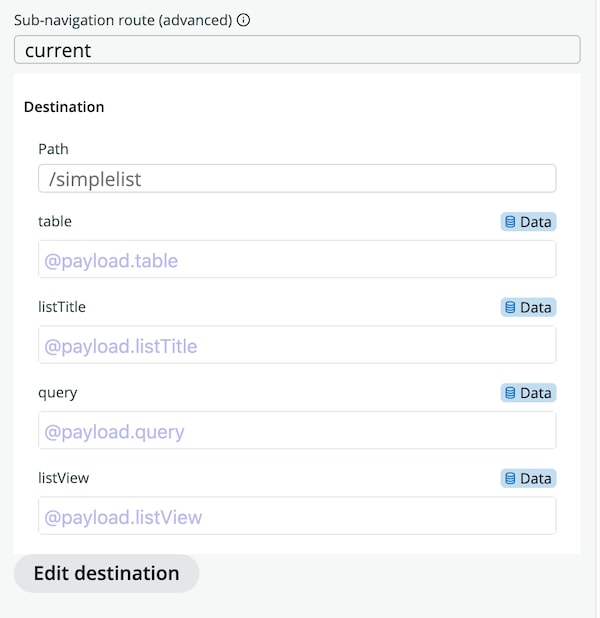
10. Add Open list event handler
The next step is very similar. We have a step that opens a list, this also needs an event mapping.
Fill it in as follows:
Path: /simplelist
table: @payload.table
sysId: @payload.sys_id
listTitle: @payload.listTitle
query: @payload.query
listView: @payload.listView
Sub-navigation route: current

The event mapping data is stored at screen level, so we need to copy the Event Mapping JSON object from the Playbook Helper screen record, to the Playbook Tab record.
After this is setup copied and saved, do another test.
Find a link in your playbook and click it. Does it open the record?
11. Screen condition
While testing, you may have noticed that the tab now shows up in cases where there is no Playbook available. In order to prevent this, our last step is adding a screen condition. This can be done from the PlayBook Tab UX screen, UX Screen Conditions Related list
Values:
Scripted condition: checked
Script:
(function playbookScriptFunction(params) {

	var grPlaybookCheck = new GlideRecord(params.table);
	if(params.sysId == - 1) grPlaybookCheck.newRecord();
	else if(!grPlaybookCheck.get(params.sysId)) return false;

	return sn_playbook.
			PlaybookExperience.
			parentRecordContainsPlaybook(grPlaybookCheck);

})(inputProperties);
When this is saved, go back to Workspace, open or reload a record that has no playbook. The tab should no longer be visible.
12. Test
We should now be done. Please do an integral test, and make sure everything works as expected.
Be sure the changes to the JSON properties in step 6 are still in place and that the event mapping field is in sync.
13. Closing thoughts
As you have experienced, there are a bunch of steps needed to get this requirement working.
The reason why there are manual steps required is that the UI Builder Page is used out of the normal context of a Page but as a nested component.
For me, diving into this was an eye opener, why building some requirements involve more steps than you would expect or hope. If you followed along the journey, I hope you feel the same!
- 28,204 Views
- Mark as Read
- Mark as New
- Bookmark
- Permalink
- Report Inappropriate Content
This is helpful. I followed a different approach to make it work.
1. Go to your custom workspace and open "Record" page.
3. Notice the component "Record Page Tabs" and edit it.

4. In Component builder open the page "Playbook" or "Playbook Screen Collection".
5. Create your own page exactly like it. Only difference would be to use your own playbook experience in "Playbook Experience" property.

6. The new experience can be created in "sys_playbook_experience" table. You can refer any of the existing experience configuration to create your own.
And this is how it worked for me. 🙂
- Mark as Read
- Mark as New
- Bookmark
- Permalink
- Report Inappropriate Content
Hi,
Will this playbook configuration work on sc_task form on CSM workspace?
Please help!
Thanks,
Sri
- Mark as Read
- Mark as New
- Bookmark
- Permalink
- Report Inappropriate Content
You are my hero. I created this playbook for demand record and it was successful!
- Mark as Read
- Mark as New
- Bookmark
- Permalink
- Report Inappropriate Content
@Sri56 I think CSM Workspace already has a playbook tab out of the box, so this should not be needed. Just create a Playbook in PAD, activate it, and test if it shows on your sc_task record when opened I would say.
@Tae Kyung Lee That's great!
- Mark as Read
- Mark as New
- Bookmark
- Permalink
- Report Inappropriate Content
Thank you for this great article Arnoud. FYI in Tokyo, App Engine Studio features a new Workspace Builder that makes this process effortless and quick.

- Mark as Read
- Mark as New
- Bookmark
- Permalink
- Report Inappropriate Content
Hi Team, is it possible to open multiple lanes within playbook in parallel
for example lets assume i have
Right now we have all the questions stored in a table which has all the questions
Lane1
- question-1
- question-2
- question-3
- question-4
Lane 2
- question-1
- question-2
- question-3
- question-4
Lane 3
- question-1
- question-2
- question-3
- question-4
********
now if i want to open up all the lanes in parallel so that multiple agents can update without performance impact
- Mark as Read
- Mark as New
- Bookmark
- Permalink
- Report Inappropriate Content
Hello,
can we configure playbooks in the contextual side panel of CSM / FSM Configurable Workspace?
I cannot find information related to this, has somebody been able to acomplish this?
We have playbooks configured for some type of records in our old agent workspace, but I can't find a way to configure this in CSM / FSM Configurable Workspace.
Thanks
- Mark as Read
- Mark as New
- Bookmark
- Permalink
- Report Inappropriate Content
Hi all,
Just wanted to leave this piece of information here. If you're using the new Record Page template, adding a Playbook is as easy as creating a new tab and using the Playbook component that Arnoud Kooi used and binding the sysId and table from the parameters doing @context.props.sysId and @context.props.table
- Mark as Read
- Mark as New
- Bookmark
- Permalink
- Report Inappropriate Content
Hello Arnoud.
I need to implement Screen Condition for one tab on certain UX Screen. But I don't understand what the name of function I should provide in the UX Screen Condition script.
Could you please clarify this moment.
- Mark as Read
- Mark as New
- Bookmark
- Permalink
- Report Inappropriate Content
I've now spend a lot of time trying to get this running on the current Service Operations Workspace. It turns out, SOW does NOT use the "Record Page Tabs" macroponent, at least not on my PDI (Washington P1). Checking the "SRP Record" page variant of the record page, you will see it uses "normal" tabs. The tabs point to 3 page colections, SOW - Record tabs left, middle and right. These work in a similar fashion as above (using Screen Type, Screent and Route), but with a different parent macroponent AND connected to a UX Extension Point (leave parent macroponent empty in route and screen). In your UX App Route, you need to add one of the SOW - Record tabs (left, middle, right) as an extension point AND clear your cache and then your tab should pop up.
- Mark as Read
- Mark as New
- Bookmark
- Permalink
- Report Inappropriate Content
I first attempted to add it to a custom workspace, and then tried using App Engine Studio's Workspace Builder. With that approach I was only able to edit original record pages created with App Engine Studio, but not page variants. However, it did provide insight into how to setup it with UI Builder, which was quite straightforward to replicate in a page variant.
Workspaces and their building tools are constantly evolving, and to my experience UIB has become easier to use in many cases.