- Post History
- Subscribe to RSS Feed
- Mark as New
- Mark as Read
- Bookmark
- Subscribe
- Printer Friendly Page
- Report Inappropriate Content
on 02-23-2021 07:34 AM
Purpose: The purpose of this article is to provide a step-by-step guide to stand up a MidServer. I used Quebec to future proof this as much as possible, but this should be very close to the procedure in Paris as well.
ServiceNow Version: Quebec EA Instance (Hot Fix 2)
Document Reference: https://docs.servicenow.com/bundle/quebec-servicenow-platform/page/product/mid-server/concept/mid-server-install-prereqs.html
Step-by-Step:
Navigate to ITOM Guided Setup in the Application Picker
Select MID Server

- Create Mid Server User
-
- Username: MidServer (or any other username you prefer)
- Password: <password1> (select your own password)
- Download and Install MidServer from your instance for the appropriate OS
-
- For this example I have downloaded Windows x64 and am using Server 2019 to install the Mid Server
- Refer to this document for Mid Server System Requirements: https://docs.servicenow.com/bundle/quebec-servicenow-platform/page/product/mid-server/reference/r_MIDServerSystemRequirements.html
- Download the Windows .msi file
-
- Note: Support for MidServer installations from Quebec forward is 64-bit only.
- Copy the file to C:\DBD3 MidServer\ <-- Substitute your directory name and path here
- On you Windows Server - run the MSI Installer for the Mid Server
- Configuring MID Server Connection Settings
-
- ServiceNow Instance URL: https://dbd3demo.service-now.com/ (make sure to include https:// and substitue the URL of your ServiceNow instance)
- ServiceNow MID Server Username: MidServer (Use the username that you create earlier)
- ServiceNow MID Server Password: <password1>
- Leave the use proxy box unchecked (check if appropriate in your environment)

-
- Test your Connection

-
- Close
- Next
- Before proceeding to "Configure MID Server Service Settings" you will need to have a user configured with "Log on as a service" privleges.
-
- Important Note: The Windows user CAN NOT be an administrator level account
- If this setting is available on your server, here is the procedure to configure the user correctly:
-
- 1. Go to Start > Programs > Administrative Tools > Local Security Policy.
- 2. Expand Security Settings > Local Policies > User Rights Assignment.
- 3. Right-click Log on as a service from the right panel and click Properties.
- 4. Select the Local Security Setting tab.
- 5. Click Add User or Group button.
- 6. Key in the account name and click OK.
- 7. Click Apply and OK.
- 8. Close all open windows.

-
- It is possible that this role is also governed by Group Policy
- Note: If you are configuring this role in Group Policy for the first time, I ran into an issue where I overwrote other Log on as a Service users that were configured locally on other servers. I suggest using a seperate GP Profile if you are adding this to Group Policy for the first time.
- Configure MID Server Service Settings
-
- MID Server Name: DBD3_MidServer <-- Replace with the name of you mideserver
- Service Account Name: Deitsch\ServiceNow.dbd3 <-- This is the Log on as a Service user that you configured above
- Service Account Password: <password2> <-- The password for the user

-
- Press "Validate MID Service Settings"

-
- Close
- Next
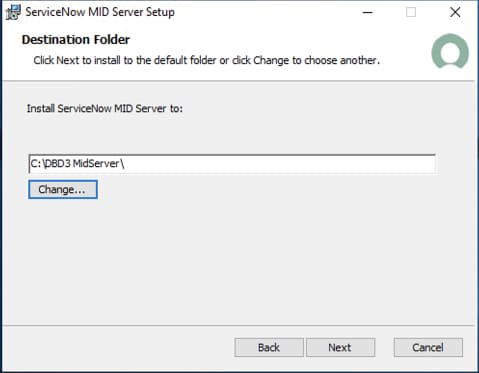
- Destination Folder
-
- C:\DBD3 MidServer\ <-- Substitute your destination folder here

-
- Next
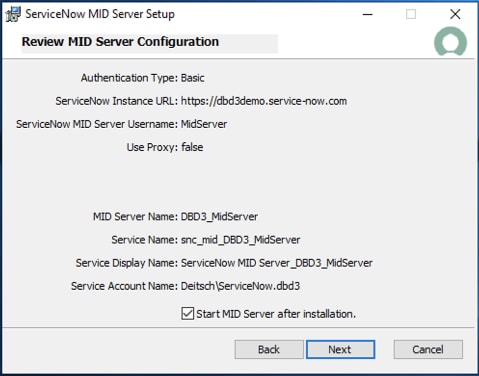
- Review MID Server Configuration
-
- Check the box for "Start MID Server after Installation"

-
- Next
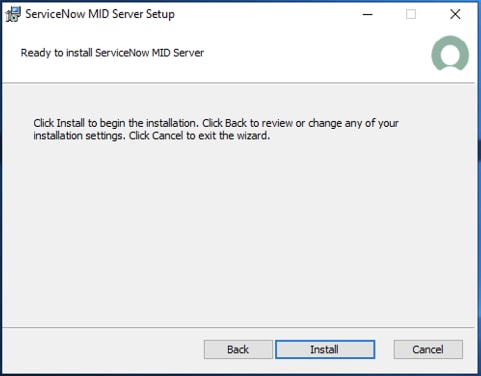
- Ready to install ServiceNow MID Server

-
- Install

-
- Finish
- Validate the Mid Server
-
- Open the Mid Server and Click "Validate

-
- Configure as desired and press "Save"

-
- Wait about 1 minute and refresh

Conclusion
This completes the setup of your ServiceNow MidServer. If something did not go as described, or there are any questions, please feel free to leave a comment and I will be happy to edit or add tot his post.
- 4,478 Views
- Mark as Read
- Mark as New
- Bookmark
- Permalink
- Report Inappropriate Content
Great write-up!!
- Mark as Read
- Mark as New
- Bookmark
- Permalink
- Report Inappropriate Content
Super easy to follow and the "gotchas" or "what out for" were pointed out very timely.
- Mark as Read
- Mark as New
- Bookmark
- Permalink
- Report Inappropriate Content
6. Key in the account name and click OK.
What is this.I cannot put value as it is asking object name.What exact it is