- Post History
- Subscribe to RSS Feed
- Mark as New
- Mark as Read
- Bookmark
- Subscribe
- Printer Friendly Page
- Report Inappropriate Content
on 05-17-2021 09:00 PM
Hello Everyone,
I would like to share one of my work that might helpful to my fellow ServiceNow colleagues i.e. ‘Date Certification’ like ‘Dev-Ops style pipeline’ once it is completely set-up.
Notes:-
1) Generally my articles are lengthy in nature as I try to give all details, so whoever goes through it get all details and able to complete the job end to end.
So, please be patient and take some time to go over my articles.
2) I am just sharing my way of completion and being owner of ‘very less ego’ & ‘always learner mentality’ I welcome for ‘feedback’. So, please feel free to comment on my articles without any hesitation.
Step by Step Data Certification Details
Dev-Ops pipeline type data certification

Pre-requisite for Success
1) The users who will be responsible for certifying the data has to do their job on time otherwise it will be stuck and whole process of touchless automation will be at stake. So, please communicate in all the possible modes to them before shooting the certification tasks to them with demo certification in non-prod environments, FAQ document preparation etc.
2) There will be some very bare minimum maintenance required to achieve this, all the maintenance steps are marked as ‘*’.
Sample Certification Process
In this entire process I will take the example of ‘Service (cmdb_ci_service)’ and the certification items will be ‘Description’ and ‘Operational Status’ by the ‘Managed by’ for that Business Service. But this can be used for any table and with any number of attributes.
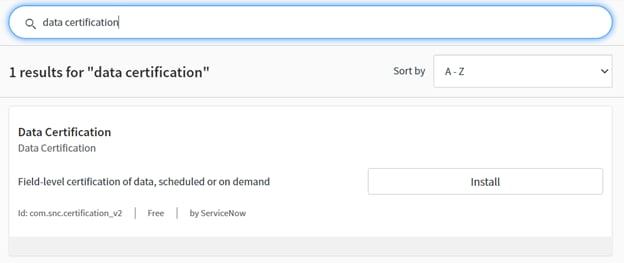
First Step – Free Data Certification Plugin Install
In the ‘Filter Navigation Pane’ on the left side type – ‘Plugin’ and then click ‘Plugin’ under ‘System Definition’ as shown in the below screenshot.

Then in the search pane type – data certification and the following free plugin will show up and to install it just click on ‘Install’ and it will be installed automatically.

Once the plugin will install successfully then in the navigation pane type ‘Data Certification’ and the following components will come up.

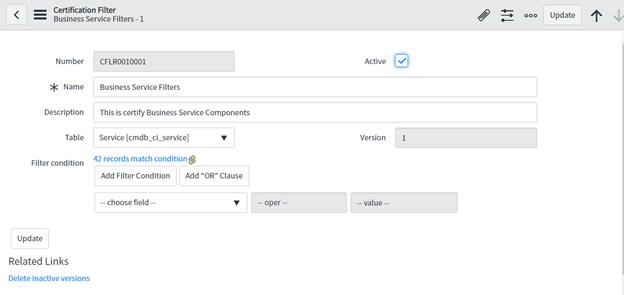
Second Step – Setting Up Data Certification Process Infrastructure
Now, type ‘Data Certification’ in the navigation pane and click on ‘Certification Filters’.

Then click on ‘New’ as per below screenshot.

Then create a ‘Certification Filter’ as per below screenshot and click on ‘Update’.
If required additional ‘Filter condition’ can be added also.

Once ‘Certification Filter’ creation has been completed then again type ‘Data Certification’ in the navigation pane and click on ‘Schedule Definitions’.

Now, click on ‘New’ as per below screenshot.

Then create a new certification schedule as per below screenshot (here I am assuming that the data is getting certified on each month and data certification mail is shooting 17th of each month and the certifier has 7 calendar days to complete the task, but all these can be changed as per wish) and click on ‘Update’.

Third Step – Custom Field Creation in Service (cmdb_ci_service) table
Type ‘tables’ in the navigation pane and click on ‘Tables & Columns’ as per below screenshot and then select on the ‘Service’ table as per below screenshot and click on ‘Edit Table’.

Then create the below mentioned columns as per the screenshot and all these columns will help to track the certification status for both admins as well as for any user of the servicenow platform.

For the new Column named – Certification Status (which is a choice field), please create the below choice field values.

Then type - Scripts – Background in the navigation pane which will bring the below screen and paste the below script.

Script –
var gr = new GlideRecord('cmdb_ci_service');
gr.query();
while(gr.next())
{
gr.u_certification_complete='Pending';
gr.update();
}
Fourth Step – Business Rule for filling up the custom fields created in the Third Step
Now, type – Business Rules in the navigation pane and click on the ‘Business Rules’ under ‘System Definition’.

Now,click on ‘New’ as per below screenshot.

Now it’s time to create a business rule which will populate the custom fields created on the above step as per exact below screenshot.

Put the below mentioned script in the advance section.
Script
(function executeRule(current, previous /*null when async*/) {
var closedDate = current.closed_at;
var closedBy = current.closed_by.getDisplayValue();
var date = new GlideDate();
date.setValue(current.closed_at);
date.addDays(23);//assuming that the certification will happen each month,so keeping it 23 days.It can be changed to any value.
var Cisys_ID;
var certDocs = new GlideAggregate('cert_element');
certDocs.addQuery('cert_task',current.sys_id);
certDocs.groupBy('id');
certDocs.query();
while(certDocs.next()){
Cisys_ID = certDocs.id;
updateServices(Cisys_ID,closedDate,closedBy);
}
function updateServices(Cisys_ID,closedDate,closedBy){
var updateCI = new GlideRecord('cmdb_ci_service');
updateCI.addQuery('sys_id',Cisys_ID);
updateCI.query();
if(updateCI.next()) {
updateCI.u_last_certification_date = closedDate;
updateCI.u_verified_by = closedBy;
updateCI.u_certification_complete = 'Completed';
updateCI.u_next_verification_date = date;
updateCI.update();
}
}
})(current, previous);
Fifth Step – Group & Role Creation for users to edit only the field they fail certified
Now, create a group and there all the ‘Managed by’ persons as ‘Group Members’ and then create a ‘role’ and add the newly created group in the role (suppose the newly created role name is – Data Certification Owners).
*Sixth Step – ACL Creation for field label control for Certifiers to edit only the field they fail certified
Now, create 5 ACL’s as per below situation –
1st ACL - cmdb_ci_service.none (operation=read) {give 2 role admin & Data Certification Owners}
2nd ACL - cmdb_ci_service.none (operation=write) {give 2 role admin & Data Certification Owners}
3rd ACL - cmdb_ci_service.operational status (operation=write) {Role = Data Certification Owners}
4th ACL - cmdb_ci_service. short_description (operation=write) {Role = Data Certification Owners}
5th ACL - cmdb_ci_service.* (operation=write) {Role = admin}
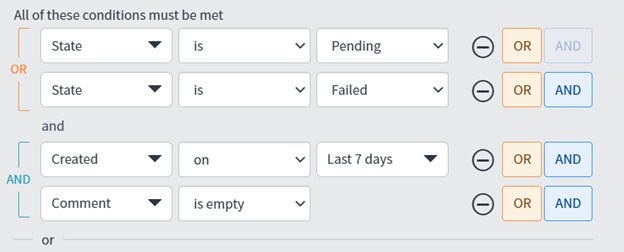
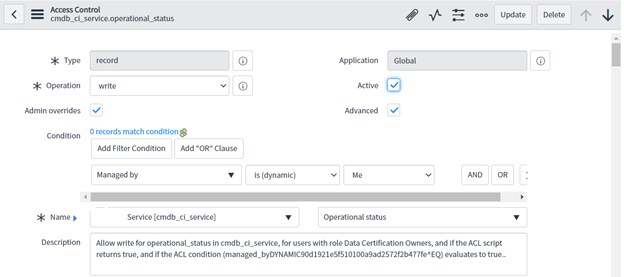
Now, please find below the ‘Operational Status’ ACL and the same has to be created for ‘Description’ in my example and this can be extended for any number of fields in real scenario.


Script
answer = false;
var cert_ele = new GlideRecord('cert_element');
var sys = current.sys_id;
cert_ele.addQuery('id', sys);
cert_ele.addQuery('element', '=', 'operational_status');
cert_ele.addEncodedQuery("certifiedBETWEENjavascript:gs.dateGenerate('2021-05-17','00:00:00')@javascript:gs.dateGenerate('2021-05-23','23:59:59')"); //the date and
time will be start date & time for start of certification and end date & time for the end of certification.This has to be changed manually at the start of each certification
schedule.
cert_ele.addQuery('state', '=', 'Failed');
cert_ele.query();
while(cert_ele.next()) {
answer = true;
break;
}
Seventh Step – Creation of future notification reminder
Now, type - Scheduled jobs in the navigation pane and the below screen will come and then click on ‘Scheduled jobs’ under ‘System Definition’.

Once that opens then click on ‘New’.

Then create a new job exactly as below.

Script
var currentDate = gs.now();
var abc = new GlideRecord('cmdb_ci_service');
abc.addQuery('u_certification_complete', '!=', 'Re-Certification Pending');
abc.addEncodedQuery("u_next_verification_date!=NULL");
abc.query();
while (abc.next()) {
var difference = gs.dateDiff(currentDate,abc.u_next_verification_date,false);
difference = difference.split(' ');
if (difference[0]< 10 && difference[0] >0) {
abc.u_certification_complete = 'Re-Certification Pending';
abc.update();
gs.eventQueue('data.certification', abc, abc.managed_by, abc.managed_by.getDisplayValue());
}
}
Eighth Step – Creation of event for next certification reminder notification
Now, type - Registry in the navigation pane and then click on the ‘Registry’ under ‘Events’ within ‘System Policy’ as per below screenshot.

Now, click on ‘New’ to create a new one as per below screenshot.

Now,create two new events exactly as per below screenshot.


Ninth Step – Creating a business rule for Real-Time Status Tracking
Now, type – Business Rules in the navigation pane and click on the ‘Business Rules’ under ‘System Definition’.

Now,click on ‘New’ as per below screenshot.

Now it’s time to create a business rule which will populate the real time status tracking of data certification status on each cycle.


Script
(function executeRule(current, previous /*null when async*/) {
var gru = GlideScriptRecordUtil.get(current);
var changedFields = gru.getChangedFieldNames();
var sys = current.sys_id;
var currentUser = gs.getUser();
var cert_ele = new GlideRecord('cert_element');
cert_ele.addQuery('id', sys);
cert_ele.addQuery('state', 'Failed');
cert_ele.addQuery('element', changedFields);
cert_ele.query();
while(cert_ele.next()) {
cert_ele.comment = 'The record has been corrected.';
cert_ele.update();
}
})(current, previous);
Tenth Step – Creating Status Reports and Dashboard for real time tracking
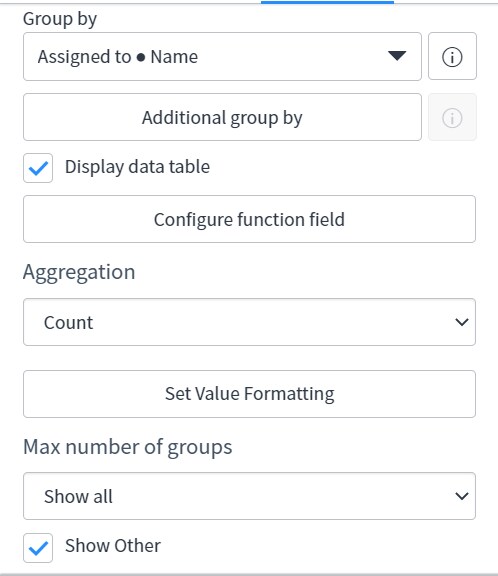
Now, create first report named – Service Certification Fail/Pending Status. In the ‘Data’ section please create it like below screenshot.

In the type tab select appropriate one (I selected ‘Donut’ type).
In the ‘Configure’ tab make it like below screenshot.

Finally,the report condition will be like below --

Now, create another report named - Service Certification Success Status and with all details remain the same as the first report mentioned here but only the condition will be like below.

Finally,create a dashboard based on these 2 reports.
Eleventh Step – Completion Notification creation and other details
Now, type – ‘Notifications’ in the navigation pane select ‘Notifications’ under ‘Email’ within ‘System Notification’ as per below screenshot.

Now,click on ‘New’.

Now,you can create a completion notification like below –


Now, for the section – What it will contain you can use all details in itself like subject, message HTML etc. or you can use/modify OOB templates for certification.

OOB notifications will be as below –

Finally, OOB workflow for this data certification is as below named – Certification task escalation and this can be modified as per requirement,like – I did it for sending less notification mailers.

- 2,747 Views