- Post History
- Subscribe to RSS Feed
- Mark as New
- Mark as Read
- Bookmark
- Subscribe
- Printer Friendly Page
- Report Inappropriate Content
on 09-14-2021 09:32 PM
Recently I was trying to enable the live agent to connect through Virtual agent. I followed the exact Agent workspace guided setup including the Advanced work assignment but the connection was not working.
I took the help of community articles and SN docs to troubleshoot the issue and have documented the exact flow I used to get the results. Hope it helps !
We can ( and probably should) establish a synchronous channel between end-users and the Service Desk.
Here is how you can ‘successfully’ enable live agent transfer from the virtual agent.
Components involved: Virtual agent, Agent Workspace, Advanced work assignment.
1. Start with using the guided setup for “Agent workspace”
Apart from other steps, make sure that “Advanced Work Assignment (Helps you automatically route tasks and interactions among agents)” & “Workspace Agent Chat (It’s the chat interface for your IT staff to actively engage with end-users)” is configured.
In general, this won’t enable the live agent transfer.
If you try connecting with a live agent, you will see this

Now let’s see how to troubleshoot (Use the below steps as a checklist)
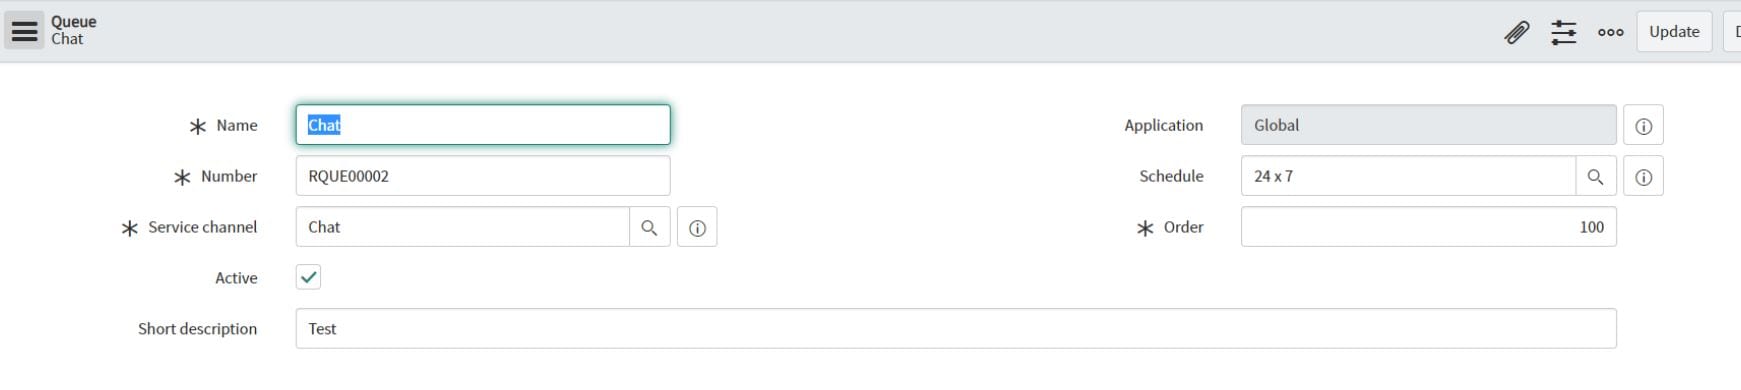
2. Navigate to the Service Channel and open the ‘Chat’ record.

3. Go to the ‘Queues’ tab and create a new record. Set the field values as in the screenshot.
I have changed the Number field value just for the demo. Then save the record. [* Copy & secure the sys id of the record you just created.]

Note: Make sure that the Schedule is set up properly as the live agent transfer won’t work outside the schedule.
4. In the ‘Assignment Eligibility’ tab of the ‘chat’ record, you should create a new record. In the ‘groups’ field, you should add the name of the group whose members will be available for chat.

5. Add members to the group. Make sure that the members have awa_agent and workspace_agent roles.
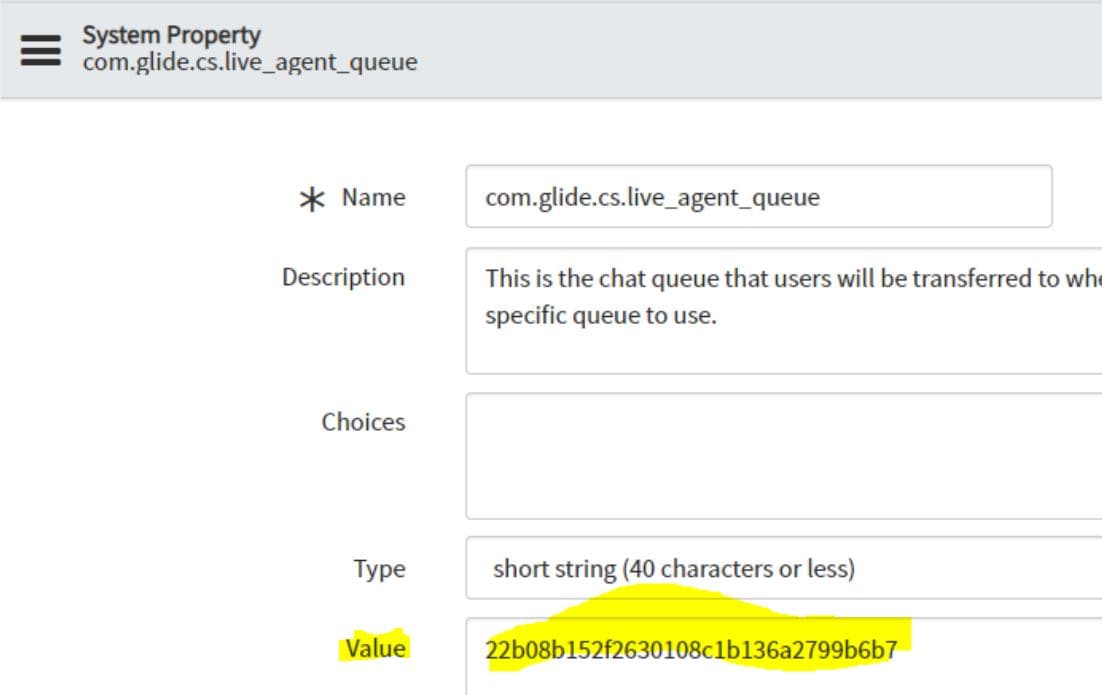
6. Use the sys id copied in step 3. Open ‘com.glide.cs.live_agent_queue’ system property & paste the sys id of your queue record i.e. chat in ‘value’ field.

Also, make sure that ‘chat’ is selected in the Presence State-> Available record.

That's how you connect the end-user (Virtual agent) to Service Desk (Agent Workspace)
For reference and to get clarity on flow, please refer this image:

------------------------------------------------------------------------------------------------------------------------------------------------------------------
Thank you for reading.
Please let me know in case there are any gaps or if this doesn't work for you.
I would love to learn from your experience and knowledge.
Best,
Rohan Raj
Find me on LinkedIn
- 6,306 Views
- Mark as Read
- Mark as New
- Bookmark
- Permalink
- Report Inappropriate Content
@rohan raj2 for this step . Use the sys id copied in step 3. Open ‘com.glide.cs.live_agent_queue’ system property & paste the sys id of your queue record i.e. chat in ‘value’ field.
Global scope is not working how to do that