- Post History
- Subscribe to RSS Feed
- Mark as New
- Mark as Read
- Bookmark
- Subscribe
- Printer Friendly Page
- Report Inappropriate Content
on 12-02-2020 06:58 AM
So far as a part of FunOnNow series, we've seen Webslides as standalone portal, ParticleJS as a Service Portal widget and HTML2PDF as a UI Page. But how about mixing it up and adding the custom UI in the native screen? We can leverage a feature called as UI Formatters to do this. Also, we will be using a great javascript library called MermaidJS today. Below is the kind of image we will be generating using MermaidJS today.

Before we jump into the implementation, a brief about MermaidJS, as per their homepage, main purpose of Mermaid is to help Documentation catch up with Development. MermaidJS lets you write the diagrams as a text. It uses D3 and DagreD3 along with some text recognition mechanism to render the diagram. No more worries about managing mappings and having to add a new activity at the end of development. All you have to do is mention the mapping as a simple syntax and let mermaidJs work on the arrows and transitions in the diagram. I was introduced to this library on sndevs slack channel. And if you just want to skip this article and start using MermaidJS in your ServiceNow instance, you can refer to this share item by
Right, first thing we need to do is create a UI Macro that will generate mermaid diagram for us. Navigate to "System UI --> UI Macros" and copy-paste below XML in it.
<?xml version="1.0" encoding="utf-8" ?>
<j:jelly trim="false" xmlns:j="jelly:core" xmlns:g="glide" xmlns:j2="null" xmlns:g2="null">
	<tr >
		<td style="text-align:center">
			<div class="mermaid">
				graph TD
                                  A[Start] --> B[Write the code]
                                  B --> C[Save Form]
                                  C --> D{Do you see the image?}
                                  D -->|No| E[Oops, try again]
                                  D -->|Yes| F[Awesome, you are all set]
                                  F -->G[End]
                                  E --> B
			</div>
		</td>
	</tr>
	<script src="https://cdn.jsdelivr.net/npm/mermaid/dist/mermaid.min.js">
//script tag should contain a source to mermaid code
//src="https://cdn.jsdelivr.net/npm/mermaid/dist/mermaid.min.js"
        </script>
	<script>
		mermaid.initialize();
	</script>
</j:jelly>
As you can see, there are three distinct logical parts in our code above which we will focus on to understand this macro better.
1. HTML - So, main part of our code is the HTML part. Since, we're going to render this as a processor on the form layout, it is advised to enclose the html inside a <tr> tag. We have hard-coded our MermaidJs syntax inside a div above. MermaidJS needs a html element with the class "mermaid" to render the contents appropriately.
2. Script reference - Again, we're going to put a script link to Mermaid CDN distribution link. Prefered way would be to download the Javascript file and store it as a UI Script within ServiceNow.
3. Mermaid Initialization - This is an important step in above code and it simply instantiates mermaid for us. Care should be taken to put this instantiation after the script tag that loads the mermaid code for us.
Let's name our UI Macro "MermaidJs" (name is important in the next steps), add some relevant description and then save the record. We're half-way there...
To add this record on a form layout, we need a table. For time being, let's add it on the "Request" (sc_request) table itself. To do so, we need to create a UI Formatter entry. Navigate to "System UI --> Formatters" and create on a new entry. There are three important fields for us.

1. Name - The name that appears in the form layout popup.
2. Formatter - It will be the UI Macro name followed by ".xml". In our case, it will be "MermaidJS.xml" since we named our macro "MermaidJS".
3. Table - Table for which we're creating this formatter. Let's select "Request (sc_request)" here.
Save the formatter record. Next step left to be done is navigating to the Request table and modifying the form layout. "Diagram" would appear in the available field list for us.

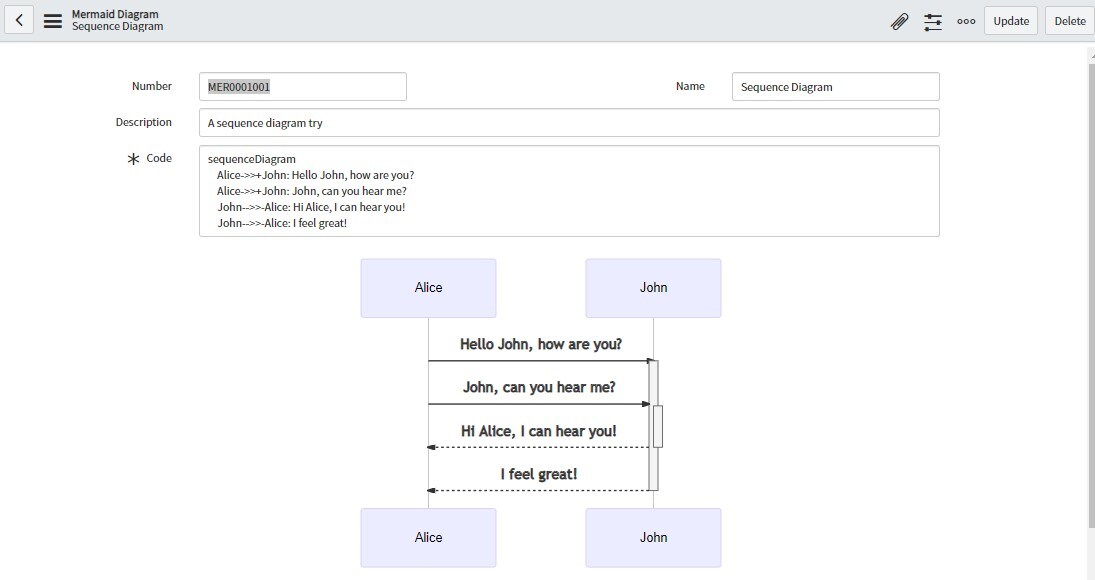
This is a hard-coded diagram that we added on Request table to do a quick dirty POC. To store your own diagrams, you could create a new table with a code field that will capture your MermaidJS syntax. And then, you could alter the macro above to dynamically fetch the values from the table field like below
<div class="mermaid">
    $[current.getValue('u_code')]
</div>
That's it. Eagle-eyed people among you would've noticed that we're using the second-phase syntax of Jelly (square brackets) here to access the field value. If you'd like to try this example out, download the attached update set and commit it in your local instance. You will find a new table called as "Mermaid Diagrams", you can alter the syntax and try it out on your own instance.

So, go ahead, use the attached update set as a reference if you're more of DIY kind of a person or as mentioned at the start of the article, use the even more configurable share item.
- 5,194 Views
- Mark as Read
- Mark as New
- Bookmark
- Permalink
- Report Inappropriate Content
Thanks for mentioning my implementation on share. Nice article by the way.
Hope you liked it and i also hope other people will enjoy MermaidJS as much as i do.
- Mark as Read
- Mark as New
- Bookmark
- Permalink
- Report Inappropriate Content
Thanks
Yup, MermaidJS is an amazing library...