- Post History
- Subscribe to RSS Feed
- Mark as New
- Mark as Read
- Bookmark
- Subscribe
- Printer Friendly Page
- Report Inappropriate Content
on 08-01-2018 05:08 AM
I've been struggeling to show a barcode in a form and also to be able to do a "clean" barcode printout on a Zebra label printer.
The printout in this case is done by using the web browser print dialog. I'm also writing an article on how to do "silent printing" directly to a Zebra printer using Zebra's Browser Print, hope to have it posted soon 🙂
But in this article we focus on the JsBarcode implementation.
I've come up with a solution that works and is pretty easy to set up (when you finally know how ;-)).
To start with i use JsBarcode, an "Easy to use, yet powerful barcode generator for the web and Node.js" as Johan Lindell (the creator) has stated on his page. And i agree, JsBarcode is really nice and easy to work with and Johan has provided some samples to use it.
The aim for this article is to show a barcode and additional fields as a label in a form.
We will also add a UI Action to be able to print the label using the browser printing functionality.
We use the Asset table/form (alm_asset) as an use case for demo purpose.
Steps to get this running:
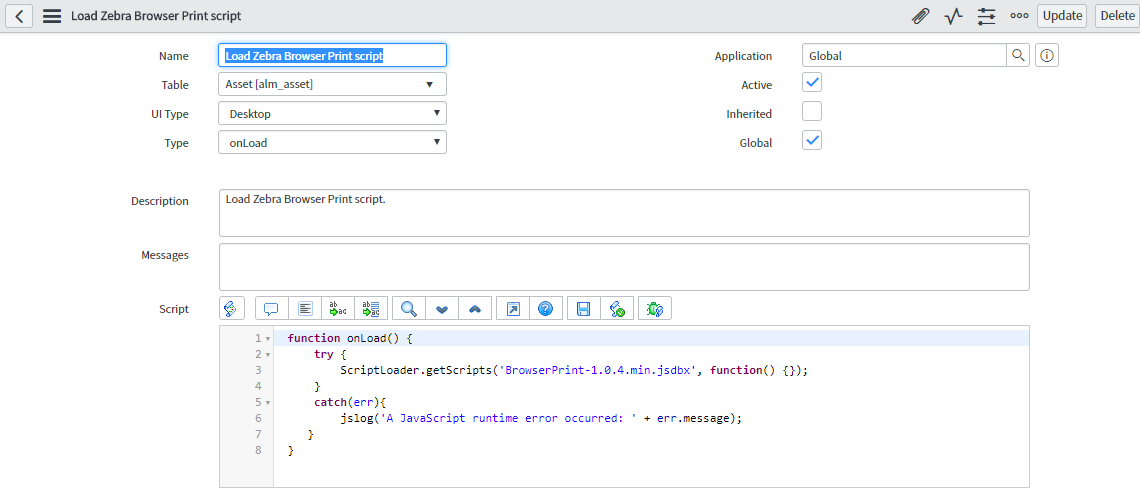
- Download the JsBarcode Javascript library and upload it (as it is, no "prettify") to your instance as a UI Script.
Tip: Create an empty UI Script (naming it "JsBarcode") and save the UI Script not pasting/inserting the script. From list view add "Script" field and paste the code using the list view. This preventing syntax check and being able to save when using the form view.
If you want to use the UI Script from different forms etc. make it global (Check "Global" field) otherwise leave it unchecked and load the UI Script in an OnLoad Client Script using ScriptLoader.
In this example i'll leave it unchecked and use ScriptLoader described further on. - Create a UI macro (naming it "barcode_label") and use below code snippet as a starting point.
In this case i've added a function to set additional fields for the label but the important field for the barcode itself is html "svg" tag.
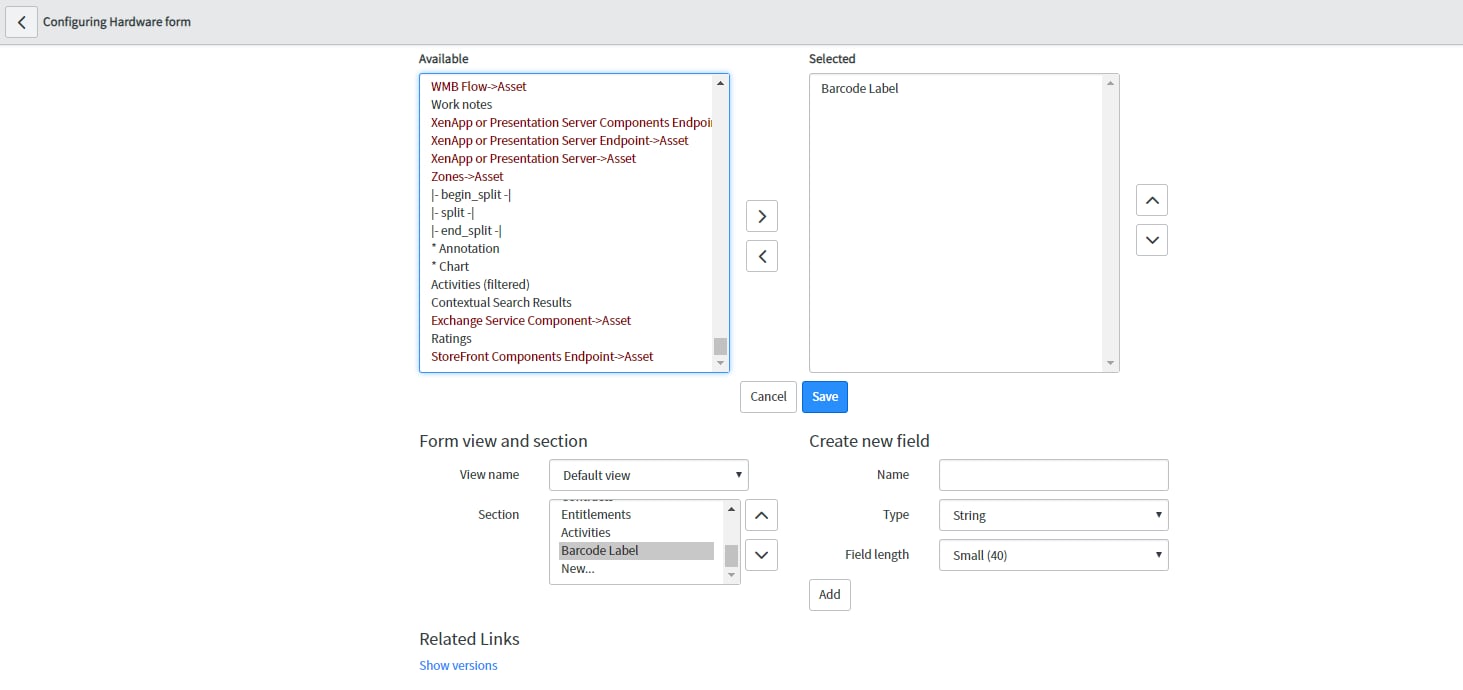
<?xml version="1.0" encoding="utf-8" ?> <j:jelly trim="false" xmlns:j="jelly:core" xmlns:g="glide" xmlns:j2="null" xmlns:g2="null"> <script> // This function is only used for adding extra text to the label itself, remove it if you don't need it. function setBarCodeLabelText(model, serial) { document.getElementById("model").innerHTML = "Model: " + model; document.getElementById("serial").innerHTML = "Serial no: " + serial; } </script> <style> td{font-size:10px;align:center;vertical-align:top;white-space:nowrap;} p{font-size:10px;align:center;vertical-align:top;white-space:nowrap;} </style> <table style="width:100% height:100%"> <tr><td colspan="2"><svg id="barcode"></svg></td></tr> <tr><td><p id="model"></p></td><td><p id="serial"></p></td></tr> </table> </j:jelly> - Create a Formatter "Barcode Label" as shown below.
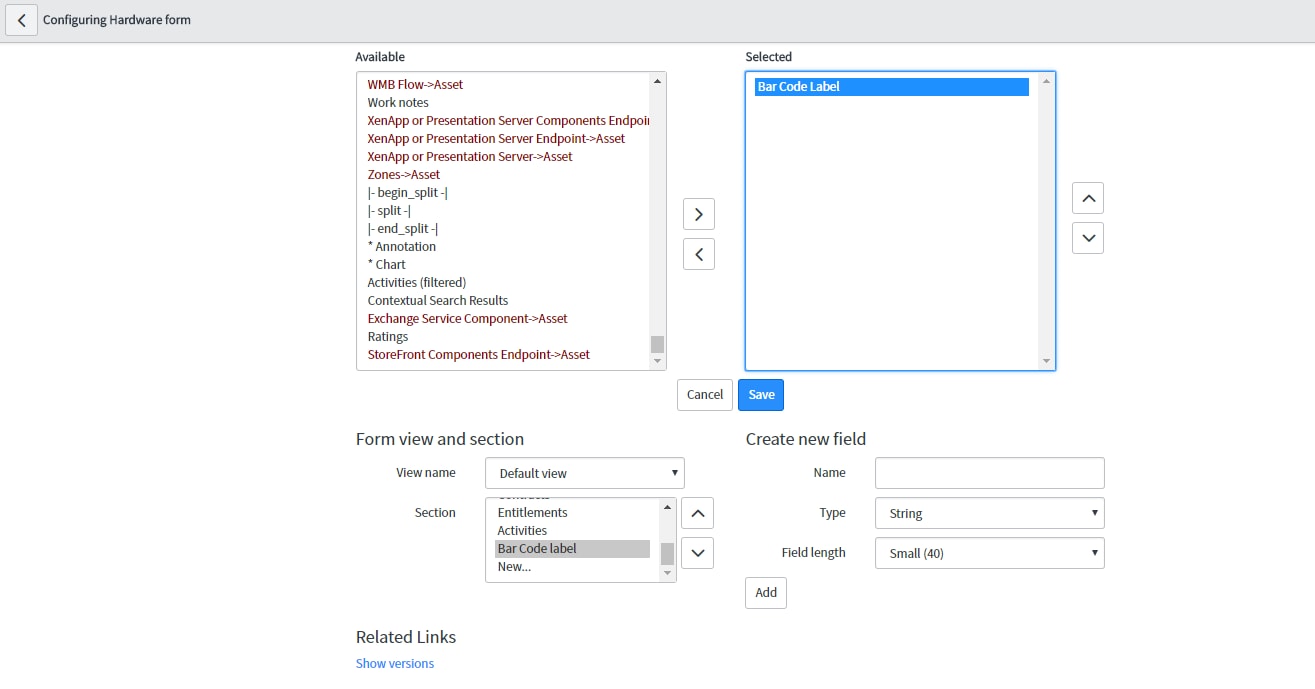
- Add the Barcode Label Formatter to the form. I've added the Formatter to a separate section named "Barcode Label".
- In my example we use a Client Script to set the values but feel free to do it your way.
We'll use the Asset table/form (alm_asset) so create an OnChange script for "Asset Tag" field.
I've also added Model and Serial Number as additional text to the label. That's the purpose with function "setBarCodeLabelText()".
The important thing here is the loading of the JsBarcode script and calling the JsBarcode function. Please take a look at the JsBarcode documentation for available options (parameters).
function onChange(control, oldValue, newValue, isLoading, isTemplate) { /* if (isLoading || newValue === '') { return; } */ var labelText = "Asset tag: " + newValue; // This statement will call the funtion in the UI Macro "bar_code_label" to set additional fields setBarCodeLabelText(g_form.getDisplayValue("model"), g_form.getValue("serial_number")); // Using JsBarcode http://lindell.me/JsBarcode/#download ScriptLoader.getScripts('jsbarcode.jsdbx', function() { JsBarcode("#barcode", newValue, {format: "CODE39", textAlign: "left", text: labelText}); }); }Reload the Asset form and you should see a barcode and additional text.
- Next step is to create a UI action and a UI page being able to do a "clean" barcode print.
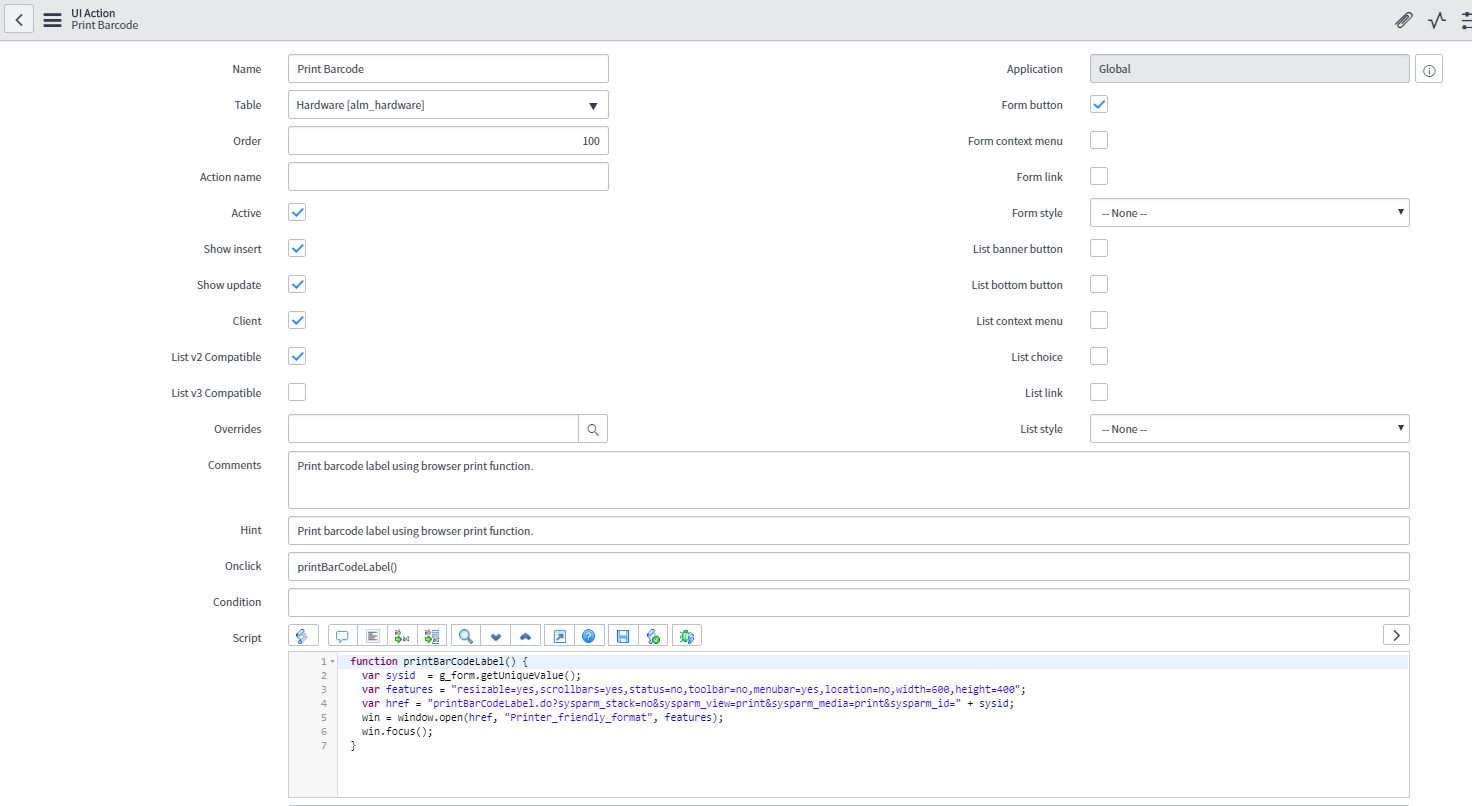
- Create a UI action "Print Barcode" as shown below.
Code snippet:
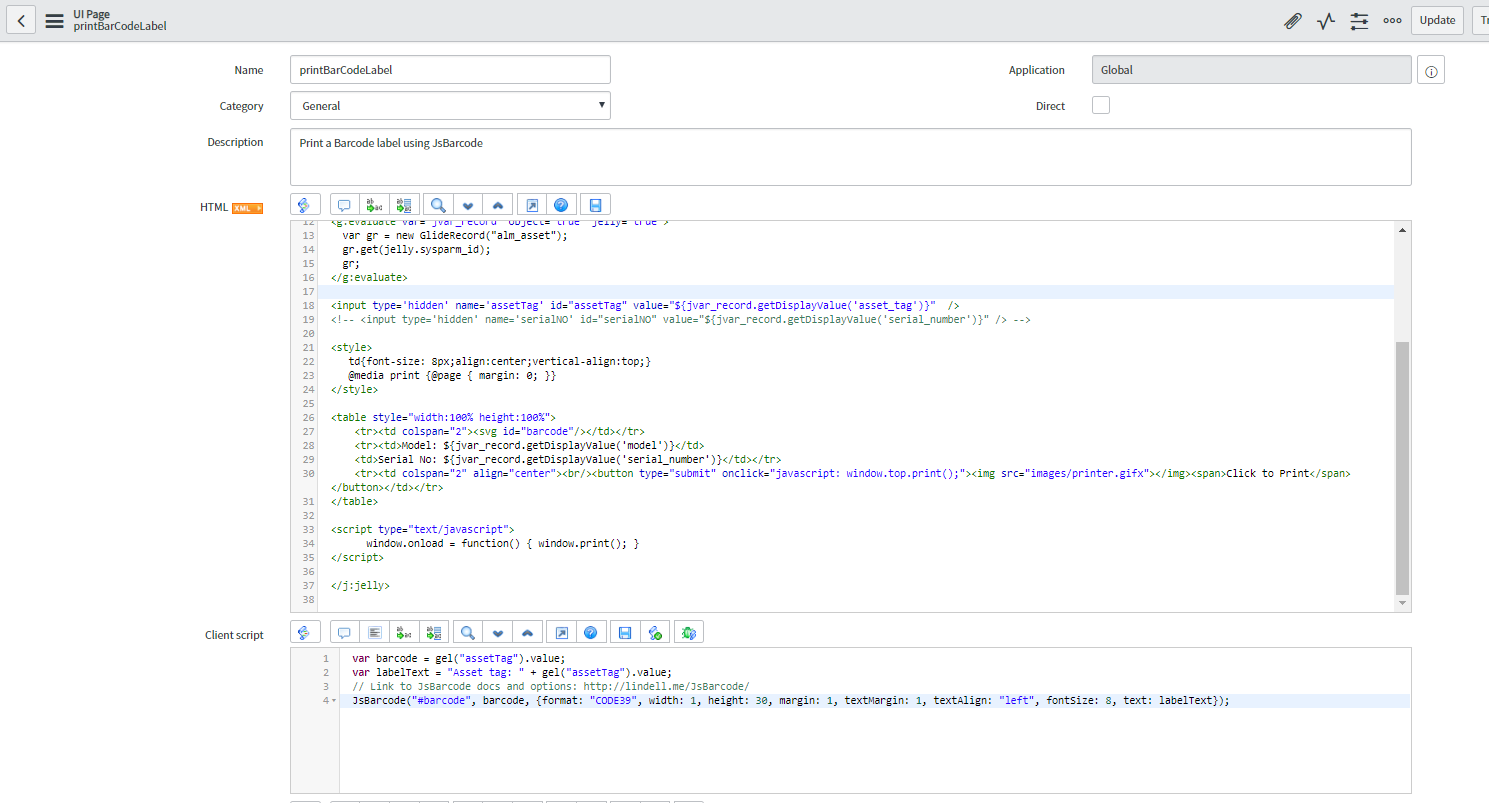
function printBarCodeLabel() { var sysid = g_form.getUniqueValue(); var features = "resizable=yes,scrollbars=yes,status=no,toolbar=no,menubar=yes,location=no,width=600,height=400"; var href = "printBarCodeLabel.do?sysparm_stack=no&sysparm_view=print&sysparm_media=print&sysparm_id=" + sysid; win = window.open(href, "Printer_friendly_format", features); win.focus(); } - Create a UI page "printBarCodeLabel" as shown below.
HTML code snippet:
<?xml version="1.0" encoding="utf-8" ?> <j:jelly trim="false" xmlns:j="jelly:core" xmlns:g="glide" xmlns:j2="null" xmlns:g2="null"> <j:set var="jvar_alm_asset_id" value="${sysparm_alm_asset}" /> <g:include_script src="jsbarcode.jsdbx"/> <g:evaluate var="sysparm_id"> var sysparm_id = RP.getParameterValue("sysparm_id"); sysparm_id; </g:evaluate> <g:evaluate var="jvar_record" object="true" jelly="true"> var gr = new GlideRecord("alm_asset"); gr.get(jelly.sysparm_id); gr; </g:evaluate> <input type='hidden' name='assetTag' id="assetTag" value="${jvar_record.getDisplayValue('asset_tag')}" /> <!-- <input type='hidden' name='serialNO' id="serialNO" value="${jvar_record.getDisplayValue('serial_number')}" /> --> <style> td{font-size: 8px;align:center;vertical-align:top;} @media print {@page { margin: 0; }} </style> <table style="width:100% height:100%"> <tr><td colspan="2"><svg id="barcode"/></td></tr> <tr><td>Model: ${jvar_record.getDisplayValue('model')}</td> <td>Serial No: ${jvar_record.getDisplayValue('serial_number')}</td></tr> <tr><td colspan="2" align="center"><br/><button type="submit" onclick="javascript: window.top.print();"><img src="images/printer.gifx"></img><span>Click to Print</span></button></td></tr> </table> <script type="text/javascript"> window.onload = function() { window.print(); } </script> </j:jelly>
Client Script code snippet:
var barcode = gel("assetTag").value; var labelText = "Asset tag: " + gel("assetTag").value; // Link to JsBarcode docs and options: http://lindell.me/JsBarcode/ JsBarcode("#barcode", barcode, {format: "CODE39", width: 1, height: 30, margin: 1, textMargin: 1, textAlign: "left", fontSize: 8, text: labelText});


- 32,185 Views
- Mark as Read
- Mark as New
- Bookmark
- Permalink
- Report Inappropriate Content
Hi,
Please help me on urgent basics , which .JS file i have to use here ?

- Mark as Read
- Mark as New
- Bookmark
- Permalink
- Report Inappropriate Content
Hi Sironi,
Use the one with all barcodes (at the top).
/Mikael
- Mark as Read
- Mark as New
- Bookmark
- Permalink
- Report Inappropriate Content
Hi Mikael,
Thanks for reply,
i followed every step as you suggested , i created every thing , but it is not working . could you please help me
please help me it is high time for me, i would have to present it. kindly help me with your inputs.
- Mark as Read
- Mark as New
- Bookmark
- Permalink
- Report Inappropriate Content
Hey Mikel,
i have build the whole functionality in Personal Instance as you provided in Article , but it is not working.
Can you help me what was the issue.
- Mark as Read
- Mark as New
- Bookmark
- Permalink
- Report Inappropriate Content
Can you provide some help, why barcode is not displaying here?
- Mark as Read
- Mark as New
- Bookmark
- Permalink
- Report Inappropriate Content
Hi Mikael,
We are working on similar requirement but want to take this barcode as an attachment. If you can please help me out how can we use this barcode to paste it on a mail or as an attachment would be great.
Thanks and Regards,
Amansingh
- Mark as Read
- Mark as New
- Bookmark
- Permalink
- Report Inappropriate Content
Anyone find the same solution for a QR code?
- Mark as Read
- Mark as New
- Bookmark
- Permalink
- Report Inappropriate Content
Thanks for the useful article.
I want to display the barcode as a variable in the catalog item, is it possible?
- Mark as Read
- Mark as New
- Bookmark
- Permalink
- Report Inappropriate Content
Thanks for the useful article, I was able to make it work for a single label.
How can I adjust this to add Text Only Lines, and how can you use this if you have 4 different size labels on 1 label print out.
1 - 3" x 1"
1 - 3" x 1/2"
2 - 1 1/2" x 1 1/2"
Mark
- Mark as Read
- Mark as New
- Bookmark
- Permalink
- Report Inappropriate Content
@Mikael at Advan Works like a charm! Thanks alot!
I have also made it working in a configurable workspace.
In the same UI Action I enabled all the Workspace checkboxes and added the following Workspace Client Script that openens the UI Page in a popup window.
function onClick(g_form) {
    var sysId = g_form.getUniqueValue(); //sysId of Asset
    g_modal.showFrame({
        url: '/printBarCodeLabel.do?sysparm_stack=no&sysparm_view=print&sysparm_media=print&sysparm_id=' + sysId,
        title: 'Lageretikett att skriva ut',
        size: 'sm',
        height: 120
    });
}
This is the result:

/Christian
- Mark as Read
- Mark as New
- Bookmark
- Permalink
- Report Inappropriate Content
Great article , but I am facing some issues duirng the process of development.
It would be more helpful if you provide the update set for this customisation.
Best Regards,
Sai
- Mark as Read
- Mark as New
- Bookmark
- Permalink
- Report Inappropriate Content
@Mikael at Advan - Thanks for the steps but I am struggling with it.
Followed steps 1-5 but the barcode is not loading on the asset form for some reason.

Any suggestions what could be the reason or if there is a updated process?
Thanks in advance.
- Mark as Read
- Mark as New
- Bookmark
- Permalink
- Report Inappropriate Content
I was able to figure it out. Thanks
- Mark as Read
- Mark as New
- Bookmark
- Permalink
- Report Inappropriate Content
@GB14 , Can you please share your solution?
- Mark as Read
- Mark as New
- Bookmark
- Permalink
- Report Inappropriate Content
The above solution works perfectly fine. For some reason when we copy the code it add some odd characters, so it is best to copy the code to notepad++ and remove those extra characters at the end of the code.
Our solution was to generate labels on the user table vs the asset like above.
If you are having any issues, please post here and we can try to assist.
Regards,
G
- Mark as Read
- Mark as New
- Bookmark
- Permalink
- Report Inappropriate Content
Hi All,
Sorry for not responding to your questions but i've totally missed out the notifications...
But also glad the article helped some of you 🙂
Kind regards,
/Mikael