- Post History
- Subscribe to RSS Feed
- Mark as New
- Mark as Read
- Bookmark
- Subscribe
- Printer Friendly Page
- Report Inappropriate Content
05-12-2021 11:35 PM - edited 10-23-2022 01:48 PM

Enable requesters to chat with the Virtual Agent or live agents using the Slack integration. Below are steps to install the Conversational Integration with Slack, available from the ServiceNow Store, to associate your instance with Slack. You can also see the video below.
Pre-requisites:
- ServiceNow instance on the Quebec release or later
- Virtual Agent or Virtual Agent Lite plugin installed
- Slack 'admin' workspace access. If you do not have the 'admin' role in the Slack workspace and attempt to install the Slack integration, you will receive an error (error code=9).
- ServiceNow 'admin' role.
The following is based on the ServiceNow documentation.
1. Navigate to System Applications > All Available Applications > All.
2. Find the “Conversational Integration with Slack” application using the filter criteria and the search bar.
You can search for the application by its name or ID. If you can't find the application, you might have to request it from the ServiceNow Store. Visit the ServiceNow Store website to view all the available apps and for information about submitting requests to the store.
3. Click Install.

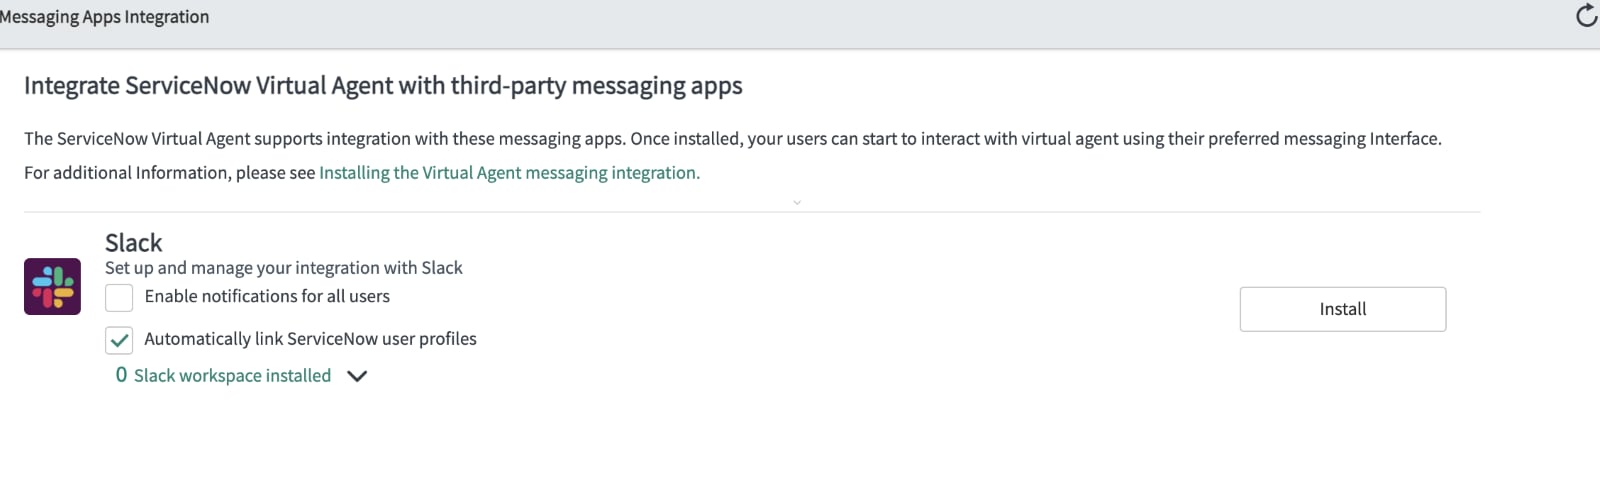
4. Navigate to Messaging Apps Integration. Next to Slack, click Install.

5. By default, the Automatically link ServiceNow user profiles option is selected. If not already selected, click this option to enable automatic linking of user profiles.
6. For details about auto-linking, see Account linking in pre-built messaging integrations.
7. In the pop-up message for confirming redirection to Slack to verify your identity, click OK.

8. Enter your Slack workspace URL to sign into your Slack workspace, and click Continue.

9. Sign in to your ServiceNow® instance.

10. Next, Virtual Agent asks for permission to access the Slack workspace.

11. Click Allow.
12. When Virtual Agent has been successfully installed on the Slack workspace, a completion message appears.
13. Navigate back to Messaging Apps Integration and refresh the page.
14. The Slack application appears in the list of available integrated messaging applications.


Linking your account
If your account is not automatically linked from Step 7 above, see below:
- Click the “Link to ServiceNow” button.
- You will be taken to your instance in the browser. Click “Confirm”. If you see an account linking failure error, try restarting Slack to renew the linking URL.

Congratulations! You can now start a Virtual Agent conversation in Slack. You can type “hi” to start.
The following are commands you can type in Slack:
Command | Description |
Hi | Begin a new conversation or access option for transferring to a live agent. |
agent | Begin a new conversation or access option for transferring to a live agent. |
bye | Leave a live chat conversation when no live agent is available (the bot does not respond). |
help | Displays a short list of useful commands. |
logout | Unlink your ServiceNow account from a messaging integration. |
notification or notifications | Subscribe to or unsubscribe from notifications. |
restart | End the current conversation and begin a new one. |
Uninstalling the Conversational integration with Slack
1. Navigate to Messaging Apps Integration.
2. On the Messaging Apps Integration screen, click the arrow next to Slack teams installed.
3. Click Uninstall next to the Slack workspace to be deleted.


5. On the Slack App Directory page, navigate to the Remove Application section and click Remove App.
6. When you see the confirmation for removing the app from the workspace, click Remove App.
7. The bot is no longer installed in the workspace and is not listed on the Messaging Apps Integration page. Now Virtual Agent no longer appears on the list of integrations in Slack.
Note: Any remaining clean up, such as deleting previously linked users or application entries, is performed after a 24-hour delay. You can change the length of this delay by editing glide.cs.delete_delay_day.
(Optional) Check the workspace record in the Slack Adapter Configuration Pages table to verify that the workspace is deleted.
- 7,070 Views
- Mark as Read
- Mark as New
- Bookmark
- Permalink
- Report Inappropriate Content
When I go to step 9 it has display error as the following.
My slack account is the owner of slack workspace.
Could you help me to solve it?

- Mark as Read
- Mark as New
- Bookmark
- Permalink
- Report Inappropriate Content
If PDI can't do that?
- Mark as Read
- Mark as New
- Bookmark
- Permalink
- Report Inappropriate Content
Is there a way to add the app to a channel? So that a user could talk to the app inside of a channel?