- Post History
- Subscribe to RSS Feed
- Mark as New
- Mark as Read
- Bookmark
- Subscribe
- Printer Friendly Page
- Report Inappropriate Content
on 05-18-2020 04:27 PM
Hello Everyone,
This is the very first article I am writing on Servicenow community. Hope this will help the fellow community members.
Step by Step Guide
This document contains the steps to implement VA and NLU in your instance with basic functionalities. I have tried to mention brief description about the various modules, tables and fields I have used to implement virtual agent. Please follow the below steps to proceed.
- Install the below required plugins
- Glide Virtual Agent Plugin [com.glide.cs.chatbot]
- NLU Model Builder [com.snc.nlu_studio]
- Branding of Virtual Agent (Optional Step)
Navigate to Collaboration ->Branding Setup.
Open Default Branding record
Update sections one by one as follows
Chat Window Section to update the following
- Chat Header – Heading appears for the chat bot of VA
- Chat Header logo
- Chat header background color
- Chat header font color
- Chat background color
- Input background color
- Menu Icon color
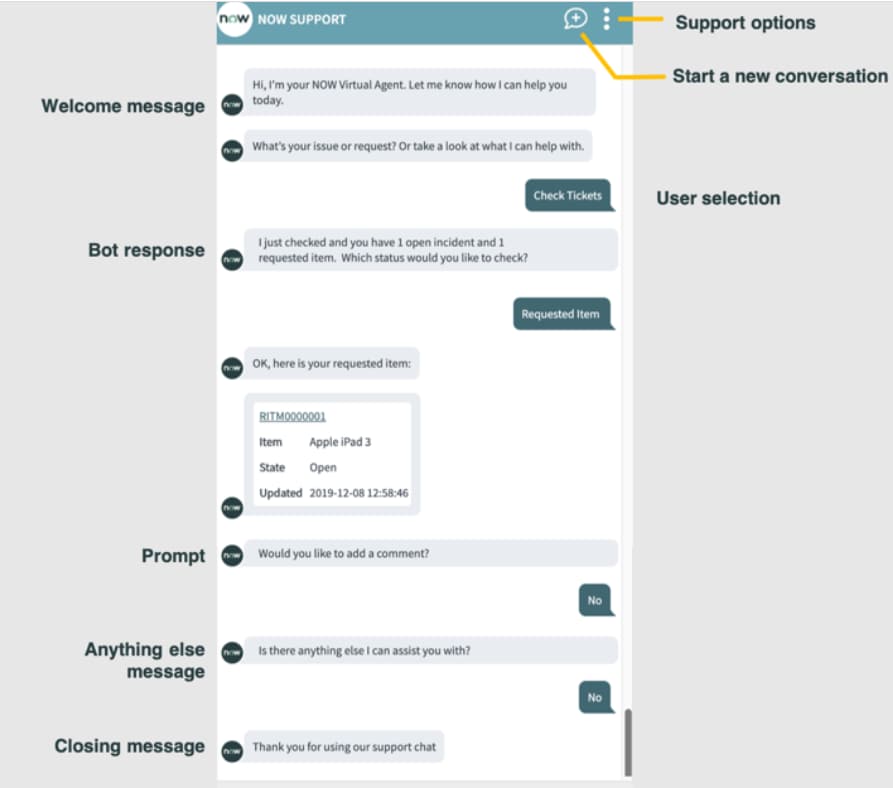
Chat Messages Section to update the following
- User bubble background color. The bubble appears for user’s text
- User Bubble font color
- Live Agent bubble background color. The bubble appears for user’s text
- Live Agent Bubble font color
- Bot Bubble background color. The bubble appears when no agent is live and only bot is chatting with end user.
- Bot bubble font color
- Color of link if there is any
- Disabled link color
- Button background color
- Bot Profile. A profile created in User [sys_user] table for virtual agent.
Others Section to update the following
- System Message color
- Time stamp color
- Category background color. Categories appeared on chat window to select what action you want to perform.
- Category font color
- Separator color. Could be a line to separate different chat sessions or chats in same session
- Loading Animation color. Color of animation visible when bot is trying to fetch info or about to perform some action
- Minimum Delay before displaying typing animation (ms).
- Minimum delay between bot messages(ms). Preferred not to reduce its default value so that user should think some human is chatting instead of bot.
Contact Support Menu Section
- Convert to live Agent checkbox.
- Chat label for live agent chat window
- Send email checkbox.
- Email label.
- Email address text box to mention support email id.
- Phone call checkbox.
- Call label text box
- Phone number text box

- Enable NLU on your instance
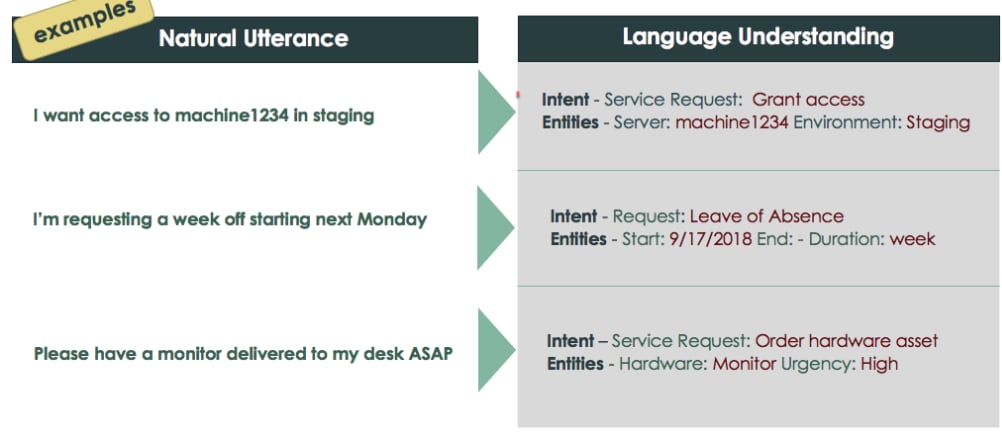
NLU stands for Natural Language Understanding which helps you to understand the end user requests/actions by using Intent, Entities and Utterances (Different ways of asking a question for e.g. What Is status of my ticket, I want to check the status of ticket etc.). In order to enable it Navigate to Collaboration -> Virtual Agent -> General Settings. Look for NLU settings section and enable NLU in virtual agent. Once you enable it you need to select the NLU service provider as well from the list of service providers you have.
- Add virtual agent on service portal.
There are two ways to do it as follows:
- Go to each page of service portal and add the Virtual agent widget on it.
- Create an Agent Chat record to enable virtual agent on all the pages of selected service portal. Navigate to Service Portal -> Agent Chat.
- Click on new. Fill the mandatory fields Name and order. Select the portal from list of portals where you want to enable this chat bot.
- Create a quick NLU application
Navigate to System Applications -> Studio. Open the studio and create a new App. Fill the mandatory fields and click on Create. Once you are on Role’s screen. Click on Continue in Studio (Advanced) link present in bottom left corner.
- Create NLU Model
NLU model contains the Intents (contains utterances), Entity and Vocabulary. Open the application you have created recently and perform the below steps.
- Create a new Application file that is an NLU model. It is located under Natural Language understanding. In order to create it click on ‘Create Application File’ present in top left corner.
- Type NLU in search bar and filter results tab will show NLU Model. Click on create and provide a name for the model and click on save.
- Create NLU Intent
- Click on + icon to create new intent.
- Provide a name for the intent and t should not contain any gaps in it. For e.g. InternetiIsues.
- Add minimum 10 different utterances for it
- To add the utterance, type it in the text box and click on add. For e.g. ‘Wifi is not working’
- Create Entity for utterances.
Entity is a keyword which helps the NLU model to understand an utterance more clearly and provide the best topic for end user’s request. It can be annotated to enrich the entity’s connectivity to its intent and utterances. We can use entity on for different utterances and intents present in same model by selecting the Model Availability checkbox. There are two broad categories of entities, System Defined Entities and User Defined Entities. There are total 4 system defined entities which we can enable and disable for our model, but we can’t edit them. Below is the list of system entities.
- DATE type simple
- TIME type simple
- DURATION type simple
- LOCATION type simple
User Defined entities are the custom entities we create for different utterances. In order to create one, we need to select a word or combination of words from an utterance and then we get the pop – up to create a new entity or annotate present entities. User defined entities are of 3 types as described below:
- Simple: A Simple Entity describes a single concept. For example, if the user's intent is "Order hardware" you can use Laptop as a simple entity to capture the Laptop for "Order hardware".
- List: A List Entity allows for multiple values in an entity. These values can have their own sets of synonyms. We can select a source field from a specific table to map the list choices or we can create new list by selecting the respective radio buttons.
- Pattern: A Pattern Entity is an entity that matches based on a regular expression that you define. Pattern Entities don’t require annotated utterances. Once selected the type as pattern, we need to define the regular expression for the same. For e.g. regular expressions for email address, phone number etc.
- Train and Test the NLU Model
Train the model by clicking on Train button. While training we can modify the Confidence Threshold (%), this percentage filters the result and allows the model to predict intents having more than the threshold value. Once the model is trained, we can test it by clicking Test button. After clicking on test, we get a text box to enter a phrase/utterance and test the results as per our model’s confidence threshold.
- Create a new category for VA
Navigate to Collaboration -> Virtual Agent -> Categories. Click on new, enter name and submit.
- Create a Virtual Agent Topic.
Navigate to Collaboration -> Virtual Agent -> Designer. Click on ‘Add a topic’ button to create a new topic. Fill out the mandatory details and click on save. While creating the topic need to know about few fields.
- Reusable Topic block: Checkbox to make this topic available for other topics.
- Resume Topic Flow: It is a checkbox to bring the user back from where they left if this topic diverges from the conversation thread.
- Condition: Expression that must return the true in order to make topics available for end users when searching from the client.
- Roles: Include all the roles a user must satisfy in order to view and run the topic.
- Live agent Variables: Context variables defined in the chat setup form to send dynamic context to a live agent when a bot conversation is transferred to a live agent.
- Edit Topic Flow
Under the designer module. Open your newly created topic and click on Edit topic flow button. It will open the flow and will show you can edit it by dragging and dropping the User inputs, Bot response and Utilities. In left side of flow, you will see the actions you can drag and drop into the flow and in right side their properties will be visible. For e.g. User Input Text will have properties like Name, Response Message and conditions if any. You can learn more about it in flow designer course. Once done and if there is now error the flow and by using left navigation arrow we can come back to our topic.
13. Publish the topic and it will be enabled for the Virtual agent chat bot.
Below are links to refer Virtual Agent course on Servicenow Now learning site. This course will give you more detailed explanation on virtual agent and NLU implementation in your instance.
Learning:
Simulator:
Feel free to comment for any query or connect with me on LinkedIn.
I would request you guys please mark this article helpful if you find it so and don't forget to bookmark as it contains important links which can help you further for more information. Do subscribe it for future updates.
Thanks,
Mohit Kaushik
- 10,403 Views
- Mark as Read
- Mark as New
- Bookmark
- Permalink
- Report Inappropriate Content
While creating intent, I am getting the connection to NLU Service is unavailable.
What's the workaround?
- Mark as Read
- Mark as New
- Bookmark
- Permalink
- Report Inappropriate Content
Resolution
Repair System Properties, Repair Machine Learning Settings, Sync Vocabulary Sources and Create an NLU Model
- Login to your lab instance.
- Change your application scope to 'Global'
- go to Lab Management > Repair System Properties
- go to Lab Management > Repair Machine Learning Settings > Click Reset Machine Learning Settings and wait for the 'Machine Learning has been reset' message.
- Navigate to NLU Workbench > Vocabulary Sources. Result: The Vocabulary sources window shows all available Source tables and the Current status for each. By default, all source tables are not synced.
- For each row in the list, hover over the column to right the Refresh column, and click the Sync icon. This will initiate the Sync process for the source table in that row. In this example, the sync process for the Catalog Item table will begin
- You can now change your application scope back to the scope you was working in before and try to add intents or train the NLU model
- Mark as Read
- Mark as New
- Bookmark
- Permalink
- Report Inappropriate Content
HI @Mohit Kaushik - Thanks for writing this article!
Can you please also recommend which scope one should use to create new custom topics? OOB one or new custom or same scope as NLU model?
- Mark as Read
- Mark as New
- Bookmark
- Permalink
- Report Inappropriate Content
@Mohit Kaushik i did the first step but i can't see the Agent chat module below the Service Portal! do you know why this happen???