


ElizabethBohlin

ServiceNow Employee
Options
- Subscribe to RSS Feed
- Mark as New
- Mark as Read
- Bookmark
- Subscribe
- Printer Friendly Page
- Report Inappropriate Content
05-16-2022
06:40 AM
ServiceNow’s Indoor Mapping solution enables organizations to digitalize their workplace floor plans. Using the Map Studio, map admins can create and update maps that can be used across the Workplace Delivery Suite.
- Reservation Management: display the maps of your workplaces throughout the world to help users visualize spaces that can be reserved.
- Case Management: use the map to facilitate inquiry requests. Users can locate precisely where a case is raised, whether in a specific meeting room, or a printer located in a hallway.
- Move Management: use the map to select where the user is currently placed and where they will be relocated.
- Location Directory: leverage the wayfinding tool to get directions throughout the campus.
Applications Needed:
- Workplace Safety Management
- Workplace Space Mapping
- Workplace Reservation Management
- Workplace Case Management
- Workplace Move Management
Getting started
Make sure the instance in which the map will be created is either on Rome or San Diego family release then proceed to install the two following plugins:
- Workplace Indoor Mapping
- Indoor Mapping (a dependency of Workplace Indoor Mapping)
Create an indoor map campus
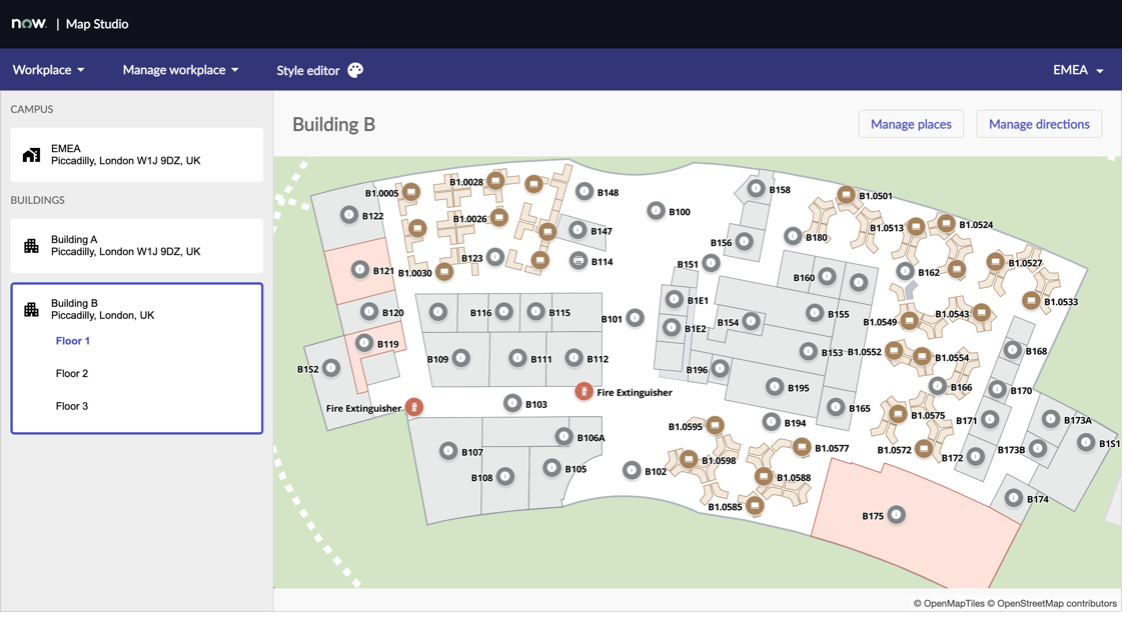
Use the left filter navigator to search for Indoor Mapping > Map Studio then proceed to go through the following steps:
- Create a campus in the Map Studio (watch the Map Studio Demo for more information)
- Create the map using floor plans of your buildings (CAD file guidelines and Raster file guidelines)
- Add points of interests (if raster/.png file was imported)
- Draw direction graphs to enable wayfinding
- Create a view in the Style Editor to decide which of the imported map elements will be made visible to users
Create records in Workplace Service Delivery
In the left filter navigator select Safety Management > Space administration (additional information on the data model can be found here)
- Create a region (e.g. AMS)
- Create a site (e.g. North America)
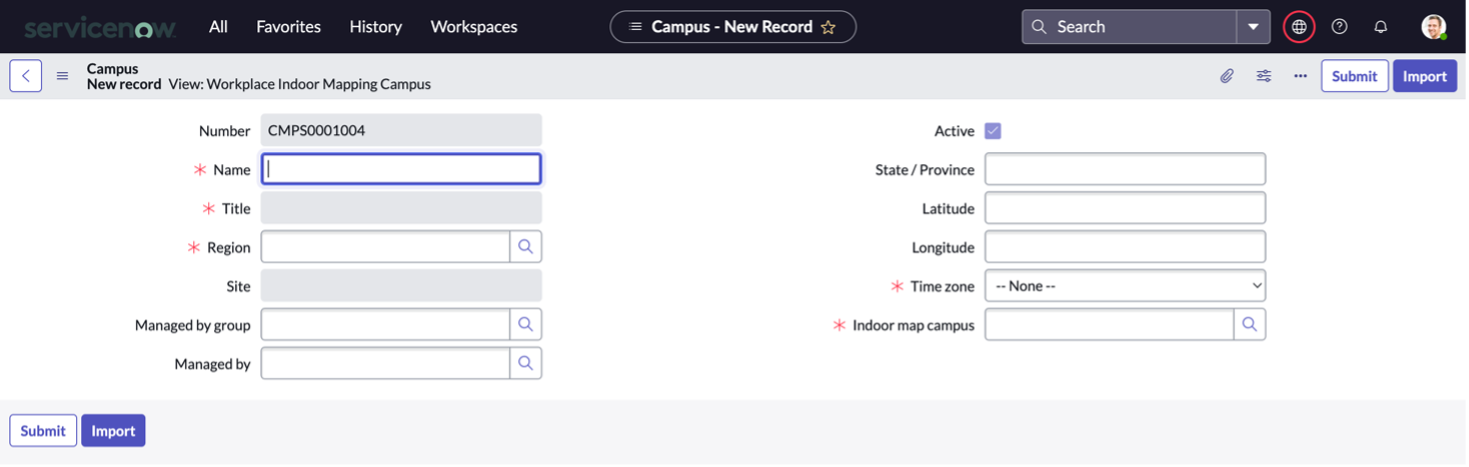
- Create a campus (e.g. California)
- In the campus record, select the Workplace Indoor Mapping Campus view in the burger menu in the top left corner of the screen to visualize additional fields related to indoor mapping.
- Select the time zone in which the campus is located
- Indoor Map Campus: select the name of the campus created in the Map Studio
- Select Import to create the campus record.
- Go back into the record you have created for the campus to link the indoor mapping campus to your WSD campus.
- Select Get Buildings to create records for the buildings, floors, areas and spaces created in Map Studio. An external ID will be created for each space.Therefore, if pre-existing data and records are already set up in the Safety Management module, make sure the name in WSD is identical to the name created in Map Studio. That way, when the map is imported, an automated peering will be done to match the data and will prevent the creation of duplicates.
Define the map provider
Complete the set-up of your map by ensuring the correct map provider is selected in Map properties. To do so, head to Space Mapping > Map Properties in the left filter navigator.
- Select Indoor Mapping as the map provider.
- Define the colors of ‘booked’ or ‘available’ spaces which will be apparent in when making a reservation. If no hexadecimals are added, the default values will be applied.
Make your spaces reservable
- By default, all spaces are marked as Is reservable = false. Select the spaces you would like to make reservable and change the Is reservable column to = true.
- Watch the following video to fully set up the reservation management module.
Updating the map and/or WSD records
- On the Map
When adding or editing a space on the map in Map Studio, the edit will be apparent on the map and will add or update the WSD records as a unidirectional sync occurs and looks for changes. Changes made to the style of the map, or the direction graph are also instantly updated.
This also means that when deleting a building, floor or space from the map, the WSD record is also updated to set the ‘Active’ field on the table to Active = false without deleting the record.
- In the record
When adding, editing or deleting a record of a building, floor or space in WSD this action is not replicated on the map. We therefore strongly recommend that all changes be made in Map Studio prior to editing WSD records.
- 7,790 Views
1 Comment
You must be a registered user to add a comment. If you've already registered, sign in. Otherwise, register and sign in.
