- Post History
- Subscribe to RSS Feed
- Mark as New
- Mark as Read
- Bookmark
- Subscribe
- Printer Friendly Page
- Report Inappropriate Content
on 01-08-2021 07:37 PM
Note: This is part four of a series of articles where we will develop Custom Components with the Now Experience UI Framework. This series started with two articles about custom GraphQL APIs which we will use to fetch data from the platform for our component. In the third article, we created the first component and displayed it in the Contextual Side Panel. Custom Components - Custom GraphQL API Part1 | Custom Components - Custom GraphQL API Part2 | Custom Components - Use GraphQL and Contextual Side Panel | Custom Components - Using Now Experience Components
In this article, we are developing a simple component with only a now-textarea. We register it as a Scripting Modal to call it from an UI Action inside the Agent Workspace. The UI Action should set the “needs attention” flag on all Cases from the contact, the model should open a now-textarea where the agent has the opportunity to enter an optional work note entry for the cases.
There are three things we need to do:
- Develop a custom component with a now-textarea
- Create a Registered Scripting Modal record (sys_aw_registered_scripting_modal)
- Create a UI action to call the Modal
Let’s start with the component.
Create a new project with the now-cli.
now-cli project --name @<company>/resolve-casesWe want to use a now-textarea, so we install the package and import it.
npm install @servicenow/now-textarea
import "@servicenow/now-textarea";
We create a property to receive the name from the contact to display it above the textarea.
properties: {

  contactName: { default: "" }

},
The view contains only the now-textarea. We use the property contactName as part of the label. We set the maxlength to 100 and with showCounter the textarea automatically displays how many characters are left.
<div>
    <now-textarea
        showBorders="true"
        label={"Worknote for Cases from " + state.properties.contactName}
        showCounter="true"
        maxlength={100}
        autoresize="true"
        resize="both"/>
</div>
The scripted model which later opens our component uses the action SN_SCRIPTED_MODAL#DATA_SET to return data to the UI Action. Our component will use this action too and dispatches the action together with the work note entry that we want to set in the cases.
actionHandlers: {
        "NOW_TEXTAREA#INPUT": ({ action, dispatch }) => { dispatch("SN_SCRIPTED_MODAL#DATA_SET", { "worknote": action.payload.fieldValue }) }
}
When the user enters text in the now-textarea, we use the action from the scripted modal to return the work note.
That’s all for the component. Deploy it.
Next, we need to create a new record in the table sys_aw_registered_scripting_modal.list.

Here we choose the component that we have just deployed. As API, we can choose any string, but it must be unique. It is used to call the component in the UI Action. The Public API will be generated automatically.
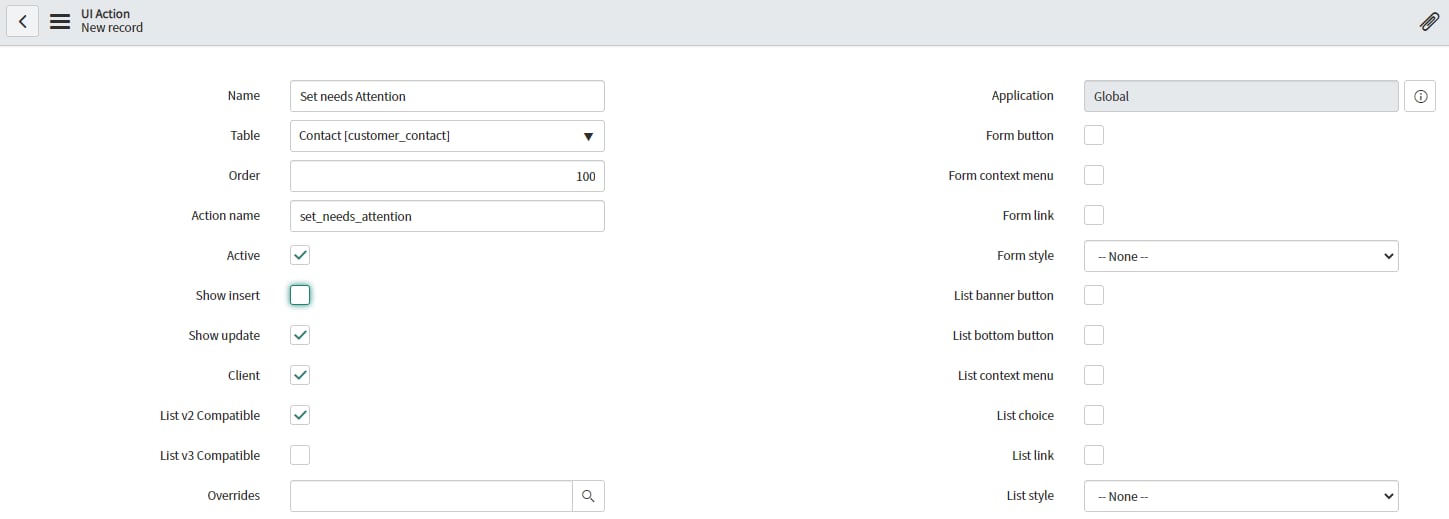
Last step, create the UI Action. Navigate to “System Definition > UI Actions” and create a new record.

It is important to check “Client” because it runs on the client-side. Otherwise, the modal will not be displayed.
On the Workspace tab, we have to check the Workspace Form Button so that the UI Action will display in the Workspace as Button. In the Workspace Client Script, we are using the public API from the Registered Scripting Modal.

The function takes an object as a parameter:
{
    title: 'Set Needs Attention on all open Cases',
    confirmTitle: "Set flag!",
    cancelTitle: "Cancel",
    size: 'lg',
    height: 'lg',
    params: {
        contactName: g_form.getValue('first_name') + " " + g_form.getValue('last_name')
    }
}
The Attribute title is the title for the Modal. confirmTitle is the text on the positive button of the modal, cancelTitle is the text on the cancel button. Size can be used to set the size of the modal. Params is an object of attributes that will be passed into our component. In our component, we already created the property “contactName”. Here is the place where we can set it. We use g_form.getValue() to access the data from the contact form.
If the user clicks on the Set flag! button we can use the result object to access the text from the textarea. Because everything runs on the client-side we need to create a little GlideAjax helper to set the flag and the work notes.
That’s it. Now we can use the UI Action.

In the next article, we are using the now-modal together with the GraphQL API to directly write to the database. To do so we need to add mutation operations to our API.
Complete index.js
import { createCustomElement } from '@servicenow/ui-core';
import snabbdom from '@servicenow/ui-renderer-snabbdom';
import styles from './styles.scss';

import "@servicenow/now-textarea";

const view = (state, { updateState }) => {
    return (
        <div>
            <now-textarea
            showBorders="true"
            label={"Worknote for Cases from " + state.properties.contactName}
            showCounter="true"
            maxlength={100}
            autoresize="true"
            resize="both"/>
        </div>
    );
};

createCustomElement('x-413019-needs-attention', {
    renderer: { type: snabbdom },
    view,
    styles,
    properties: {
        contactName: { default: "" }
    },
    actionHandlers: {
        "NOW_TEXTAREA#INPUT": ({ action, dispatch }) => { dispatch("SN_SCRIPTED_MODAL#DATA_SET", { "worknote": action.payload.fieldValue }) }
    }
});
UI Action Script
function onClick(g_form) {

    g_modal.global.showNeedAttention({
        title: 'Set Needs Attention on all open Cases',
        confirmTitle: "Set flag!",
        cancelTitle: "Cancel",
        size: 'lg',
        height: 'lg',
        params: {
            contactName: g_form.getValue('first_name') + " " + g_form.getValue('last_name')
        }
    }).then(function(result) {

		var ga = new GlideAjax('DemoHelper');
		ga.addParam('sysparm_name',  "setNeedsAttention");
		ga.addParam('sysparm_contact',  g_form.getUniqueValue());
		ga.addParam('sysparm_work_note', result.data.worknote);
		ga.getXML(setFlagResponse);

    });
	function setFlagResponse(response){
		console.log(response);
	}
}
- 2,623 Views