- Post History
- Subscribe to RSS Feed
- Mark as New
- Mark as Read
- Bookmark
- Subscribe
- Printer Friendly Page
- Report Inappropriate Content
on 06-23-2020 11:02 AM
Even after five months at ServiceNow, I still feel like a newbie. The platform and its capabilities are massive, and as soon as I think I have most of it figured out, someone stumps me with a question I have to go digging around to answer. Fortunately, my teammates with many years of experience at ServiceNow tell me they feel the same way. Even if it’s just to make me feel better, I appreciate the compassion!
It’s no surprise, then, that our partners with limited exposure to ServiceNow don’t realize that, in addition to the wealth of functionality our platform offers, we also provide an easy way to integrate with all of that functionality as well.
In this post, I will briefly go over ways our partners can integrate their products with ServiceNow. Then, I’ll focus on one specific example of that integration: making sure budget alerts generated by Azure are tracked and managed by the world-leading IT Management solution that is ServiceNow.
ServiceNow Integration Options
The sheer number of “integrations” available with ServiceNow boggles the mind! From incident creation to intelligent alert routing and notification to actions on Azure Active Directory in response to external events – this functionality is neatly packaged into ServiceNow spokes. Spokes represent a set of enterprise-grade actions created and vetted by the ServiceNow product team, offering the scalability and first-class support for which our company is known. Those actions can be used in any workflow you create, with one powerful example of such actions being and ITSM spoke. In addition to using spokes, you can also write custom code on top of the ServiceNow platform with JavaScript and access a wealth of built-in functions to query virtually anything inside ServiceNow.
But back to the integration options. Generally, ServiceNow offers the following options to developers/integrators seeking to process data from external systems:
- Scripted REST API. The most flexible but also the most laborious option. Here, developers have to manually parse input submitted to the RESTful endpoint in ServiceNow (automatically generated for you) and invoke actions on the platform via code. If you are a hardcore coder, this one’s for you! Below, I will be using this approach to show you how to process budget alerts from Microsoft Cloud.
- Existing Table (and other) APIs. A very quick way to do CRUD (Create/Read/Update/Delete) operations on ServiceNow tables. A nice way to get proof-of-integration created with the corresponding workflow in ServiceNow firing off in response to operations on the table. A note of warning, however, that invoking table API on base tables (such as Incident), is not recommended.
- Email notifications. Certain systems are not allowed to communicate over HTTPS, and in these cases, a limited subset of functionality is available via email messages.
- Event Management (Monitoring events) Connectors. A preferred way to send alerts and notifications related to IT operations. You can create your own connector or utilize one already available. There's a connector for Azure, ready for you to utilize with massive amounts of event data coming from your infrastructure deployed into Microsoft Cloud.
Using Scripted REST API and Flow Actions to Process Azure Alerts
Now, let’s focus on a very specific (and practical!) use case of integrating Microsoft Azure alerts with ServiceNow. For this integration, we will create a custom REST API endpoint inside ServiceNow that will accept alerts coming from Azure. Assuming you have access to both the ServiceNow instance and Azure, the task breaks down into four simple steps.
Step 1: Create REST API Endpoint and a Flow Action
The first thing you will do is add a custom API endpoint inside ServiceNow for Azure to send alerts to. You will also create a Flow Action that will be called from that custom endpoint; having a Flow Action encapsulate the logic of what happens with the alert gives you a lot of flexibility to modify the workflow(s) for that alert. For our scenario, you'll create a simple action to send email passing alert information.
Inside the ServiceNow Studio, click the "+Create Application File" link on the top left and add a Scripted REST API resource. Give it an "Ingest Alerts" name and create a new "ingest" resource with HTTP POST method, as shown in the screen shot below. Take a note of the "Base API Path" value, you will use it in Step 3 below.

Next, you'll add a Flow Action that will send an email with alert information to a specific recipient. Once again, click the "+Create Application File" link on the top left, then search for "Flow" and add it to the project. This will take you to the Flow Designer, where you will add a Send Email action, with a single input of "alertnotification," as illustrated in the screen shot below.

Finally, you will add a bit of code to invoke the Flow Action you've created from the Scripted REST API resource you've defined. Click on the "ingest" resource you created in Scripted REST API, then in the Script field, replace everything with the code below. This code packages information and calls the Flow Action that you've just created.
(function process(/*RESTAPIRequest*/ request, /*RESTAPIResponse*/ response) {

	/* extract alert data from the request - example below concatenates it all, but you certainly don't have to */
	var requestBody = request.body;
	alertnotification = "Metric Type: Budgets\n";
	alertnotification += "Metric Unit: " + requestBody.data.Unit + "\n";
	alertnotification += "Metric Value: " + requestBody.data.SpendingAmount + "\n";
	alertnotification += "Threshold Amount: " + requestBody.data.NotificationThresholdAmount +"\n";
	alertnotification += "Budget Start Date: " + requestBody.data.BudgetStartDate + "\n";
	alertnotification += "BudgetName: " + requestBody.data.BudgetName + "\n";
	alertnotification += "BudgetType: " + requestBody.data.BudgetType + "\n";

	alertnotification += "Enrollment Number: " + requestBody.data.EnrollmentNumber + "\n";
	alertnotification += "Department Name: " + requestBody.data.DepartmentName + "\n";
	alertnotification += "Account Name: " + requestBody.data.AccountName + "\n";
	alertnotification += "Billing Account Id: " + requestBody.data.BillingAccountId + "\n";

	alertnotification += "Billing Account Id: " + requestBody.data.BillingProfileId + "\n";
	alertnotification += "Invoice Section Id: " + requestBody.data.InvoiceSectionId + "\n";
	alertnotification += "Resource Group: " + requestBody.data.ResourceGroup + "\n";
	alertnotification += "Spending Amount: " + requestBody.data.SpendingAmount + "\n";

	/* invoke a Flow Action with alert data */
	try {
		var inputs = {
			"alertnotification": alertnotification
		};
        var outputs = sn_fd.FlowAPI.executeAction('process_azure_budget_alerts', inputs);

	} catch (ex) {
		var message = ex.getMessage();
		gs.error(message);
	}


})(request, response);
Your end result for Scripted REST API will look like the screen below.

Step 2: Create Azure budget
There are various ways to create a budget inside Azure, including directly from the Azure portal, as well as outside the portal, i.e. using an Azure CLI. Here, I will use an ARM template to create one. The ARM resource that creates budgets in Azure is "Microsoft.Consumption/budgets" and it has a variety of properties associated with it.
Go ahead and click the “Deploy to Azure” button in this Azure Quickstart template, and fill in the parameters similar to the screenshot below. I selected a specific resource group to create a budget for; you can either create a new resource group or pick an existing one. Click Deploy to complete budget creation.

Note: As stated in the GitHub repo, you will need to have an Enterprise subscription to create a budget.
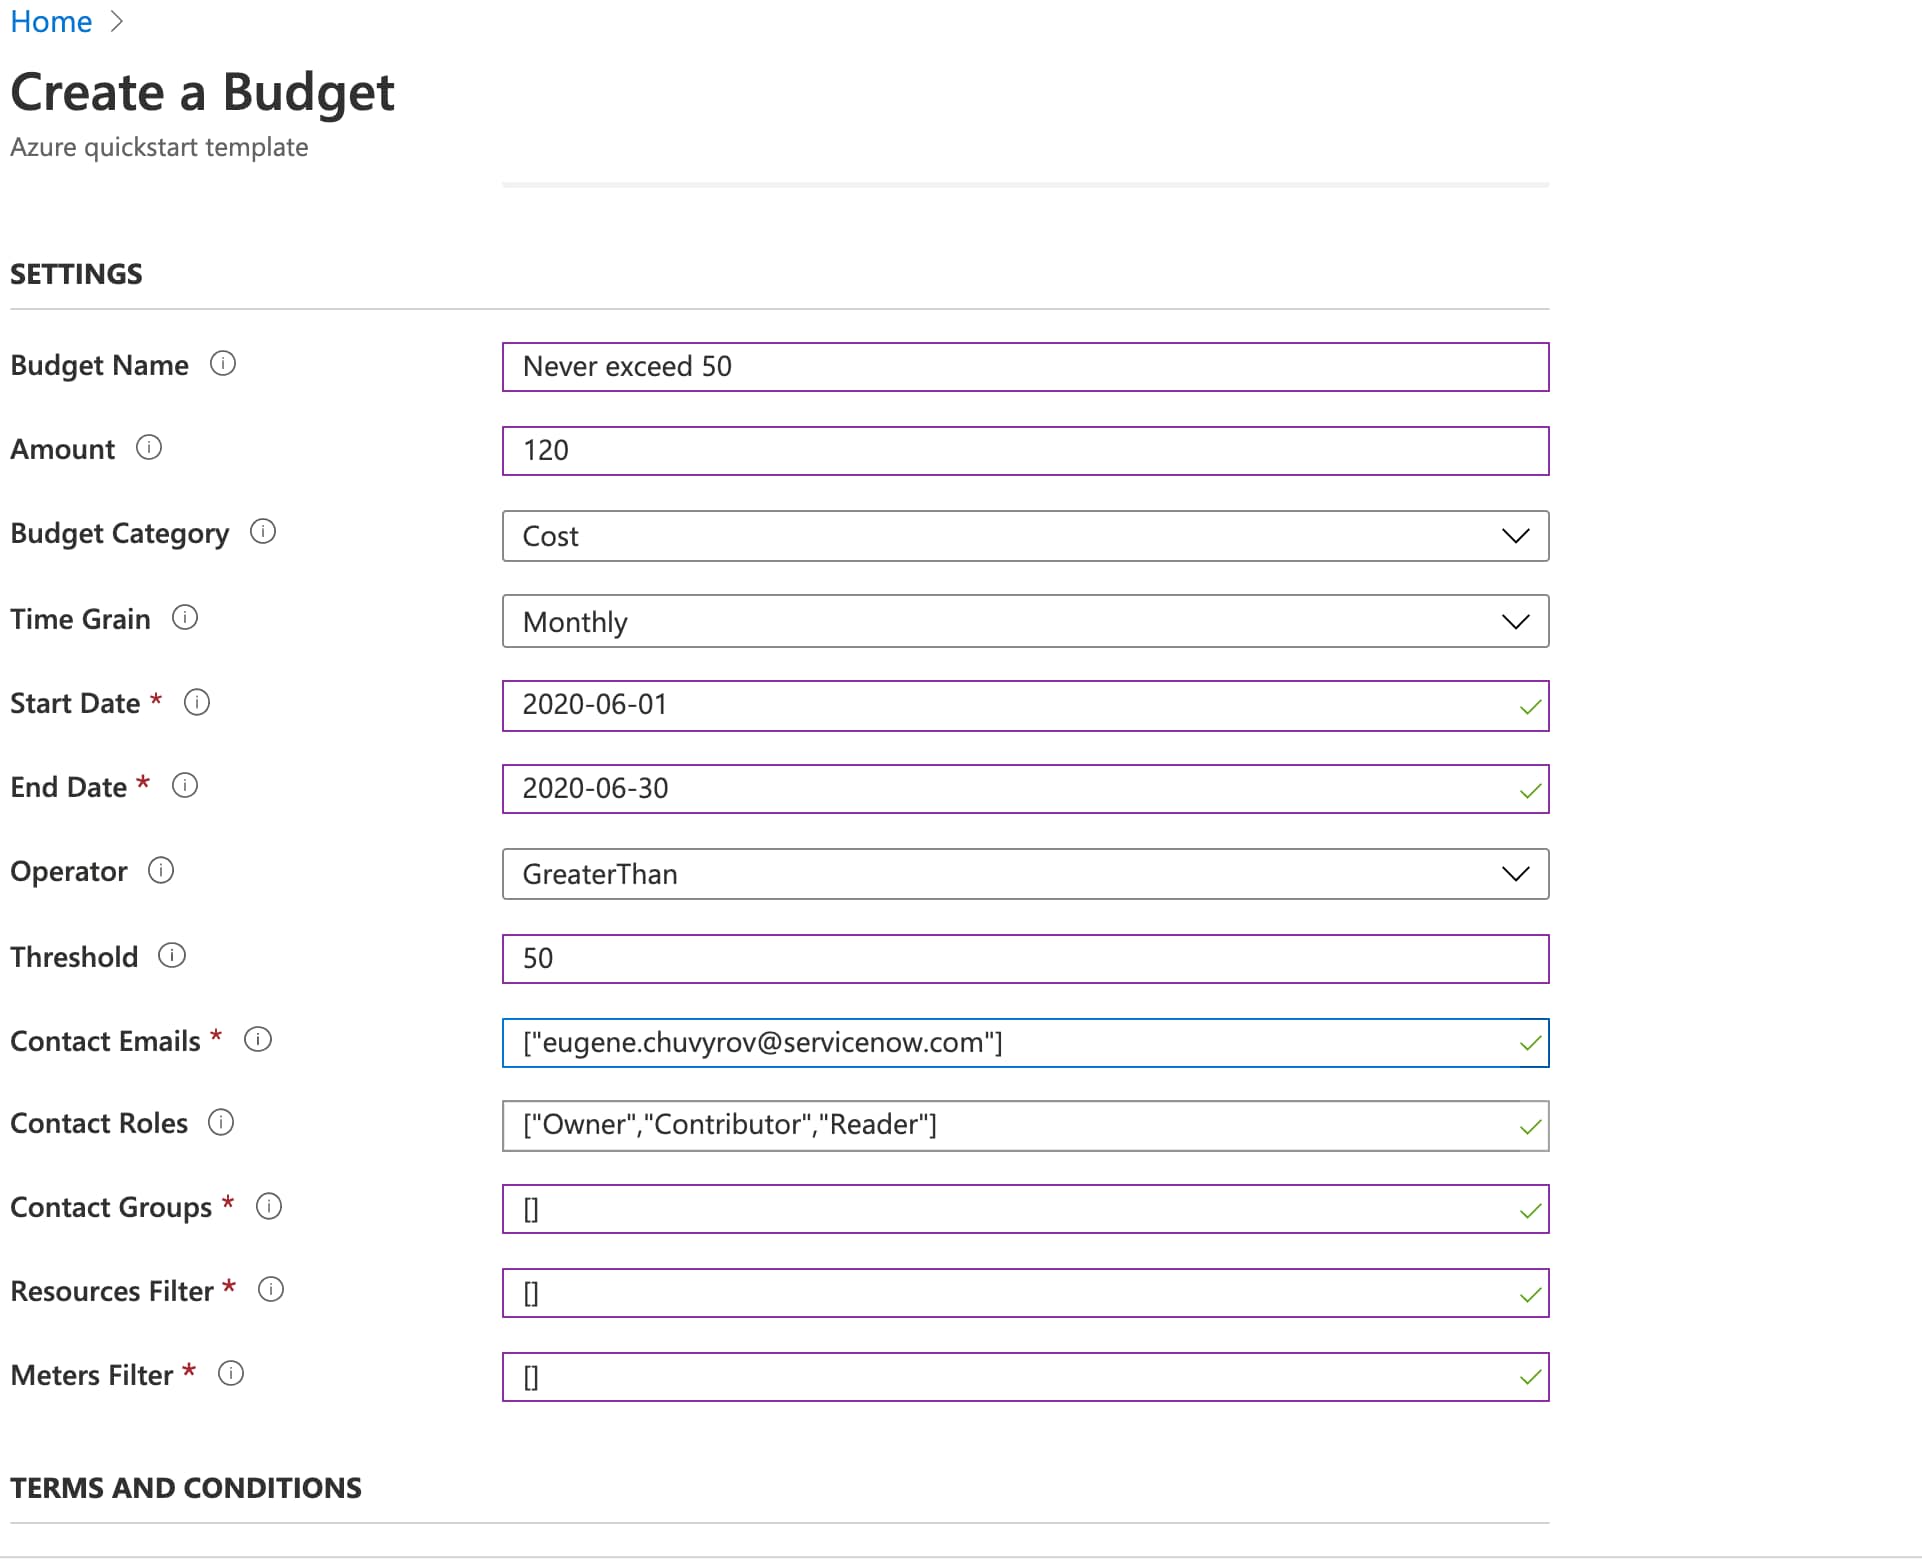
Step 3: Create Azure budget alert
In the portal, create an alert for the budget we just defined. Navigate to the resource group you created the budget in, then select budgets in the left nav and click on the budget you just created. Click Edit Budget to bring up the screen similar to the one shown below.

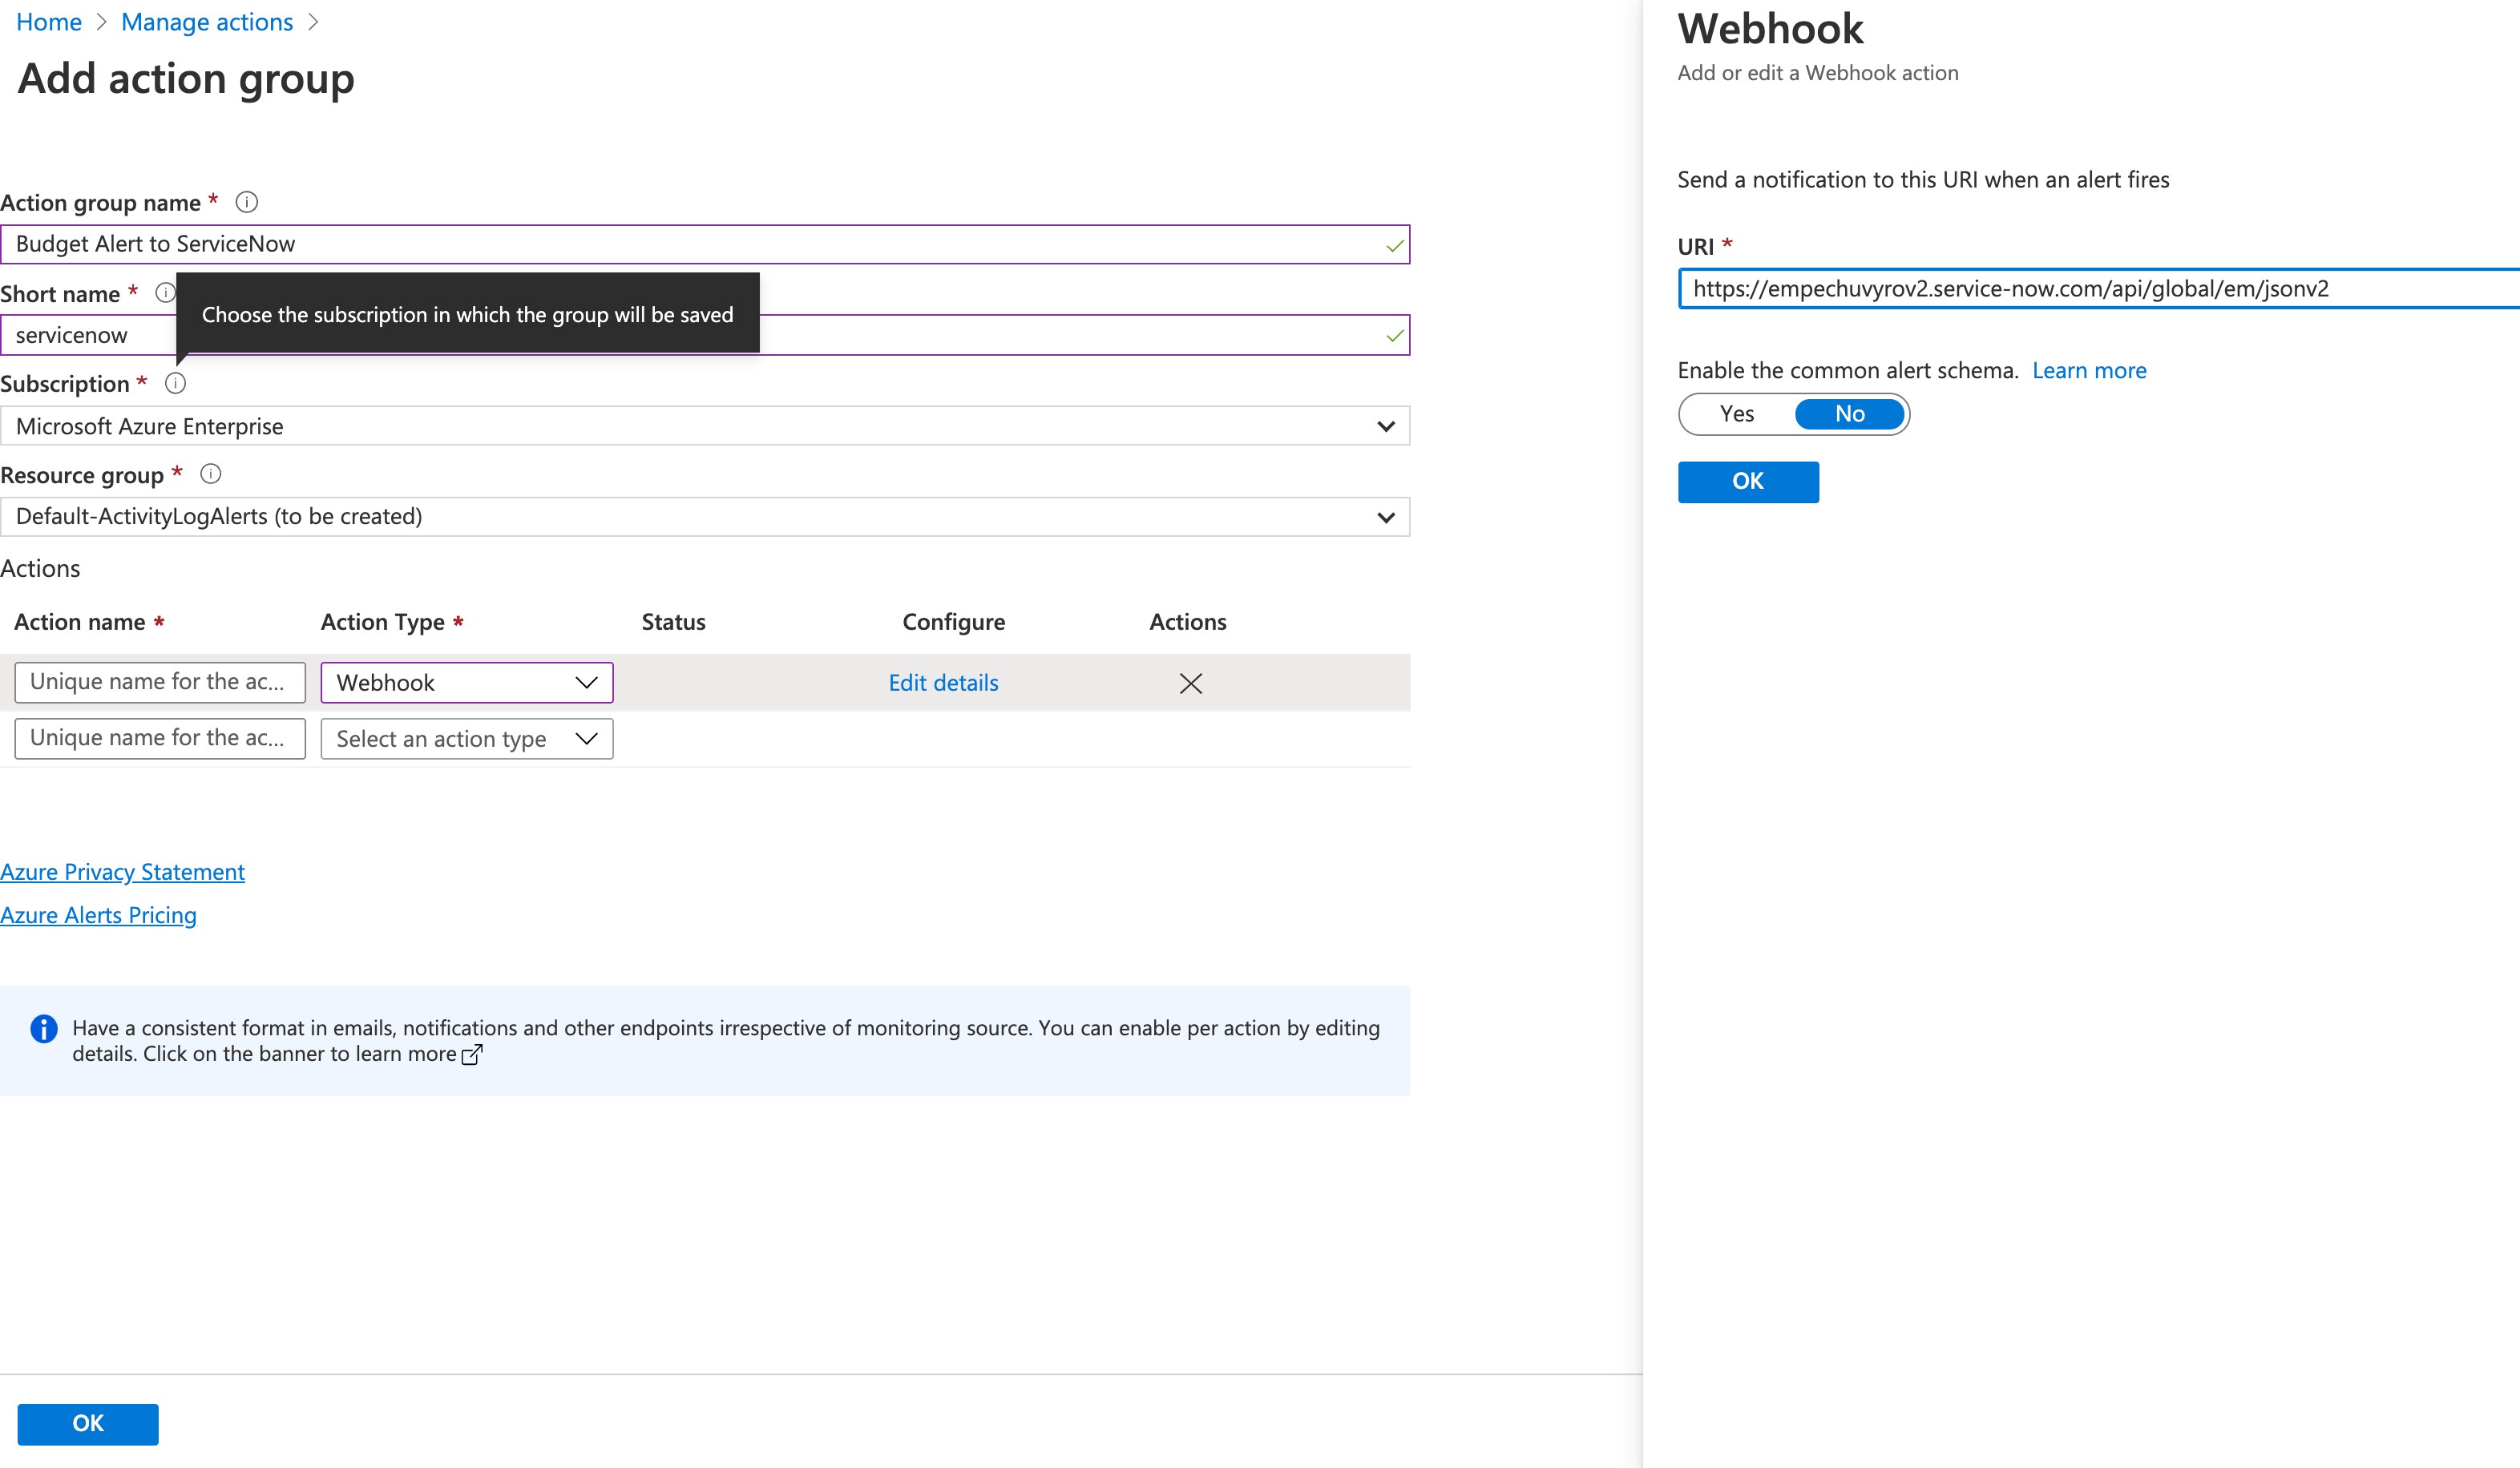
For a notification to be sent from Azure to ServiceNow, we need to create what is known as an Action Group in Azure. An Action Group describes what to do with alerts when they are generated in Azure. In our case, we will use an endpoint inside ServiceNow (a webhook) to which to send the alerts. You have created an API endpoint in Step 1 above and noted Base API Path value, therefore the endpoint will be https://<your-instance-name>.service-now.com/<base api path>, where <base api path> value will be the one you have noted.

From the Edit Budget screen, click Set Alerts, then click on Manage Action Groups, Add New Action Group and select Webhook as Action Type. Paste the webhook URL for your instance, and save the new action group.
Step 4: Trigger the alert and find it inside ServiceNow
With the budget and budget alert created, it is time to test the integration. Setting an alert at an arbitrarily low amount or temporarily provisioning a fairly expensive alert to exceed budget threshold are some ways to test the Azure alert integration.
Note: Per Microsoft documentation, budgets are evaluated every 4 hours, so it might take a few hours for the alert to be triggered. In my tests, alerts showed up 6-8 hours after budget had been exceeded.
With alert triggered, ensure that the alert was properly routed to ServiceNow. Inside ServiceNow, make sure the Flow Action you have created has been executed (did you receive an email?). From here, you can customize ServiceNow workflows to process budget alerts by automatically creating Incidents, notifying somebody, or invoking a workflow that is specific to budgets for cloud computing. Alternately, also take a look at ServiceNow Cloud Insights solution, which allows you not only to manage budgets on a per resource level, but also optimize cloud spend across your whole enterprise.
This is just scratching the surface of what’s possible with the ServiceNow platform. Armed with additional knowledge for integrating your solution with our platform, it’s your turn to build an amazing integration with our workflows.
Author: Eugene Chuvyrov
Technical Reviewer: Sasson Jamshidi
Technical Editor: Zach Dubin
- 2,285 Views