- Post History
- Subscribe to RSS Feed
- Mark as New
- Mark as Read
- Bookmark
- Subscribe
- Printer Friendly Page
- Report Inappropriate Content
01-10-2022 02:12 PM - edited 06-02-2023 09:25 AM
The Practical Guide to What is GraphQL and How to query data within ServiceNow. This is part two of three. Please see part 1 "Setting up and Testing your first GraphQL API Tutorial" for help getting started creating and querying GraphQL APIs.
Who is this for?
I started this series to help myself learn what GraphQL is and how to use it within ServiceNow. In step one we cover how to create a simple API and setup a client to unit test it. Now we're ready for the next step--using the ServiceNow GraphQL API to query records in ServiceNow and return them.
In the first part we just returned a simple message but today we are going to add the ability to query incident records using GlideRecords to easily perform queries and return results (with little or no field mapping code) and how to extend our document model to return user records as well.
Whatsamatta U
Today we will be creating an API that will be used from the agent workspace that administrators at the esteemed Whatsamatta University in Frostbite Falls use to create an incident when something is the matter with one of the students.
We need to shift our mindset a bit from what we are used to and use GraphQL not as a generic API, such as the REST Table API which works with any table in the system, but instead using it to encapsulate the retrieval, entry and editing of data specific to our application domain. For example the Playbook Experience uses a GraphQL API to retrieve and update data as it guides the user through a workflow and to encapsulate the logic on server.
Get Incidents
When assisting a student the administrator at the college needs to know what else might be the matter with the student, so we need to retrieve a list of incidents opened by the current student.
Since completing part 1 you're pretty comfortable adding types, so let's start with a complete schema and we'll explain how the new stuff works. (We will get rid of the Hello World samples we created in part 1).
Incident Query Schema (01)
schema {
  query: Query
}

type Query {
  getIncidentsForStudent(callerId: String!, last: Int): [Incident]
  getIncidents(priority: String): [Incident]
  getIncident(id: ID!): Incident!
}

type Incident {
  id: String! @source(value: "sys_id.value")
  number: String! @source(value: "number.value")
  active: Boolean! @source(value: "active.display_value")
  state: String! @source(value: "state.display_value")
  shortDescription: String @source(value: "short_description.value")
  description: String @source(value: "description.value")
  priority: String @source(value: "priority.display_value")
  assignedTo: User @source(value: "assigned_to.value")
  caller: User @source(value: "caller_id.value")
}
Basic Query and Type
Pretty familiar, no? We specify in the Schema that we support Query and then define the getIncidents query operation which accepts an optional integer called "last" to return the last number of specified records in an array, an optional "priority" to filter by and it returns an array of Incidents.
While we're at it we include a query called getIncident to return a single incident by sys id.
NOTE: The "!" indicates required fields, so as you can see in getIncident the id argument is mandatory as is the Incident result--i.e. it will never return a null result.
You might notice that the Incident type has a new syntax, though.
@Source Directive
The "@source" directive is a special shortcut that allows us to map the underlying fields to be returned from a ServiceNow GlideRecord directly from the schema. While it is possible to do this manually (by composing the JSON in the resolver directly), this is a nice little shortcut that allows us to specify this map at the same time the field is defined and then let the system wire it up.
The syntax is simply the name of the field followed by "value" or "display_value" (e.g. for priority "value" is "1" and "display_value" may be "Priority - 1").
GlideRecord Resolver
Like any GraphQL query we must wire up the getIncidents operation with a Resolver.
1. Go to the "GraphQL Scripted Resolvers" related list and choose "New".
2. Name it "Get Incidents" and copy the following script:
Get Incidents Resolver (02)
(function process(/*ResolverEnvironment*/ env) {
  var gr = new GlideRecordSecure('incident');

  // If these parameters were passed add them to the GR
  if(env.getArguments().callerId){
  gr.addQuery('caller_id', env.getArguments().callerId);
  }

  // If the sys id is specified for getIncident
  if(env.getArguments().id){
    gr.addQuery('sys_id', env.getArguments().id);
  }

  // default to last 5 if not specified
  var last = env.getArguments().last || 5;

  // Handle optional "priority" argument
  if(env.getArguments().priority){
    gr.addQuery('priority', env.getArguments().priority);
  }
  gr.orderByDesc('sys_created_on');
  gr.setLimit(last);
  gr.query();

  return gr;
})(env);
NOTE: We use GlideRecordSecure instead of a plain GlideRecord to ensure that only records the logged-in user has access to are returned.
As you can see the first thing we do is create a GlideRecord on the Incident table.
Using the env.getArguments() method we can retrieve arguments passed to the call and if they exist add them to the query. This way you can use the same resolver with different flavors of operations and different arguments (in the real world you would probably want to encapsulate your logic in a separate script include).
Finally it executes query() on the record and returns it.
Wait, what?
Notice that there is no mapping logic, or really any code other than setting up the query. We simply return a queried GlideRecord and the engine will use the "@source" directives to wire up your result to match the Incident type that you specified. It seems so easy--we're almost done!
Incident Resolver Mappings
Don't forget to always add a Resolver Mapping. In this case two--one for each query operation we have defined.
getIncidentsForStudent Resolver Mapping
1. Go to the "GraphQL Resolver Mappings" related list and select "New".
2. Select the path "Query:getIncidentsForStudent".
3. Select the "Get Incidents" resolver.
getIncident Resolver Mapping
1. Go to the "GraphQL Resolver Mappings" related list and select "New".
2. Select the path "Query:getIncident".
3. Select the "Get Incidents" resolver.
getIncidents Resolver Mapping
1. Go to the "GraphQL Resolver Mappings" related list and select "New".
2. Select the path "Query:getIncidents".
3. Select the "Get Incidents" resolver.
See what happened there? With a single resolver we solved three common scenarios without writing any extra code. Now let's see how to use them.
Query Incidents
We're ready to test! Return to your GraphQL client (check out Part 1 of this series if you need help getting this working) and let's create a new query.
1. Method is "POST", url is "https://{your-instance}.service-now.com/api/now/graphql", and select Body of type "Structured GraphQL Query".
2. Select Auth of "Basic" and enter your username and password (promise me that you will do this in dev only).
3. Select the "schema" button and refresh your schema. Give it a couple of minutes to complete.
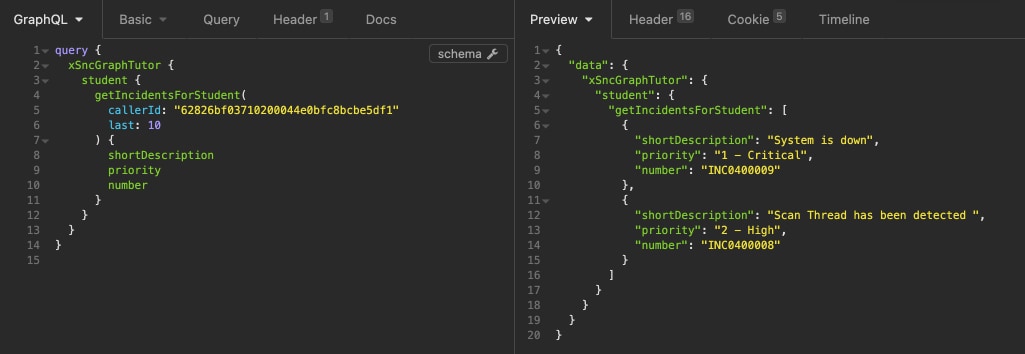
4. Test yourself--see if you can build a query to return the short description, priority and number of the last 10 incidents for Abel Tuter (id: "62826bf03710200044e0bfc8bcbe5df1") without my help (no peeking!)
NOTE: You must change the first node under the query to whatever you Application Namespace is--that's on the GraphQL API form and will be something like "x530453Gqlt" for a PDI. (Don't forget to make that change for all queries from here on.)
Get Incidents Basic Query (03)
query {
  xSncGraphTutor { /* Replace with your Application Namespace */
    university {
      getIncidentsForStudent(
        callerId: "62826bf03710200044e0bfc8bcbe5df1"
        last: 10
      ) {
        shortDescription
        priority
        number
      }
    }
  }
}
How did it go? You may have gotten an error (it happens to the best of us). This is almost always an issue in the resolver. Be sure that the names of the arguments match, that the user you're logged in as has access to the table, and that all of the fields which you are requesting exist.
You should have gotten a result like this:

Play around some more by making queries to "getIncident" and "getIncidents" using what you have learned and the parameters defined in the schema.
Adding More Details
Remember that one of the advantages we tout for GraphQL is the ease of composing complex documents and returning results in a single query? Let's do that now by adding user types to the results.
Add User type to Schema
We need to know information about the student (the caller) and the person that this incident is assigned to.
Do you think that you can add a type to the schema to include a user's id, name, email address and manager?
After adding the type for User we then need to add the Assigned To and Caller fields to the Incident type.
Schema with Incidents and Users (04)
schema {
  query: Query
}

type Query {
  getIncidentsForStudent (callerId: String!, last: Int) : [Incident]
  getIncident (id: ID!) : Incident!
}

type Incident {
  id: String! @source(value: "sys_id.value")
  number: String! @source(value: "number.value")
  active: Boolean! @source(value: "active.display_value")
  state: String! @source(value: "state.display_value")
  shortDescription: String @source(value: "short_description.value")
  description: String @source(value: "description.value")
  priority: String @source(value: "priority.display_value")
  assignedTo: User @source(value: "assigned_to.value")
  caller: User @source(value: "caller_id.value")
}

type User {
  id: String! @source(value: "sys_id.value")
  active: String @source(value: "active.display_value")
  name: String @source(value: "name.value")
  email: String @source(value: "email.value")
  manager: User @source(value : "manager.value")
}
Notice that we added the "User" type and all we had to do is reference it in assignedTo and caller fields. Just as we used "String", "Boolean" and "Int" previously we can reference our new User type. Easy!
Resolve the child type for Users
Just like any other type you need to add resolver for the User. There is one special tool you will need to determine the sys_id from the field on the Incident record, but when it comes to creating Resolvers you know the drill by now!
1. Go to the "GraphQL Scripted Resolvers" related list and select "New".
2. Name it "Get User" and use the following script.
User Resolver (05)
(function process( /*ResolverEnvironment*/ env) {
  // By default try to get ID from the query arguments: getStudent(id: ID!)
  // If that is empty then try to use the value from the @source directive
  // in the schema definition.  This allows us to use the same resolver
  // from a query (getUser(id)) or from a nested field (getIncident/assignedTo)
  var sysId = env.getArguments().id || env.getSource();

  var gr = new GlideRecordSecure('sys_user');
  gr.query('sys_id', sysId);

  return gr;
})(env);
(Note: This is good boilerplate to keep in your toolbox--this script can be reused for any resolver to get a record by sys_id by merely changing the table reference for GlideRecordSecure.)
Get Source
To resolve nested "sub types" the env.getSource() method is critical. This is how you are able to get the context needed to resolve a "sub type", in this case the sys id of User record for the assigned to field.

Thanks to this handy helper you do not need to create new resolvers every time a user is referenced. Sweet!
Resolver Mappings are next (Spoiler: It's always Resolver Mappings)
Resolver mappings are necessary yet again but luckily they're simple and as we just discovered you do not need extra Resolver code beyond resolving the user.
Go to the "GraphQL Resolver Mappings" related list and create two new mappings using the "New" button.
1. Path: "Incident:assignedTo", Resolver: "Get User"
2. Path: "Incident:caller", Resolver: "Get User".
Get an Incident with User Details Query
I know that you've got this! Give a shot at creating a GraphQL query request to lookup a specific incident by ID and return the name and email address for the assigned to user and caller. (Be sure to find an incident with these values set.)
Don't forget to save your configuration and refresh your schema in Insomnia.
Let's get an incident and include the Caller and Assigned To users' name and email so we can update them on the status of the incident.
Query for Incidents and include User Data (06)
query {
  xSncGraphTutor { /* Replace with your Application Namespace */
    university {
      getIncident(id: "08c257b21b6c0010a26310e63e4bcb54") {
        shortDescription
        priority
        number
        caller {
          name
          email
        }
        assignedTo {
          name
          email
        }
      }
    }
  }
}
Extra Credit: Digging Deeper
O.K., this has been a long tutorial, but did you notice the reference to "Manager" in the User type declaration? By simply adding another (what else?) Resolver Mapping we have the ability to "dot-walk" into mangers as deeply as we wish, and we didn't even have to code for it!
1. Add a Resolver mapping for "User:manager" using the "Get User" resolver.
2. Modify your query to return the Assigned To manager's name and email so we can send them a message too, like this:
Query for Incidents including User and Manager Data (07)
query {
  xSncGraphTutor { /* Replace with your Application Namespace */
    university {
      getIncident(id: "979b6060a5954300964fa3aa92874155") {
        shortDescription
        priority
        number
        caller {
          name
          email
        }
        assignedTo {
          name
          email
          manager {
            name
            email
          }
        }
      }
    }
  }
}
Next Presenting the Data
Great job! You've got the tools to do pretty much any type of query you could imagine at this point. But eventually you want to present this data to the user. Good news--part 3 is when we will learn about how easy Using Data from your GraphQL API in UI Builder is.
Source for this series is available at https://github.com/ServiceNowNextExperience/graphql-tutorial
- 9,823 Views
- Mark as Read
- Mark as New
- Bookmark
- Permalink
- Report Inappropriate Content
Hello Jon
Thank you for your great tutorial so far. It helped me getting started with GraphQL in Servicenow.
Two remarks:
Currently, in User Resolver (05) a GlideRecordSecure is created on the incident table. I think it should be like that:
var gr = new GlideRecordSecure('sys_user');
- It might be helpful to mention in the 1st part and this part of the tutorial that Insomnia is a GraphQL client. I was wondering for a while what you mean by that.
Keep up the great work!
Kind regards,
Hendrik
- Mark as Read
- Mark as New
- Bookmark
- Permalink
- Report Inappropriate Content
Hi @Jon G Lind
Thank you for this great article.
Also could you please suggest or provide couple of inputs for "How we can pull the data from other application using GraphQL?"
Currently I am trying to pull the data from LeanIX application but not getting proper method to achieve the same.
Your inputs help me a lot here. Thank you in advance!
Regards,
Ganesh