


Saroja D

ServiceNow Employee
Options
- Subscribe to RSS Feed
- Mark as New
- Mark as Read
- Bookmark
- Subscribe
- Printer Friendly Page
- Report Inappropriate Content
10-08-2024
11:01 AM
Agent Workspace is a tailored environment in ServiceNow designed to streamline work for agents handling tasks like incidents, cases, or requests. It provides an intuitive interface, optimized for performance and productivity, featuring configurable layouts and panels. UI Actions in Agent Workspace allow developers to create custom buttons and actions that agents can trigger directly from their workspace, making the system more interactive and efficient.
What Are UI Actions?
UI Actions are buttons, links, or context menu items that trigger actions when clicked. In Agent Workspace, they can be used to:
- Perform server-side operations such as creating records or updating fields.
- Open modals to collect additional information.
- Interact with external systems.
- Simplify agent workflows by automating repetitive tasks.
Types of UI Actions in Agent Workspace
- Form Buttons: These are buttons on forms that trigger specific actions, such as saving or closing a record.
- Contextual Menu Items: Actions that can be triggered from right-click context menus or action bars.
- List Buttons: Actions that can be performed on records in a list view, such as bulk updates or record deletion.
Creating a UI Action in Agent Workspace
Creating UI Actions for Agent Workspace involves defining the action in the UI Action record and handling the action's logic in a client script or a server-side script.
Steps to Create a UI Action for Agent Workspace:
- Navigate to UI Actions:
- Go to System Definition > UI Actions in the ServiceNow application navigator.
- Create a New UI Action:
- Click New to create a new UI Action.
- Define the UI Action:
- Table: Select the table where this action will be available (e.g., incident or case).
- Name: Provide a name for your UI Action.
- Action Name: Give it a unique action name (this is important for calling it from a client script).
- Active: Ensure the UI Action is active.
- Workspace Settings:
- In the Workspace tab of the UI Action, you can define specific settings that apply to Agent Workspace.
- Available in Agent Workspace: Check this box to make the action visible in Agent Workspace.
- Workspace Form Button/Action: Decide whether this UI Action will be displayed as a button, a link, or in the menu of a form in Workspace.
- Conditions:
- Define conditions for when the action should appear. For example, the button could be hidden if certain field values are not met.
- Client-Side Script:
- Add a client-side script if you want to handle some logic directly in the Workspace without calling the server. For example, showing modals, gathering information, or making GlideAjax calls.
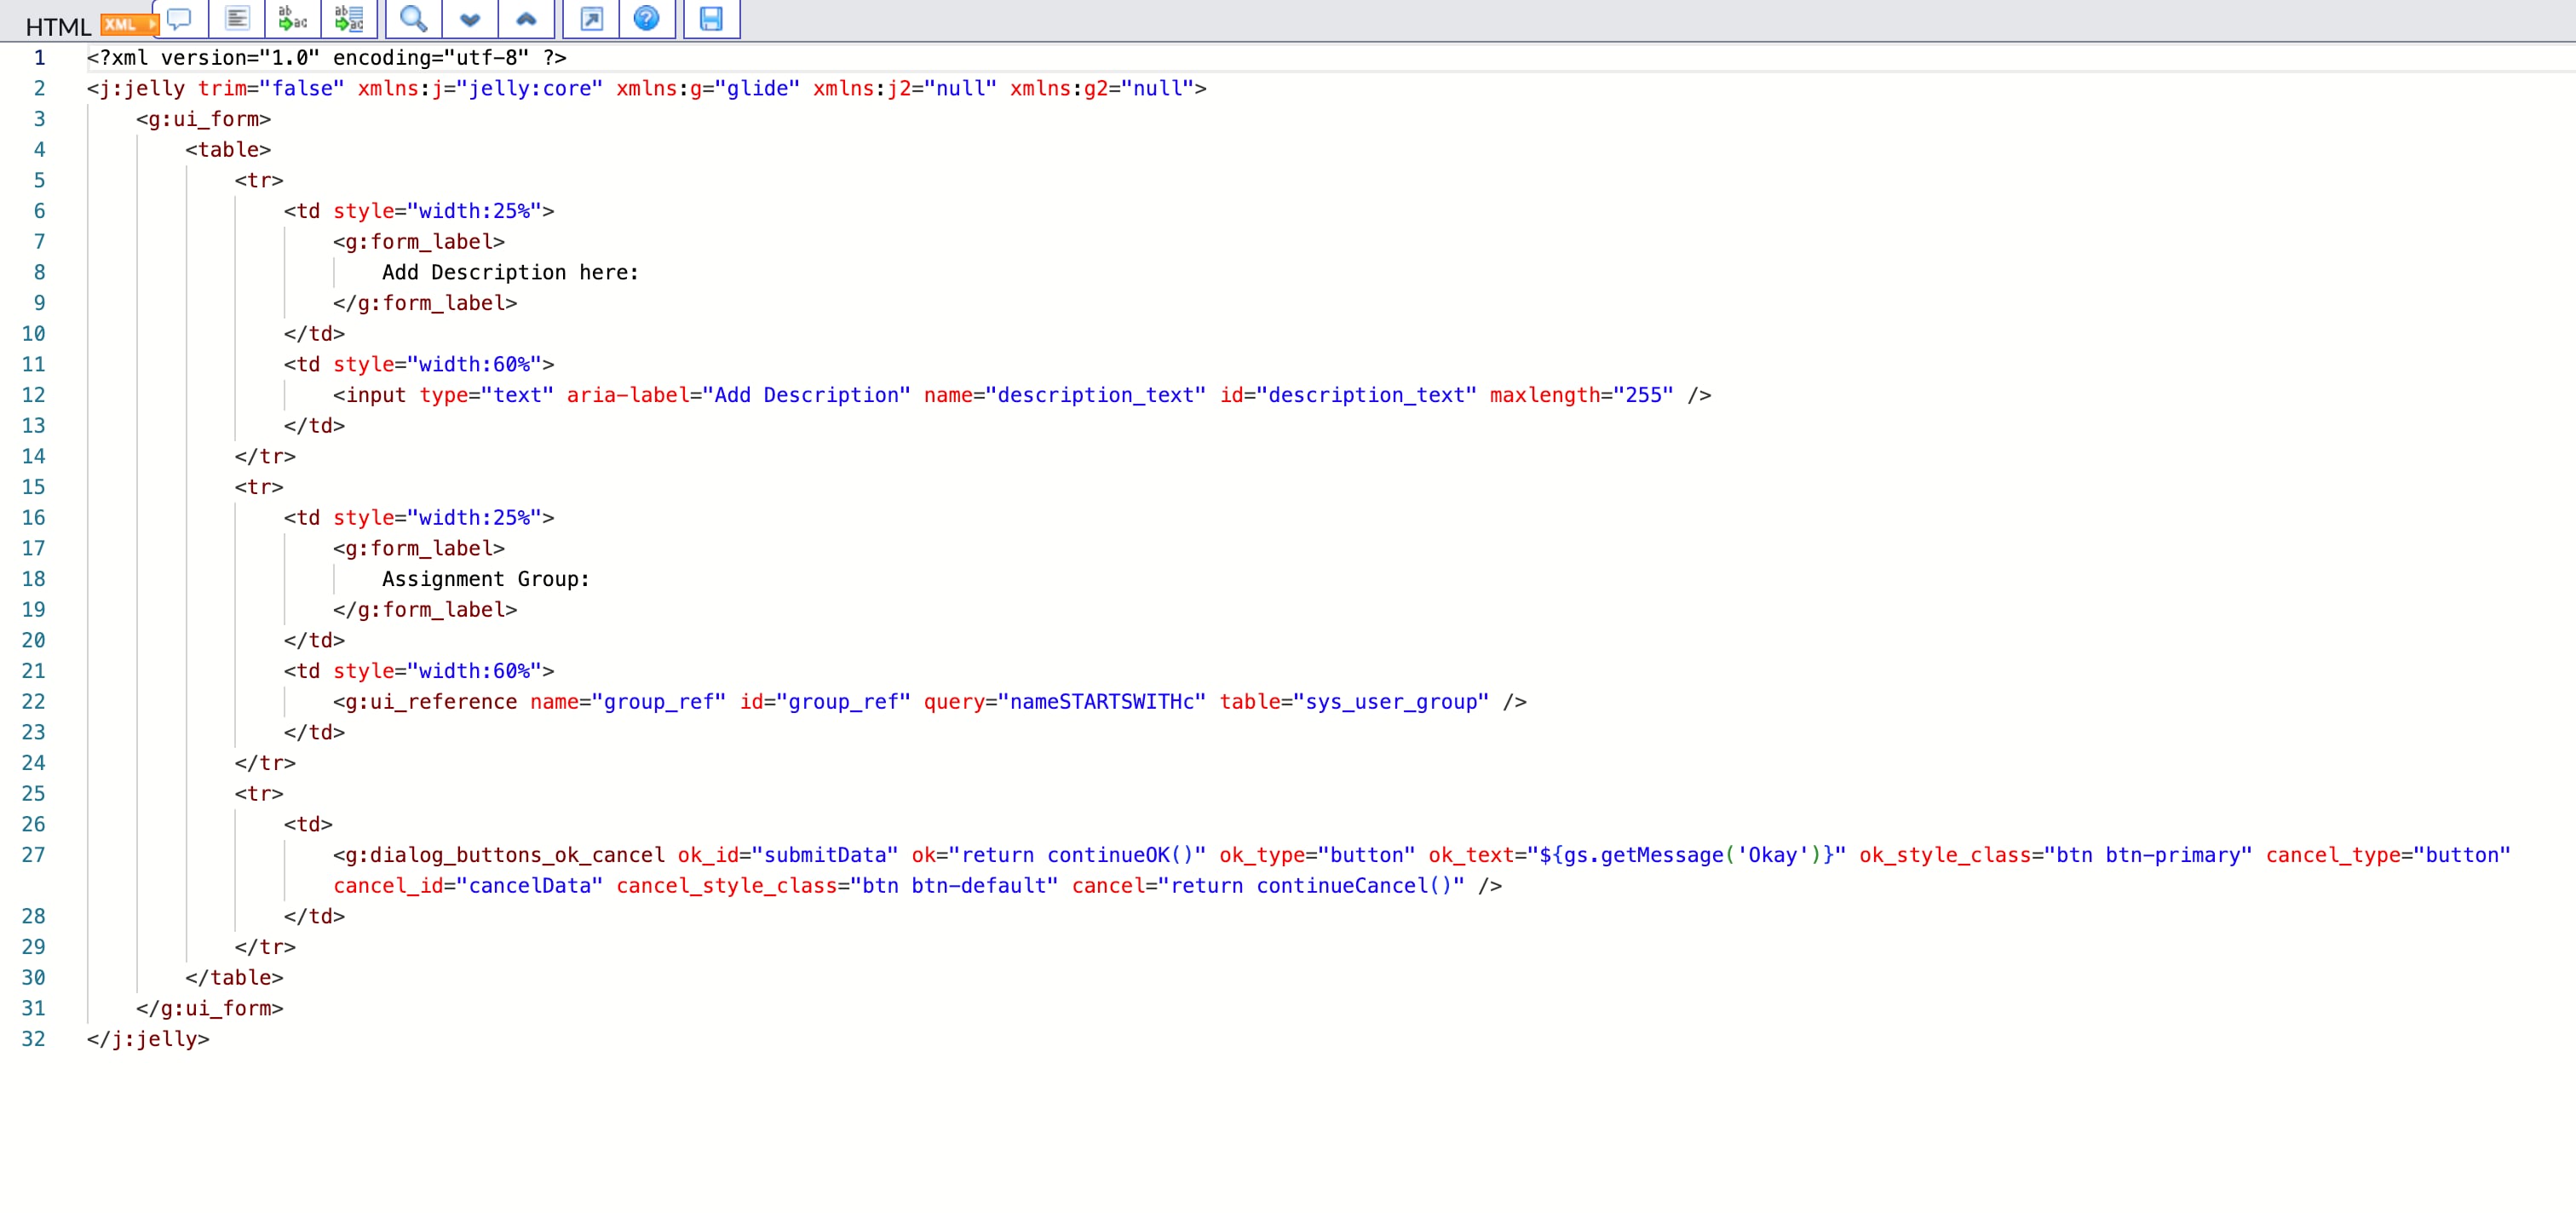
UI Action to Open a Modal to capture text and a reference field value
In this example, the modal window has a text field and a reference field. The field values populate the fields on the current case.
How the Script Works:
- Modal Setup:
- A textarea for work_notes (description).
- A reference field for u_itsm_group, which points to the sys_user_group table (the ITSM group field).
- Both fields are set as mandatory.
- Modal Display:
- The modal is shown using g_modal.showFields().
- After the agent enters the details and submits the modal, the values are captured via fieldValues.
- Form Update:
- The script sets the values of the u_incident_description and u_itsm_group fields using g_form.setValue(), which updates the form.
Workspace Client-Side script
Native UI action to open a modal window to capture information and pass this information to the newly created incident.
Here are the steps -
Step 1. Create a UI page
Name – transfer_to_it
Application – Human Resources: Core
Endpoint – sn_hr_core_transfer_to_it.do
HTML Script
- Client Script
Step 2 – Call the UI page in the UI action
Action name – transfer_to_it
OnClick – transferToIT()
Step 3 – Create a script include
Name – UpdateRecordFields
Note : Make sure to allow the restricted caller access records.
Here are screenshots of the modal window
On submission of the modal window, the new incident carries over the information of description and assignment group.
- 11,637 Views
1 Comment
You must be a registered user to add a comment. If you've already registered, sign in. Otherwise, register and sign in.

