


sabell2012

Mega Sage
Options
- Subscribe to RSS Feed
- Mark as New
- Mark as Read
- Bookmark
- Subscribe
- Printer Friendly Page
- Report Inappropriate Content
09-07-2016
04:36 AM
NOTE: MY POSTINGS REFLECT MY OWN VIEWS AND DO NOT NECESSARILY REPRESENT THE VIEWS OF MY EMPLOYER, ACCENTURE.
DIFFICULTY LEVEL: ADVANCED
Assumes very good knowledge and/or familiarity of scripting, and user interfaces in ServiceNow.
____________________________________________________________________________
The other day I was working on a gnarly UI problem with lisse (Calisse Voltz), and we found that we needed to add a Slush Bucket control to a GlideDialog form. We went looking in the community, and on the web for information on how to best accomplish this task, and what did we find? Nuttin - technical term meaning null. Well, a GlideDialog executes a UI Page, and there are a few UI Page examples in the Out-Of-The-Box (OOB) ServiceNow platform, and one of them should contain a Slush Bucket, right? Well, one did! With that we were then able to figure it out. I thought I would share.
So, what is needed?
Design:
- Create a simple UI Page that contains a Slush Bucket control.
- Create a Client Script on that UI Page that populates the Slush Bucket.
- Create a Ajax Script Include to provide the data for the Slush Bucket - for demo purposes.
- Create a UI Script that pulls the picked data from the Slush Bucket and allows us to use it.
- Create a UI Action to fire the UI Page as a GlideDialog - for demo purposes.
Lab 1.1: Create the Ajax Script Include
This will be the driver that fills our Slush Bucket with test data. Of course this would change should you want to really do something special with the example, but I put this here to give you an idea of how it can be done.
1. Navigate to System Definitions -> Script Includes. The Script Includes list view will be displayed.
2. Click on the New button to create a new Script Include. The new Script Include form will be displayed.
3. Fill out the form with the following:
a. Name: GetIncidentsAjax
b. Client callable: checked
c. Active: checked
d. Accessible from: All application scopes
e. Description: Driver to fill GlideDialog Slush Bucket with test data
f. Script:
var GetIncidentsAjax = Class.create();
GetIncidentsAjax.prototype = Object.extendsObject(AbstractAjaxProcessor, {
getIncidentList : function() {
var incidentList = [];
var incidentRecords = new GlideRecord('incident');
incidentRecords.setLimit(10);
incidentRecords.orderByDesc('number');
incidentRecords.query();
while (incidentRecords.next()) {
var incident = {};
incident.number = incidentRecords.getValue('number');
incident.sys_id = incidentRecords.getValue('sys_id');
incidentList.push(incident);
}
return new JSON().encode(incidentList);
},
type: 'GetIncidentsAjax'
});
g. Submit to save your work
Lab 1.2: Create the UI Page and Client Script
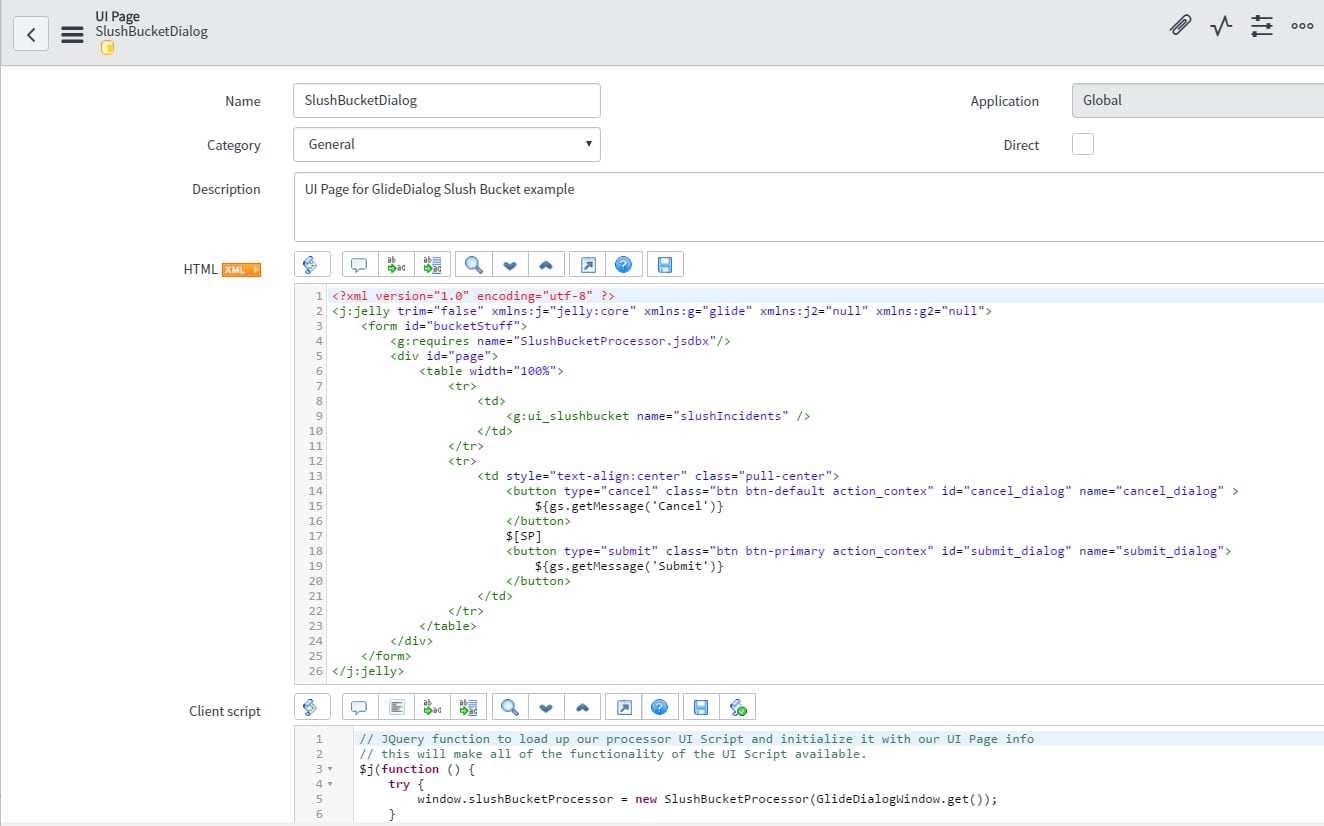
Next we want to create the actual UI Page that will act as our GlideDialog. This will contain the Slush Bucket control, a couple of buttons (Cancel, Submit), and our Client Script to fill the Slush Bucket on load of the form. You will note, in the example below, that the Slush Bucket is a single inclusion line, and contains only a name. I am also using some of the fancier button definitions I have found in the OOB code. For those of you who didn't know: If you use gs.getMessage you can localize the example. You need to do a requires tag to link in the UI Script library, and make it available to the page. Read the comments in the code as I explain a lot of what's happening there.
NOTE: Yeah, using Jelly as that is still the default when creating a new UI Page in Helsinki. I will let b-rad (Brad Tilton) set this up in Angular, or may do it myself later.
1. Navigate to System UI -> UI Scripts. The UI Scripts list view will be displayed.
2. Click on the New button to create a new UI Script. The new UI Script form will be displayed.
3. Fill out the form with the following:
a. Name: SlushBucketDialog
b. Category: General
c. Description: UI Page for GlideDialog Slush Bucket example
d. Direct: unchecked
e. HTML:
<?xml version="1.0" encoding="utf-8" ?>
<j:jelly trim="false" xmlns:j="jelly:core" xmlns:g="glide" xmlns:j2="null" xmlns:g2="null">
<form id="bucketStuff">
<g:requires name="SlushBucketProcessor.jsdbx"/>
<div id="page">
<table width="100%">
<tr>
<td>
<g:ui_slushbucket name="slushIncidents" />
</td>
</tr>
<tr>
<td style="text-align:center" class="pull-center">
<button type="cancel" class="btn btn-default action_contex" id="cancel_dialog" name="cancel_dialog" >
${gs.getMessage('Cancel')}
</button>
$[SP]
<button type="submit" class="btn btn-primary action_contex" id="submit_dialog" name="submit_dialog">
${gs.getMessage('Submit')}
</button>
</td>
</tr>
</table>
</div>
</form>
</j:jelly>
f. Client Script:
// JQuery function to load up our processor UI Script and initialize it with our UI Page info
// this will make all of the functionality of the UI Script available.
$j(function () {
try {
window.slushBucketProcessor = new SlushBucketProcessor(GlideDialogWindow.get());
}
catch(err){
alert(err);
}
});
// Called when the form loads
addLoadEvent(function() {
// clear the slush bucket
slushIncidents.clear();
// show loading dialog until we get a response from our ajax call to retrieve a list of incidents
showLoadingDialog();
// load the slushbucket with test data
var incidentAjax = new GlideAjax('GetIncidentsAjax');
incidentAjax.addParam('sysparm_name', 'getIncidentList');
incidentAjax.getXML(incidentResults);
function incidentResults(response){
hideLoadingDialog();
var incidentList = JSON.parse(response.responseXML.documentElement.getAttribute("answer"));
// Fill the Slush Bucket control with the test data
// Note that the value is the sys_id, and the "label" is the number
for (var i=0; i < incidentList.length; i++) {
slushIncidents.addLeftChoice(incidentList[i].sys_id, incidentList[i].number);
}
}
});
g. Submit to save your work
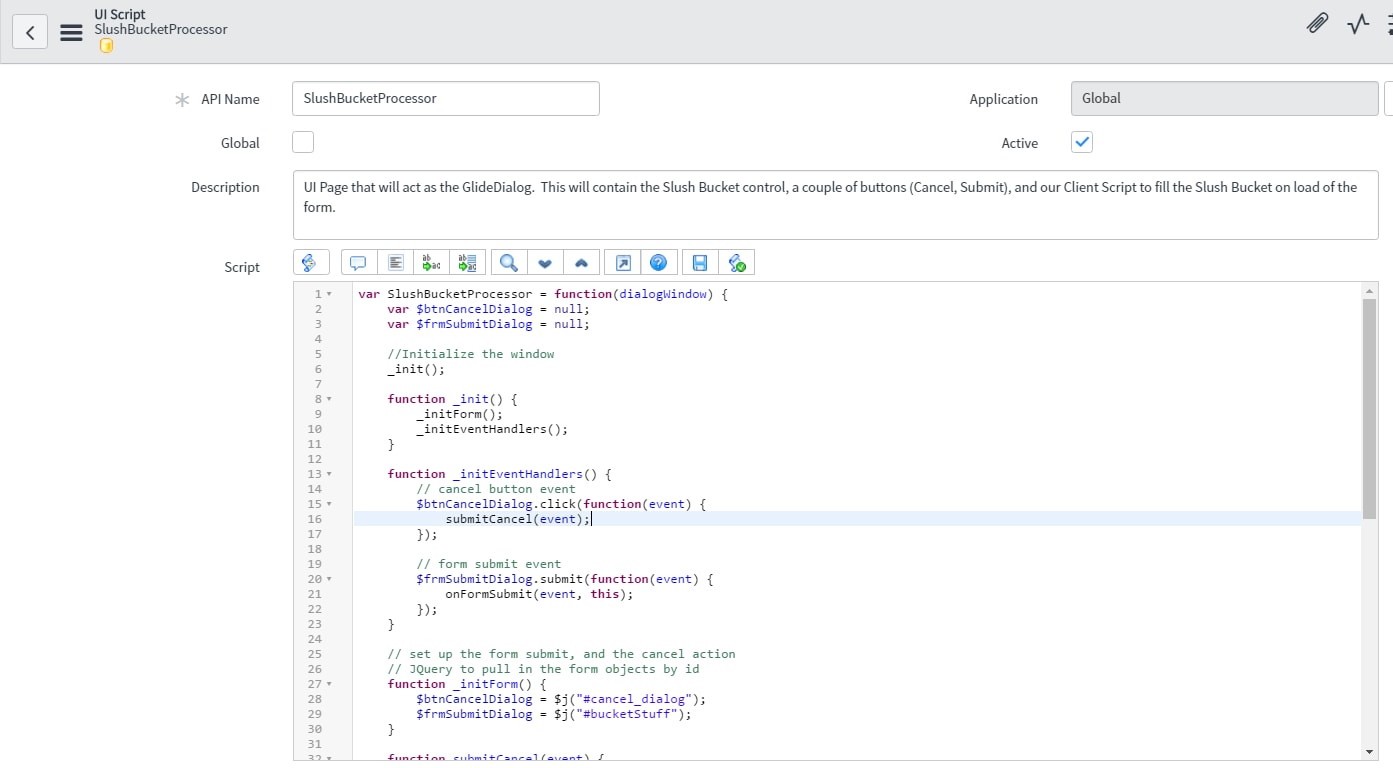
Lab 1.3: Create the UI Script Processor
We need to create a processor script to add functionality to our UI Page. When called from the UI Page this script will be merged into the page functionality. BTW, this is a good practice to keep your UI Page Client Scripts "thin", and allow for possible re-use of code. UI Scripts are the Client-Side library containers. If you keep it generic enough you can create some nice libraries for later use in other projects. Don't forget to read my comments in the code.
1. Navigate to System UI -> UI Scripts. The UI Scripts list view will be displayed.
2. Click on the New button to create a new UI Script. This will display the new UI Script form.
3. Fill in the form with the following:
a. Name: SlushBucketProcessor
b. Global: unchecked
c. Active: checked
d. Description: UI Page that will act as the GlideDialog. This will contain the Slush Bucket control, a couple of buttons (Cancel, Submit), and our Client Script to fill the Slush Bucket on load of the form.
e. Script:
var SlushBucketProcessor = function(dialogWindow) {
var $btnCancelDialog = null;
var $frmSubmitDialog = null;
//Initialize the window
_init();
function _init() {
_initForm();
_initEventHandlers();
}
function _initEventHandlers() {
// cancel button event
$btnCancelDialog.click(function(event) {
submitCancel(event);
});
// form submit event
$frmSubmitDialog.submit(function(event) {
onFormSubmit(event, this);
});
}
// set up the form submit, and the cancel action
// JQuery to pull in the form objects by id
function _initForm() {
$btnCancelDialog = $j("#cancel_dialog");
$frmSubmitDialog = $j("#bucketStuff");
}
function submitCancel(event) {
event.preventDefault();
// tear down the dialog
dialogWindow.destroy();
return false;
}
function onFormSubmit(event, form) {
event.preventDefault();
var slushIncidents = [];
// extract the results from the slush bucket control
var slushIncidents_right = form.slushIncidents_right;
// how many did we end up with?
alert(slushIncidents_right.length);
// do something with the results. The name is the innerHTML, the sys_id is the value
for (var i=0; i < slushIncidents_right.length; i++) {
slushIncidents.push(slushIncidents_right[i].innerHTML + '-' + slushIncidents_right[i].value);
}
// display our array
alert(JSON.stringify(slushIncidents));
// tear down the dialog
dialogWindow.destroy();
return true;
}
};
f. Submit to save your work
Lab 1.4: Create the UI Action to Fire the Dialog
Finally we need to create some sort of action to actually test our new GlideDialog UI Page with Slush Bucket! I chose to create a UI Action attached to the Incident form. It really doesn't do anything with the form, but gives the impression it does!
NOTE: I use another good OOB technique here by using a class to fire off the GlideDialog. This allows me to use the "this" construct, and other functionality that is available to a class that wouldn't be available to normal function.
a. Name: Dialog Slushbucket
b. Table: Incident [incident]
c. Order: 100
d. Action name: dialog_slushbucket
e. Active: checked
f. Show insert: checked
g. Show update: checked
h. Client: checked
i. Form button: checked:
Everthing else unchecked
j. Comments: Form button to test the functionality of the Slush Bucket GlideDialog UI Page
k. Onclick: (new slushBucketHandler(g_form)).showDialog();
l. Script:
var slushBucketHandler = Class.create({
showDialog: function() {
// fire off the dialog using our UI Script name
this.dialog = new GlideDialogWindow("SlushBucketDialog");
this.dialog.setTitle('Slushbucket Dialog');
this.dialog.setWidth(400);
this.dialog.render(); // Open the dialog box
}
});
m. Submit to save your work
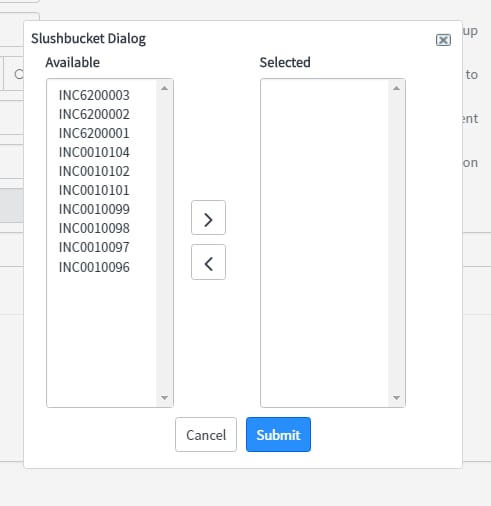
Lab 1.5: Testing the GlideDialog
We have arrived! All the bits are done. Now let's test our dialog page!
1. Navigate to Incident -> All. The Incident list view will be displayed.
2. Open up any incident. Note that the Dialog Slushbucket button appears on the form.
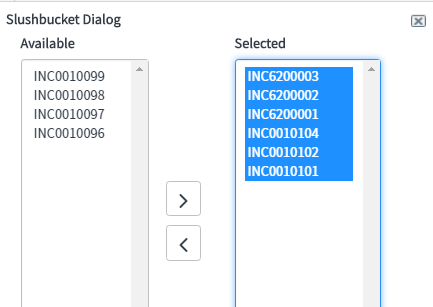
3. Click the button. The dialog should be displayed, and the slush bucket control will populate. It may take a moment, and you might actually see the LoadingDialog box appear briefly.
4. Pick as many incident numbers as you want, and transfer them to the right side of the control.
5. Click the Submit button. 1) an alert will appear showing how many incident numbers you had selected. 2) a second alert will appear showing a compressed view of the array of your incident number-sys_id combos. Click on the ok button to close each respectively.
6. Click ok, on the last alert box, and the dialog should disappear.
And you are done! You might want to test out the cancel button to check that functionality as well (unit test everything).
Some extra reading:
https://learn.jquery.com/using-jquery-core/avoid-conflicts-other-libraries/
Displaying a Custom Dialog - ServiceNow Wiki
Steven Bell
For a list of all of my articles: Community Code Snippets: Articles List to Date
Please Share, Like, Bookmark, Mark Helpful, or Comment this blog if you've found it helpful or insightful.
Also, if you are not already, I would like to encourage you to become a member of our blog!
- 14,221 Views
10 Comments
You must be a registered user to add a comment. If you've already registered, sign in. Otherwise, register and sign in.

