


sabell2012

Mega Sage
Options
- Subscribe to RSS Feed
- Mark as New
- Mark as Read
- Bookmark
- Subscribe
- Printer Friendly Page
- Report Inappropriate Content
03-27-2017
01:04 PM
NOTE: MY POSTINGS REFLECT MY OWN VIEWS AND DO NOT NECESSARILY REPRESENT THE VIEWS OF MY EMPLOYER, ACCENTURE.
DIFFICULTY LEVEL: INTERMEDIATE
Assumes basic knowledge and/or familiarity of Client and Server-Side Scripting in ServiceNow.
____________________________________________________________________________
In my previous article (Mini-Lab: Converting a UI Script Library From Global to Scoped - Part 1) I described the whys and wherefores of using the Scoped environment and the Studio versus the old Global environment. In this article I will present how to convert my old global UI Script function library into a Scoped UI Script library.
Pre-requisite:
The old UI Script library: Mini-Lab: Using Ajax and JSON to Send Objects to the Server
The purpose of this UI Script is to provide a generic AJAX interface between client side (sic. browser) code and server-side functions.
Lab 1.1: Using JSON and AJAX to Transmit a Complex Object to the Server
Based on the design from my Using Ajax and JSON article; we re-work it slightly to indicate the scoped components.
We will be working the application from the bottom-up. Building from the Script Include function class to finally the UI Action that will be calling the whole chain. This entire lab was written on my personal developer instance that has been upgraded to Istanbul Patch 1.
The Scoped Application
The Studio, and the UI Script
So, let's get started. First we will need to create a scoped application.
1. Navigate to System Applications -> Studio. The Load Application form will be displayed.
2. Click on the Create Application Button. The Create Application choice form will be displayed.
3. We will be using the Start from scratch option. Click on the Create button. The Create Application property form will be displayed.
4. Fill in the form with the following:
Name: Using Ajax and JSON to Send Objects to the Server
Scope: x_1234_using_ajax
Note: The Scope field will auto-fill using your "company code". This will be different than the 1234 in my example above.
5. Click on the Create button. The Studio form will be displayed.
6. Click on the Create Application File button. The Create Application File choice form will be displayed.
7. Enter Script Include in the search filter text box. The Filter Results will show Script Include.
8. Click on the Create button. The new Script Include form will be displayed.
9. Fill in the form with the following:
Name: JavascriptUtils
Accessable from: All application scopes
Active: checked
Description: Various useful utilities. Note: These were adapted from the JSUtil library
Protection Policy: -- None -- (automatically set for personal instances)
Script:
var JavascriptUtils = Class.create();
// This nil check works for Scoped applications
JavascriptUtils.nil = function(item) {
var nilCheck = true;
try {
nilCheck = !item
|| (item == null)
|| (typeof item == 'undefined')
|| ('' == '' + item)
|| (item == 'undefined');
}
catch(err) {
gs.error('---> [{1}-{2}] \n{0}',
[err, new GlideDateTime().getNumericValue()], 'SI:' + this.type + '.nil');
}
return nilCheck;
};
JavascriptUtils.notNil = function(item) {
return !this.nil(item);
};
10. Click the submit button to save your work.
Note: This is our "bottom-most" library. We will be using this in our other Script Includes. Since JSUtil does not work in the scoped environment (it contains a Packages.Java.String call), we needed to have an analog that would work. This is a good, not best, but good workaround.
11. Now repeat this step and create another Script Include.
12. Fill out the form with the following:
Name: ArrayHandlingUtils
Accessable from: All application scopes
Active: checked
Description:
Various array utilities
Contains:
getEmailsFromSysIDs - retrieve all user records in the list of sys_ids
Protection Policy: -- None -- (automatically set for personal instances)
Script:
var JSUtil = JavascriptUtils;
var ArrayHandlingUtils = Class.create();
ArrayHandlingUtils.prototype = {
initialize: function() {},
//retrieve all user records in the list of sys_ids
getEmailsFromSysIDs : function(listInfo) {
try {
var sysIDList = listInfo.list;
gs.info('---> [{1}-{2}] \n{0}',
[sysIDList.length,
new GlideDateTime().getNumericValue(),
this.type + '.getEmailsFromSysIDs']);
var userRecords = new GlideRecord('sys_user');
userRecords.addQuery('sys_id', 'IN', sysIDList);
userRecords.query();
var userList = [];
while (userRecords.next()) {
var user = {};
user.name = userRecords.name + '';
var email = userRecords.email + '';
user.email = JSUtil.notNil(email) ? email : 'no email found';
userList.push(user);
}
var message = '';
message += 'Location: ' + listInfo.location + '\n';
for (var i=0; i < userList.length; i++) {
message += 'EMail[' + i + ']: '
+ userList[i].name + ' - '
+ userList[i].email + '\n';
}
gs.info('---> [{1}-{2}] \n{0}',
[message,
new GlideDateTime().getNumericValue(),
this.type + '.getEmailsFromSysIDs']);
}
catch(err) {
gs.error('---> [{1}-{2}] \n{0}',
[err,
new GlideDateTime().getNumericValue(),
this.type + '.getEmailsFromSysIDs']);
}
},
type: 'ArrayHandlingUtils'
};
Note: We do not have to use a qualified call to the JavascriptUtils function to include it since it is already in our namespace. No need to do gs.include() either.
13. Click on the Submit button to save your work.
14. Ok, repeat one last time to create our Ajax Script Include that will be called from the client.
15. Fill out the form with the following:
Name: AjaxUtilsServer
Accessable from: All application scopes
Active: checked
Client callable: checked
Description: Description: Method for decoding the passed JSON object and writing it to the system log
Protection Policy: -- None -- (automatically set for personal instances)
Script:
var AjaxUtilsServer = Class.create();
AjaxUtilsServer.prototype = Object.extendsObject(global.AbstractAjaxProcessor, {
pushListToSysLog: function() {
var listInfo = global.JSON.parse(this.getParameter('sysparm_listInfo'));
new ArrayHandlingUtils().getEmailsFromSysIDs(listInfo);
},
type: 'AjaxUtilsServer'
});
NOTE: Write down the API Name. You will be using this name to call into this Script Include from your UI Script.
16. Click the Submit button to save your work.
17. Click on Create Application File, and create a new UI Script.
18. Fill out the form with the following:
Script Name: AjaxUtilsClient
Description: Transmits a list of sys_ids to the server to be pushed to the System Log.
Use Scoped Format: unchecked.
Script:
var utils = Class.create();
utils.sendListToSysLog = function(list, location) {
try {
var infoOnList = {};
infoOnList.location = location;
infoOnList.list = list.split(',');
var systemLogger = new GlideAjax('x_1234_using_ajax.AjaxUtilsServer');
systemLogger.addParam('sysparm_name','pushListToSysLog');
systemLogger.addParam('sysparm_listInfo', JSON.stringify(infoOnList));
systemLogger.getXML(function(result){ }); // no callback action
}
catch(err) {
alert('---> ERROR: ' + err);
}
};
NOTE: Replace the x_1234 in line 6 with your own ServiceNow company code.
NOTE: When you save the system will throw an error and tell you that the script is missing the Immediately Invoked code. Ignore this error, and continue with the save. The error is bogus. It appears that the system does not want or like you to use this type of script which is nonsense.
19. Lastly, let's create a UI Action to drive the entire chain. Click on Create Application File, and create a new UI Action.
NOTE: We will build this as part of our scoped application, but it does not necessarily have to be part of it. It could be built in the Global namespace.
20. Fill out the form with the following:
Name: Transfer Watchlist
Table: Incident
Active: checked
Show Insert: checked
Show Update: checked
Client: checked
Form Button: checked
OnClick: sendWatchList()
Form Action: Checked (done automatically).
Script:
function sendWatchList() {
try {
// this is the only way to load a UI Script Library into a scoped Client Script!
// loads the utils library
ScriptLoader.getScripts('x_0462_using_ajax.AjaxUtilsClient.jsdbx', followup);
}
catch (err) {
alert(err);
}
// After the UI Script Library has been loaded then continue
function followup(result) {
try {
utils.sendListToSysLog(g_form.getValue('watch_list'), 'UIA:Transfer Watch List');
}
catch (err) {
alert('---> ERROR: ' + err);
}
}
}
NOTE: Replace the x_1234 in line 6 with your own ServiceNow company code. Also, notice how much this script differs from how it would be done in the Global environment. In addition see that there is now a loader step that occurs prior to being able to use the library. This is done via an asynchronous (async) call-back that loads the script from the server (the on-demand bit).
21. Click the Submit button to save your work. We are now done with our Scoped application, and it is time to do some testing!
Unit Test
Our unit test will be what we had in the previous article.
- First go and in-activate the original UI Action; if you did the previous article. We will only be using the new (same named) UI Action we created in the Studio.
- Navigate to Incidents -> Open. The list view of open Incidents will be displayed.
- Open one of the Incidents. You should have a new button labeled: Transfer Watchlist.
- Make sure there are four or five people on the watchlist. Add some if you have to.
- Click on the Transfer Watchlist button. Observe that the spinner (activity indicator) in the upper right of the form activates for a second or two then goes away. That is your only indicator that something happened. I guess we could always go back and put in an alert that things have finished, but this is supposed be a lab that emulates something you might do for real!
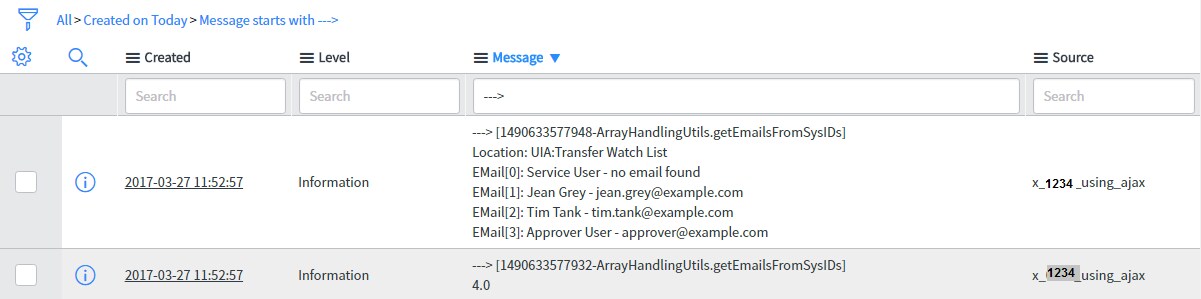
- Navigate to System Log -> All. Filter on Message starts with --->. Order by Message descending. Note how I placed milliseconds into the gs.info messages? This allows me to sort by true date descending. This is REALLY important if you are trying to figure out exactly in which order things occurred in your code!
- Expected Result: A list of names and emails matching the watchlist should be present as a log entry.
And there you have it! Conversion of a Global UI Script and all of it's call chain into a Scoped application.
Steven Bell
For a list of all of my articles: Community Code Snippets: Articles List to Date
Please Share, Like, Bookmark, Mark Helpful, or Comment this blog if you've found it helpful or insightful.
Also, if you are not already, I would like to encourage you to become a member of our blog!
1 Comment
You must be a registered user to add a comment. If you've already registered, sign in. Otherwise, register and sign in.

